Mastering MCP on OpenAI Agent Builder| Ritz7 Automations
January 13, 2026

Key Pointers:
AI That Does Real Work: Don't just chat—build agents that read emails, check payments, and update apps for you.
Connect Anything: Use the "Model Context Protocol" (MCP) to easily plug your AI into Gmail, Outlook, and Stripe.
Safety First: Set up "Guardrails" so your AI always asks for permission before doing something big, like sending money.
Build Custom Skills: Use n8n to teach your agent new tricks that standard tools can't do.
Secure Access: Keep your data safe by using proper login tokens and keys for every tool your agent uses.
Table of Contents
Part 1: The New Architecture of Automation
Part 2: Setting Up Your First Workflow
Part 3: Seamless Email Integration (Gmail & Outlook)
Part 4: Automating Payments with Stripe
Part 5: Extending Capabilities with Custom MCPs
Video Tutorial: MCP Servers in OpenAI Agent
Part 6: Securing Your Integrations
Part 7: Troubleshooting and Best Practices
Conclusion: Unleashing Your Agent's Full Potential
In the rapidly shifting landscape of Silicon Valley and the broader global tech ecosystem, the conversation has moved decisively beyond simple chatbots. We are now in the era of autonomous AI agents—intelligent systems capable of perceiving, reasoning, and acting upon the world. OpenAI's Agent Builder platform and other agent tools keep getting better. They give developers a new way to connect and work with many external services using the Model Context Protocol (MCP).
This detailed, expansive guide explores how to leverage MCP servers to integrate key tools like Gmail, Outlook, Stripe, and even custom-built external services such as N8N, Rube MCP, or the high-performance Tinybird MCP Server. We will uncover how to handle authentication, manage approvals efficiently via guardrail nodes, and architect robust, automated workflows. Whether you build a simple YouTube Q&A agent or a complex procurement and vendor management agent, you must understand the agent node's architecture. You also need to know how it connects to other parts.
Part 1: The New Architecture of Automation
Understanding Model Context Protocol (MCP)
At the heart of this revolution lies the Model Context Protocol (MCP). It serves as the crucial bridge between your core language models and the external systems that drive business logic. In the past, connecting an LLM to a database or an API was a bespoke, fragile process often prone to hallucination. MCP changes this by acting as a standardised communication protocol. It lets AI agents access structured data, perform actions, and execute functions through connected APIs or third-party services with a high degree of reliability.
If you are wondering, "What exactly is MCP in the context of an agent workflow?"—think of it as the universal translator. It is the standard that enables your AI to step out of its text-generation sandbox and interact with the physical and digital world. It transforms vague intents into precise API calls, allowing an agent to fetch rows from a Tinybird MCP Server, post a message to Slack, or update a CRM record without human intervention. This ability creates many chances for automation, data retrieval, and smooth integration with digital platforms.
The Evolution from Prompts to Nodes
In earlier setups, developers relied heavily on "prompt engineering" and basic "guard rates" (previous methods for managing control and authorisation) to keep bots in check. Building on that foundation, modern sessions focus on how to seamlessly implement and utilise MCP servers within the visual interface to connect with real-world tools.
The fundamental unit of this new architecture is the agent node. This node is not just a text processor; it is a decision engine. It evaluates incoming signals, determines which hosted MCP server tools are required to fulfil a request, and orchestrates the execution. If we change how we think from "chatting with a bot" to "setting up an agent node," we can build advanced systems. For example, a call centre agent can handle refunds on their own. Also, an employee onboarding agent can provide software licences as soon as a new hire signs their contract.
Also Read: How to Use OpenAI Agent Builder: Beginner’s Guide
Part 2: Setting Up Your First Workflow
Initial Configuration and the Agent Node
Getting started with the ecosystem is straightforward, yet capable of immense depth. The interface automatically provides a default setup with a start element and a primary agent node. Users can rename the workflow and quickly define how user inputs should be captured and processed.
The initial configuration step involves taking user input as text. This text is no longer just conversation; it becomes the "context" that the Model Context Protocol uses to determine intent. For example, if a user says, "Update the Q3 projections," the agent node looks at this text. It sees that the user wants the project status rollup agent to act. Then it gets ready to get the needed data.
The Connector Registry: Your Gateway to Tools
In the tools section of the interface, clicking the plus (+) sign opens the Connector Registry (often visualised as an MCP support window). This is your gateway to connecting external applications. It is here that the abstract concept of an "integration" becomes a concrete connection.
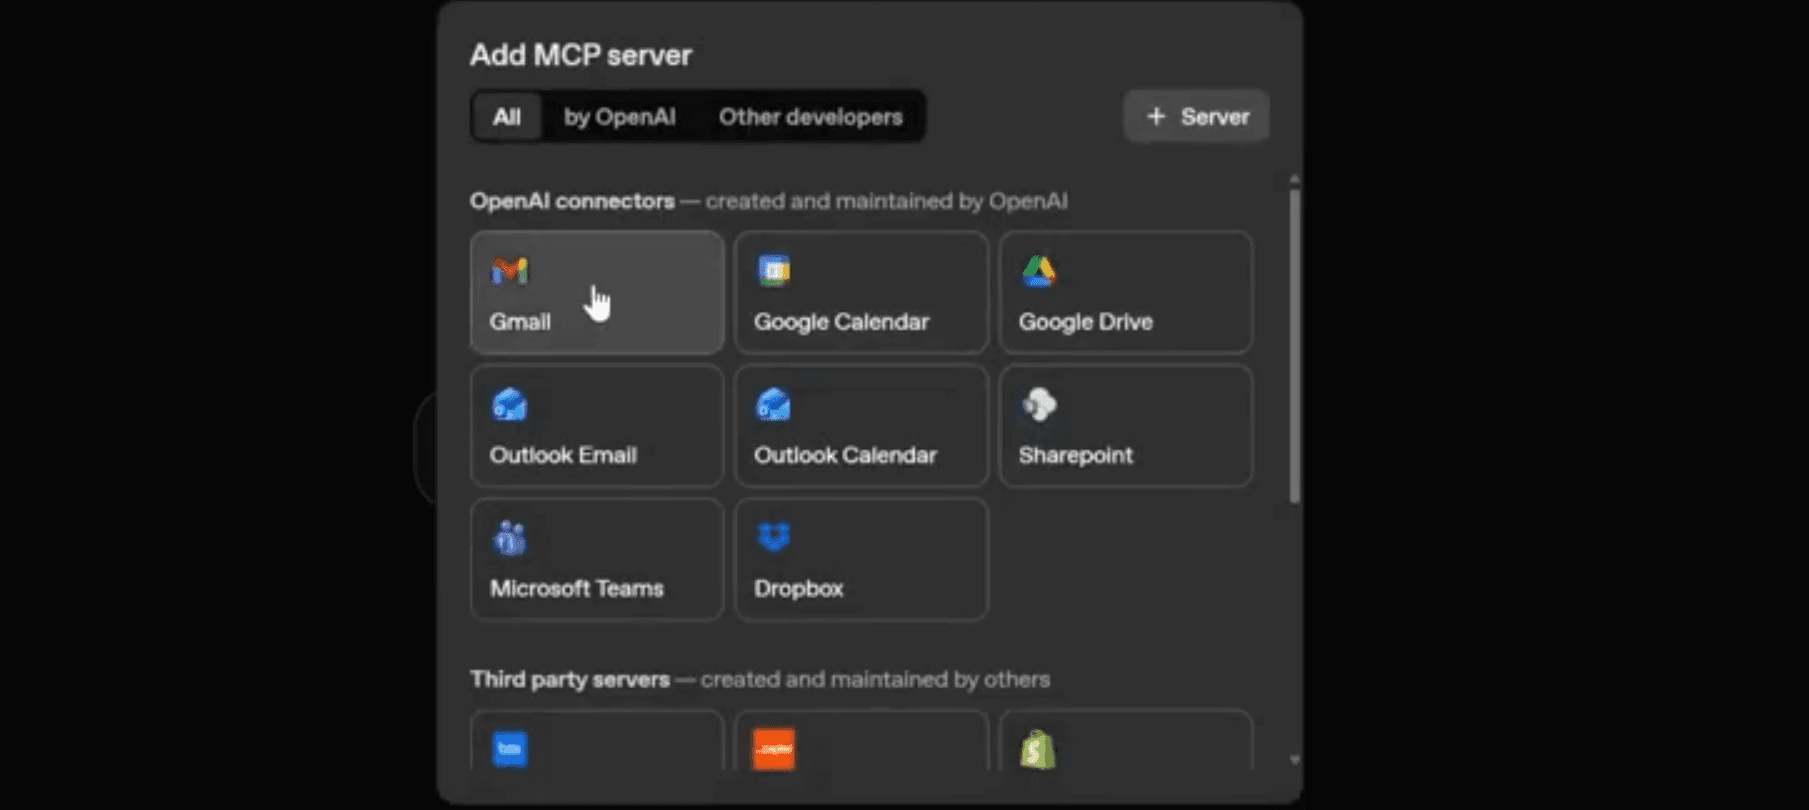
You can connect standard services such as Gmail or Outlook, as demonstrated in many tutorials. However, the registry is also where you configure more advanced connections, such as a Tinybird MCP server for real-time analytics or a Rube MCP setup for orchestrating complex multi-step processes. While Outlook might be used for a basic demo, the process for connecting other email clients, including Gmail, remains largely similar, ensuring robust functionality regardless of the provider.
Also Read: How to Build an AI Quiz Generator with OpenAI Agent
Part 3: Seamless Email Integration (Gmail & Outlook)
Integrating email services like Gmail and Outlook is a common and powerful application of MCP servers. It transforms an agent from a passive listener into an active participant in business communications. To connect Gmail, you typically need to provide an access token. This token is crucial for authenticating your agent's requests to Google's services, a pattern that is standard across most HTTP servers handling secure data.
Google Developer Console & OAuth Setup
The access token for Gmail is obtained through the Google Developer Console. You will need to create a project, enable the Gmail API, and configure an OAuth consent screen. This is a critical security step. During this process, you authorise the necessary APIs for Gmail, granting your application the required permissions.
Once authorisation is granted, a temporary authorisation code is generated. You then exchange this for a persistent access token and a refresh token. This ensures a secure and compliant connection for your Gmail integration. The platform simplifies the process of plugging in this access token directly into the agent node configuration. You should turn on the auto-refresh option. It makes sure your access token renews automatically before it expires, usually after an hour. This prevents downtime for your customer service agent or other important bots.
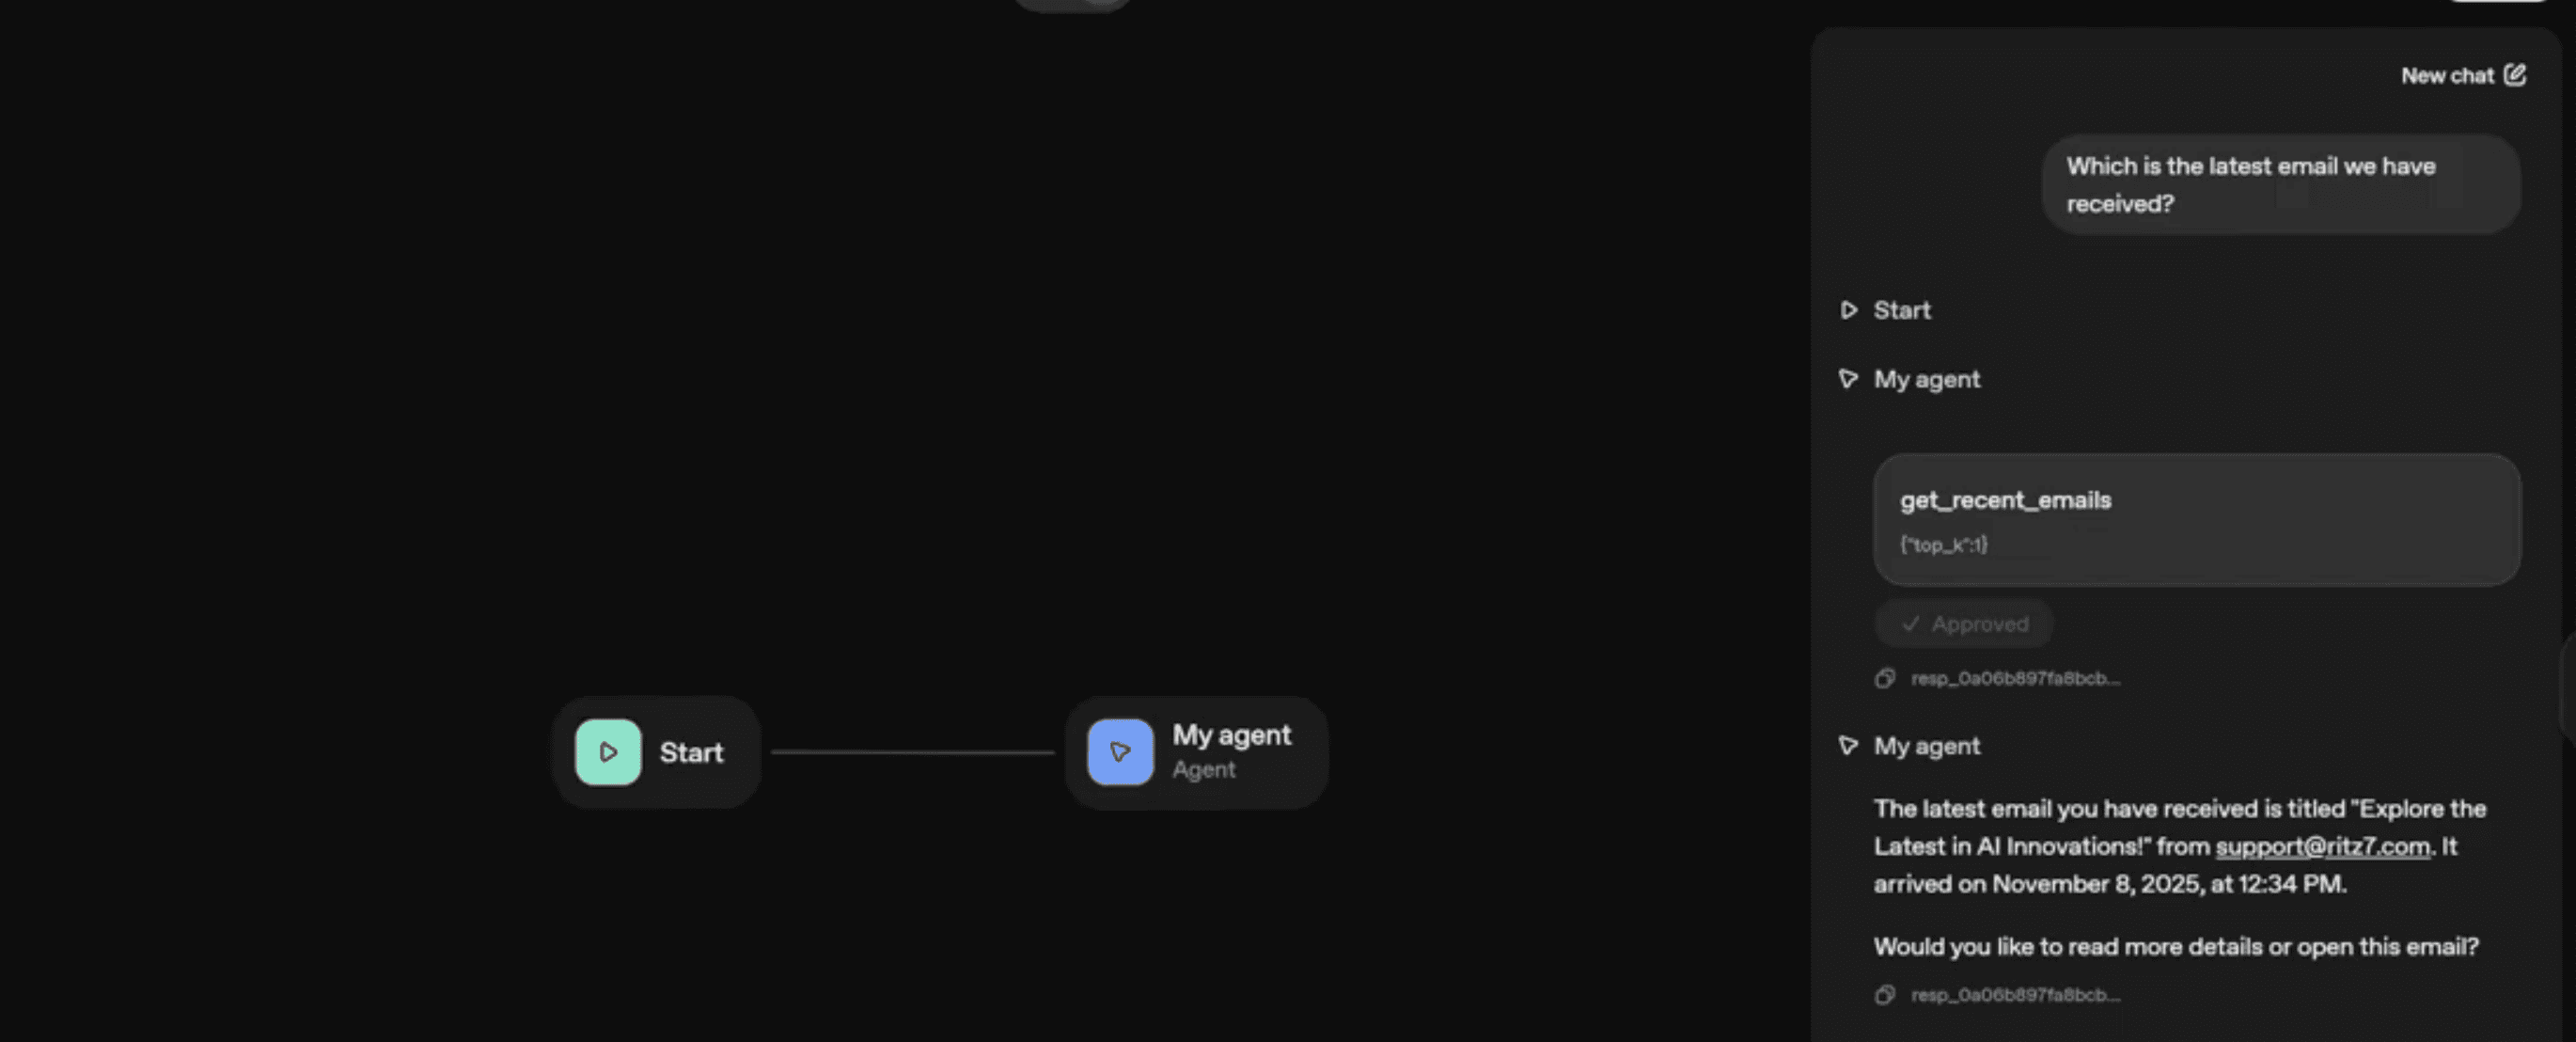
Once connected, the Gmail MCP provides various actions that your agent can perform, such as:
Reading recent emails to summarise threads.
Getting email profiles to identify VIP clients.
Searching for specific email IDs or messages based on semantic queries.
Batch reading emails, which can be essential when processing logs in JSONL format for large-scale data analysis.
Managing Approval Flows and Guardrail Nodes
Security in autonomous systems is a major concern for enterprises in Silicon Valley and beyond. By default, each connector in the platform requires user approval before executing a request. This adds a critical layer of security, effectively acting as a guardrail node.
For example, if a procurement and vendor management agent attempts to send a purchase order email, the system pauses and asks the human user, "Do you want to send this email?" This is excellent for safety, but can be a bottleneck for speed. Fortunately, users can easily customise this behaviour. You can configure each tool within your setup to either:
Always require approval: Essential for sensitive or critical actions (like transferring funds), ensuring human oversight via the Guardrail node.
Never require approval: Ideal for trusted or routine operations (like reading a calendar or fetching a status), allowing for seamless automation.
Choosing “never” allows for smoother, uninterrupted execution without manual confirmation. For instance, once approval was disabled in the Gmail setup, the agent could read emails automatically without interruption. This is the difference between a "copilot" (which helps you) and a true "autopilot" agent workflow.
Troubleshooting Read/Send Issues
When integrating email services, common issues can arise. If your MCP servers are failing to read or send emails, first double-check your API permissions in the Google Developer Console (or equivalent for Outlook). Ensure all necessary scopes (e.g., https://www.googleapis.com/auth/gmail.readonly for reading, https://www.googleapis.com/auth/gmail.send for sending) are granted.
Verify your access token is valid and hasn't expired, and that auto-refresh is active. Incorrect folder categorisation (e.g., drafts vs. inbox) can also lead to issues. Additionally, check if your guardrail nodes are inadvertently blocking the action due to strict safety settings.
Part 4: Automating Payments with Stripe
One of the most powerful integrations highlighted is with Stripe, a globally popular payment gateway. When developers set up an MCP for Stripe, they can easily get important account and transaction data from the interface. This allows them to create advanced financial agent workflows.
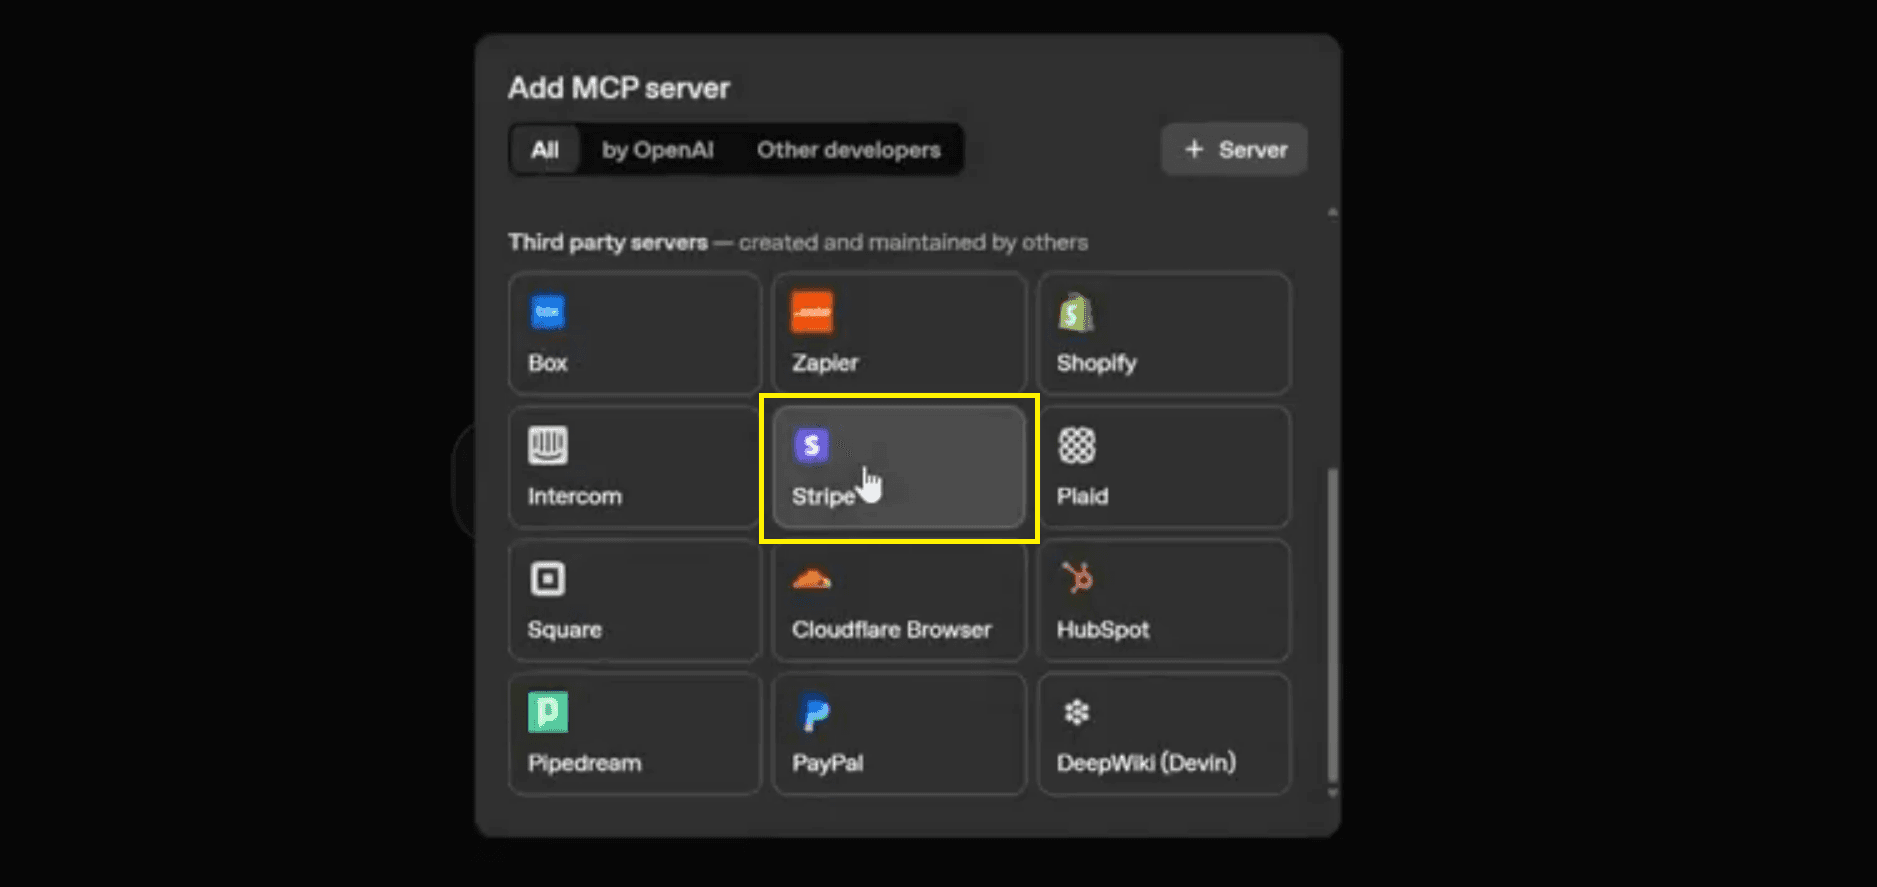
Generating Secure Stripe API Keys
To connect Stripe, you first navigate to your Stripe Developer Dashboard. Here, you should generate a restricted API key. Restricted keys offer enhanced security by limiting the permissions granted to the key, ensuring your AI agents only have access to the necessary data.
Once generated, you plug this secret key into the configuration. You then select which specific features to enable, such as retrieving account info, accessing transaction history, or even creating customers. Managing keys carefully follows best security practices. It makes sure your procurement and vendor management agent has only the authority it needs.
Fetching Account Balances & Transaction Data
After successfully connecting, your agent can query Stripe for various financial data. You can ask for your "account balance" or "fetch the last transaction." As demonstrated in various tutorials[1], the system can accurately retrieve a test mode balance (e.g., $5,739.32) and validate it against the live Stripe dashboard, showcasing complete accuracy and real-time data access.
This capability is invaluable for automated financial reporting. Imagine a project status rollup agent that not only reports on code commits but also summarizes the burn rate and recent vendor payments for a specific project. This holistic view is only possible when MCP servers bridge the gap between code repositories and financial gateways.
Implementing Automated Payment Workflows
Beyond simple data retrieval, Stripe integration can power complex automated payment workflows. Imagine a customer service agent who flags overdue invoices automatically. It can start refunds based on rules like "Refund if the user complaint says 'defective' and the purchase was less than 7 days ago." It can also make reports about subscription updates.
By leveraging Stripe's API actions through the MCP, AI agents become proactive managers of your financial operations, enhancing efficiency and accuracy. For example, an agent could monitor pending balances and alert you to incoming funds, or a call centre agent could check a caller's billing status in real time before routing the call.
Also Read: WhatsApp Automation (Part 1): Set Up Meta Business API
Part 5: Extending Capabilities with Custom MCPs
While OpenAI's Agent Builder platform offers native connectors, not every service is directly supported. This is where external, custom-built MCPs become invaluable. Platforms like n8n, Rube MCP, and Tinybird MCP Server allow you to create your own servers to bridge functionality gaps.
The Power of Rube MCP and n8n
Rube MCP and N8N serve as middleware that can translate the simple requests from an agent node into complex, multi-step workflows. n8n, a customisable automation platform, allows you to create your own HTTP servers that function as MCP endpoints.
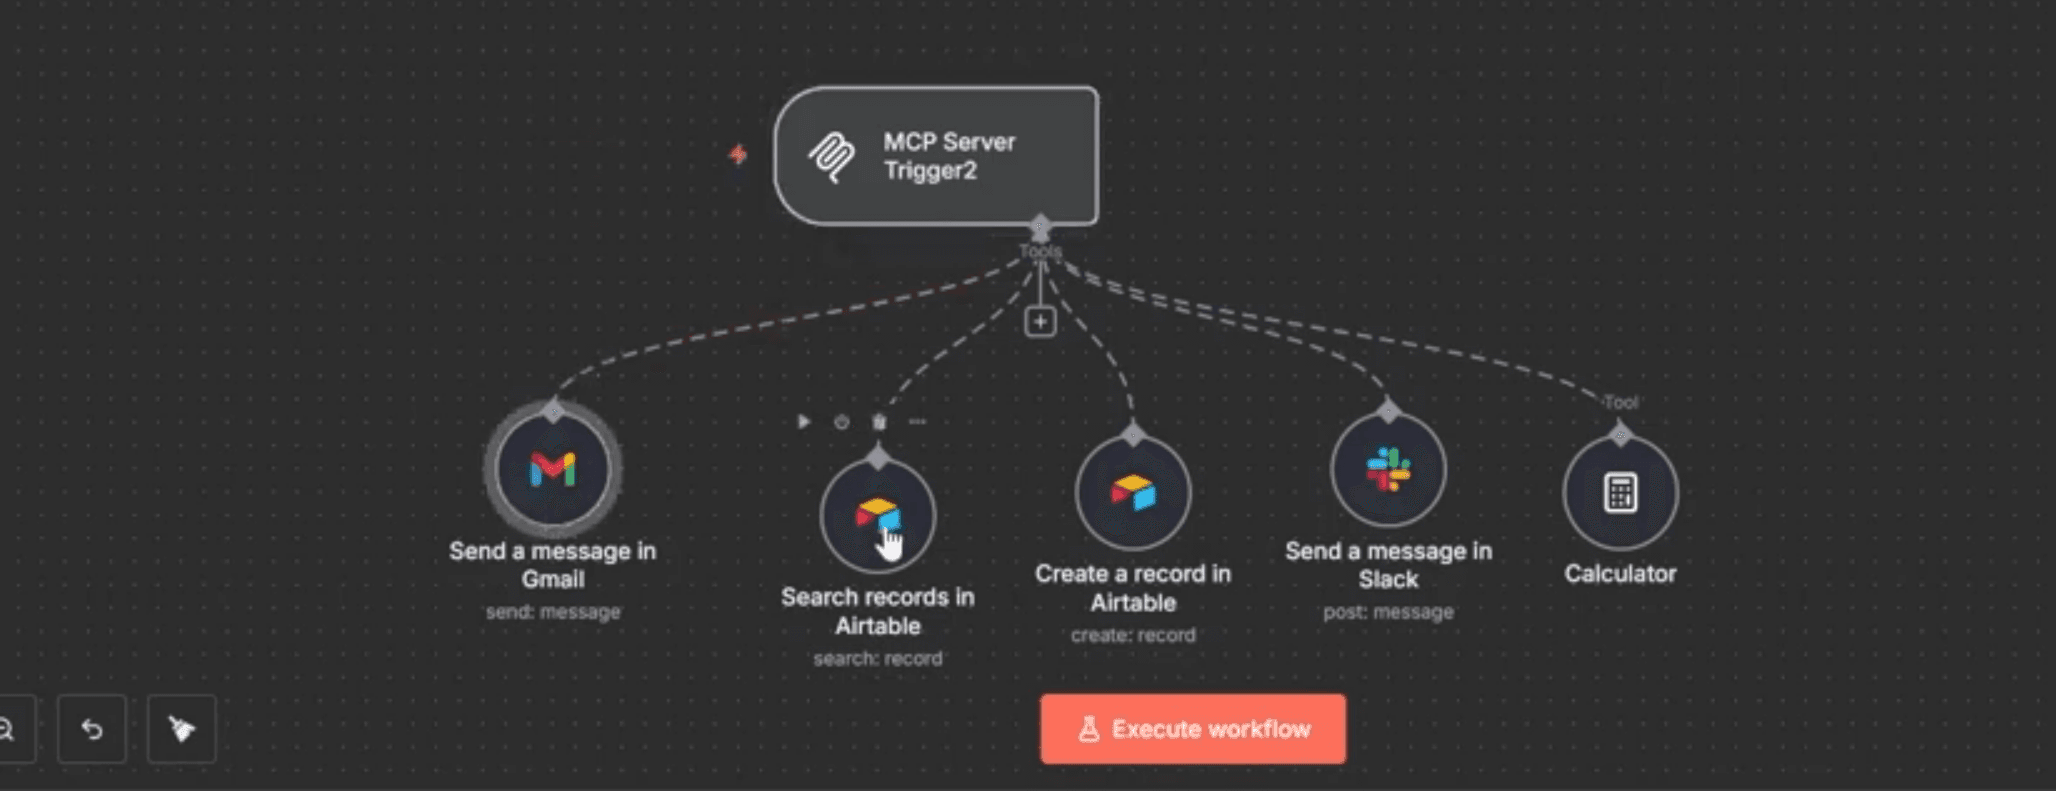
The demonstration highlighted how an n8n-based MCP server could expand an agent's capabilities. For example, a custom n8n MCP can handle actions like:
Sending emails through Gmail with complex conditional logic (e.g., only send if the recipient is in the 'Leads' table).
Searching and creating records in Airtable.
Sending messages via Slack to specific channels based on keyword triggers.
Performing complex calculations that language models might struggle with natively.
Building an n8n MCP Server Workflow
Configuring an n8n MCP is straightforward. First, you build your desired workflow in n8n, culminating in an MCP server trigger. You then copy the MCP server's production URL from n8n. This URL is then pasted into the input field in the Connector Registry.
You can assign a descriptive label and configure authentication as needed. Crucially, ensure the n8n MCP server is set to "enabled" before attempting to connect it. This proactive step helps prevent common authentication errors. This method effectively turns any API accessible by n8n into a tool for your AI agents.
Integrating Airtable, Slack, and Custom Logic
Once connected, your agent workflow can perform multiple actions directly. This includes sending test emails that show up in the destination inbox. It also includes getting project data from an Airtable database using the linked N8N flow. It can even send Slack notifications.
This flexibility allows you to create highly customised and dynamic automation scenarios. For instance, a YouTube Q&A agent could use a custom MCP to fetch new comments from a video, analyse the sentiment, check a vector store for similar past answers, and draft a reply—all within seconds.
Video Tutorial: MCP Servers in OpenAI Agent
Part 6: Securing Your Integrations
Authentication is very important for keeping your integrations secure and reliable. This is especially true when you connect third-party services using hosted MCP server tools. The platform currently supports robust authentication schemes to ensure that your Guardrail nodes are effective.
Bearer Token Authentication
Bearer Token authentication involves a secure token, typically an OAuth 2.0 access token, passed in the HTTP Authorization header. This token grants the bearer (your agent) permission to access protected resources on behalf of the user. It is a widely adopted and secure method for API access, particularly for services like Gmail and Outlook, where OAuth flows are common. Understanding token refresh mechanisms is vital for maintaining continuous, secure access for your agent workflow.
Custom Header Authentication
Custom headers provide flexibility for authentication where a simple key-value pair is required. This involves a user-defined key and value (e.g., X-API-KEY: your_secret_key) added manually during the configuration. While useful for internal services or APIs that utilize this method, it is crucial to manage these keys securely, particularly in production environments. This is often used when connecting to internal, corporate HTTP servers or custom n8n workflows.
Also Read: Step-by-Step Guide: Create a Telegram-Calendar Bot in n8n
Part 7: Troubleshooting and Best Practices
Even with careful setup, integration issues can arise. Knowing how to troubleshoot effectively is key to maintaining robust workflows.
Debugging Connection Failures
If your MCP is failing to connect, check your API keys, access tokens, and server URLs for typos. Verify network accessibility between the platform and your MCP server—especially for custom n8n setups, ensure the workflow is set to "Enabled" or the connection will fail. Review the execution logs for specific error messages, which often provide clues about the root cause.
Data Inconsistency and Sync Problems
Occasionally, data fetched by the agent might not reflect the most current state (e.g., outdated email inboxes or Stripe balances). This can happen due to caching, delayed API updates, or issues with refresh tokens. Ensure your MCP logic explicitly requests the freshest data. For custom n8n MCPs, verify the data flow within your n8n workflow itself.
Conclusion: Unleashing Your Agent's Full Potential
The ability to use the Model Context Protocol (MCP) within OpenAI's Agent Builder platform opens up a world of integrated automation. The system helps developers create smart and flexible agents. These agents can read Gmail emails, watch Stripe transactions, and manage custom workflows through n8n. They can handle many different digital tasks.
By combining smart AI agents with flexible MCP integrations, you can make workflows simpler. You can analyze data and do tasks across platforms with great accuracy and speed. You can do all this from one easy-to-use interface.
Try integrating your favorite tools with these protocols and share how you are enhancing automation. The frontier of AI-assisted workflow automation has never been more exciting. The future of work is not just about using software; it is about training your agents to use it for you.