WhatsApp Automation (Part 1): Set Up Meta Business API

Key Pointers:
Get Ready First: You need a Meta Business Account and a dedicated phone number to start automating WhatsApp.
The Key Codes: Find and save your "Client ID," "Client Secret," and "Access Token" to connect n8n securely.
Never Expires: Create a special "System User" to get a permanent token so your bot never stops working.
Two-Way Chat: Use n8n to instantly receive customer messages and send automated replies back.
Smart Savings: Understand that you pay per "conversation," with the first 1,000 service chats free each month.
Table of Contents:
Prerequisites for n8n WhatsApp Automation
Video Tutorial: How To Set Up Meta Business API
Step 1: Setting Up Your Meta Business Account for WhatsApp API
Step 2: Creating System Users for n8n
Step 3: Creating Your WhatsApp App in Meta Developers Console
Step 4: Access API Setup
Step 5: Understanding & Fetching Key WhatsApp Business API Parameters
Step 6: Locate App ID (Client ID) and App Secret (Client Secret)
Step 7: Create and Assign System User for Production
Step 8: Generate Permanent Access Token
Connecting n8n to WhatsApp Business Cloud API: Next Steps
What n8n Can Do with These Credentials
What are the Costs of WhatsApp Business Cloud API?
Common Troubleshooting Tips for n8n WhatsApp Setup
Advanced n8n WhatsApp Automation Use Cases & Ideas
Automating WhatsApp workflows with n8n can greatly improve business communication. It allows instant interactions without manual work. In this comprehensive guide, we’ll walk you through a clear, step-by-step process to connect WhatsApp using Meta’s Business Account and API configuration. By the end, you’ll have all the crucial components—Client ID, Client Secret, Access Token, and Phone Number ID—ready for seamless WhatsApp automation. This setup is the foundation for creating powerful chatbots, automated notifications, and streamlined customer service directly from your n8n instance. When you set them up correctly, n8n and WhatsApp work together as a strong messaging platform. They allow real-time communication and instant messaging.
Prerequisites for n8n WhatsApp Automation
Before you dive into the setup process, confirm that you have the following prerequisites ready. These components are vital for creating your Meta Business Account, configuring the WhatsApp API, and enabling n8n to automate your workflows.
A Meta/Facebook Account: This will be used to create and manage your Meta Business Account and developer app.
A Dedicated Phone Number: This number must not be currently in use for a personal WhatsApp account. It will be exclusively linked to your WhatsApp Business API and the WhatsApp Business app.
An Active n8n Instance: Whether you're using n8n Cloud or a self-hosted version, ensure it's up and running with an active internet connection.
Basic Understanding of n8n: Familiarity with n8n's interface and workflow concepts will be beneficial, especially when you design workflows that use WhatsApp as a trigger or as an action.
Video Tutorial: How To Set Up Meta Business API
Step 1: Setting Up Your Meta Business Account for WhatsApp API
The first crucial step in building your WhatsApp automation with Meta is to establish your business presence on Meta’s platform. Head over to business.facebook.com to begin this process.
1.1 Creating Your Business Portfolio
Click on the icon in the dashboard to navigate to Create a Business Portfolio. Enter your business details such as your business name (for example, “Bizzmate”), business type, and contact information. Click on Create to generate your business account.
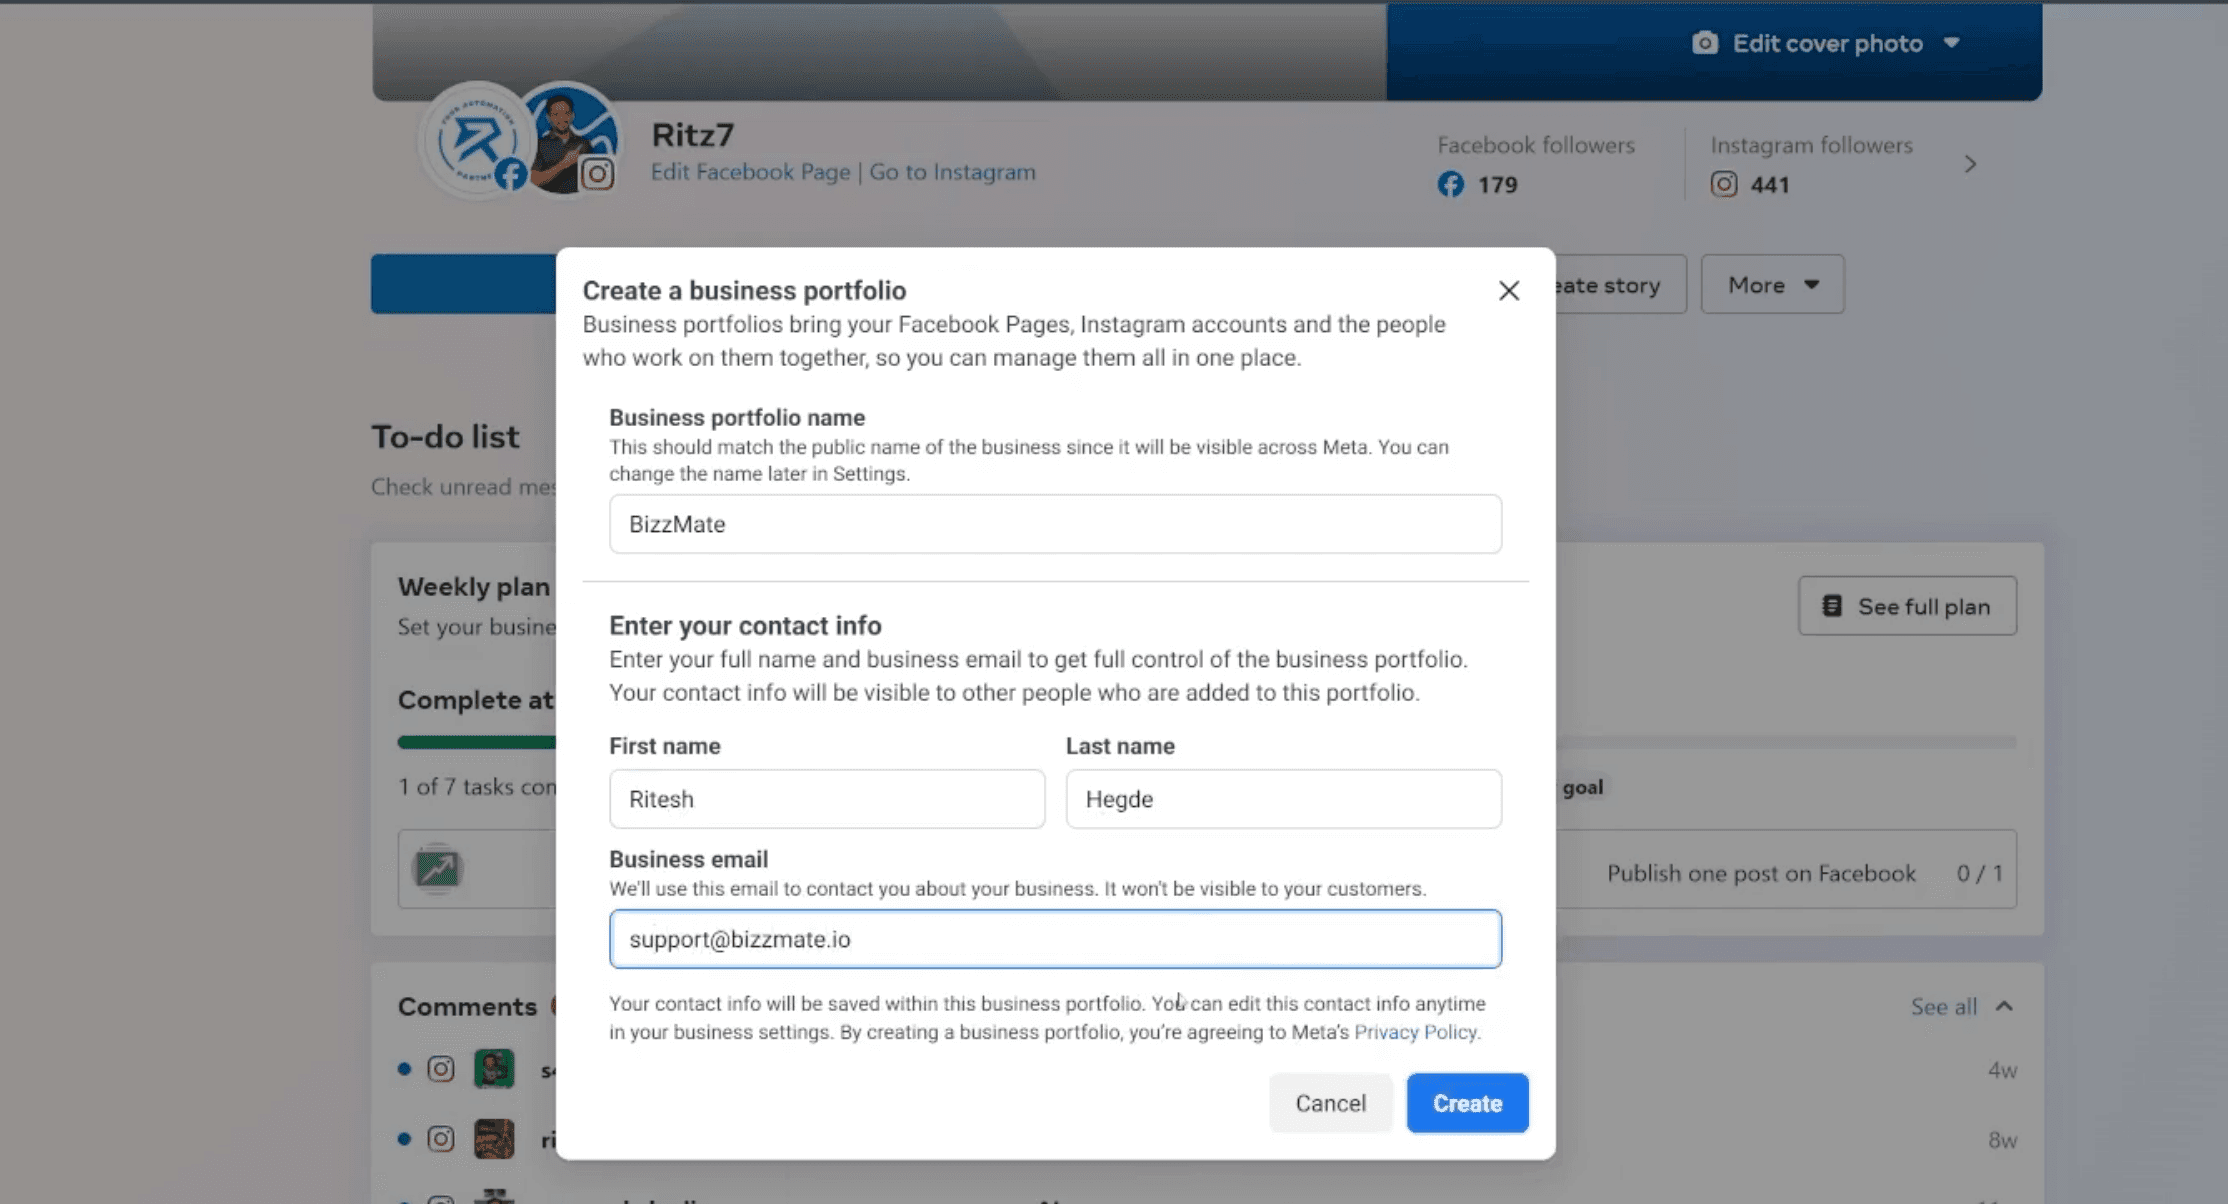
1.2 Noting Your Business ID
Once created, you’ll see a section mentioning your Business ID. It's vital to note this down—you’ll need it later to link various Meta assets. While Meta provides options to invite employees or administrators to the account at this stage, you can skip this for now and proceed with the core setup. This Business ID will later become central to your integration process when you connect Meta services, WhatsApp Business Cloud API, and your n8n workflows.
Step 2: Creating System Users for n8n
In your Meta Business Settings, you can manage many parts of your business. You can add people, partners, or system users. The system user is very important. It acts as a secure, non-human account. It connects your business app with n8n for automated tasks and messages that run all day without manual work.
2.1 Adding System Users
Go to System Users under the “Users” section in your Meta Business Settings. Click the Add button and proceed to create a new system user. During creation, you will need to assign either Employee or Admin access. For n8n integration, Admin access is often recommended for full control over the necessary API functionalities.

2.2 Addressing the "App Must Be Linked" Message
It's common to encounter a message stating that “in order to create a system user, an app must be a part of this business.” If you see this, don’t worry. This simply means you need to create your Facebook App and associate it with your Meta Business Account first. You can then return to this step to complete the system user creation after your app is set up (proceed to Step 3). This is a normal part of the integration process and ensures a secure, seamless data flow between Meta, n8n, and your WhatsApp Business Cloud API setup.
Step 3: Creating Your WhatsApp App in Meta Developers Console
This dedicated application serves as the essential bridge between your n8n workflows and the powerful WhatsApp Business Cloud API, acting as the central point for configuration and credentials. You must configure this application correctly within the Meta Developer environment to ensure seamless and authorized communication between your automation system and WhatsApp's servers. Navigate to developers.facebook.com to begin the app creation process.
3.1 Initiating App Creation
The initial step is to register a new application within the Meta developer environment using your associated account. This application will function as the crucial container for all your WhatsApp integration settings, security details, and API credentials, which must be correctly linked to your business. Selecting the Business app type ensures that you have access to commercial features, including the WhatsApp Business Platform.
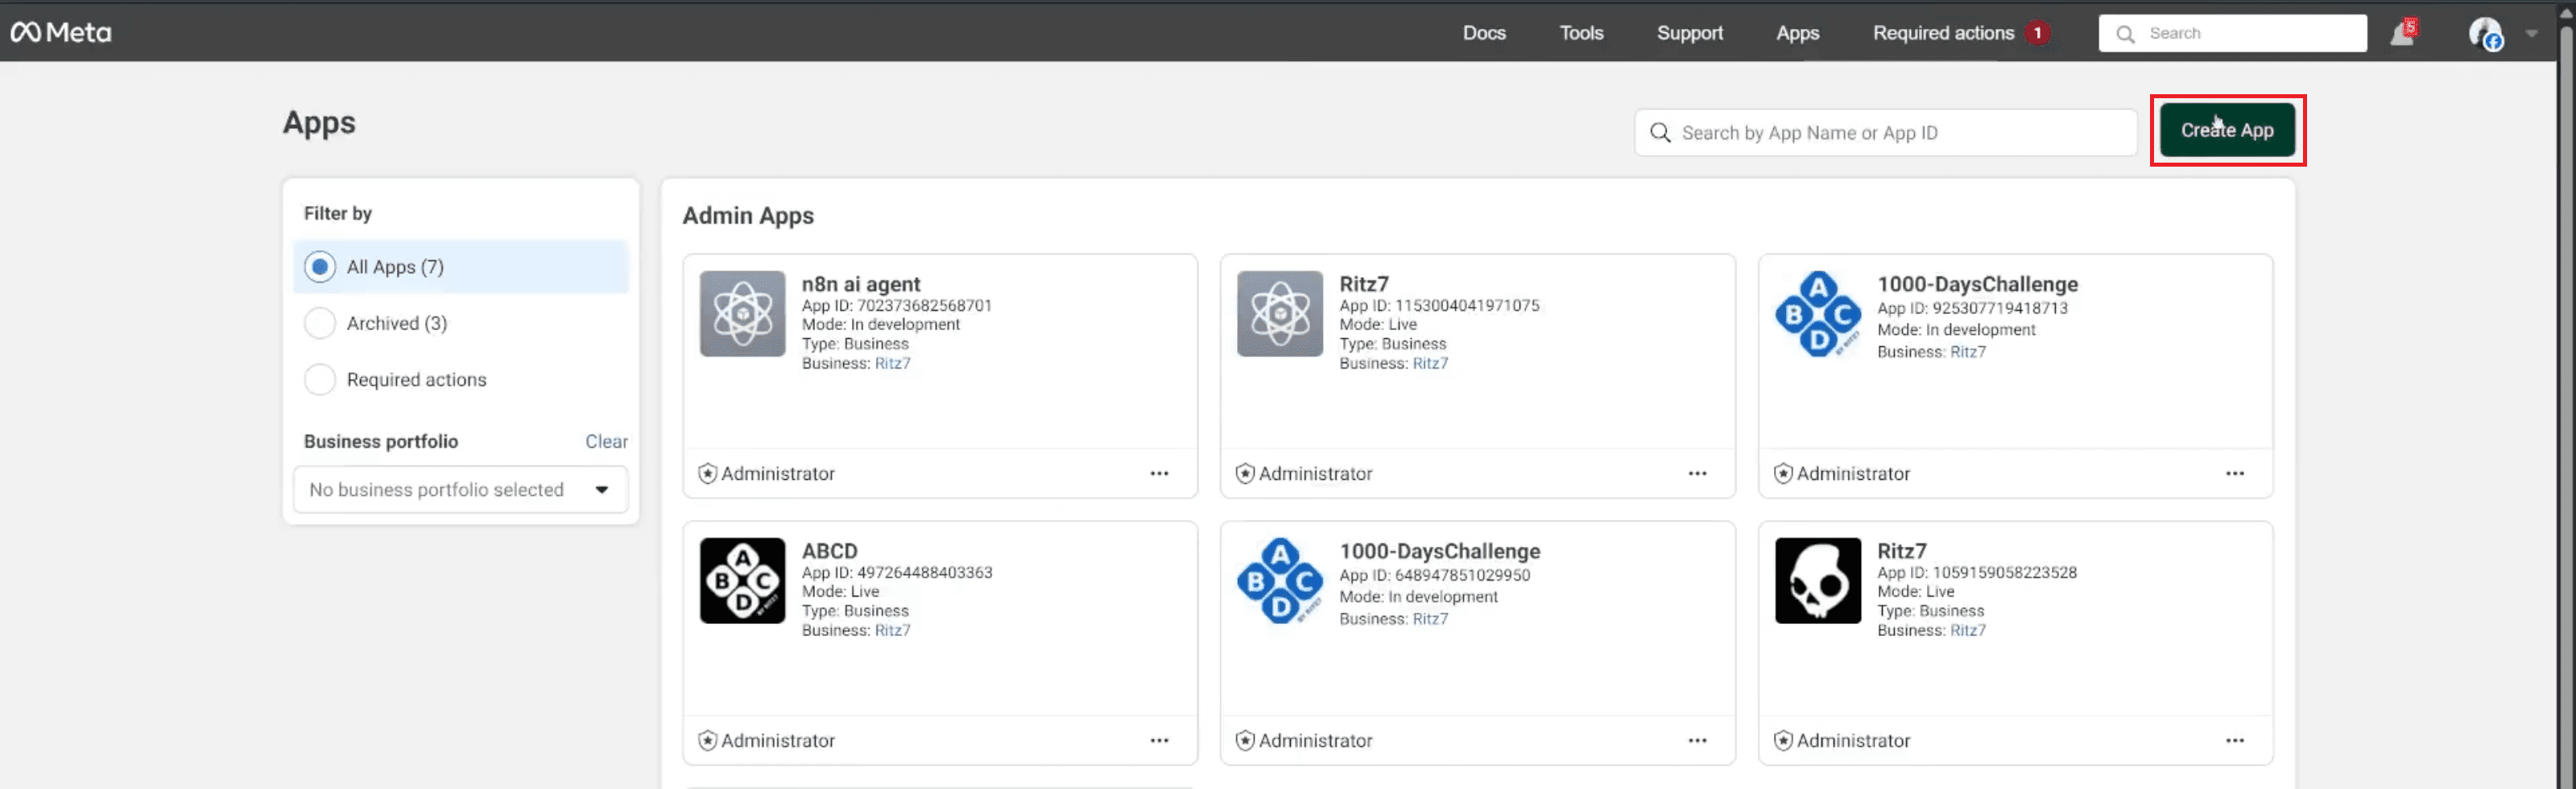
Go to the Meta Developer website and click on My Apps.
Click the Create App button.
When prompted for the app type, select Business.
Click Next to proceed to the details form.
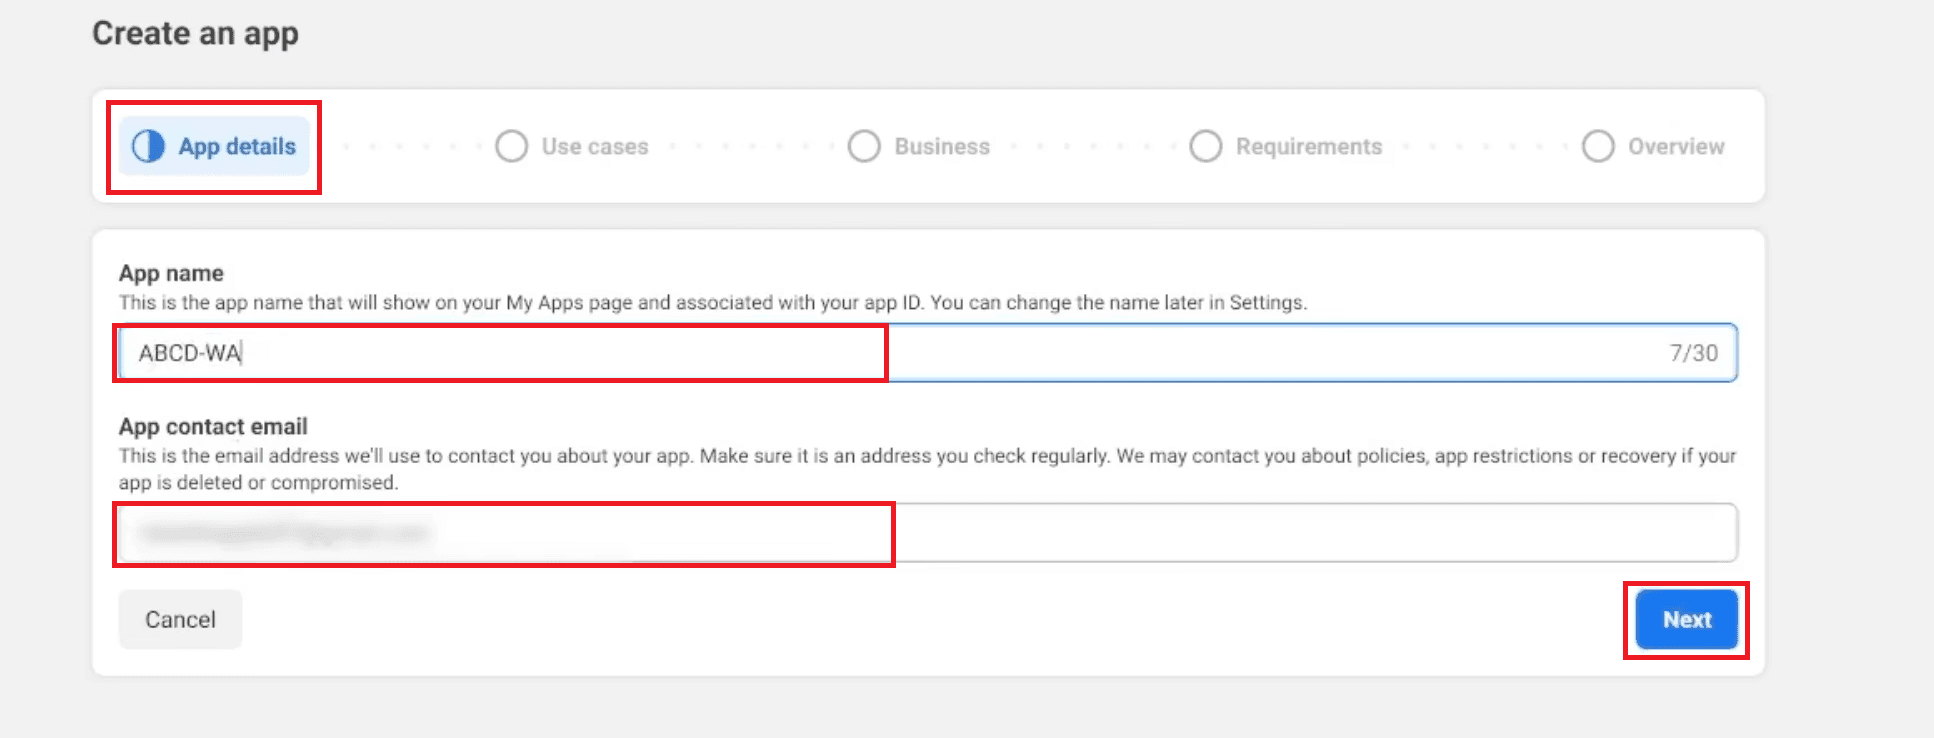
3.2 Configuring App Details and Use Case
You need to define the application's specific purpose for Meta's ecosystem and then explicitly associate it with your previously created and verified business portfolio. This linking process is essential, as it ensures the app operates under the correct legal and business entity permissions, granting it access to the WhatsApp Business Platform product. This step defines the app's identity and its functional scope.
App Details:
Enter a suitable and descriptive App Name (e.g., “ABCD WhatsApp App”).
Provide your App Contact Email Address for notifications and recovery.
Click Next.
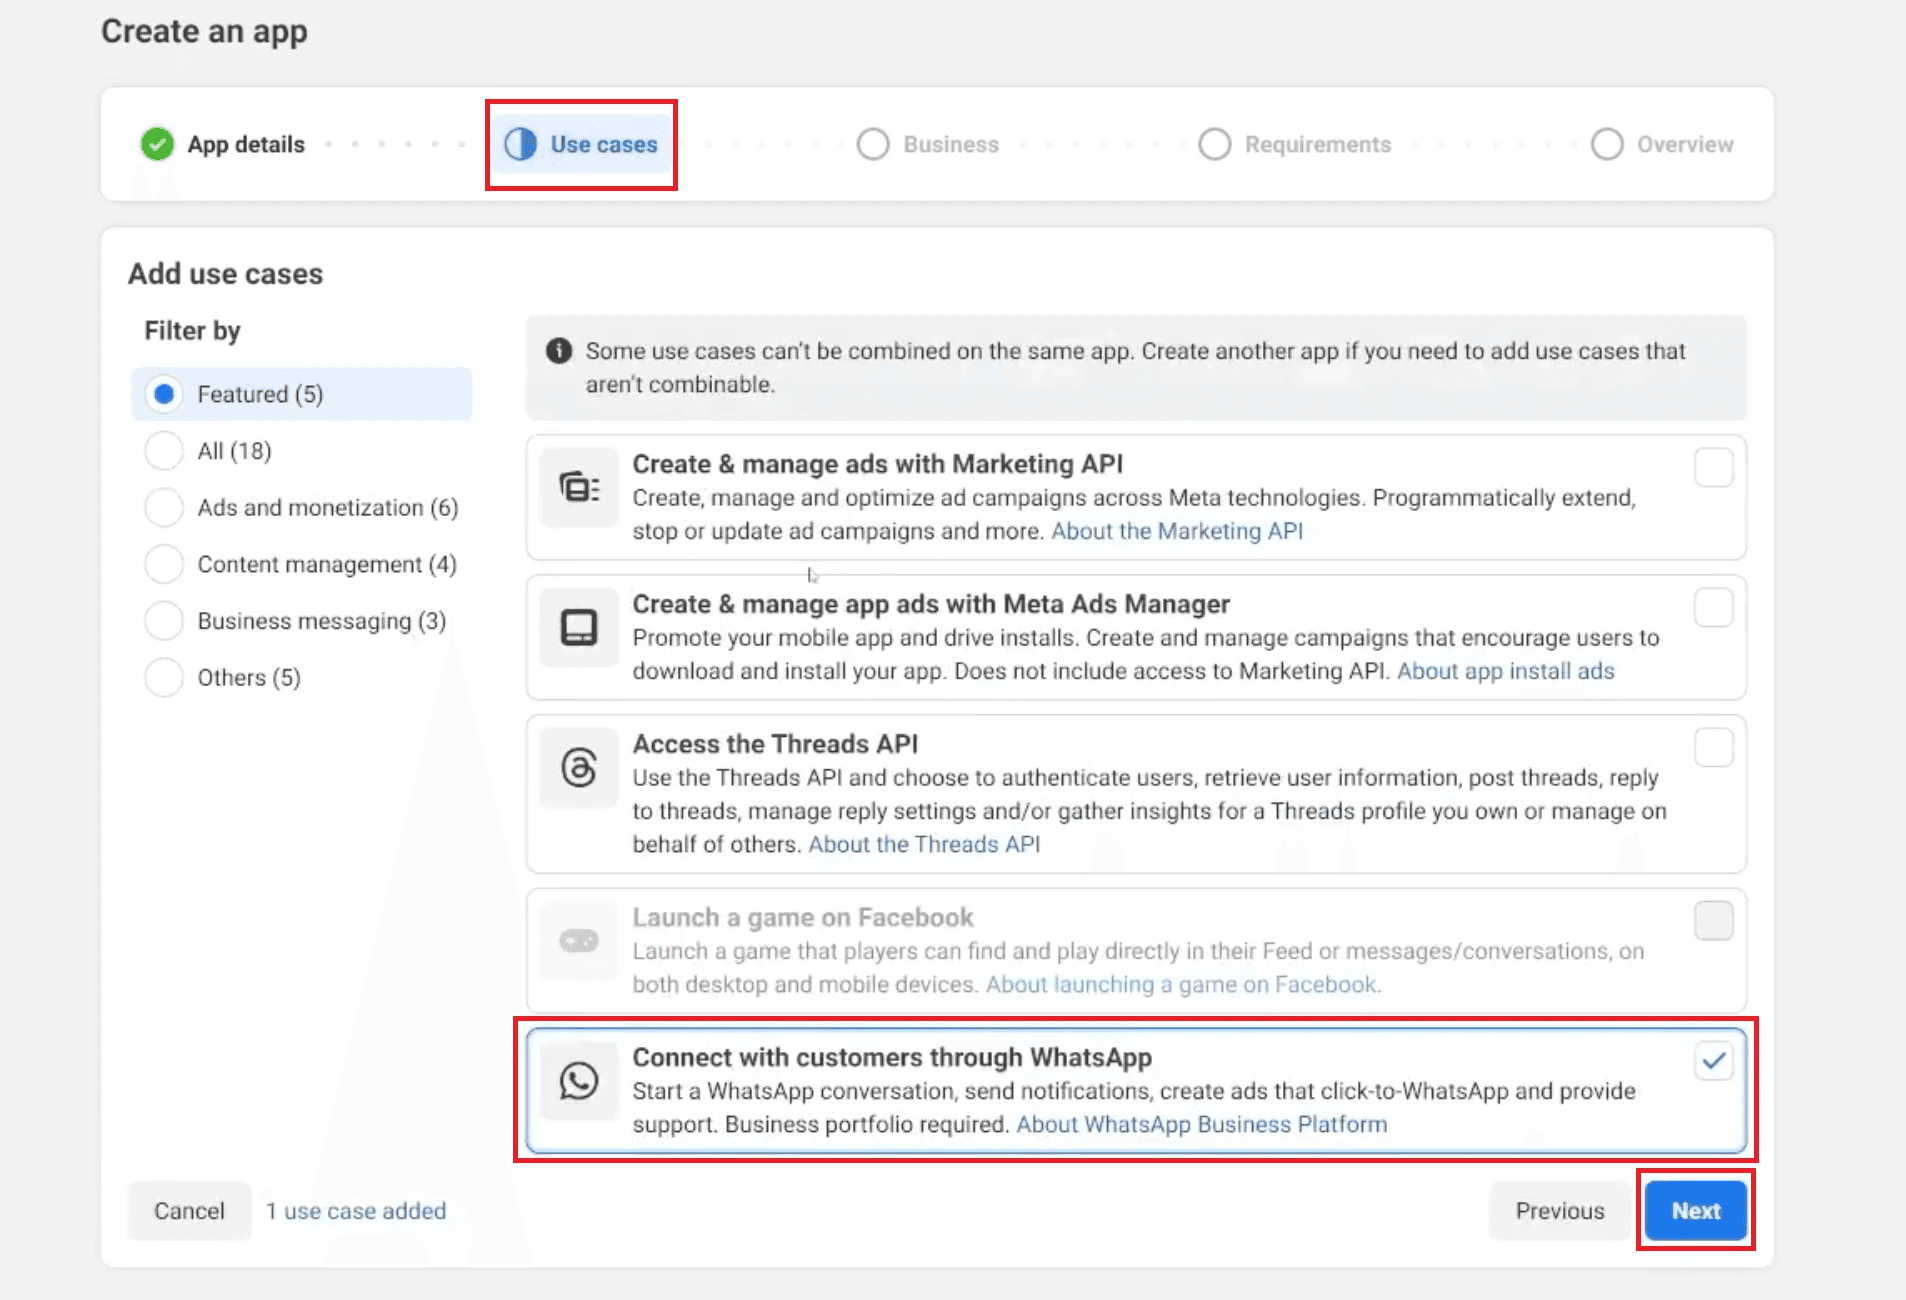
Use Case:
On the “Use Cases” screen, select Connect with customers through WhatsApp. This selection explicitly defines the purpose of your app and focuses its capabilities on WhatsApp-based automation and messaging.
Click Next.
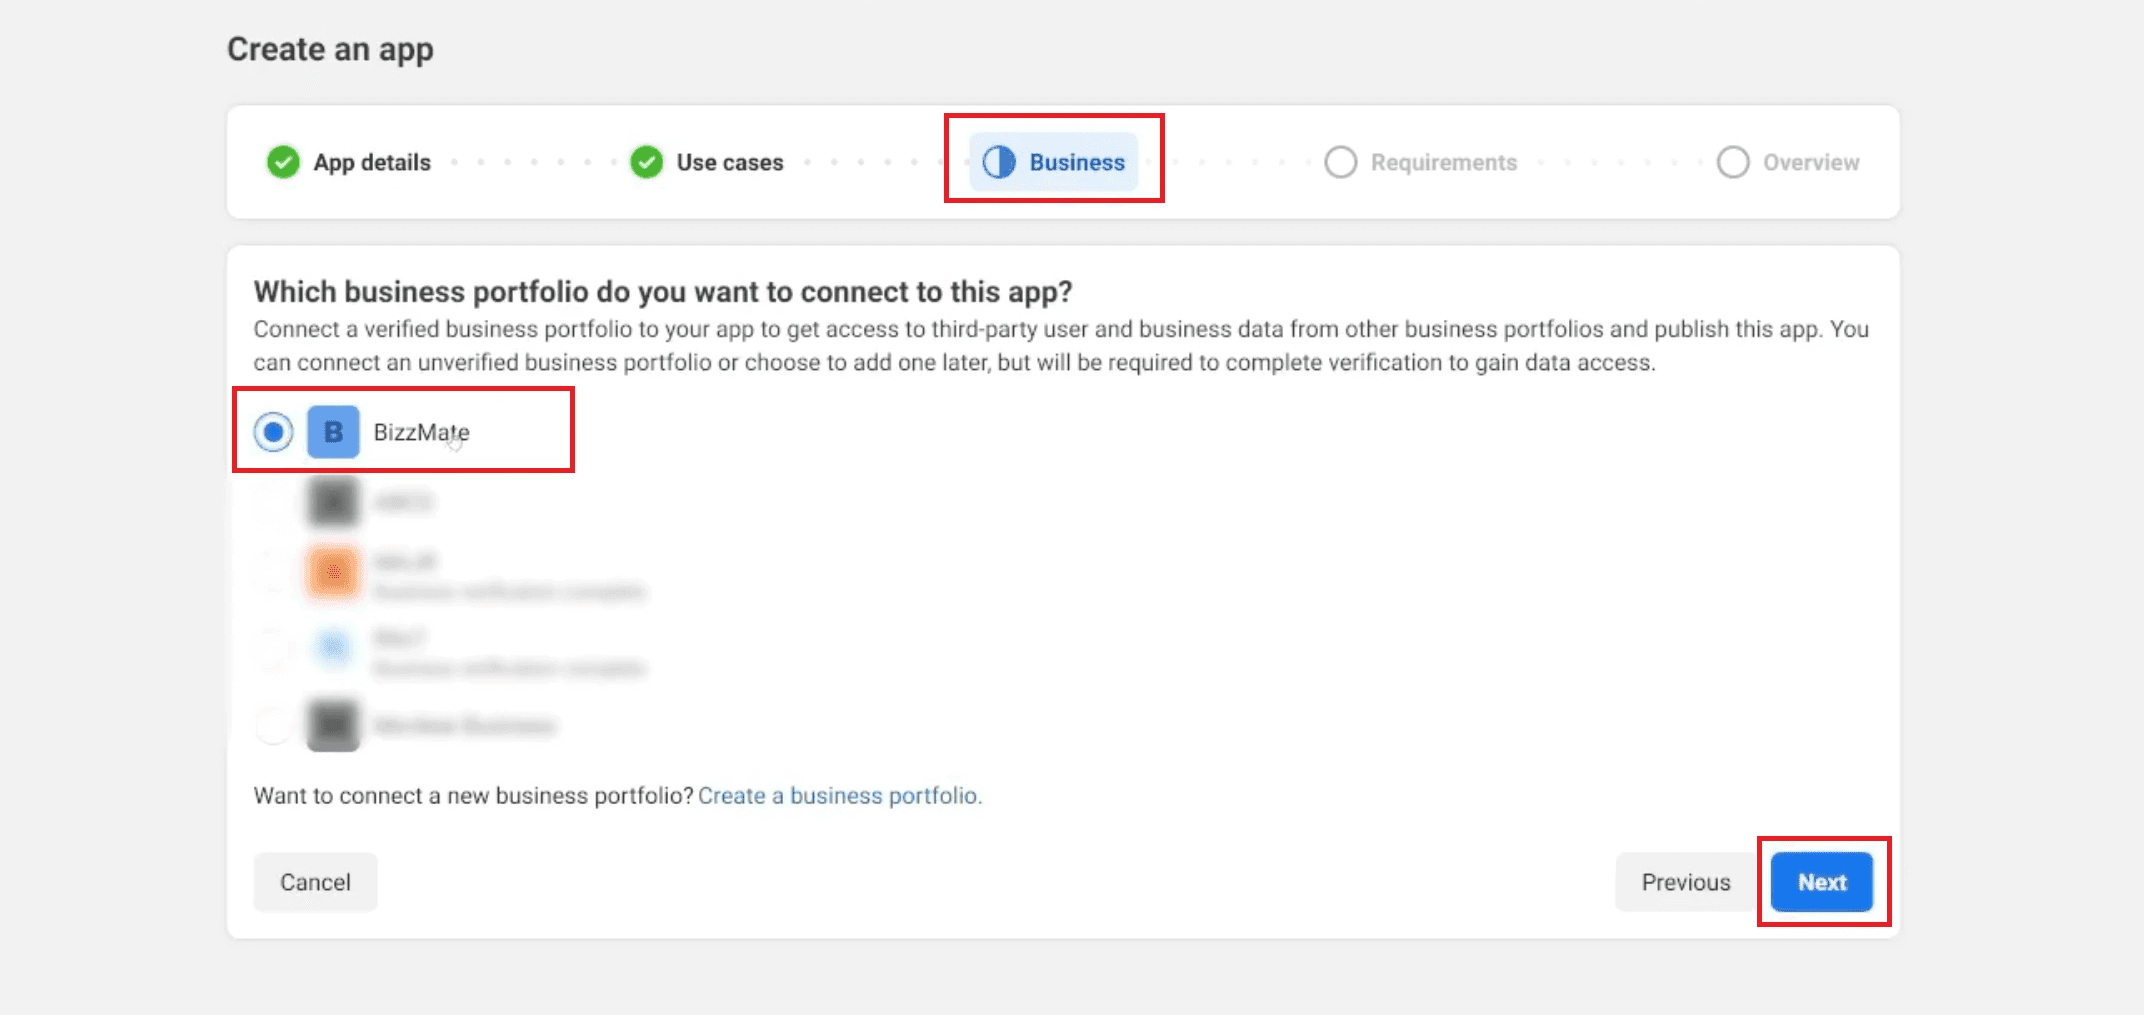
Business Account:
Select the business you just created (e.g., “Bizzmate”) from the dropdown list to formally associate the app with your business portfolio.
Click Next.
3.3 Completing App Setup
Finalize the app creation process by reviewing the requirements and the overall summary to ensure all linked information is accurate before deployment. Upon successful confirmation, you will be automatically directed to the application dashboard, where you can immediately begin configuring the necessary API products. This moves you from the setup wizard to the active development environment.
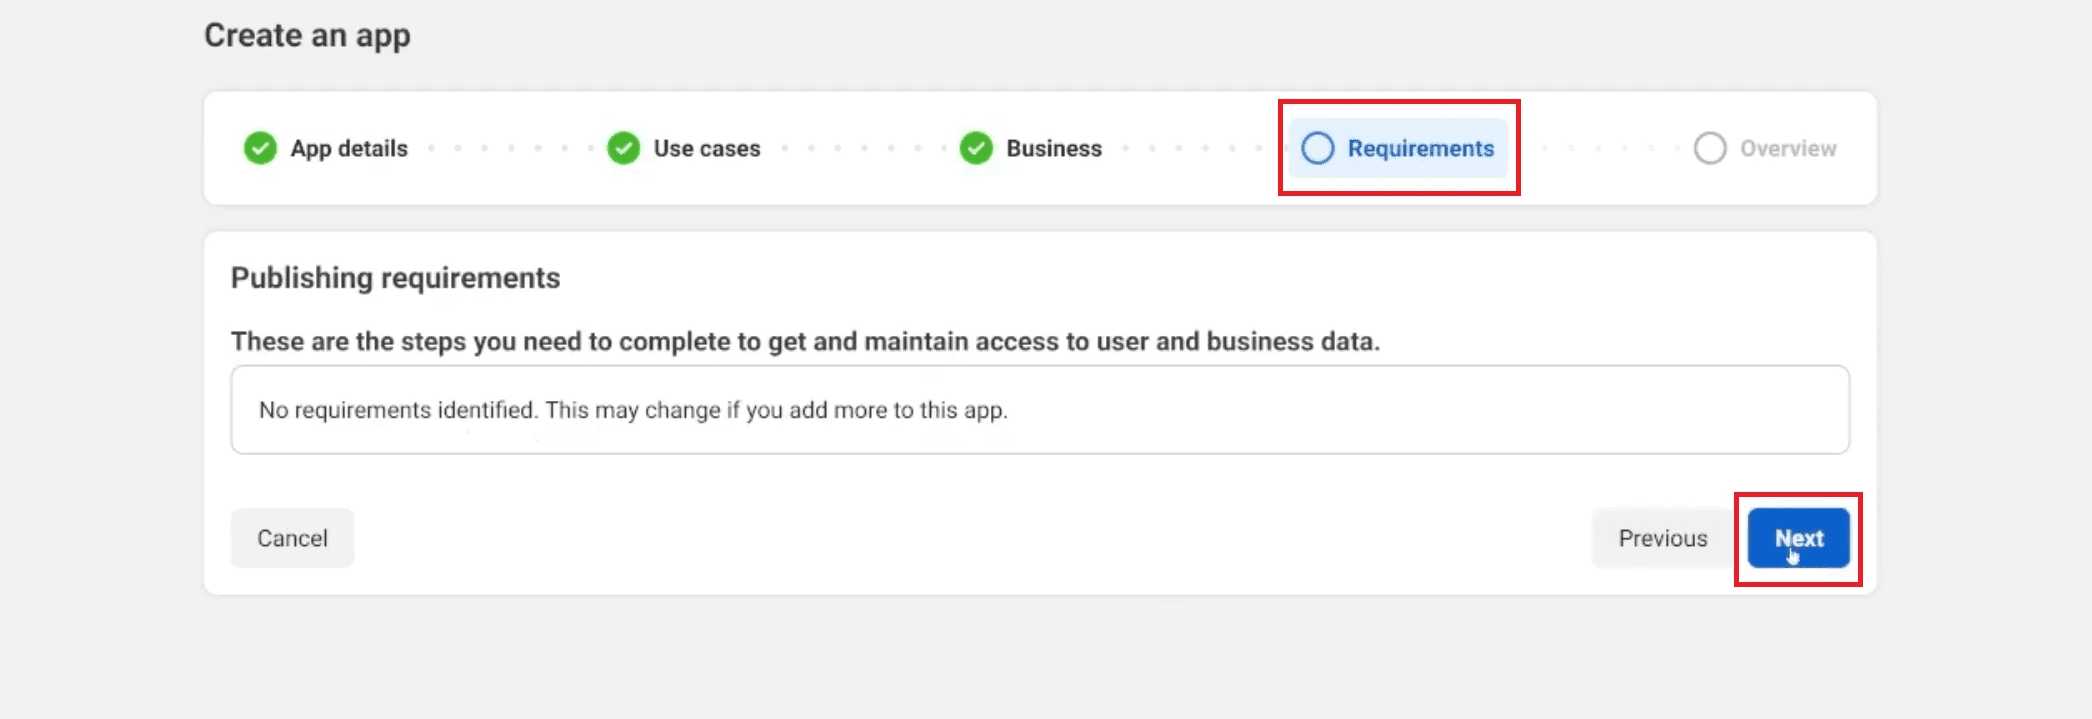
Requirements Review:
Review the Publishing Requirements screen. If your business is verified, this screen should typically show "No requirements identified" at this stage.
Click Next.
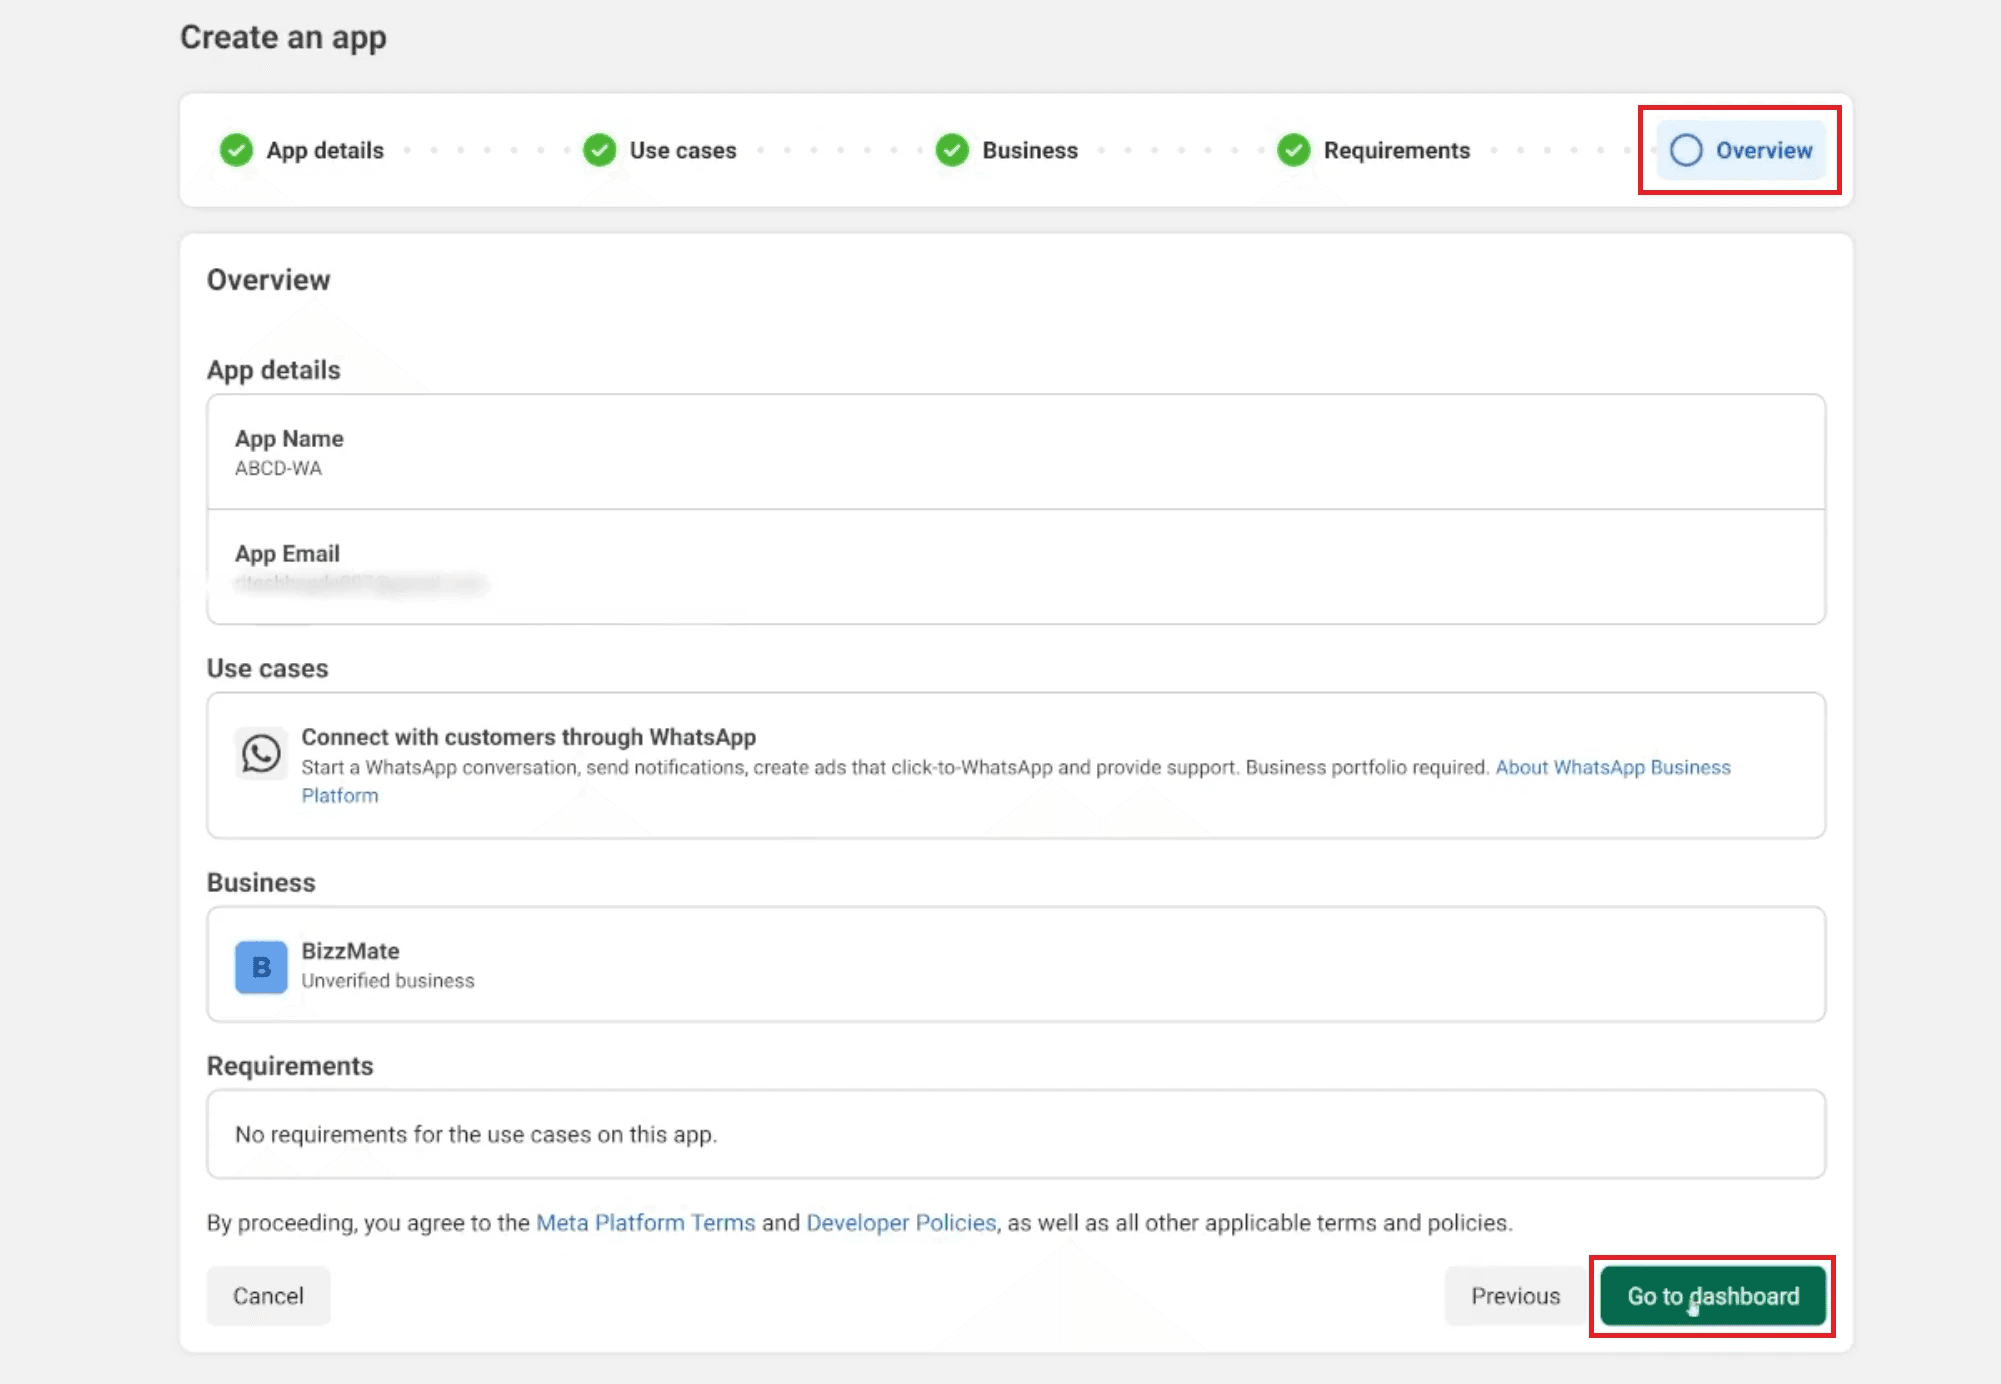
Overview and Finalize:
Review the final app details on the Overview screen, checking all linked assets like the business account. Read and accept the required developer platform terms.
Click Go to dashboard to complete the app creation and exit the setup wizard.
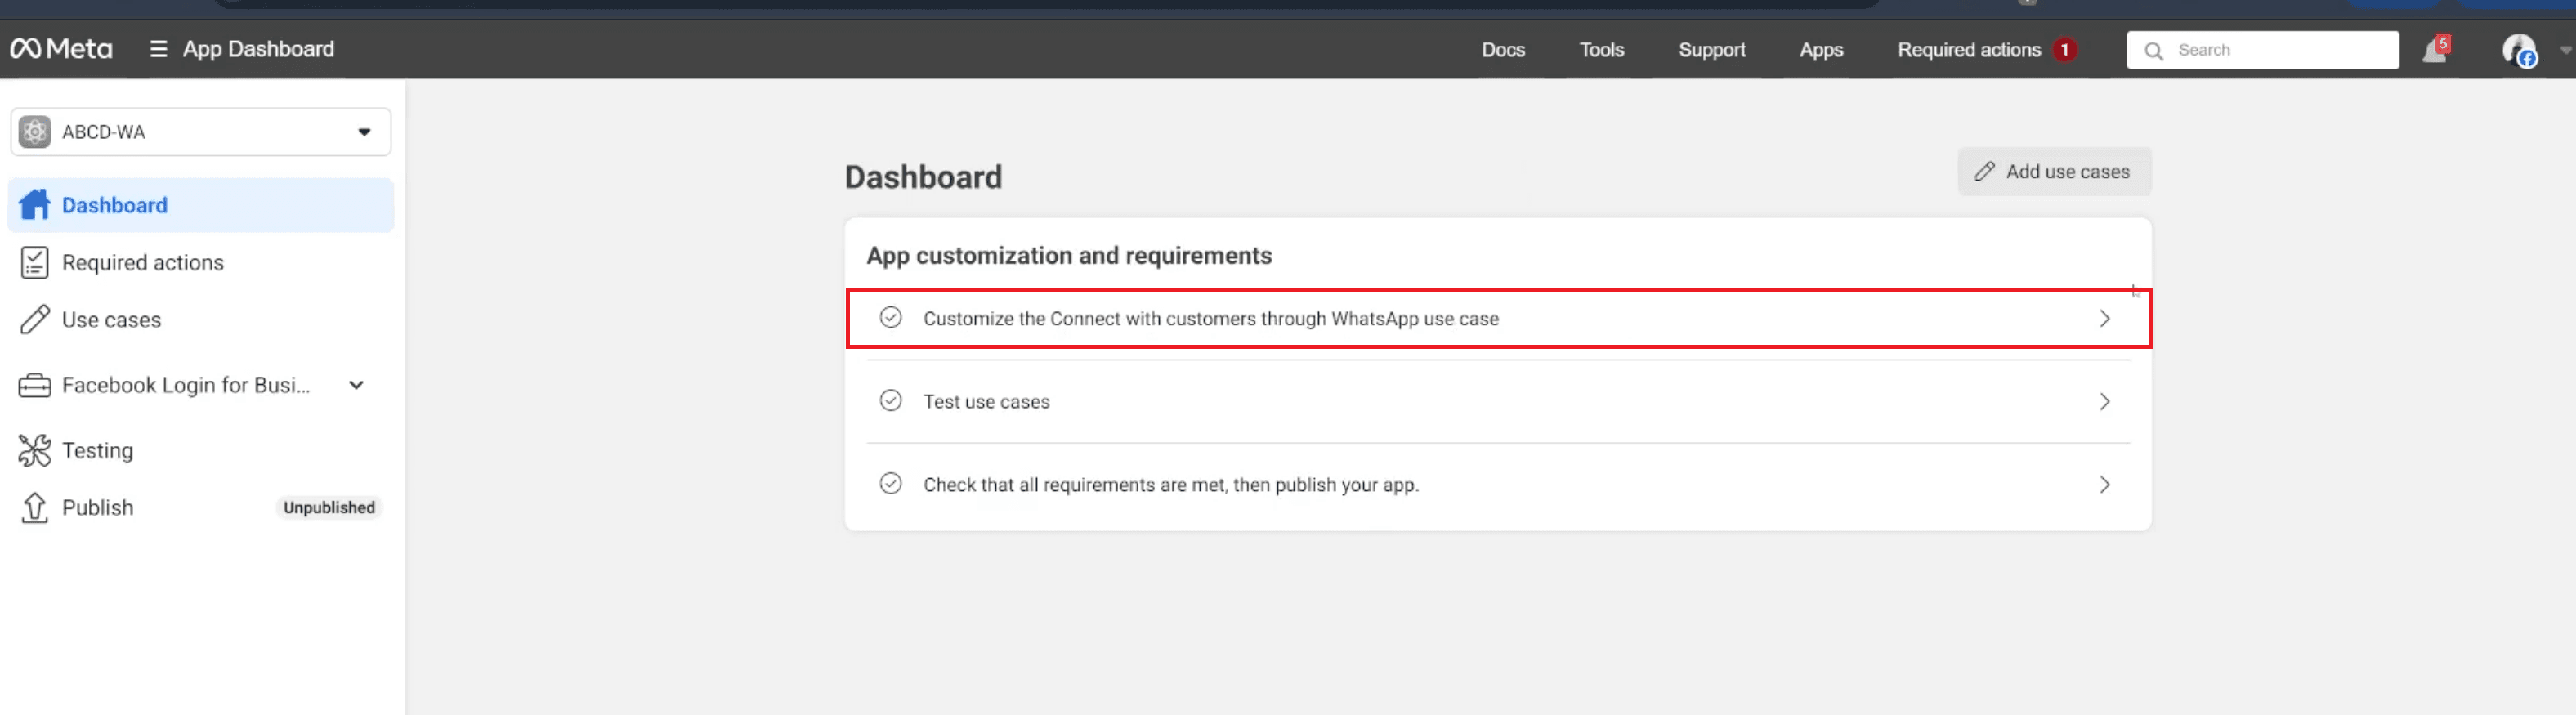
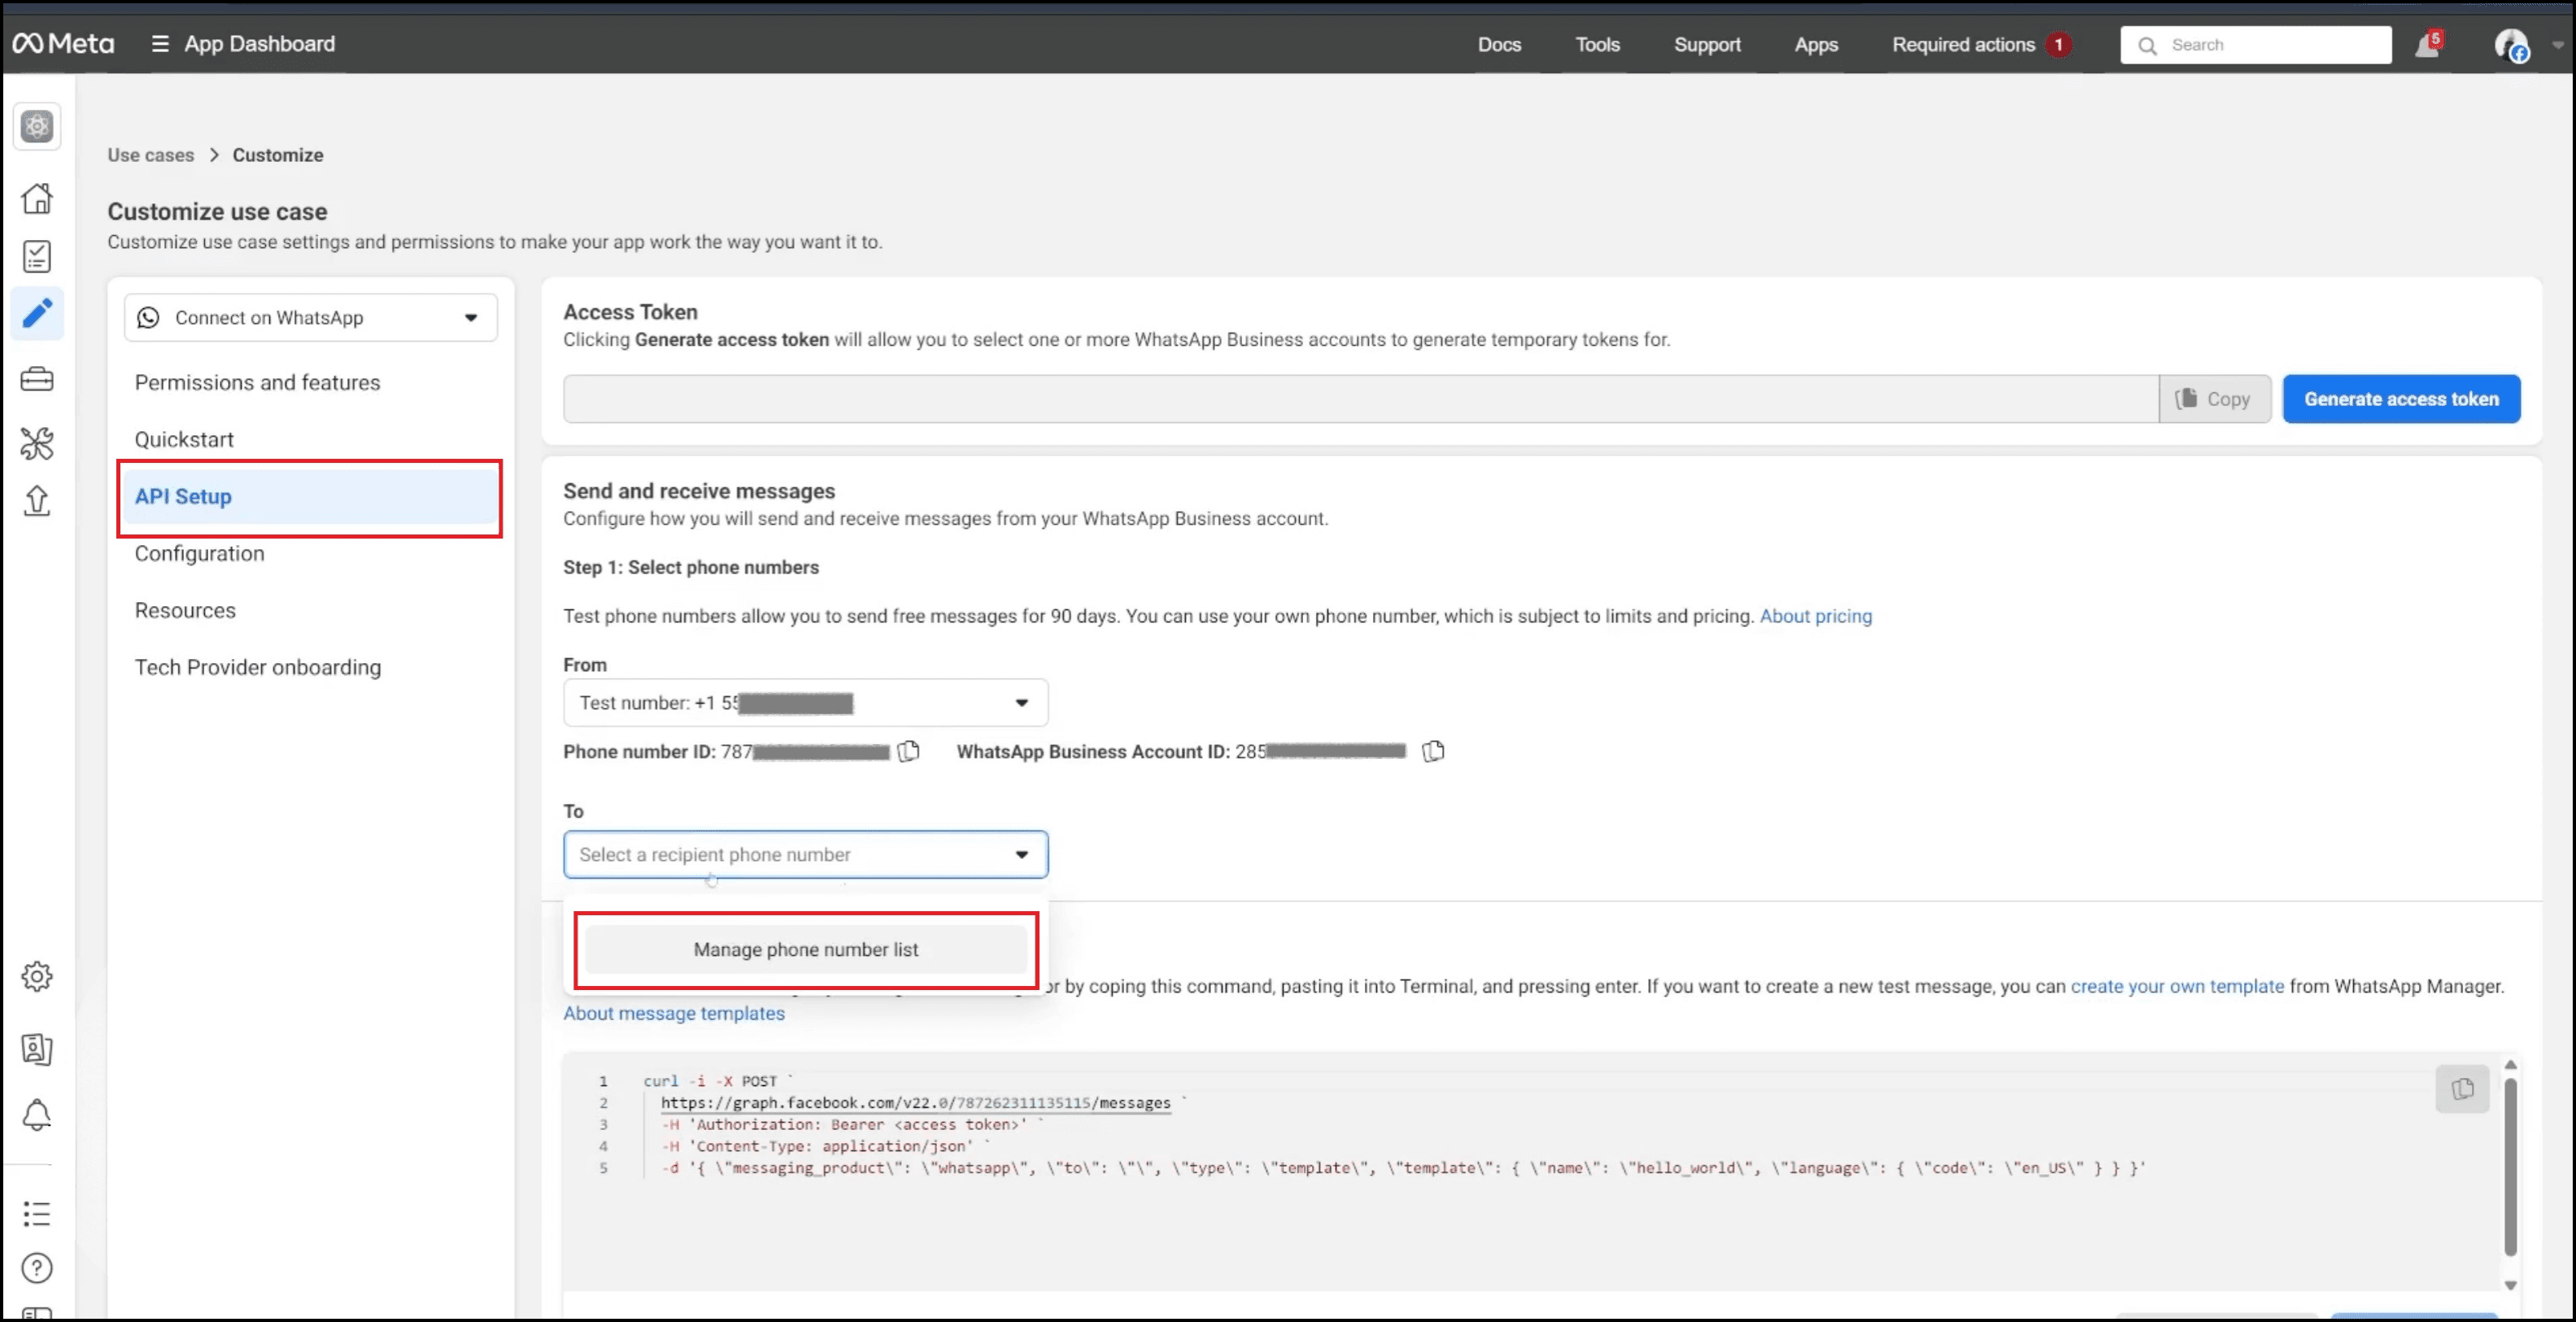
Step 4: Access API Setup
Once successfully created, you’ll be directed to your new app’s Dashboard (as shown in the image), where you can view customization options. To proceed directly to the WhatsApp configuration, click on the box labeled Customize the Connect with customers through WhatsApp use case.
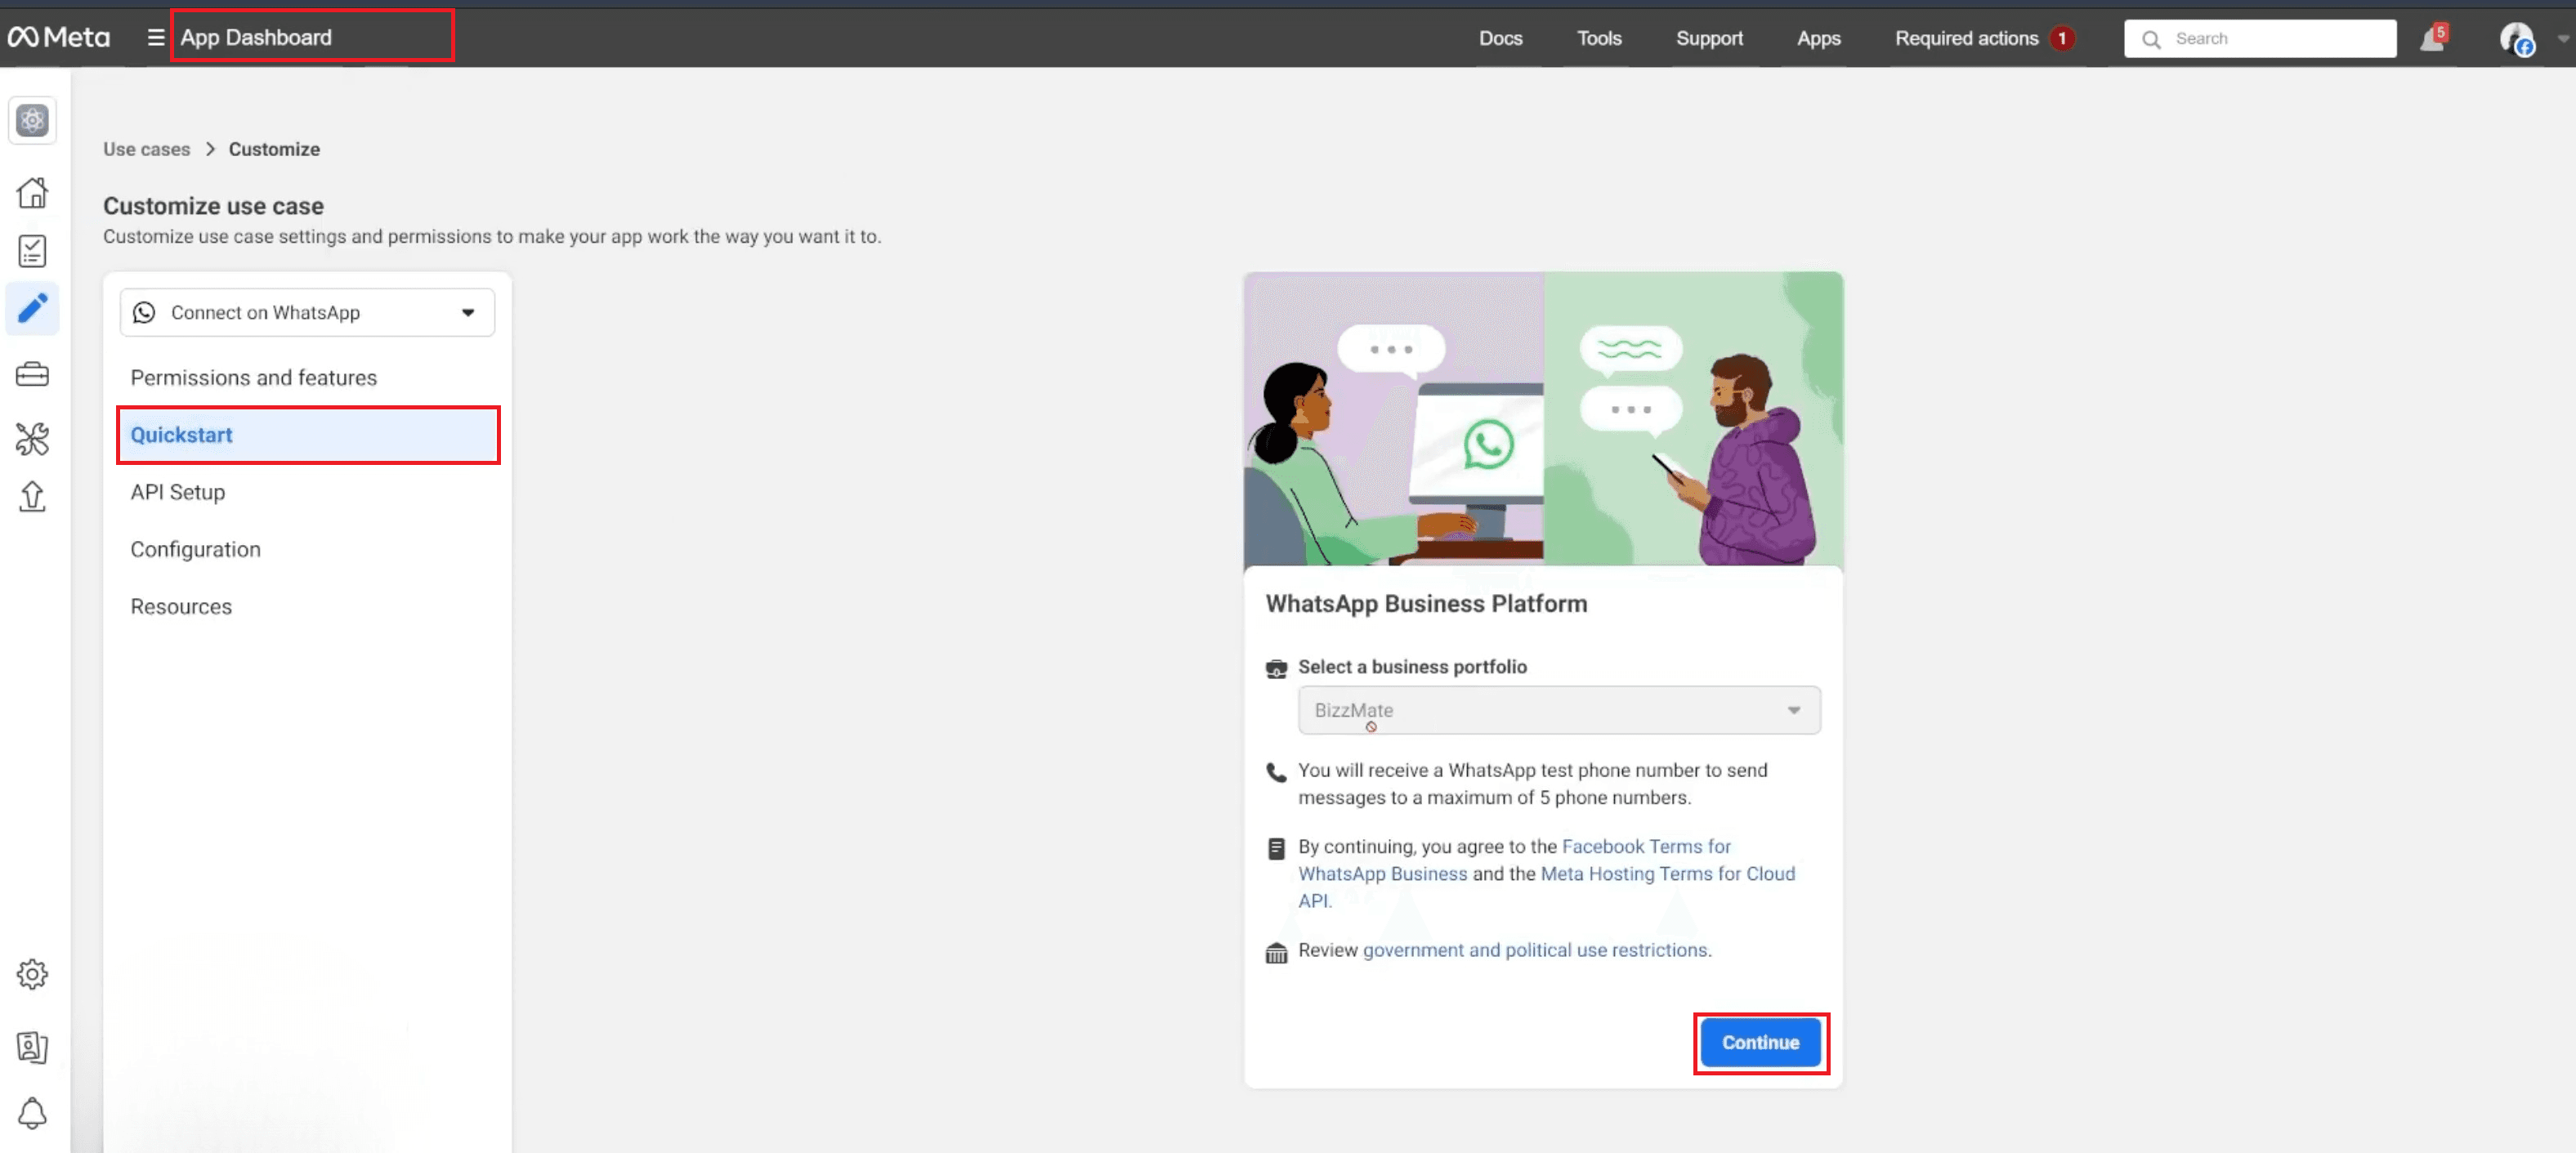
After clicking on the "Customize the Connect with customers through WhatsApp use case" from the Dashboard, you are immediately taken to the Quickstart flow. This critical step requires you to confirm the necessary business association and accept the terms of service, which allows the system to provision your initial test environment and essential temporary credentials. This process is necessary before you can move on to generating the permanent keys for your integration.
Confirm Business and Terms:
On the Quickstart screen, review the selected business portfolio (e.g., BizzMate) to ensure the correct host entity is chosen.
Read and acknowledge the Facebook Terms for WhatsApp Business and the Meta Hosting Terms for the Cloud API, which are mandatory to proceed.
Click Continue to move forward with the initial API setup.
Accessing API Setup:
On the subsequent screen, you will see the API Setup section, which is designed to guide you toward making your first API call.
Click the large blue button labeled "Start using the API" to be taken directly to the page containing your initial test credentials and environment details.
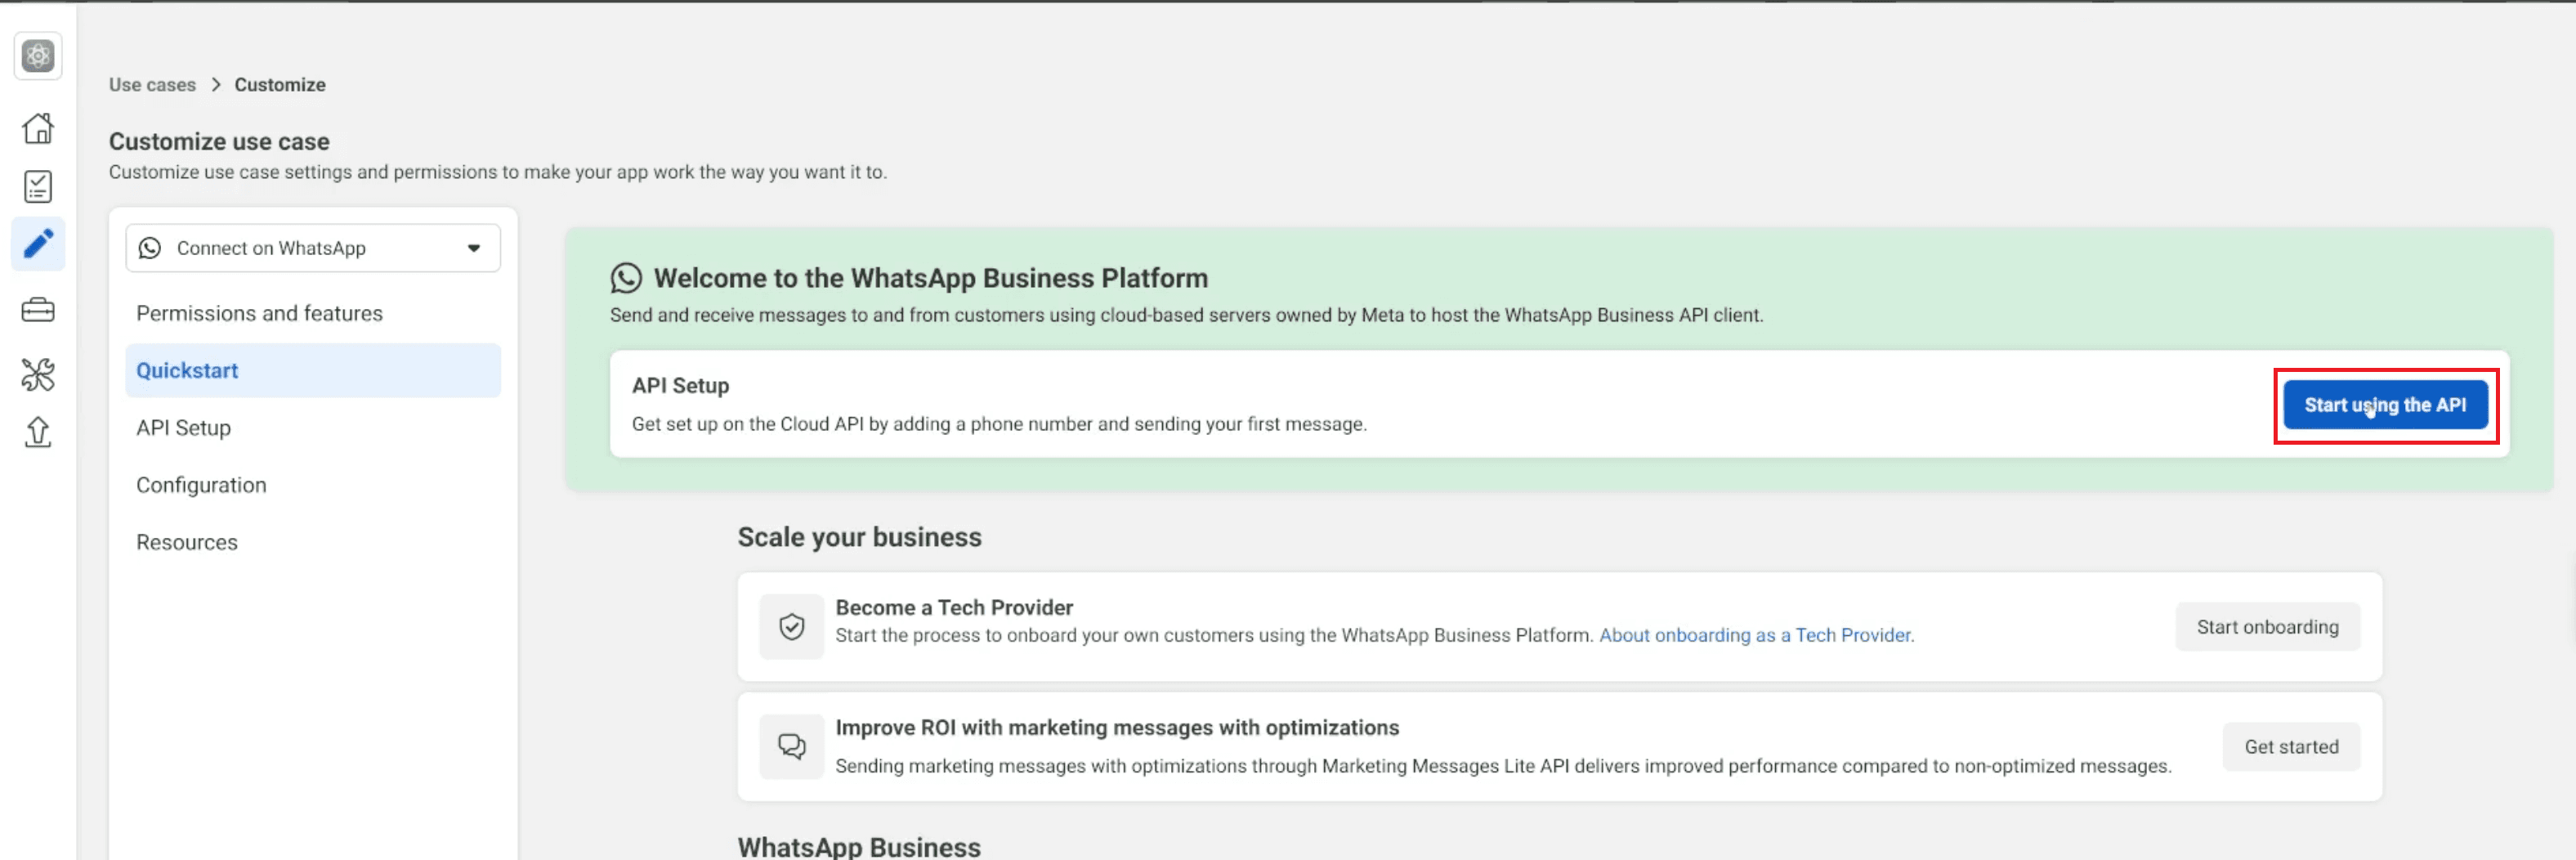
This page is crucial as it displays your Temporary Access Token, the WhatsApp Business Account ID, and the Phone Number ID, which are all needed to send your first test message.
Step 5: Understanding & Fetching Key WhatsApp Business API Parameters
To enable n8n to securely communicate with and automate WhatsApp, you need to obtain four critical credentials. These parameters work as essential authentication keys, providing the necessary authority and identification. They also clearly identify the connection between your WhatsApp Business Account and your n8n instance for message routing and security.
5.1 The Four Essential Credentials
The WhatsApp Cloud API integration requires four specific parameters for reliable automation. The instructor notes that the Access Token obtained initially is temporary and must be replaced. You must fetch and securely store the following four critical credentials:
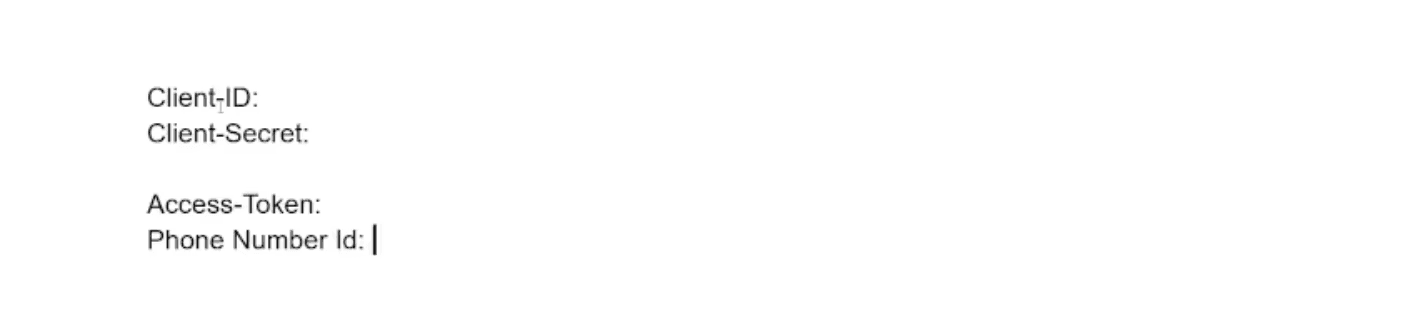
Client ID (also known as App ID)
Client Secret (App Secret)
Access Token
Phone Number ID
5.2 Locating Key IDs and Initial Testing
The API Setup page provides the immediate identifiers you need to begin configuration and perform a preliminary test message. The instructor emphasizes that the temporary token found here will expire every 24 hours, meaning it is not suitable for n8n production workflows.
Find IDs:
On the API Setup screen, locate and copy the Phone Number ID and save it somewhere or in a Google Doc.

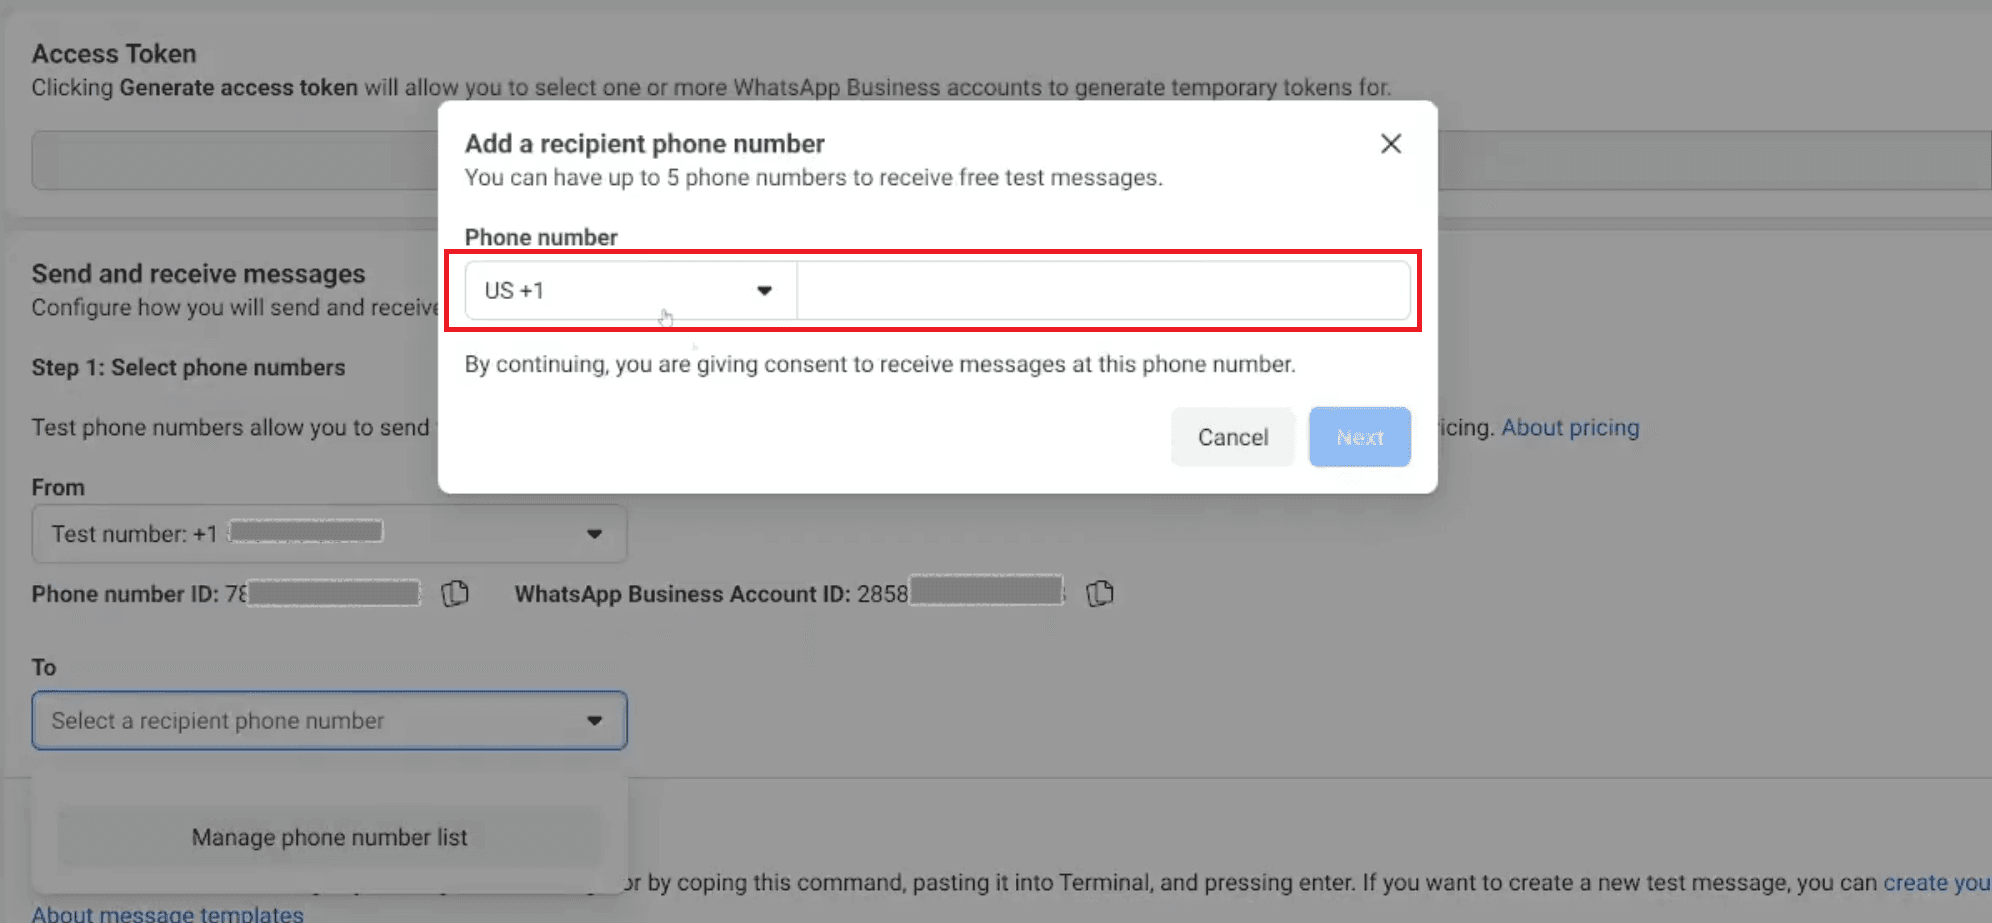
Add Recipient Number
To authorize a recipient for testing, click the Manage phone number list link on the API Setup page.
In the pop-up, you select your country and enter the mobile phone number you wish to use as the test recipient.
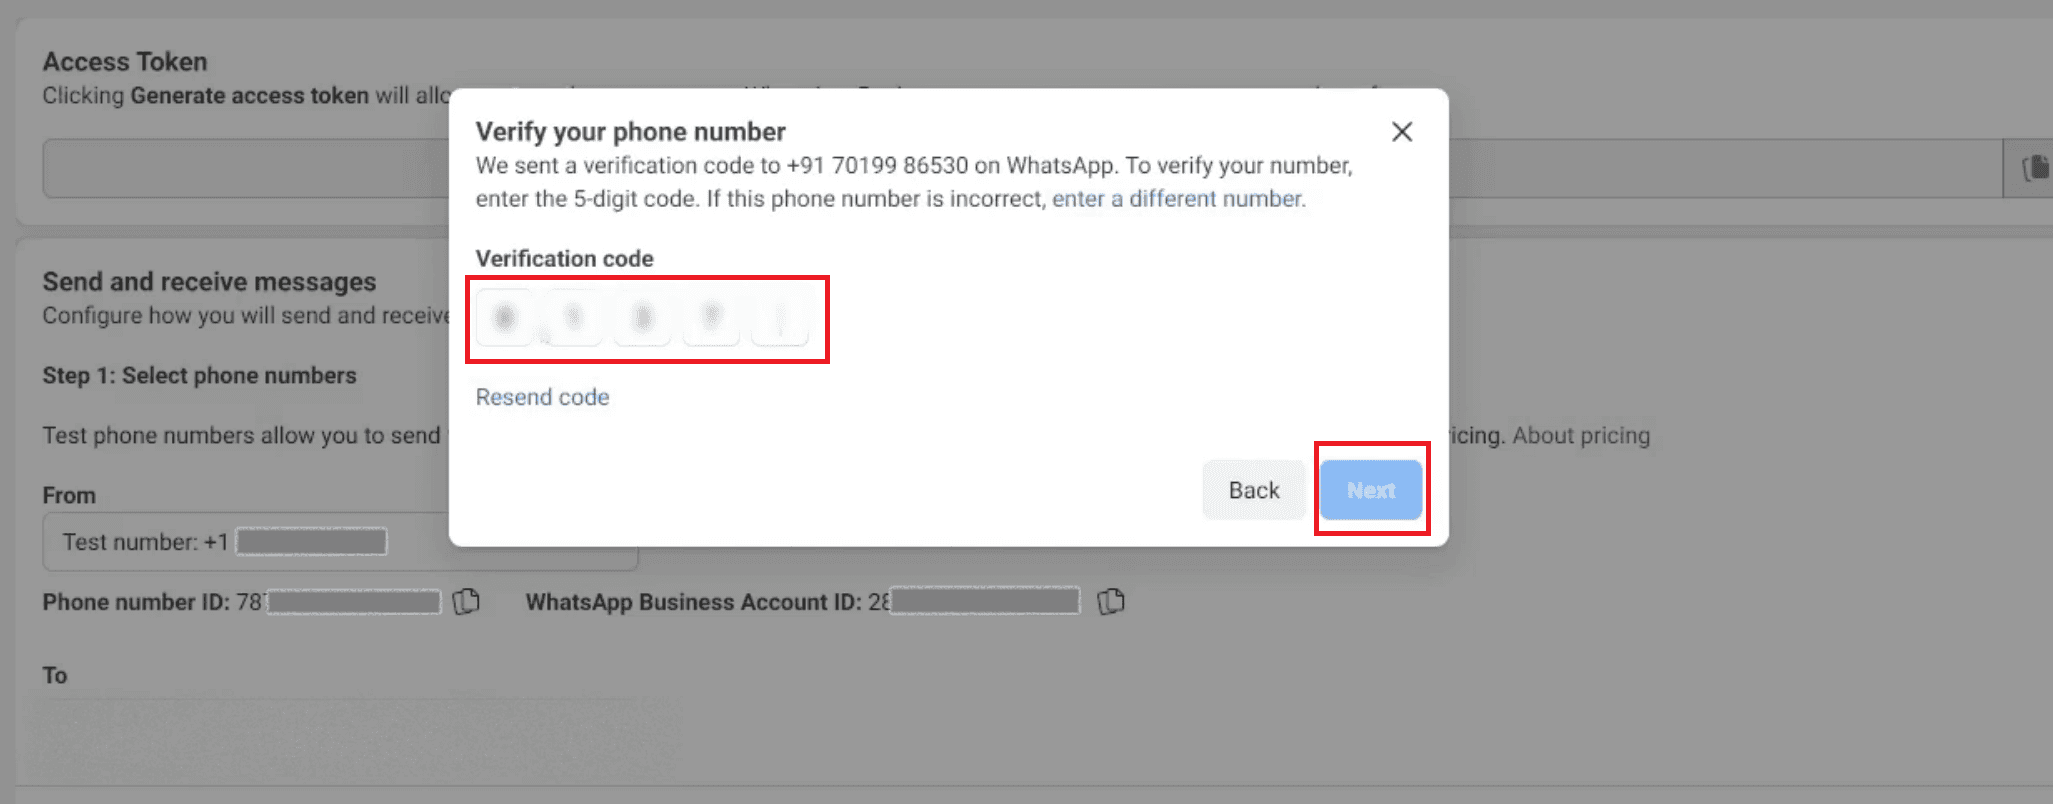
Verify Number:
Meta sends a verification code to that number; enter it and click Next to confirm and activate the number for API use.
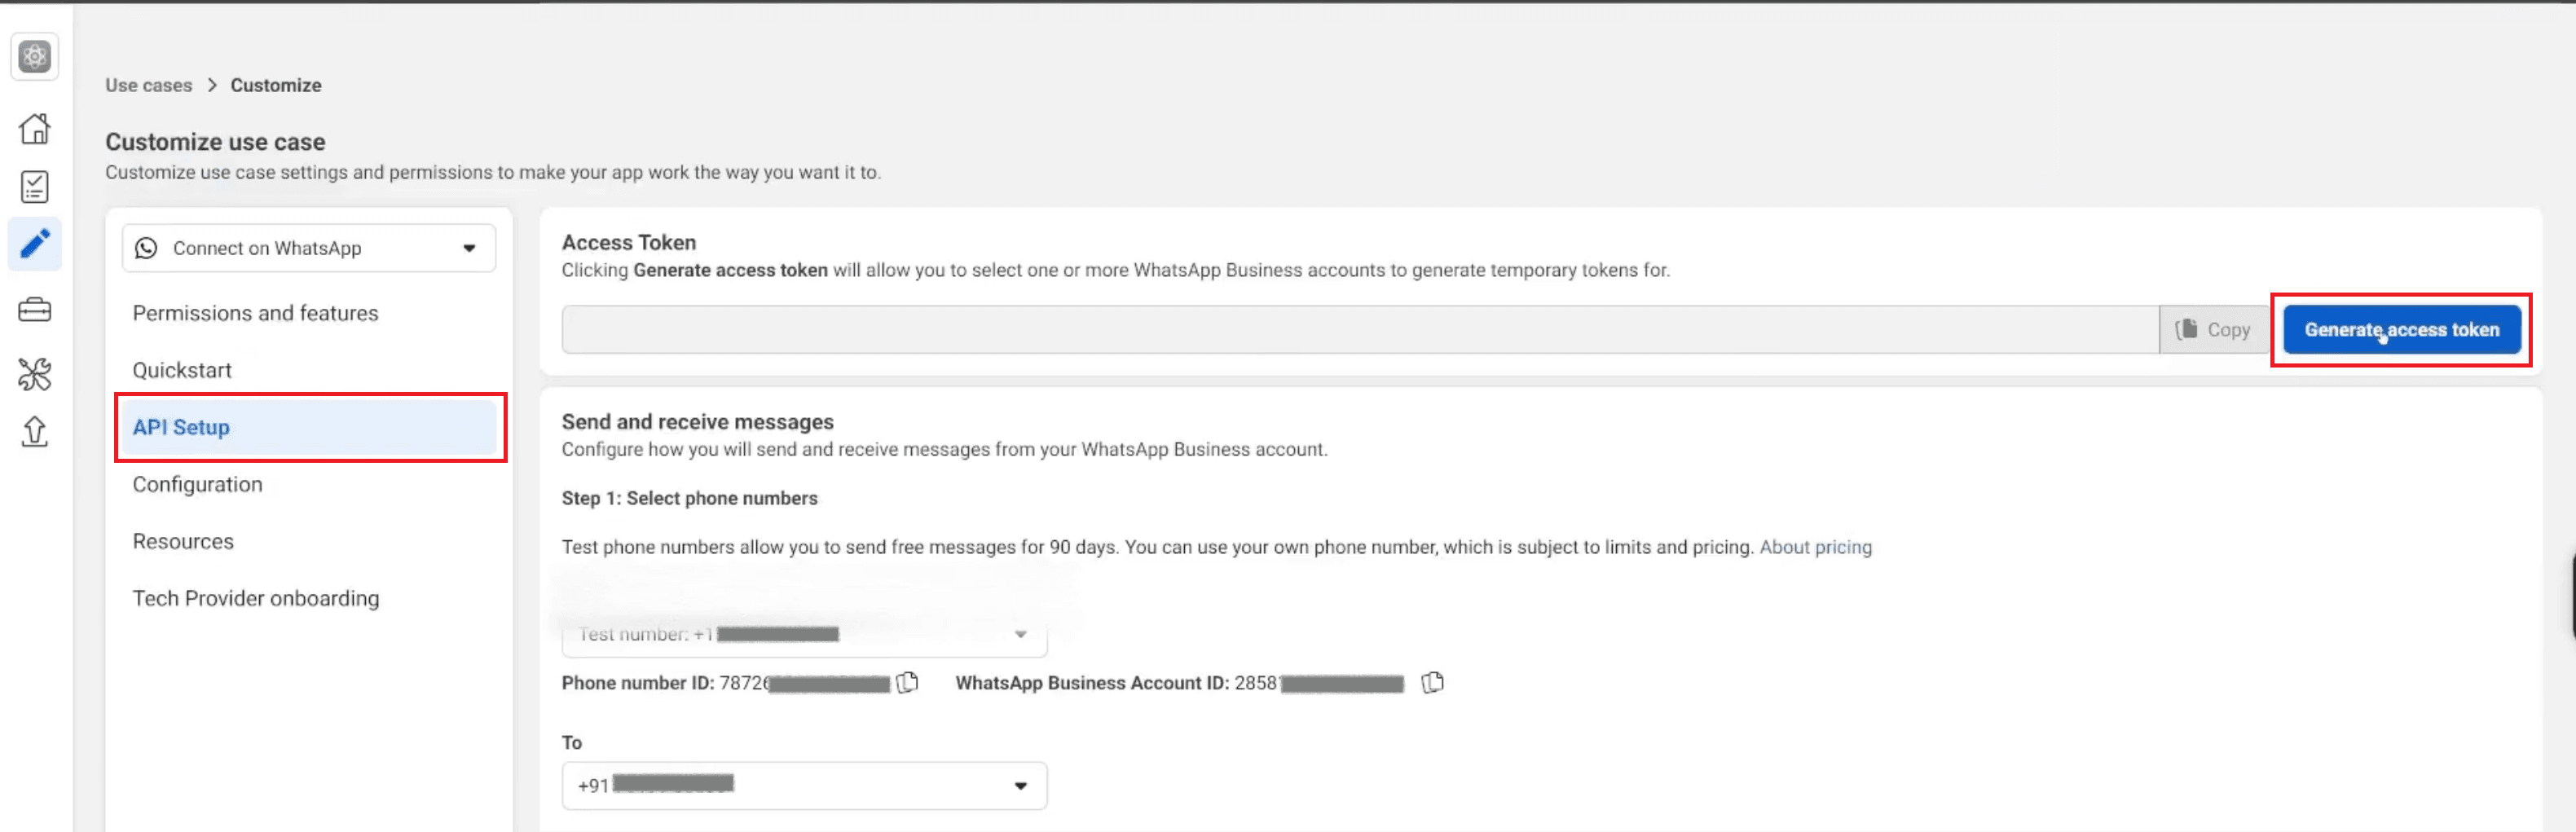
5.3 Generate Access Token
The final and most critical step for production is replacing the temporary token with a permanent System User Token generated outside the Developer App Dashboard. This non-expiring key is mandatory for uninterrupted automated service from n8n.
Generate Temporary Access Token:
On the API Setup page, click the Generate access token button. This token is temporary and expires in 24 hours.
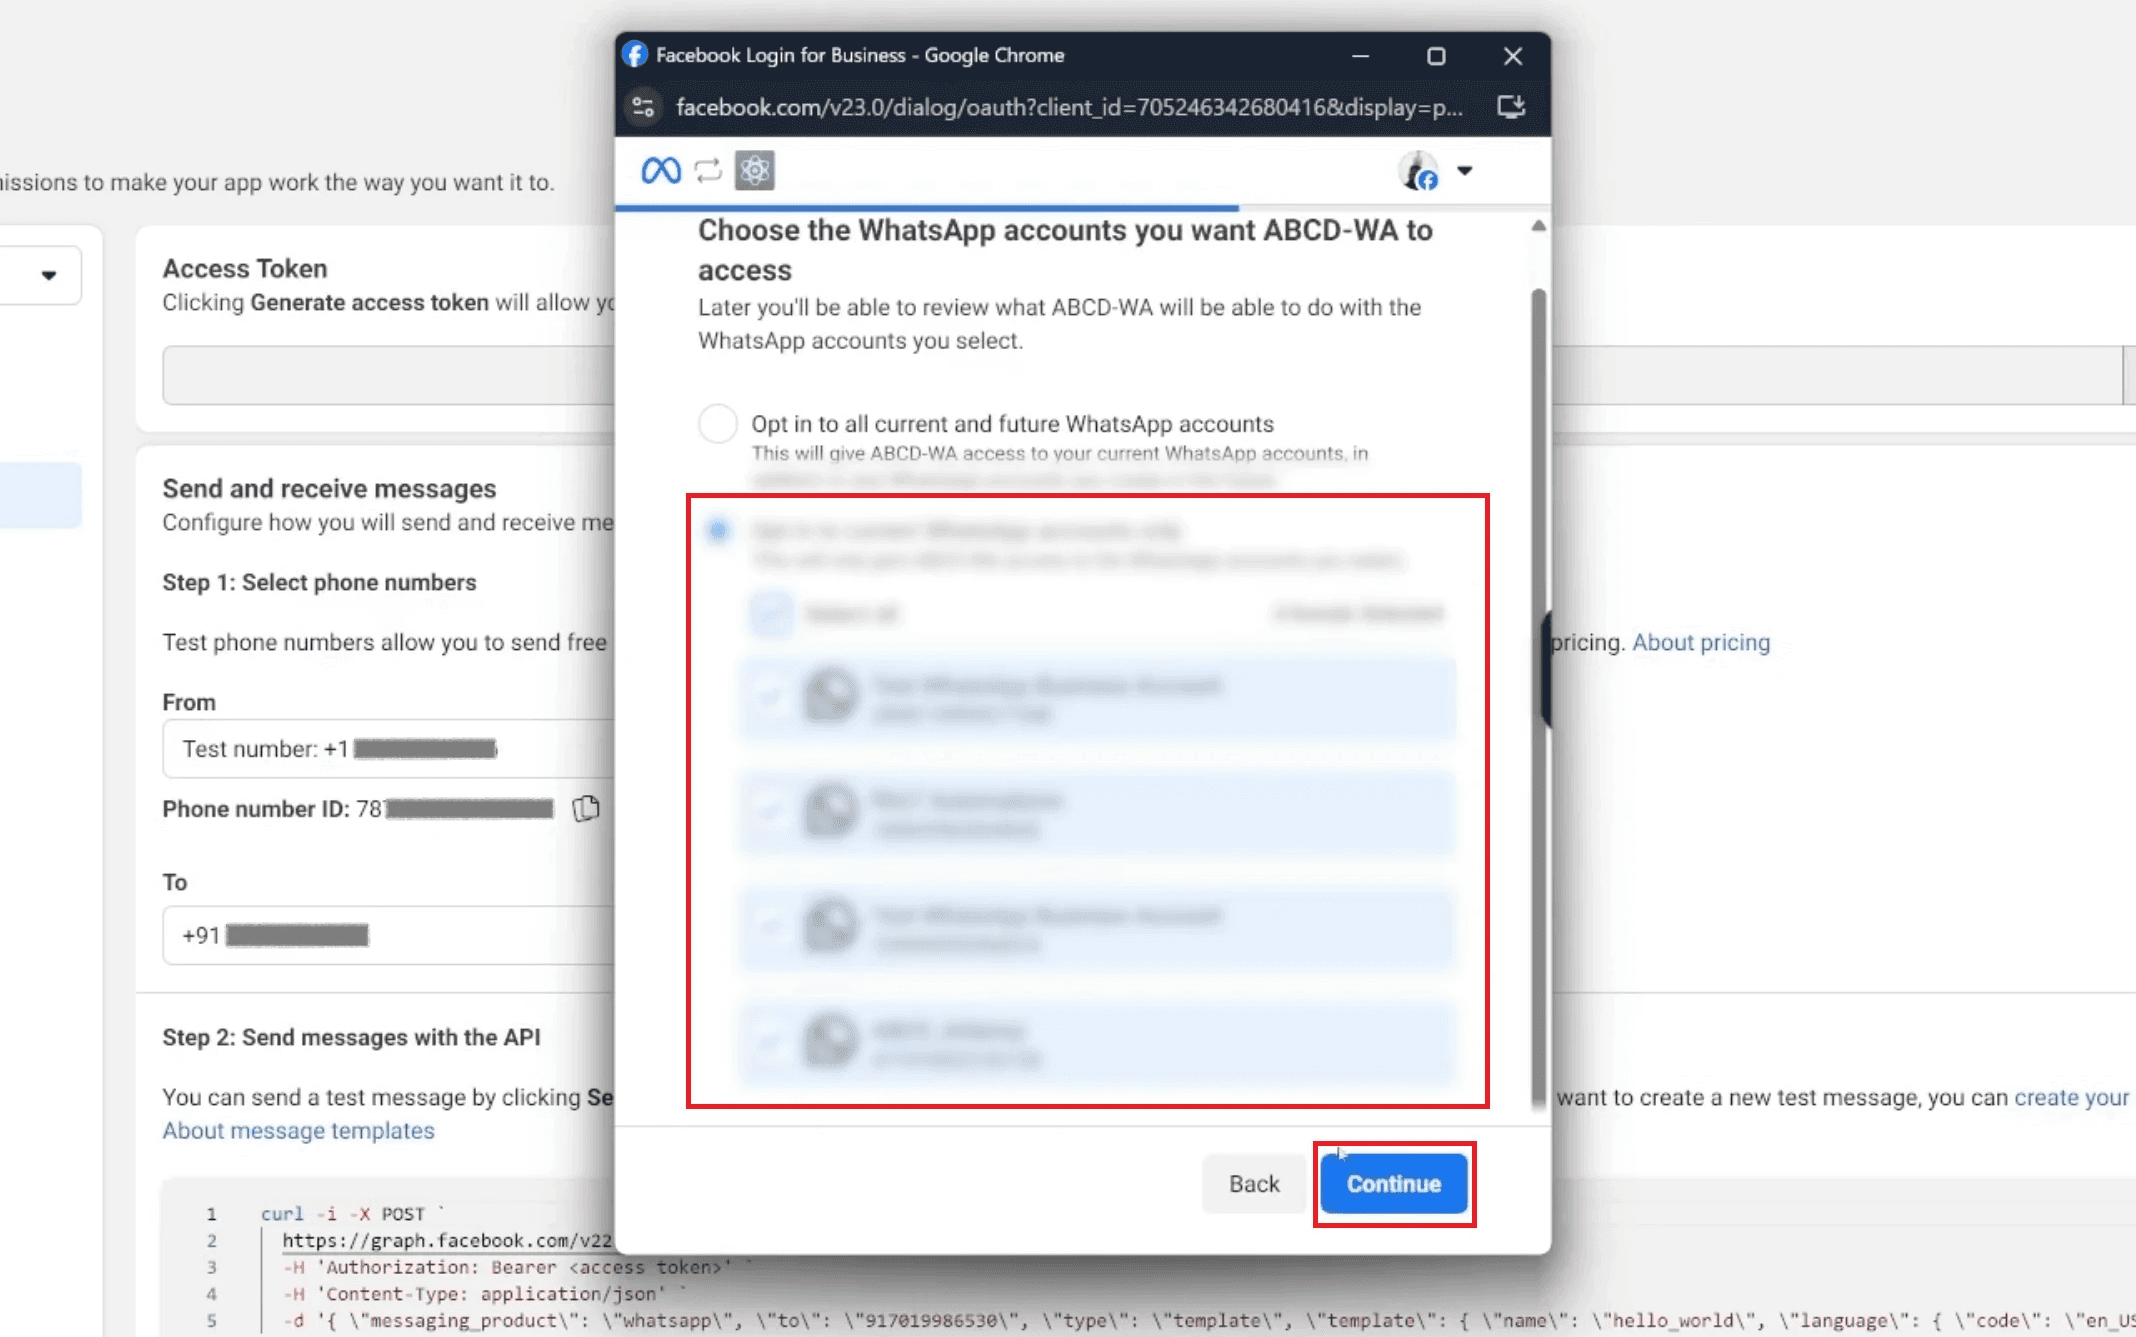
A pop-up will appear, asking you to choose the WhatsApp accounts the app can access; select the accounts and click Continue.
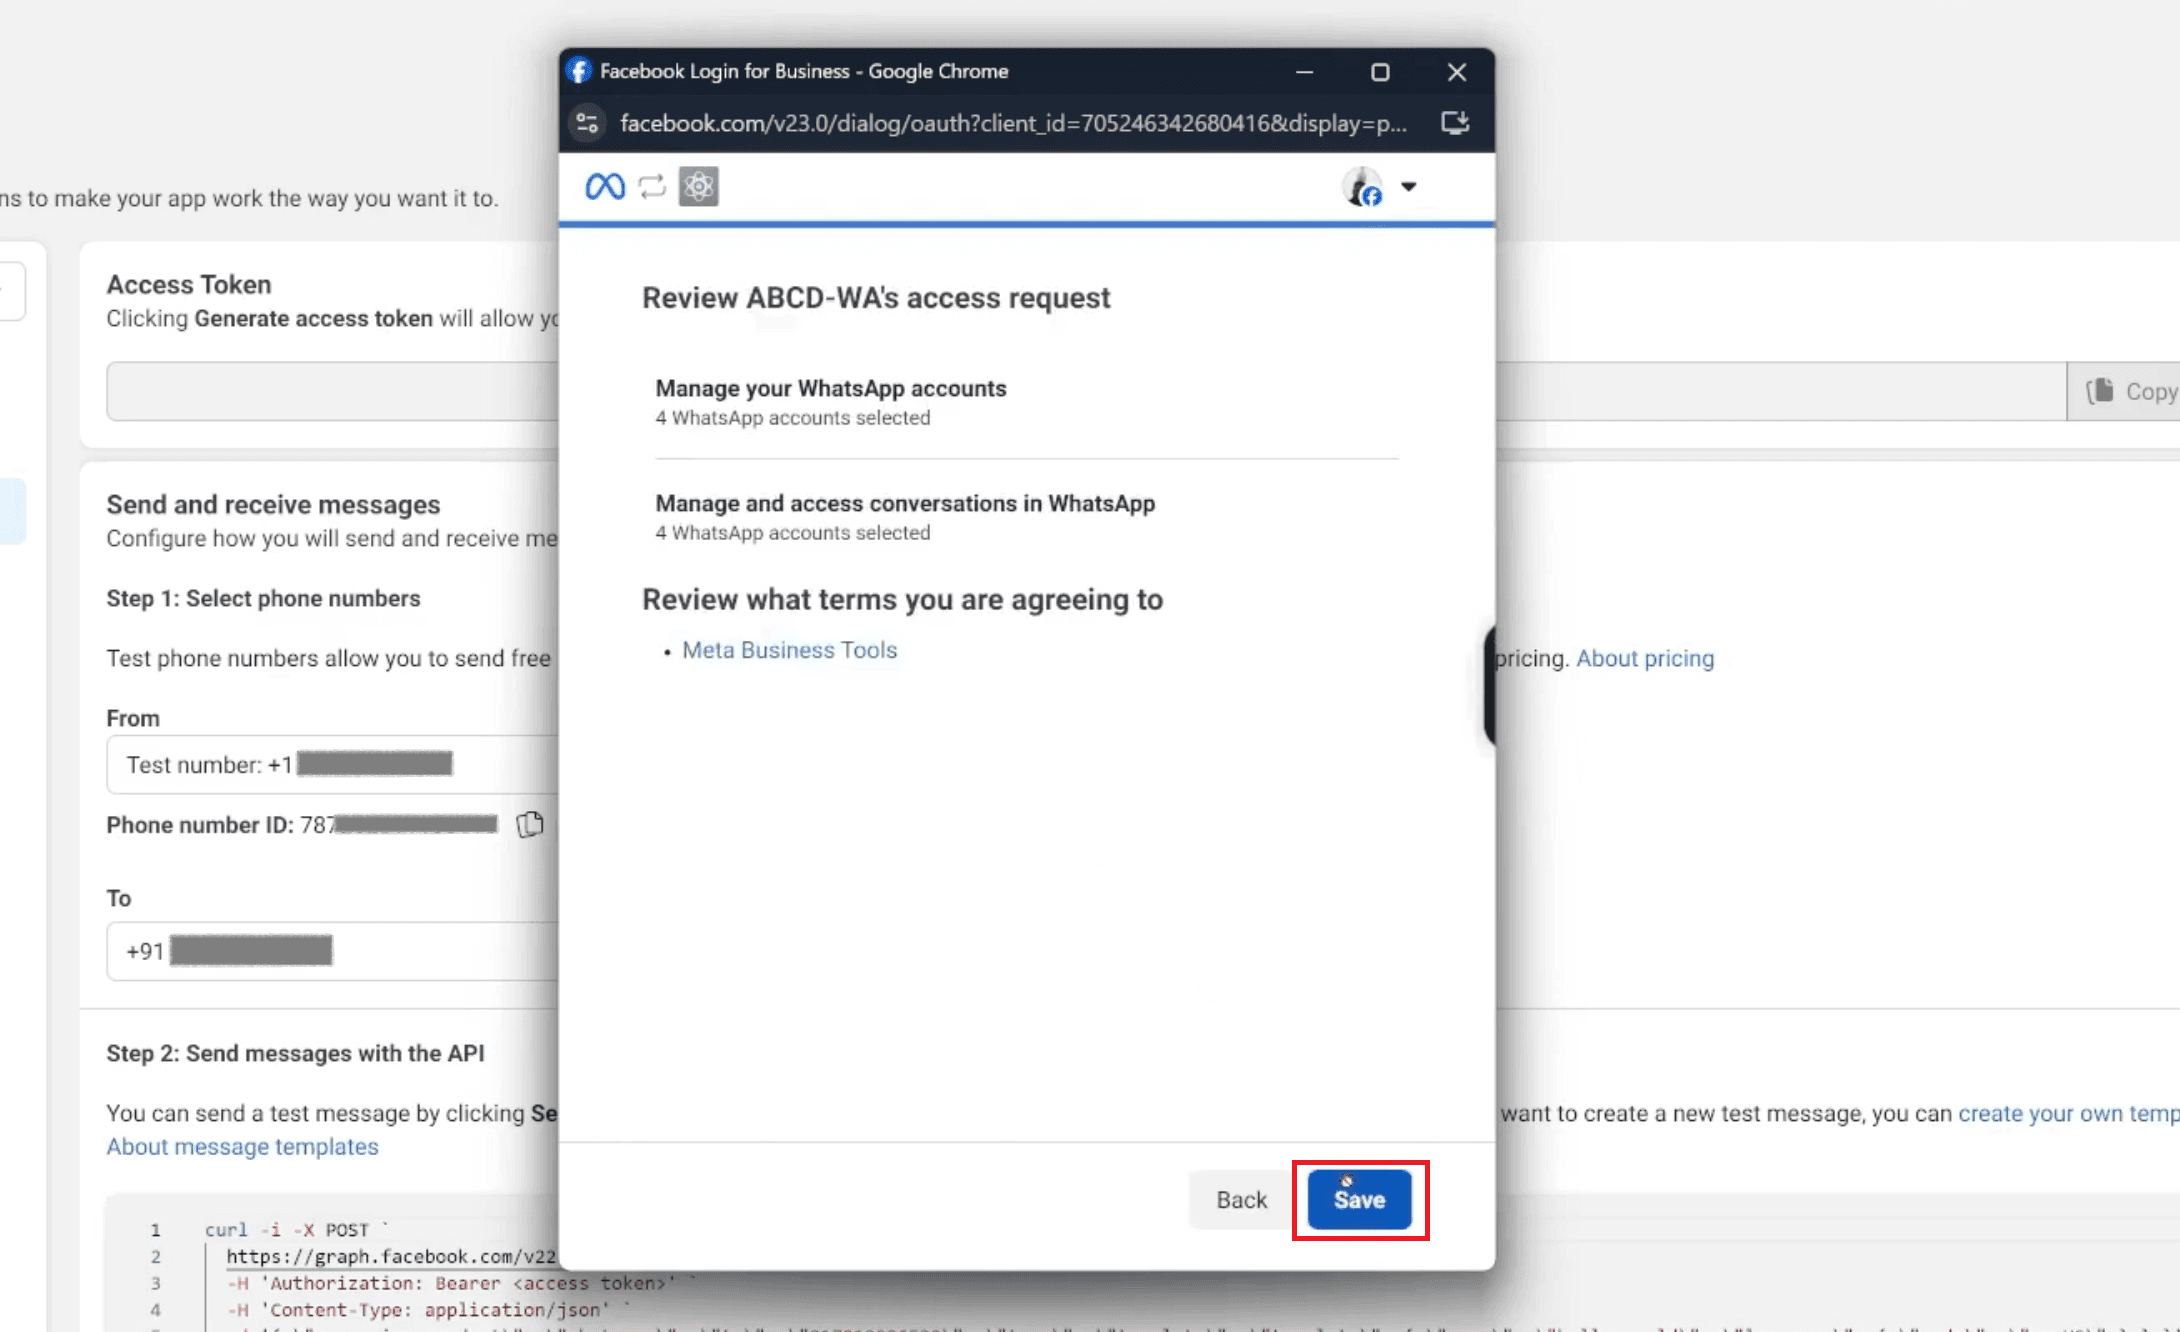
Review the access request and terms, then click Save. The temporary token will now be visible on the API Setup page and is suitable for initial testing.
Before proceeding to n8n, it's a good practice to perform a quick test to confirm that your WhatsApp Business Cloud API setup is functional and that your credentials are valid.
Testing Your WhatsApp API Connection:
From your app's dashboard (specifically the WhatsApp section), look for the feature to “Send test message”.
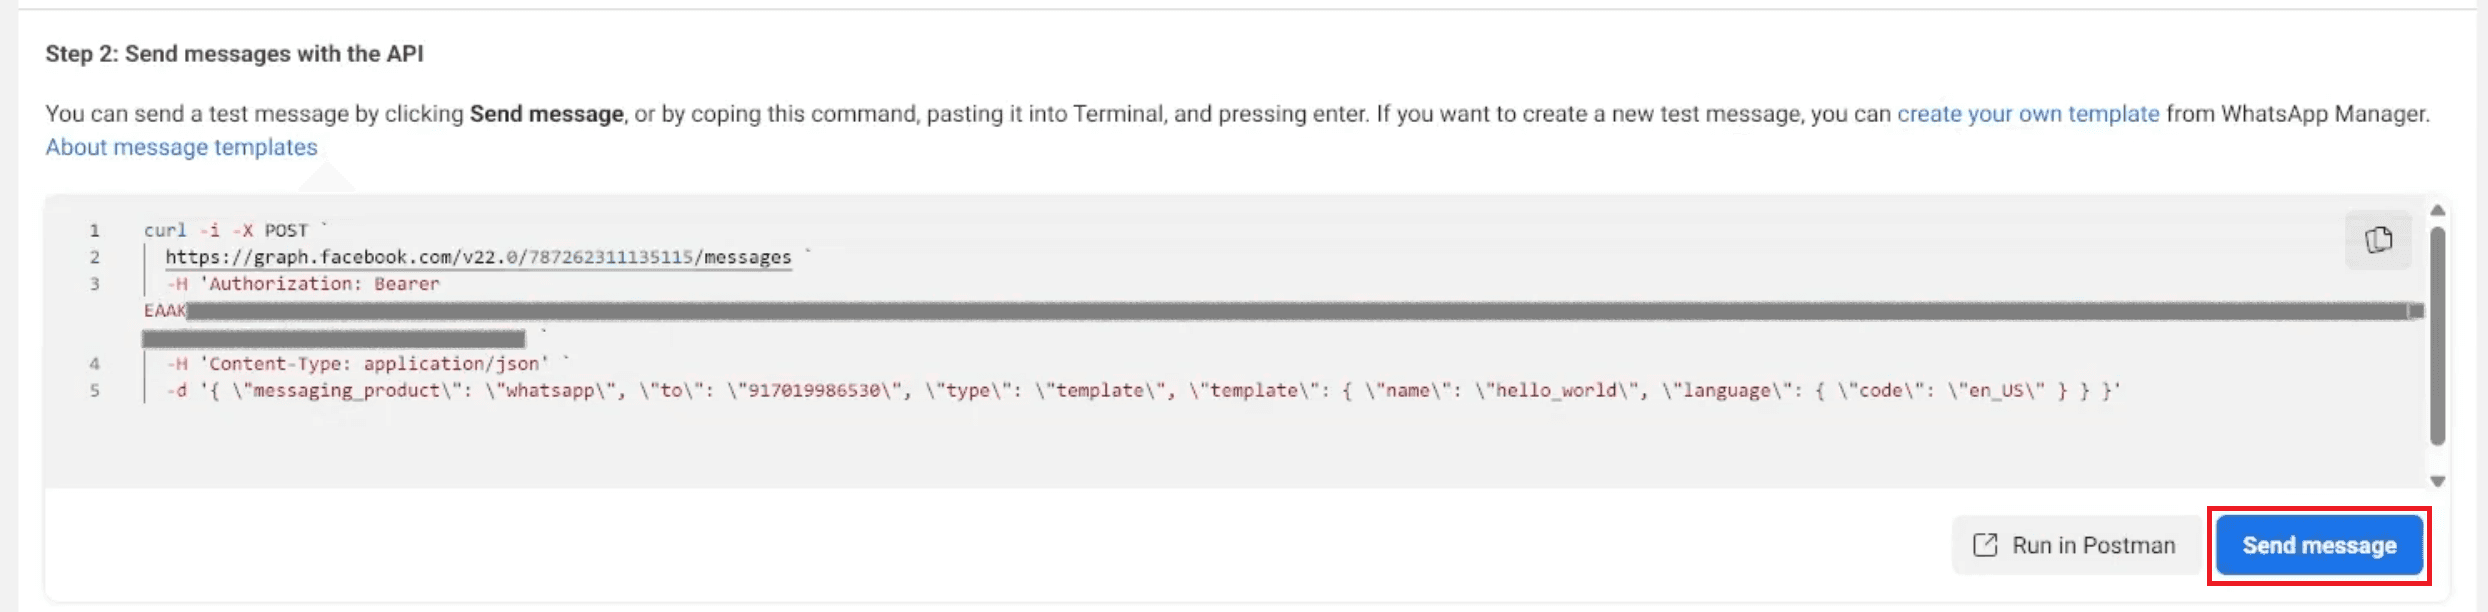
Use this option, which is usually preconfigured with the temporary access token you just generated.
If you set everything up correctly and connect the API properly, you will get a sample message. This message will arrive on the phone number you registered and verified earlier. This success confirms your Meta setup is ready for n8n.
Step 6: Locate App ID (Client ID) and App Secret (Client Secret)
Although the System User Token handles most runtime authentication for the Cloud API, you still need your App ID and App Secret for certain configurations, such as Webhook verification or if you need to use the older Business Management API endpoints.
6.1 Locate App IDs:
To find your app’s core identifiers, navigate away from the WhatsApp sections and go to App Settings.
Select the Basic section.

Your App ID directly corresponds to your Client ID for OAuth purposes.

To reveal your Client Secret (App Secret), you must click the “Show” button next to the encrypted field. It is crucial to keep both of these securely stored, as they are fundamental for authenticating your n8n connection. Copy and save these IDs somewhere for future reference.
Step 7: Create and Assign System User for Production
The System User is the secure, non-human account representing your n8n instance. Creating this user in Meta Business Settings and assigning it to your WhatsApp assets is the mandatory step before generating the permanent token.
7.1 Create System User
Navigate to Business Settings: Go to Meta Business Settings and find the System users section under Users.
Add System User: Click the Add button.
Configure User: In the pop-up, enter a name for the System User (e.g., "Ritesh Test").
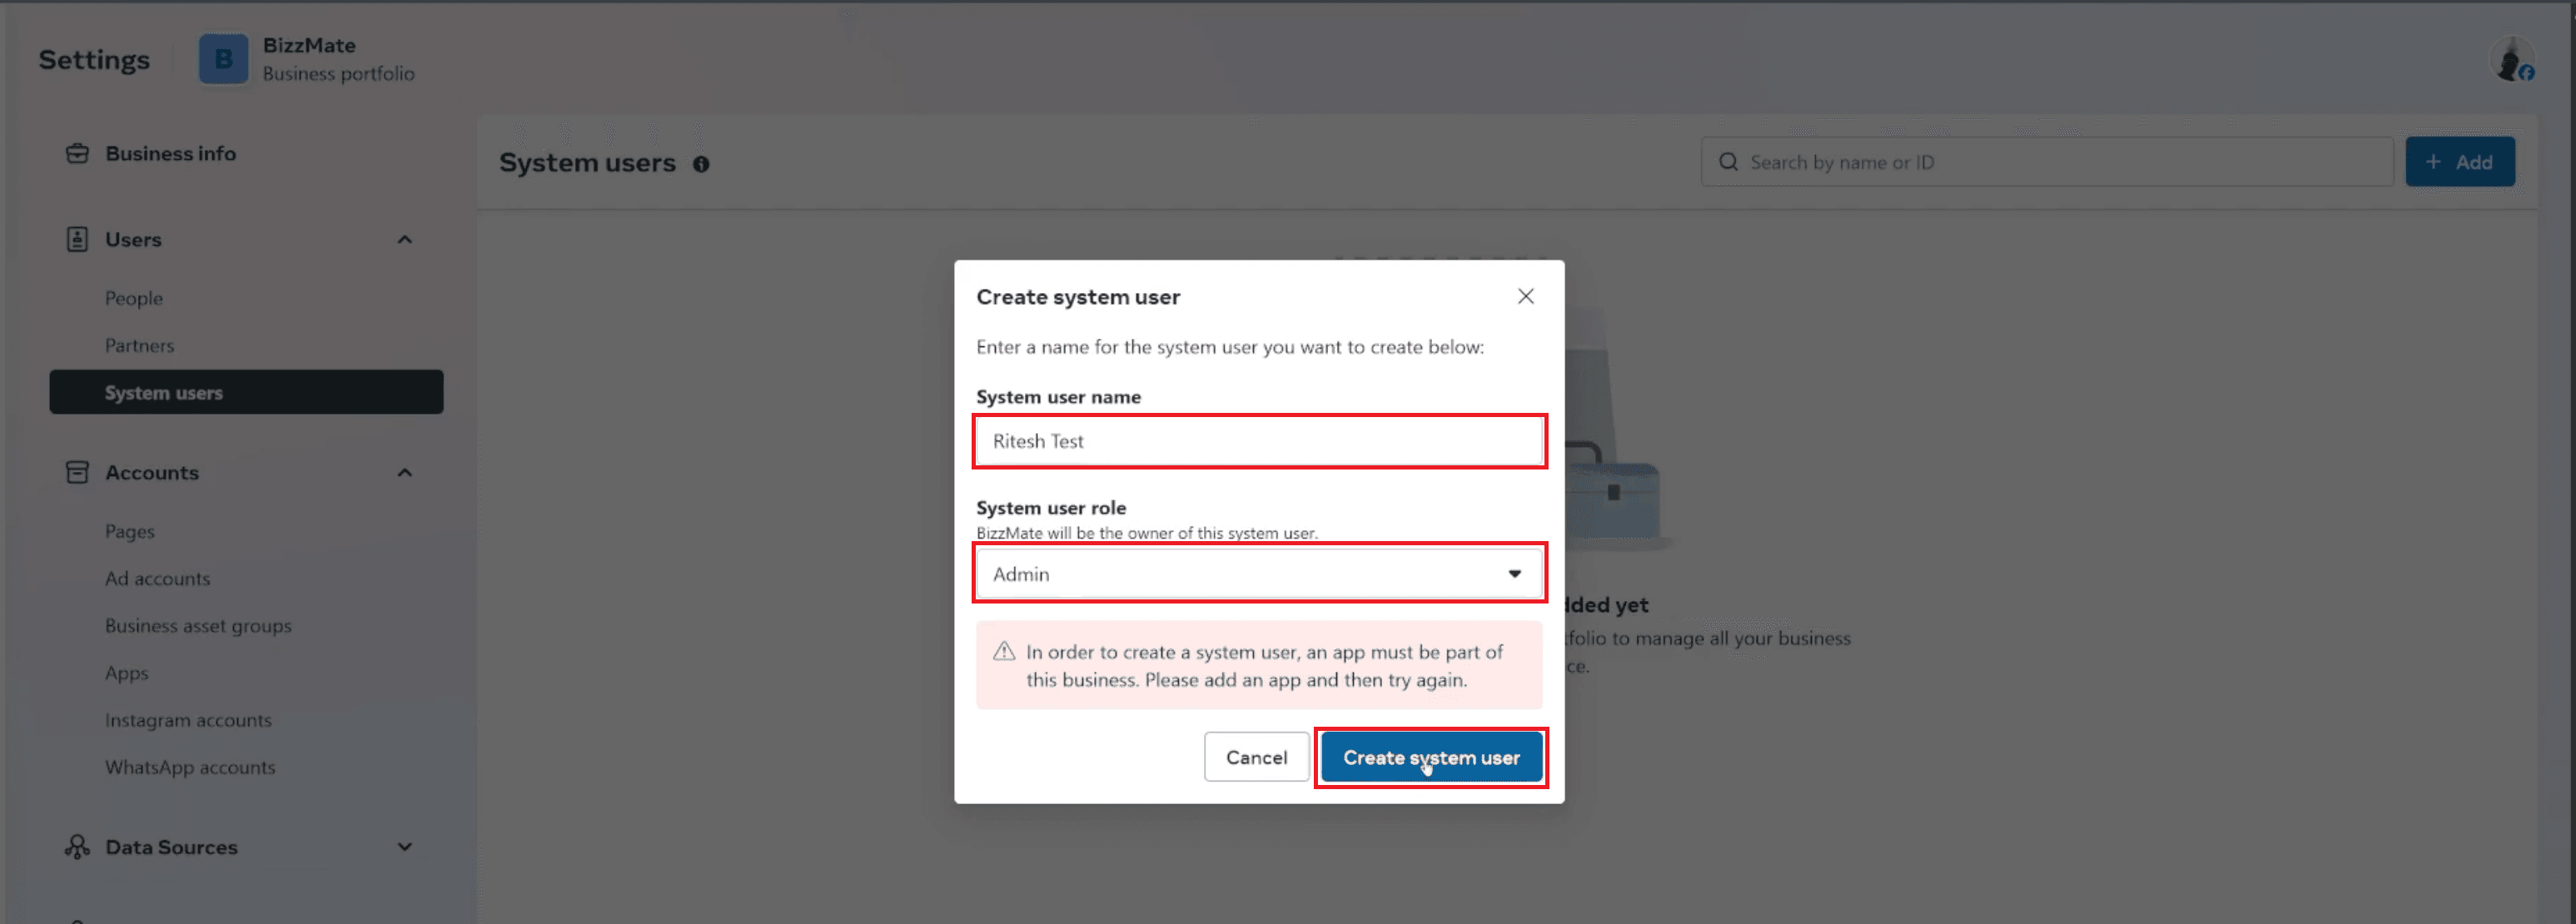
Set the System user role to Admin for full control over the necessary API functions.
Click Create system user.
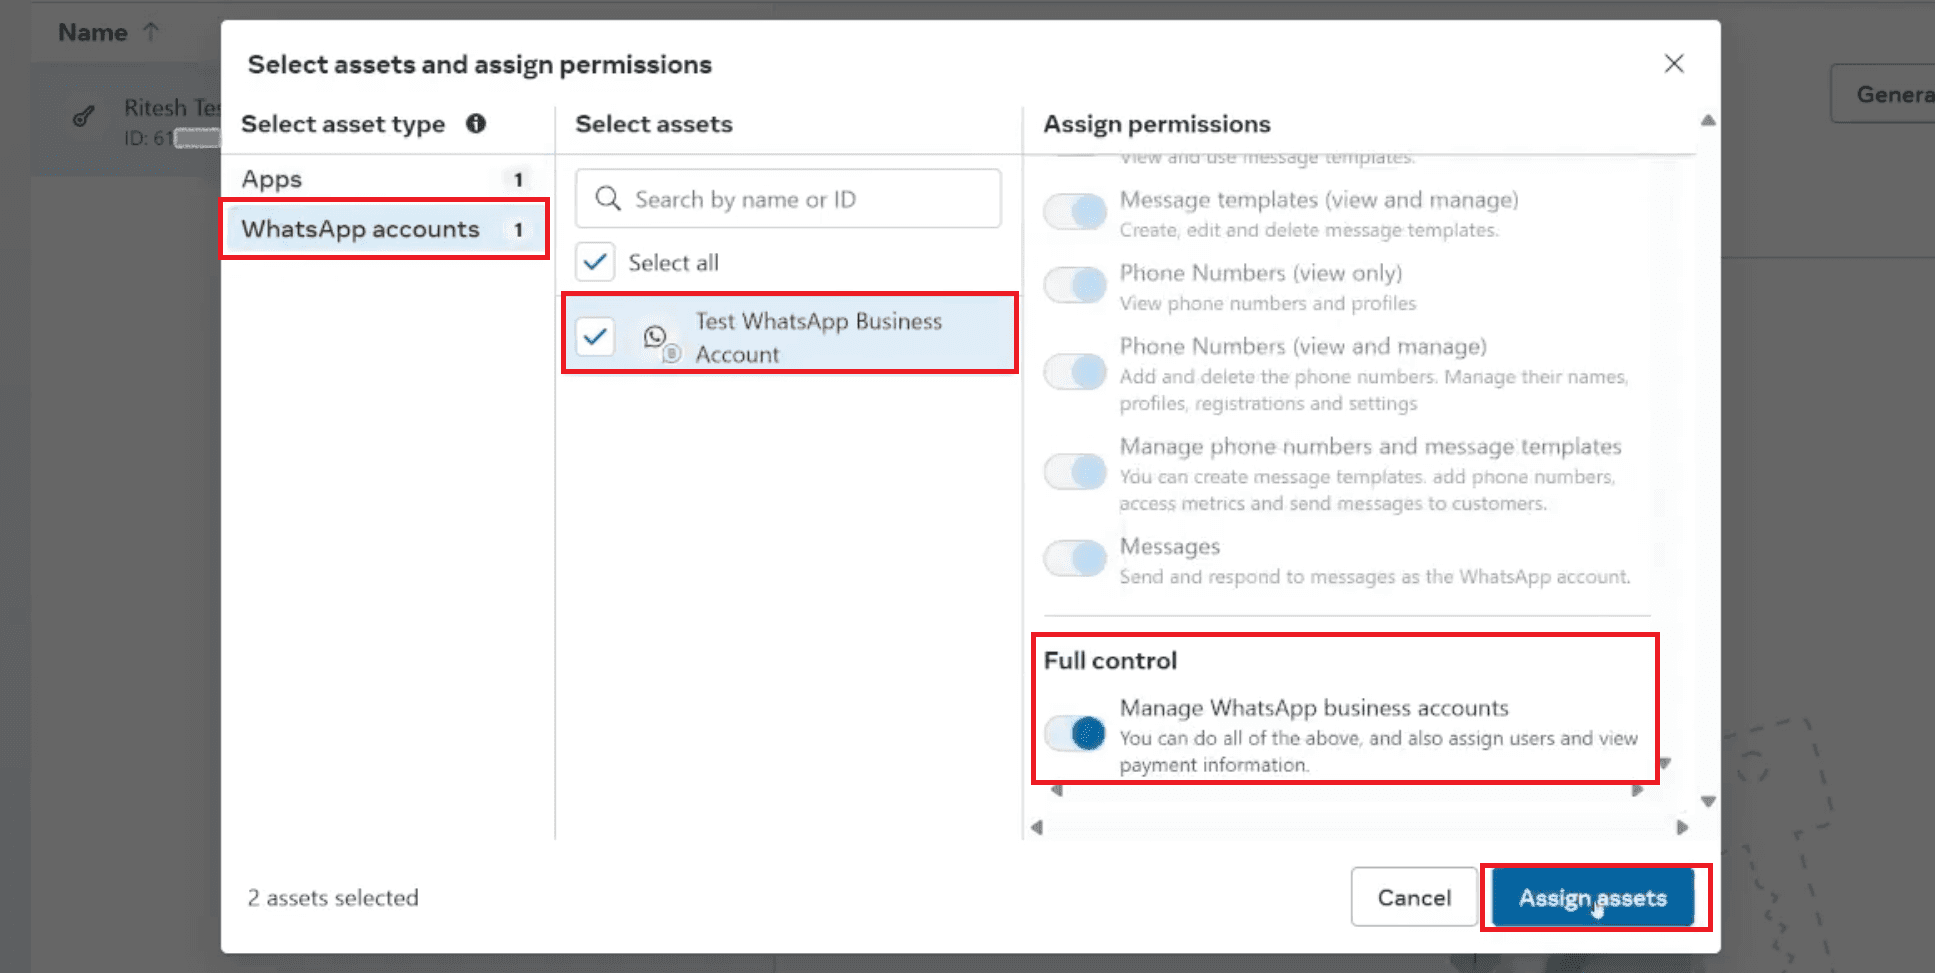
7.2 Assign Assets (App and WhatsApp Account)
After creation, you must grant this System User access to your application and the WhatsApp Business Account it needs to manage.
Initiate Assignment: Select the newly created System User in the list (e.g., "Ritesh Test"). Click the Assign assets button.
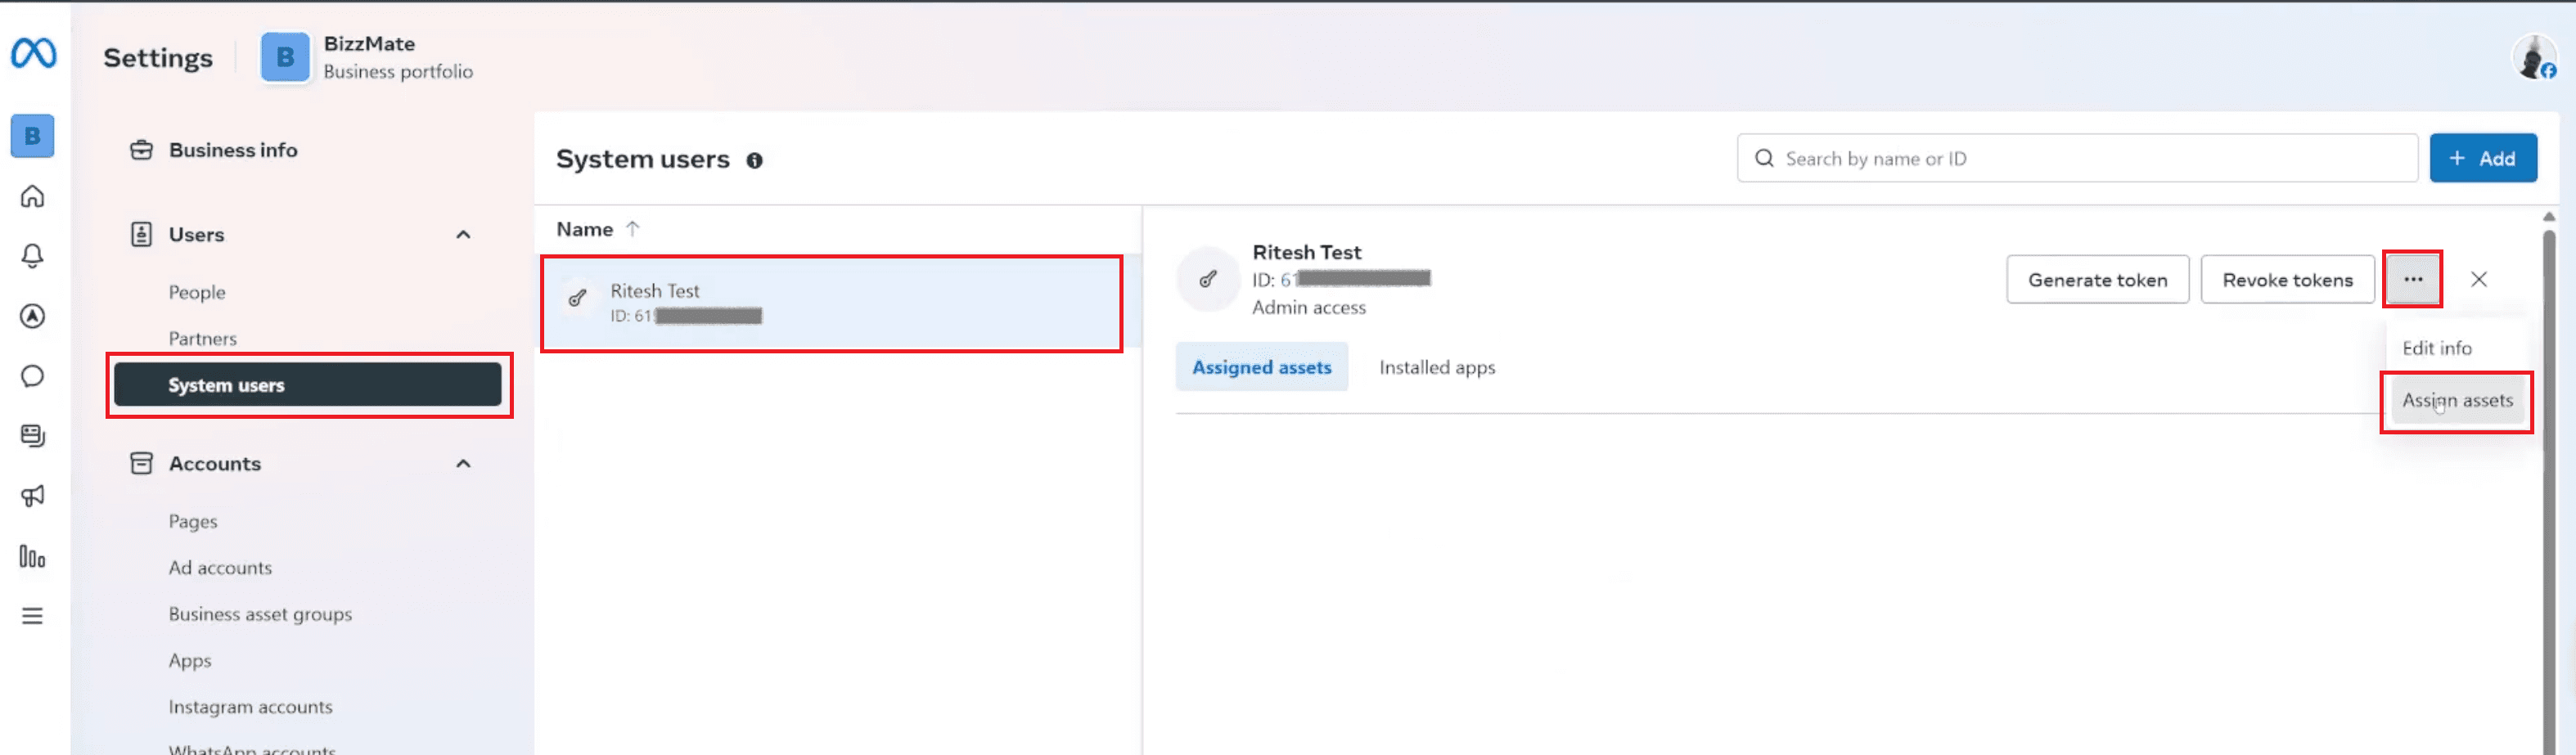
Select Asset Type: In the pop-up, locate and click on Apps under Select asset type.
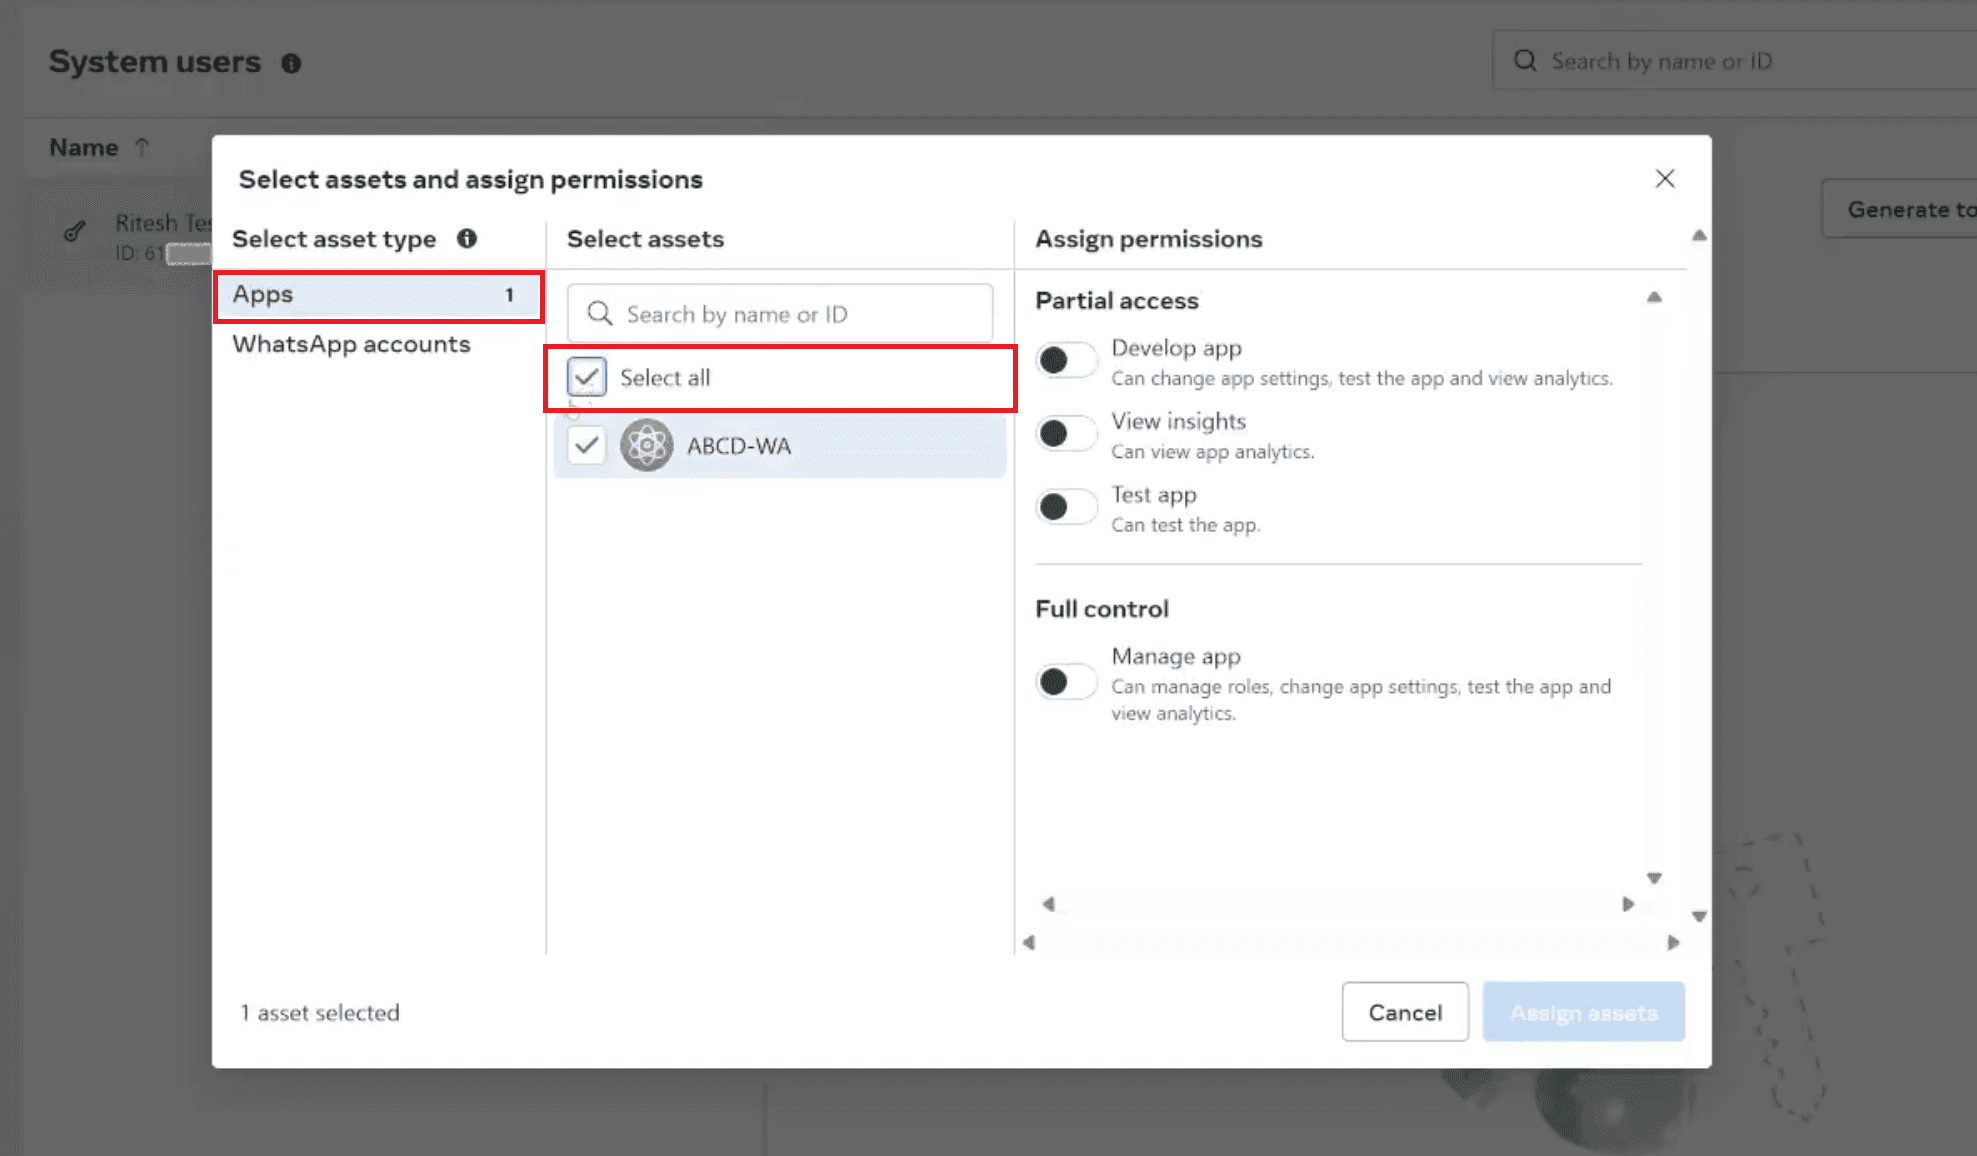
Assign App Control: Select your WhatsApp app (e.g., "ABCD-WA"). Under Assign permissions, ensure you grant Full control (Manage app) for your app.
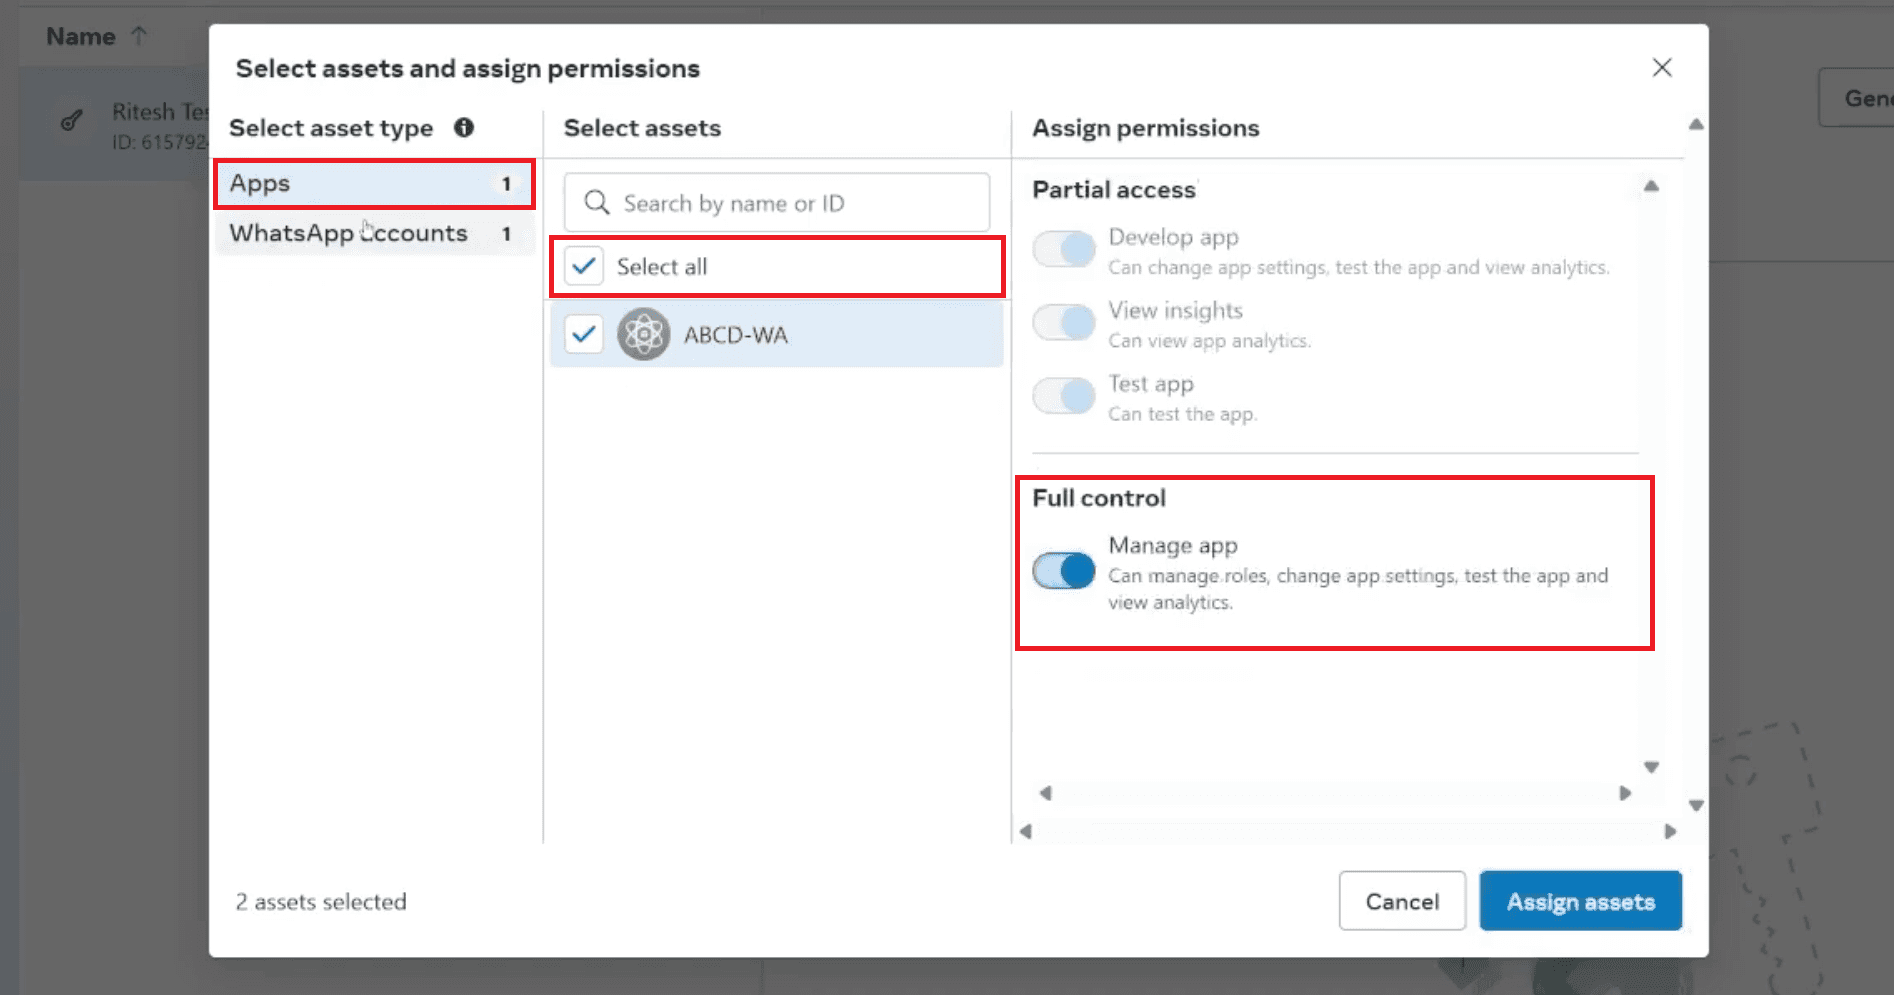
Select WhatsApp Account Asset: Next, click on WhatsApp accounts under Select asset type.
Assign WABA Control: Select your Test WhatsApp Business Account from the list.
Under Full control, ensure the toggle is set to Manage WhatsApp business accounts.
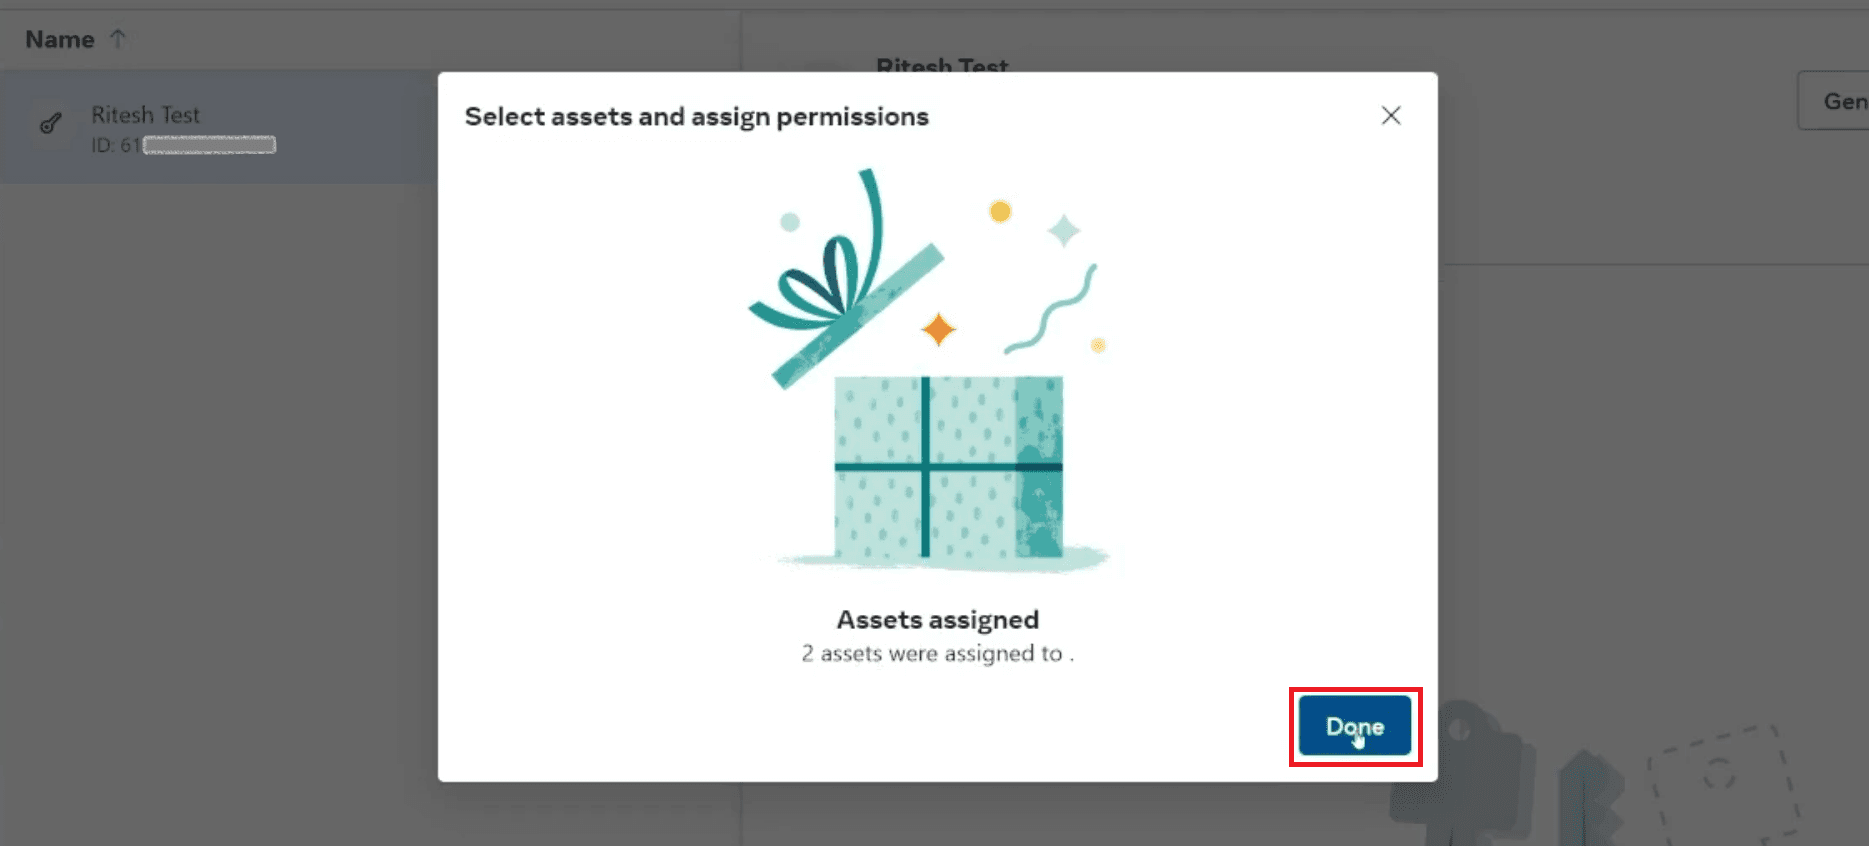
Finalize Assignment: Click the blue Assign assets button at the bottom right.
A confirmation pop-up will appear ("Assets assigned"). Click Done.
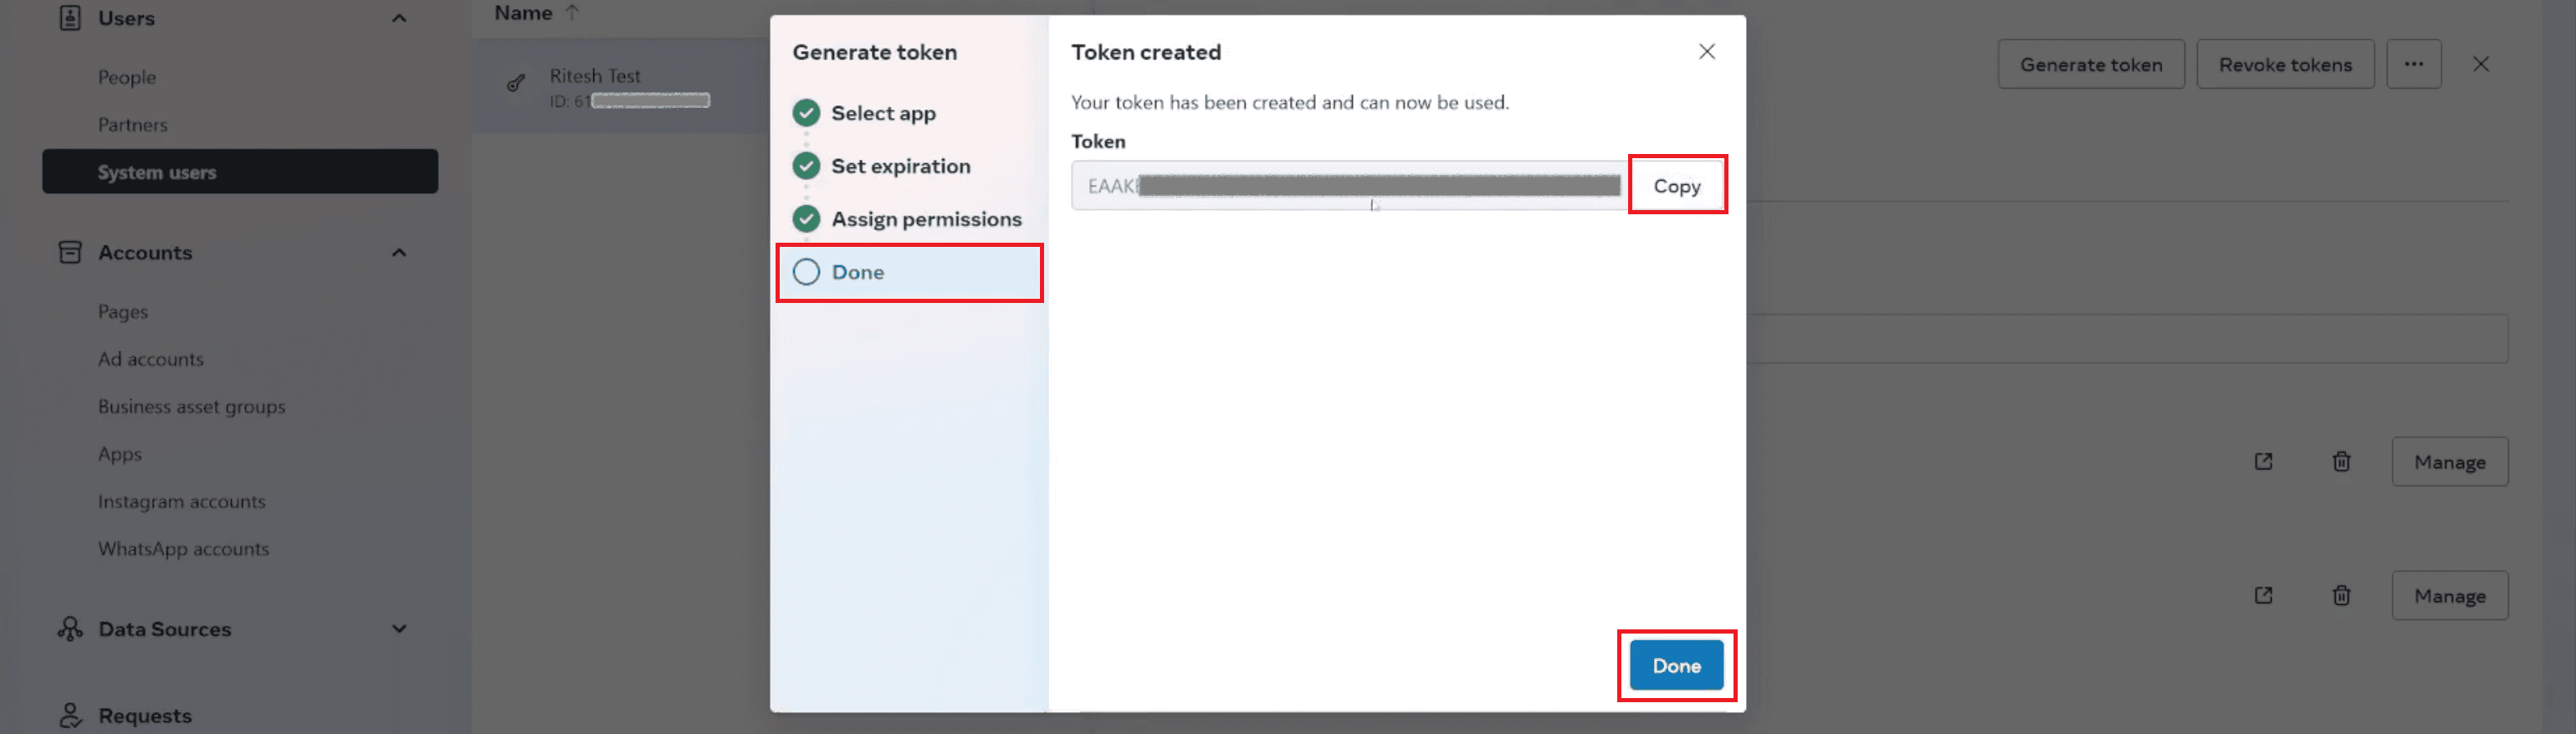
Step 8: Generate Permanent Access Token
The final and most critical step for production is replacing the temporary token with a permanent System User Token generated in Business Settings. This non-expiring key is mandatory for uninterrupted automated service from n8n.
Generate Permanent Token :
Return to the System Users page, select the user, and click Generate token.
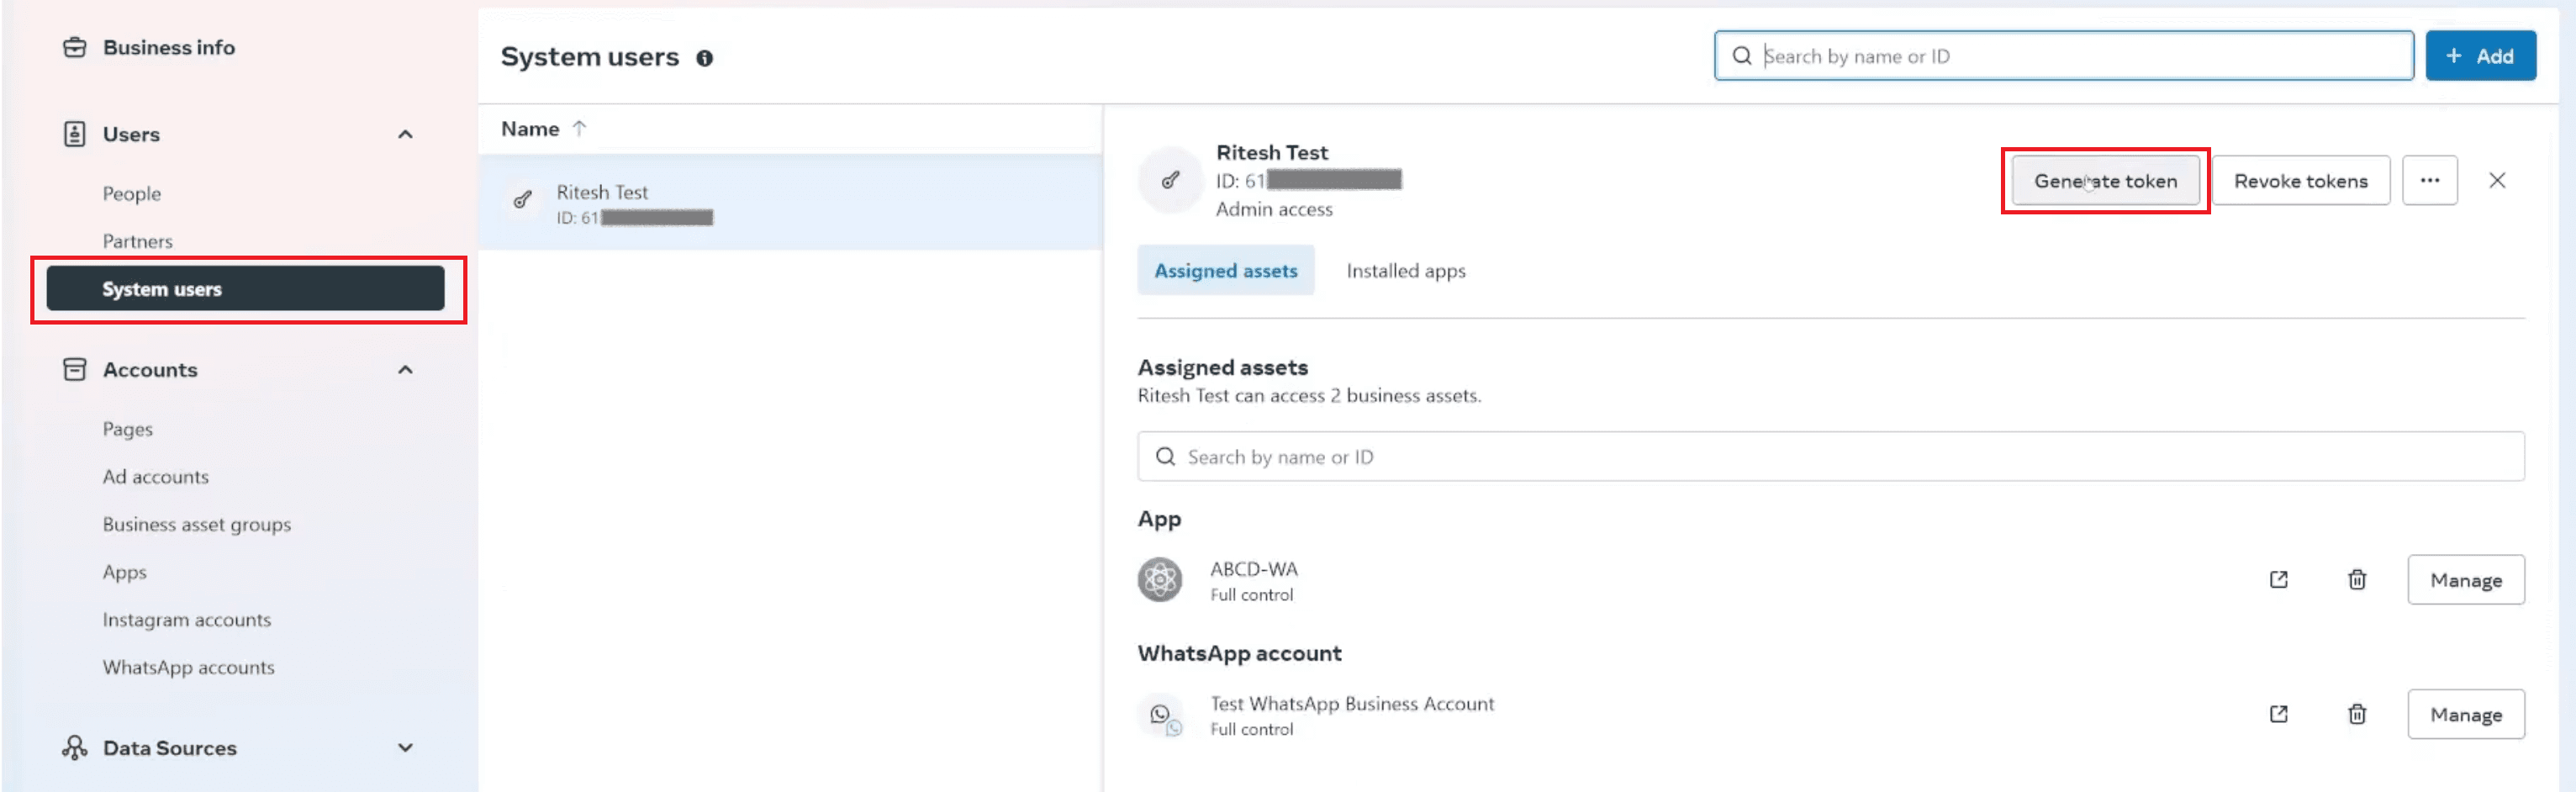
Select your app (e.g., "ABCD-WA").
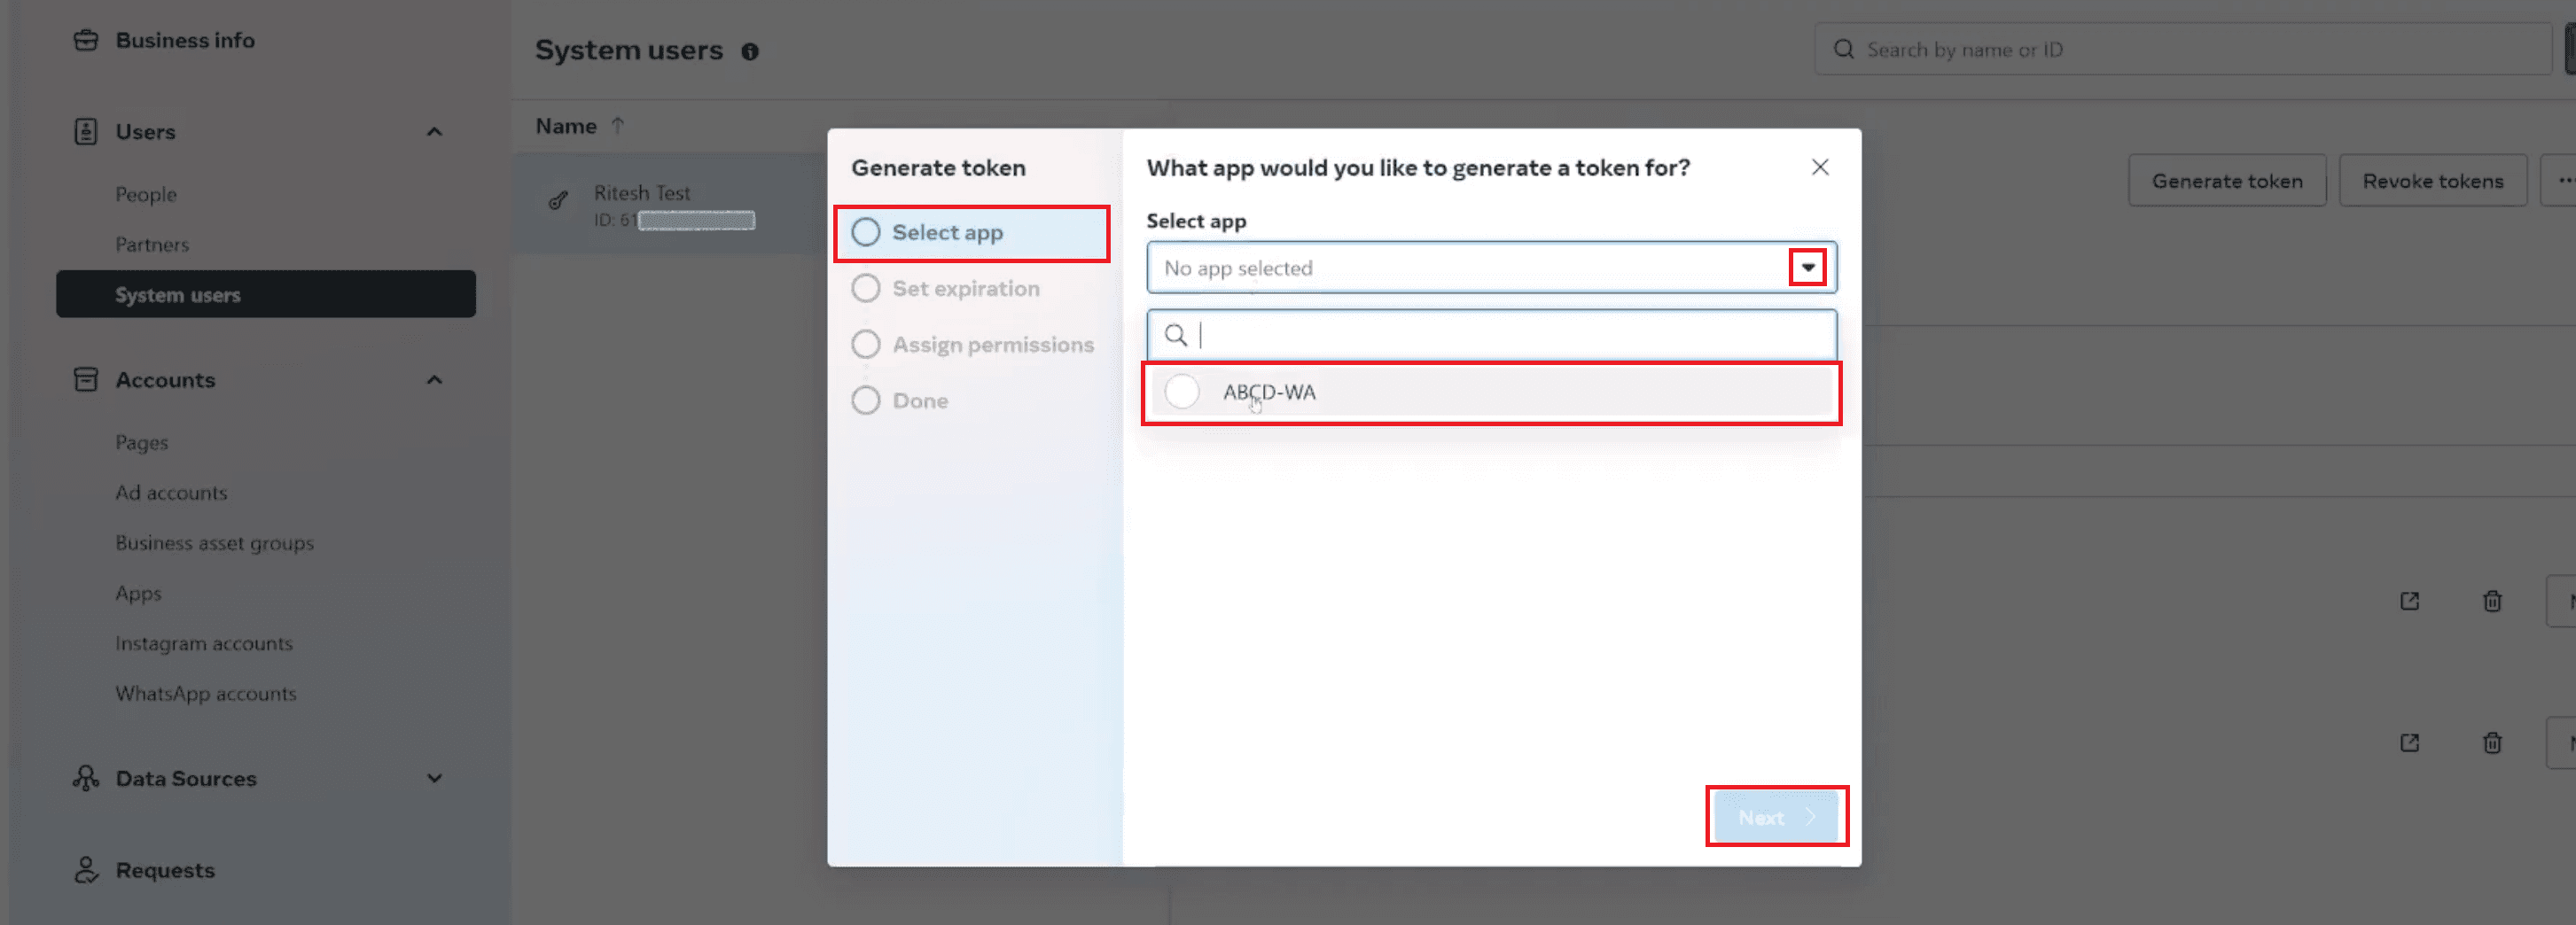
Set the Expiration to Never for reliable automation.
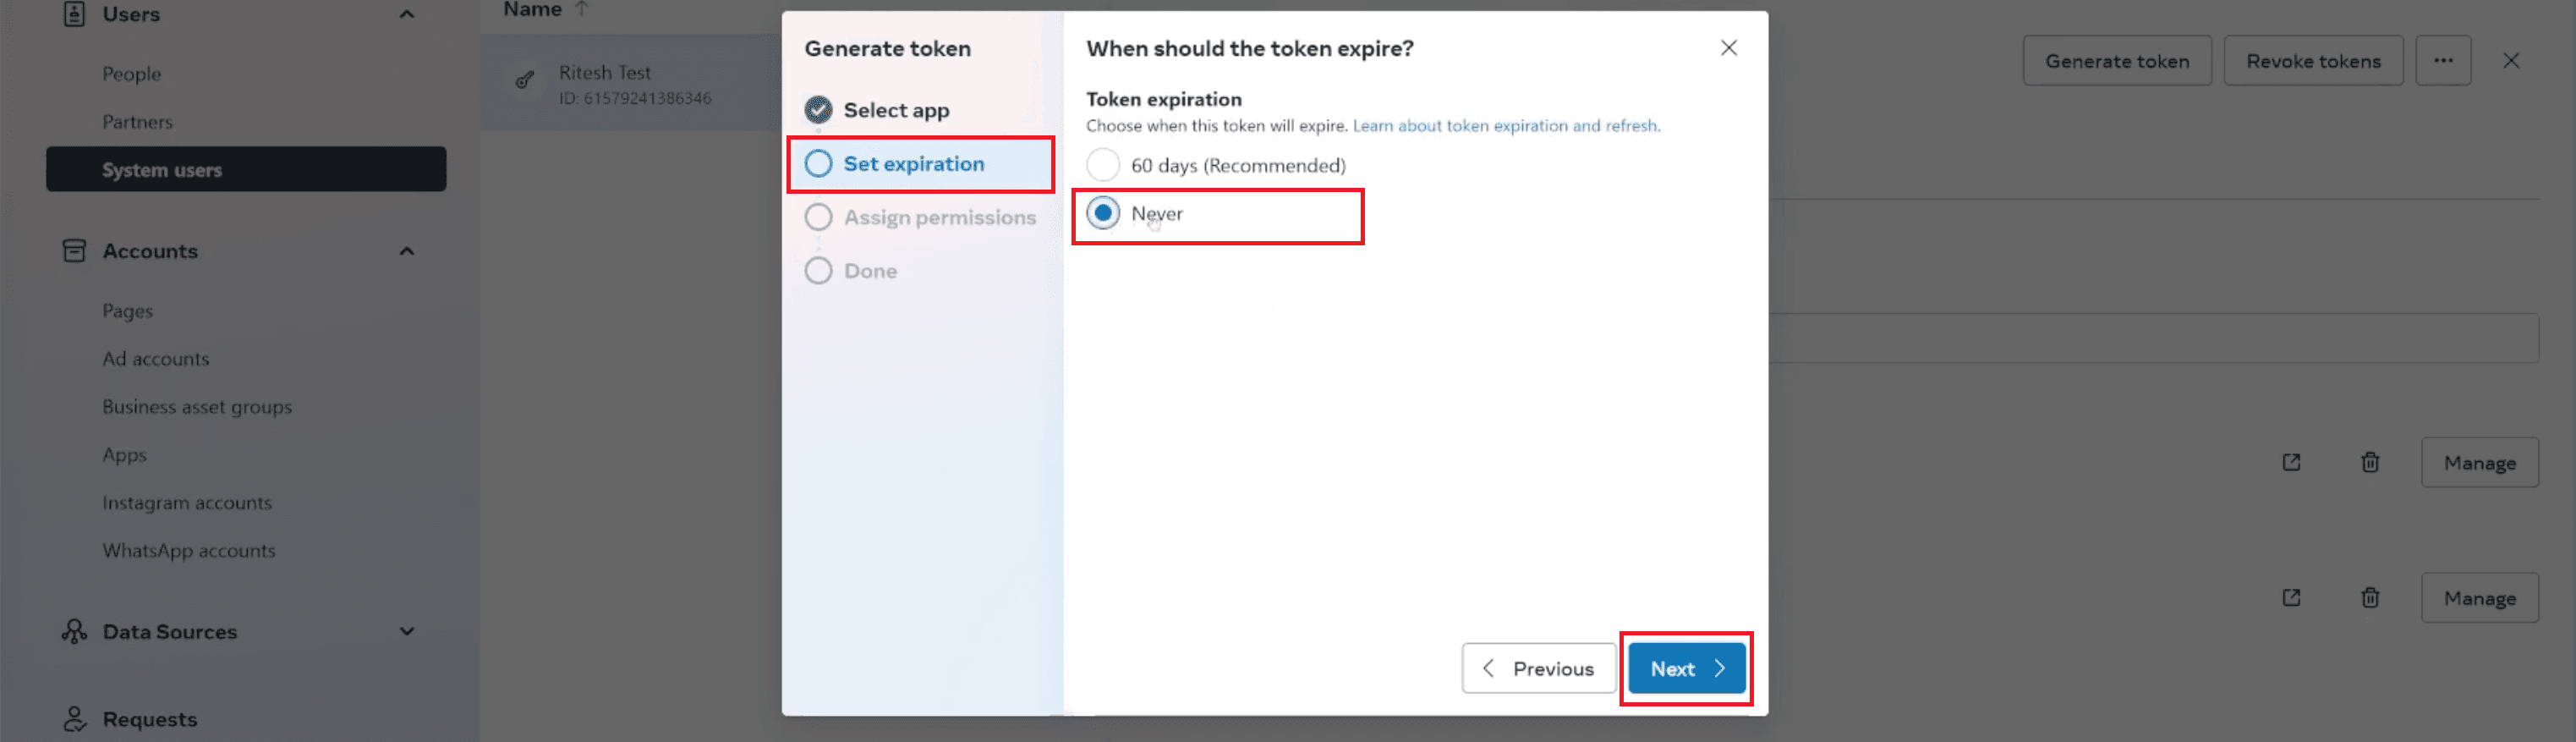
Click Assign permissions and select the required scopes, typically including
whatsapp_business_messagingandwhatsapp_business_management. Click Continue (or Next).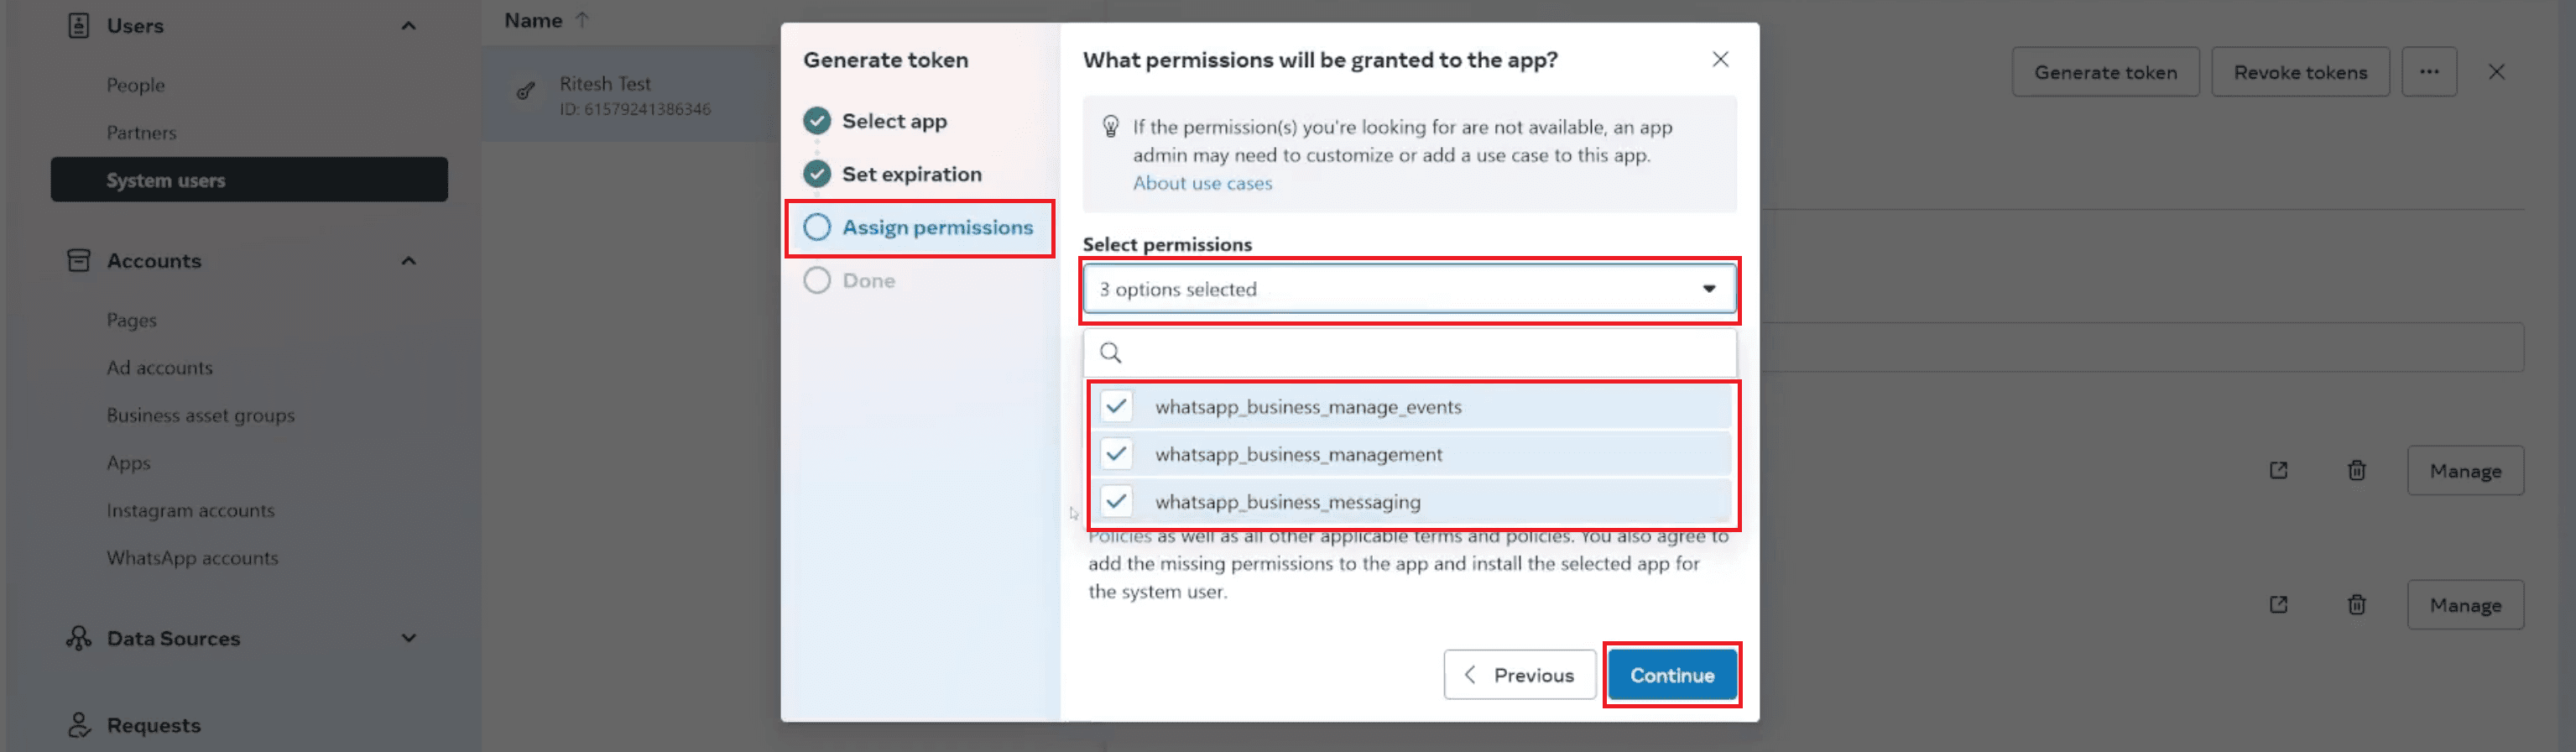
And immediately copy and save this permanent token. This is the key that authorizes all your n8n messages. Then click Done.
Connecting n8n to WhatsApp Business Cloud API: Next Steps
You have securely retrieved four key parameters: Client ID, Client Secret, Access Token, and Phone Number ID. Your n8n instance is now ready to connect directly with the WhatsApp Business Cloud API. The subsequent steps will involve configuring n8n nodes to leverage this robust connection.
What n8n Can Do with These Credentials
These credentials will allow you to set up and authenticate the “WhatsApp Business Cloud” nodes within n8n, enabling secure communication between your workflows and the WhatsApp Business API. Once these credentials are added, n8n can use them to perform automation tasks reliably and in real time. You'll be able to:
Use WhatsApp as a trigger: Automatically initiate workflows the moment a new message is received on your business number. This allows you to capture user inquiries instantly, start automated responses, route messages to the right team members, or kick off follow-up processes without manual intervention.
Use WhatsApp as an action: Send automated messages, notifications, or replies to users based on the logic you define within your workflows. This includes sending confirmation messages, sharing updates, delivering reminders, or responding intelligently depending on the data received.
This creates a wide range of possibilities for automated notifications, service messages, and real-time interactions. With these capabilities in place, you can efficiently manage all your WhatsApp-based workflows directly through your n8n automation system.
What are the Costs of WhatsApp Business Cloud API?
Understanding the pricing model for the WhatsApp Business Cloud API is crucial for budgeting your automation efforts. Meta generally charges per conversation, not per message, according to Meta’s Official WhatsApp Pricing Documentation. There are two main conversation types:
Business-initiated conversations: These start with a template message sent by your business (e.g., appointment reminders, delivery updates). There's usually a cost associated with each template.
User-initiated conversations: These begin when a user messages your business. You typically have a 24-hour window (the “customer service window”) to respond freely. Once this window closes, any subsequent message from your business needs to be a template message.
Pricing varies by country and is subject to Meta's current rates, as listed in Meta’s Country-Specific WhatsApp Rates. Additionally, n8n itself has pricing models (cloud subscription or self-hosted infrastructure costs), based on n8n’s Official Pricing Page. To get detailed and current information on WhatsApp Business API pricing, look at the official Meta for Developers documentation.
Common Troubleshooting Tips for n8n WhatsApp Setup
Even with a clear guide, you might encounter minor hurdles during the setup. Here are some common issues and their potential solutions:
"App Must Be Linked to Business" Error: As mentioned in Step 2, this simply means you need to create your app (Step 3) first, then return to create the system user.
Invalid Access Token: Double-check that you've copied the entire access token without any leading/trailing spaces. Ensure it hasn't expired (if you chose a 60-day expiry). If in doubt, generate a new token.
Incorrect Client ID/Secret: Verify these against your app's Basic settings in the Meta Developers Console. They are case-sensitive.
Phone Number Not Verified: Ensure your phone number has completed Meta's verification process. Messages won't send if the number is unverified.
n8n Node Connection Issues: Ensure your n8n instance can access Meta's API endpoints (check firewall rules if self-hosting). Verify that all credentials are correctly entered into the n8n “WhatsApp Business Cloud” node.
Message Sending Failures: Check Meta's API logs (in your app dashboard) for specific error codes. Common reasons include unapproved message templates or attempts to send non-template messages outside the 24-hour customer service window.
As your automation grows, you may also want to review how often messages are successfully delivered and how users respond, so you can improve your flows over time.
Advanced n8n WhatsApp Automation Use Cases & Ideas
Once your basic n8n to WhatsApp integration is live, the possibilities for advanced automation are vast. Think beyond simple messages and consider how you can enhance your workflows:
Basic Chatbots and Auto-Replies: Build simple WhatsApp automations that send predefined answers to common questions or auto-reply when messages arrive outside business hours.
Order & Delivery Updates: Automate sending order confirmations, shipping updates, and delivery notifications through WhatsApp.
Lead Follow-up Flows: Use WhatsApp messages to follow up with leads captured via forms or other entry points, and guide them through the next steps.
Appointment Reminders: Send automated reminders for appointments, consultations, or upcoming events.
Feedback Collection: After a service interaction, send a WhatsApp message asking for quick feedback or a rating.
Internal Alerts: Set up alerts for your team on WhatsApp for specific events such as new leads, form submissions, or errors in your systems.
n8n is flexible. It lets you connect WhatsApp with many other services. You can create custom automation flows for your specific business processes.
You have set up your Meta Business Account and stored the four key credentials. Now you are ready to add WhatsApp communication directly into your n8n automations. While the setup process may seem intricate at first, taking these steps one by one makes it manageable. Once connected, WhatsApp automation can become a powerful tool in your business’s workflow landscape, saving time and improving how you communicate with your users.