How to Build a YouTube Video Summarizer in n8n
January 20, 2026

Key Pointers
Visuals Over Text: Replace boring text blocks with interactive visual widgets.
Seamless Automation: Connect OpenAI and n8n to automate the entire workflow.
Rich Data: Instantly grab video views, likes, thumbnails, and summaries.
Dual Display: Show a beautiful stats card alongside a clear text summary.
Low Code: Build professional, app-like AI tools with minimal coding.
Table Of Contents:
Introduction
Why Visual Widgets Improve AI Workflows
Video Tutorial: Create a YouTube Video Summarizer
Step-by-Step Guide to Building Your Summarizer
Step 1: Initialize Your Workflow and Variables
Step 2: Integrate n8n for Data Extraction
Step 3: Configure the Summarizer Agent
Step 4: Create a Custom Visual Widget
Step 5: Save Extracted Data (Set State)
Step 6: Finalizing the Output with a Text Summary and Widgets
Security and Advanced Integrations
OpenAI Agent Builder vs. Other Tools
Practical Applications for this Agent
Conclusion
FAQ
Creating interactive AI tools is becoming easier and more accessible. In this guide, we will outline exactly how to build a fully automated YouTube video summarizer using the OpenAI agent builder and n8n integration.
This project goes beyond simple text. We will create a visually rich experience that organises video content into interactive cards and creates structured summaries. By the end of this tutorial, you will have a working agent workflow that takes video links, extracts data, and presents it beautifully—all with minimal coding.
Why Visual Widgets Improve AI Workflows
The true power of the OpenAI agent builder lies in its unique ability to use widgets. Most traditional summarisation tools output a dense block of text that can be hard to read.
Widgets provide an elegant, visual interface. Instead of just reading text, users can see analytics, AI-generated summary cards, and real-time statistics. This makes the tool ideal for projects like a video summariser, intelligent dashboards, or a YouTube Q&A agent. Each widget blends user experience with conversational AI, allowing you to design workflows that don't just inform but actively interact with the user.
Video Tutorial: Create a YouTube Video Summarizer
Step-by-Step Guide to Building Your Summarizer
Follow these steps to start your workflow, integrate data, and visualise the results.
Step 1: Start Your Workflow and Variables
Start by creating a new project in the OpenAI agent builder. You can name it "Video Summariser with Widget". The primary goal of this agent is to accept a video URL as input and automatically generate a summary, display the thumbnail, and show metadata like view counts.
To make this work, you need to define the inputs and storage for your data. First, set your input variable to input_as_text (String) So the agent can accept the YouTube link. Next, create specific state variables to hold the extracted data.
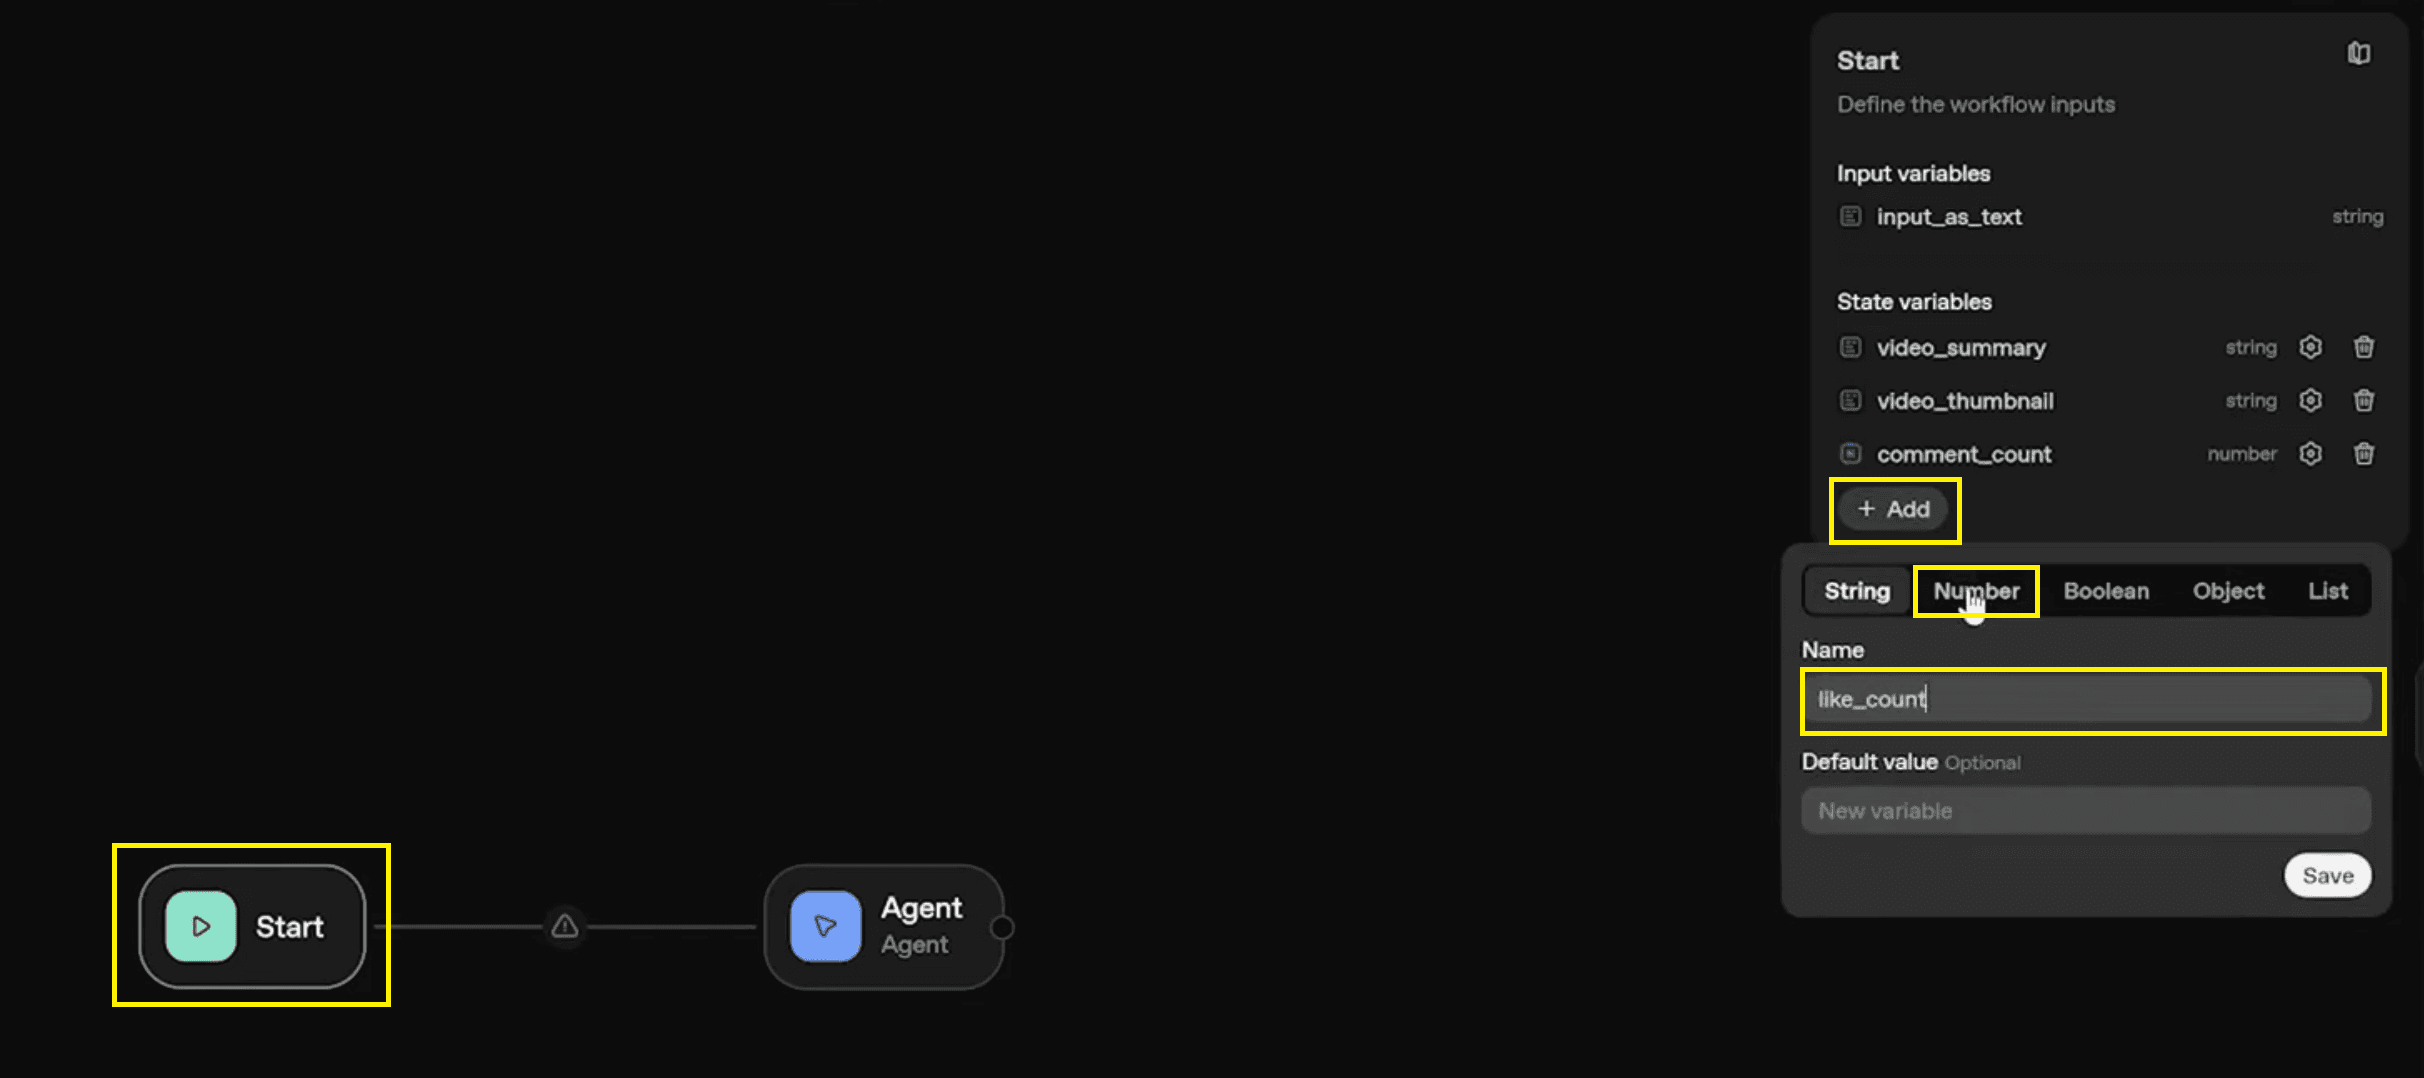
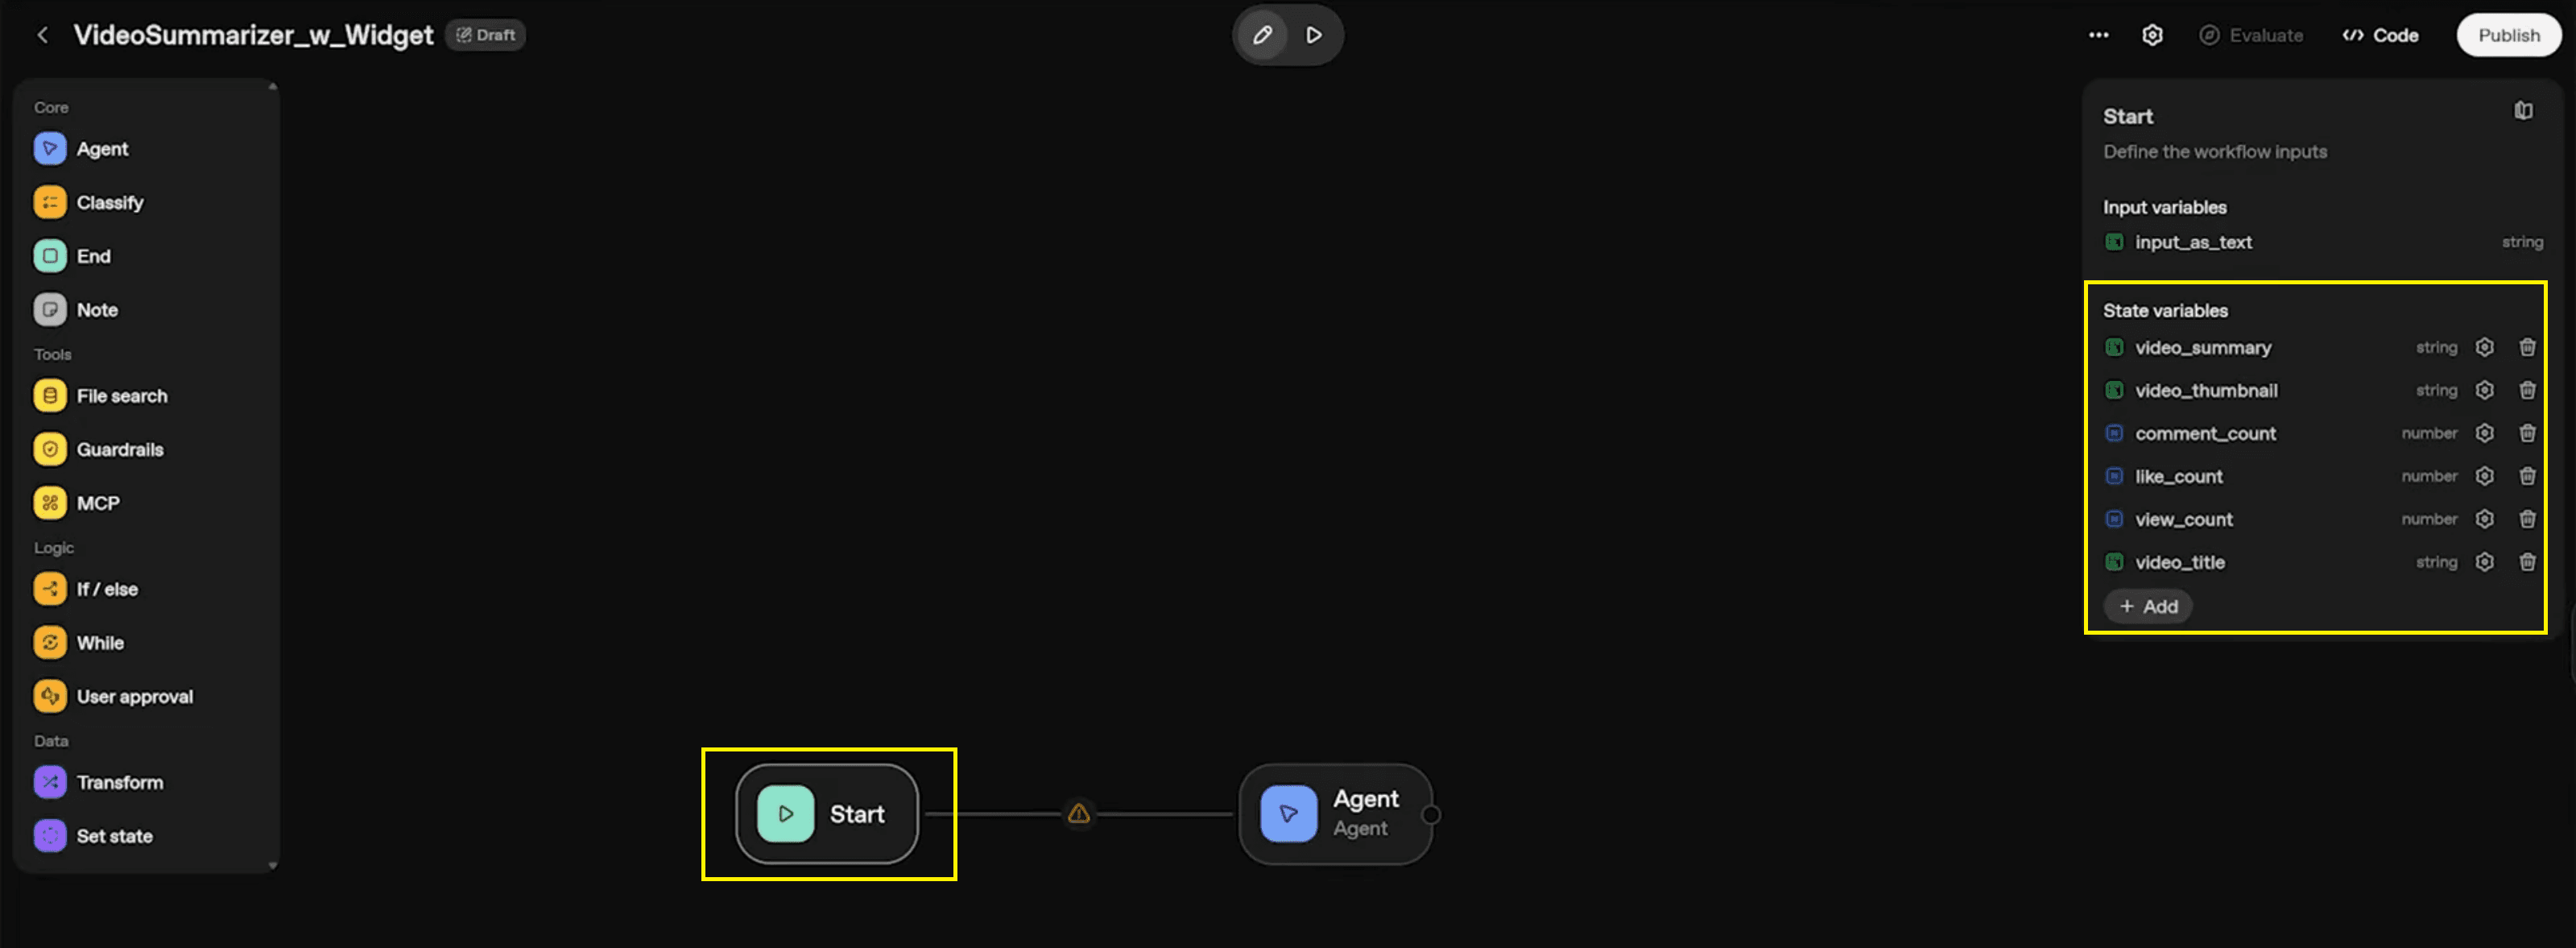
As seen in the workflow configuration, these variables act as containers for the information we pull from YouTube:
video_summary: (String) Stores the final automatic AI summary.
video_thumbnail: (String) The direct link to the video’s image.
comment_count: (Number) The total number of comments on the video.
like_count: (Number) The number of likes the video has received.
view_count: (Number) The total number of times the video has been watched.
video_title: (String) The actual name of the video.
Step 2: Integrate n8n for Data Extraction
To get the actual data, we will use an n8n integration. This bridges the gap between your agent and external services. We need to set up MCP servers (Model Context Protocol) to handle the heavy lifting of fetching data.
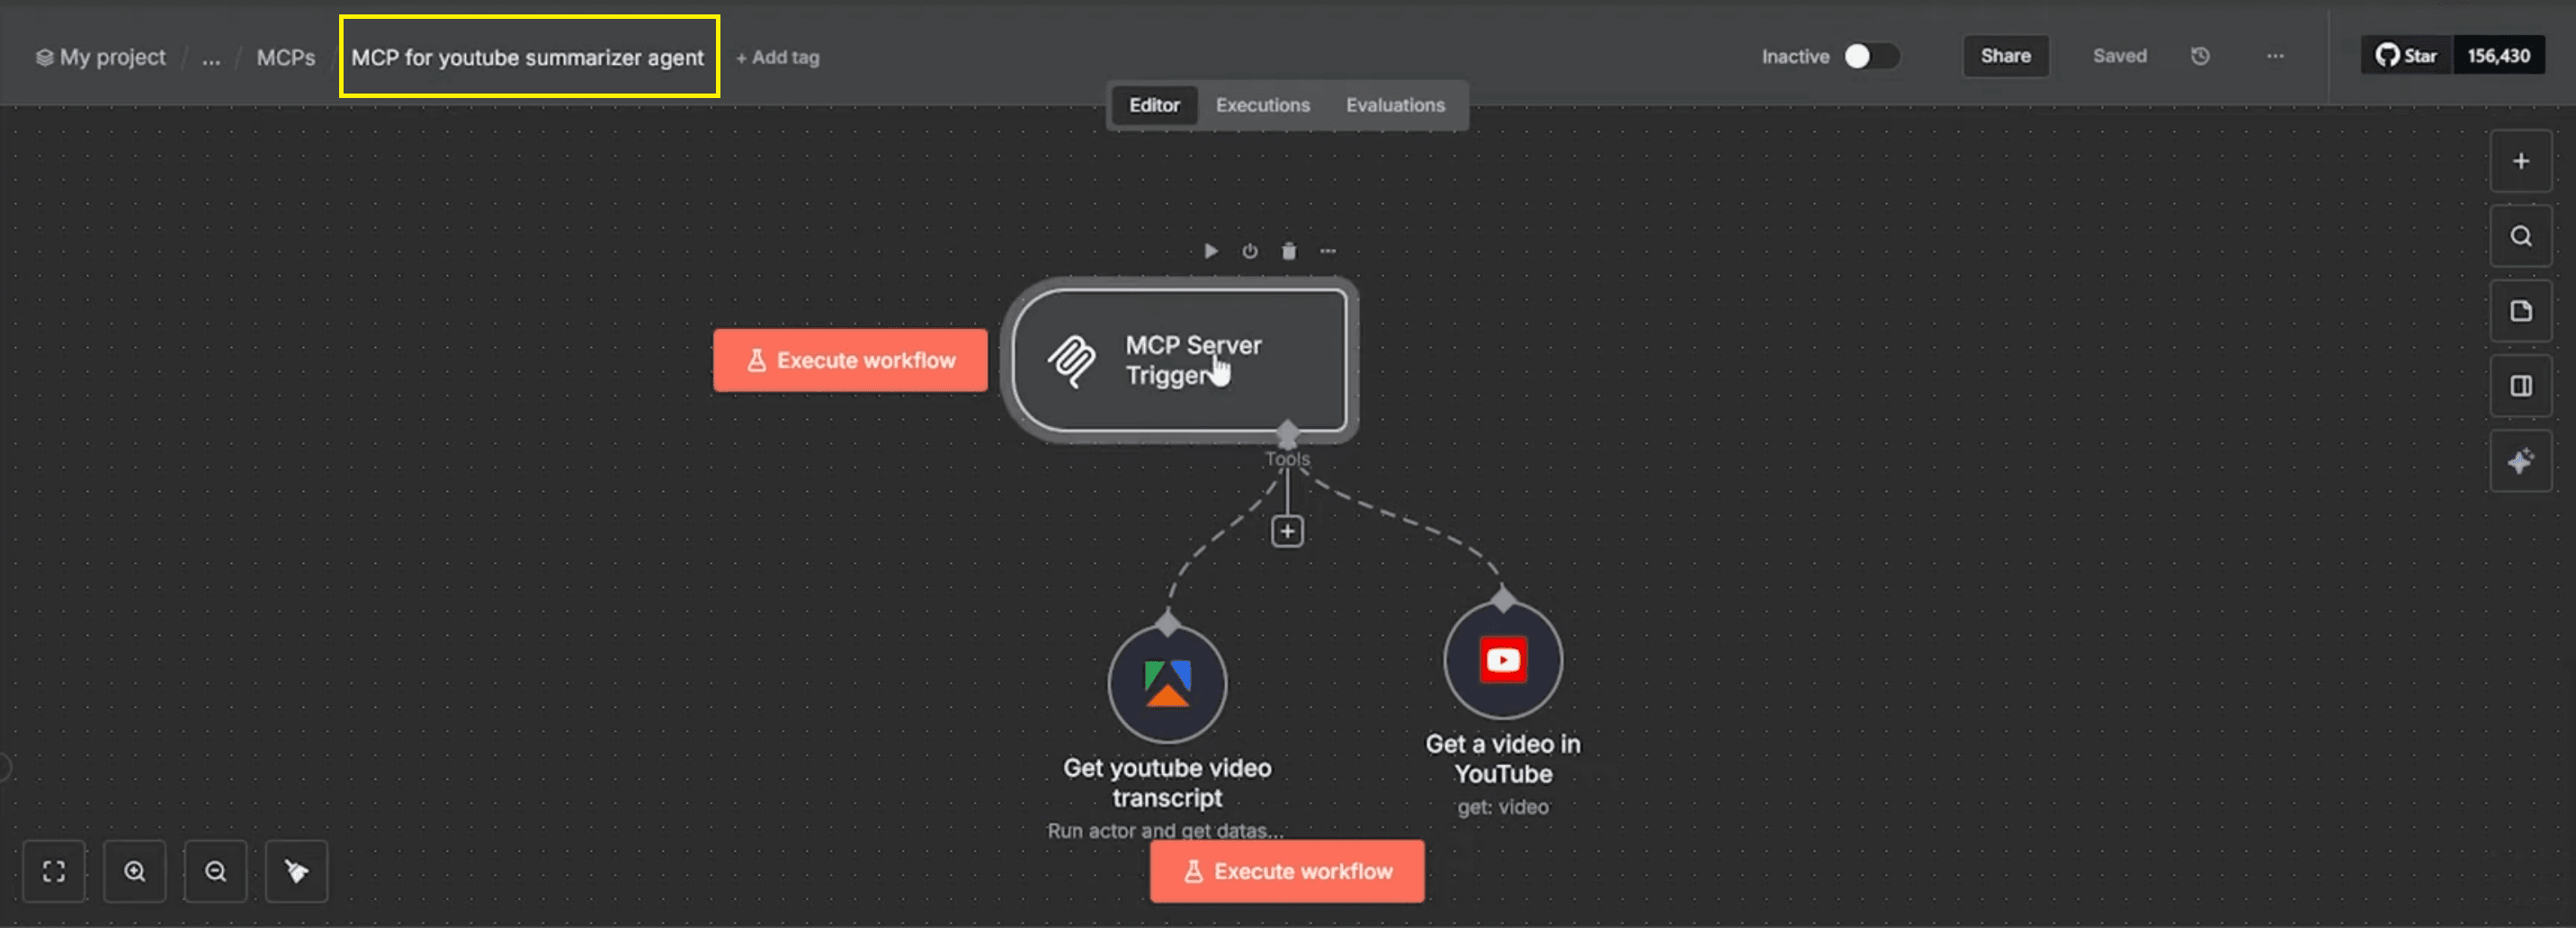
Setting Up Your n8n Configuration: You will need to configure a workflow starting with an MCP Server Trigger node. From there, link two critical nodes to ensure data flows smoothly:
Get YouTube Video Transcript: This node uses an Amplify scraper (specifically the "Run actor and get dataset items" action) to pull the full video transcripts from the provided link.
Get Video Data: This specific agent node connects to the YouTube Data API. It is responsible for fetching statistical metadata, such as the title, views, and thumbnail URL.
Step 3: Configure the Summarizer Agent
Once n8n is set up, you need to configure the logic for your "Summarizer" agent node.
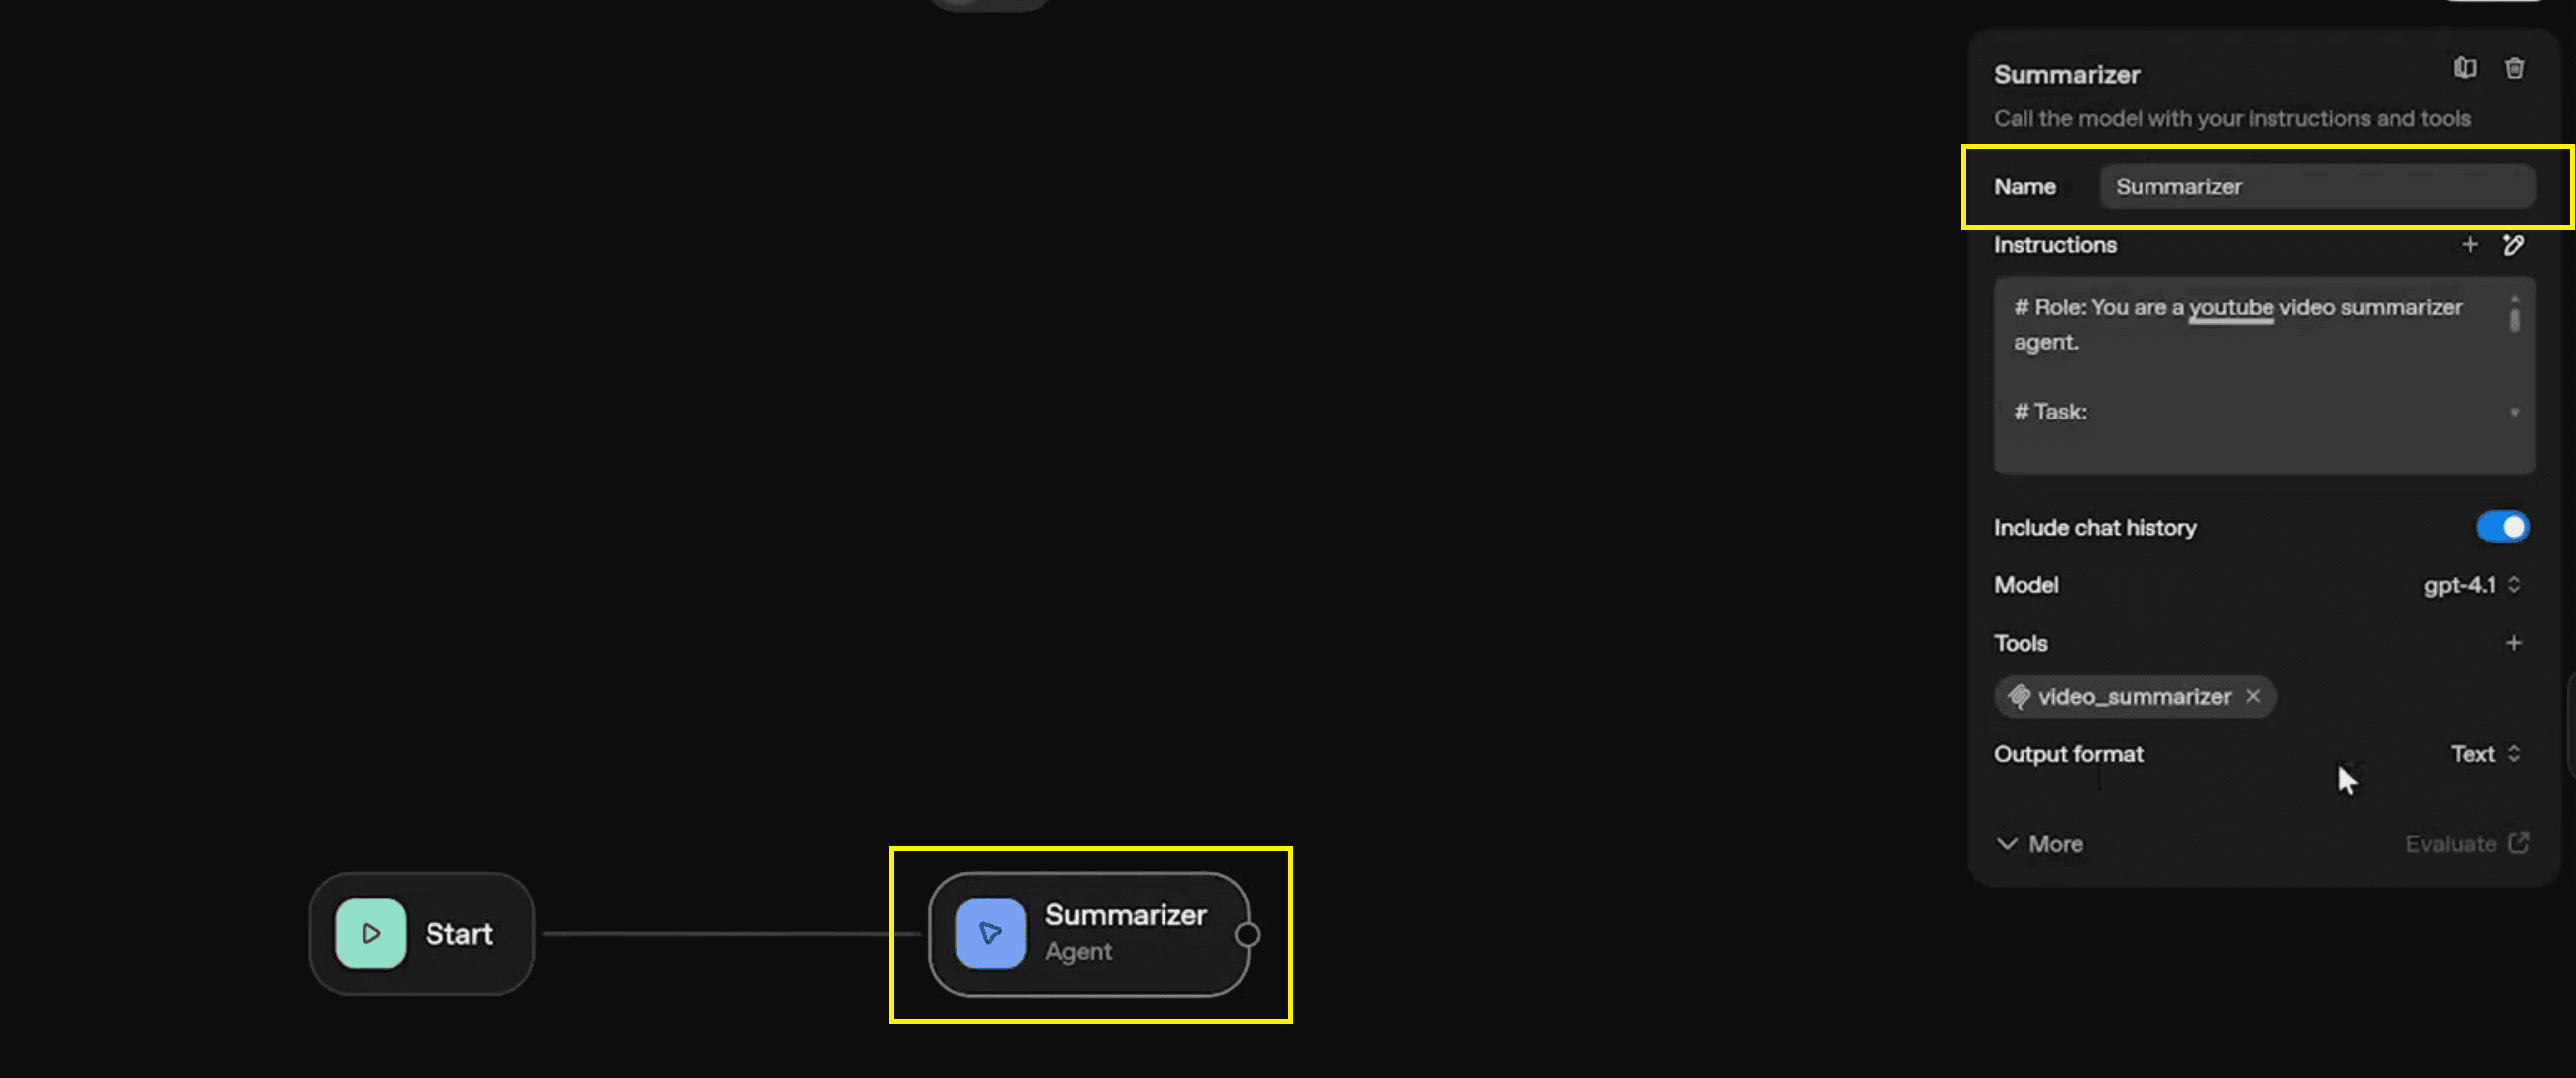
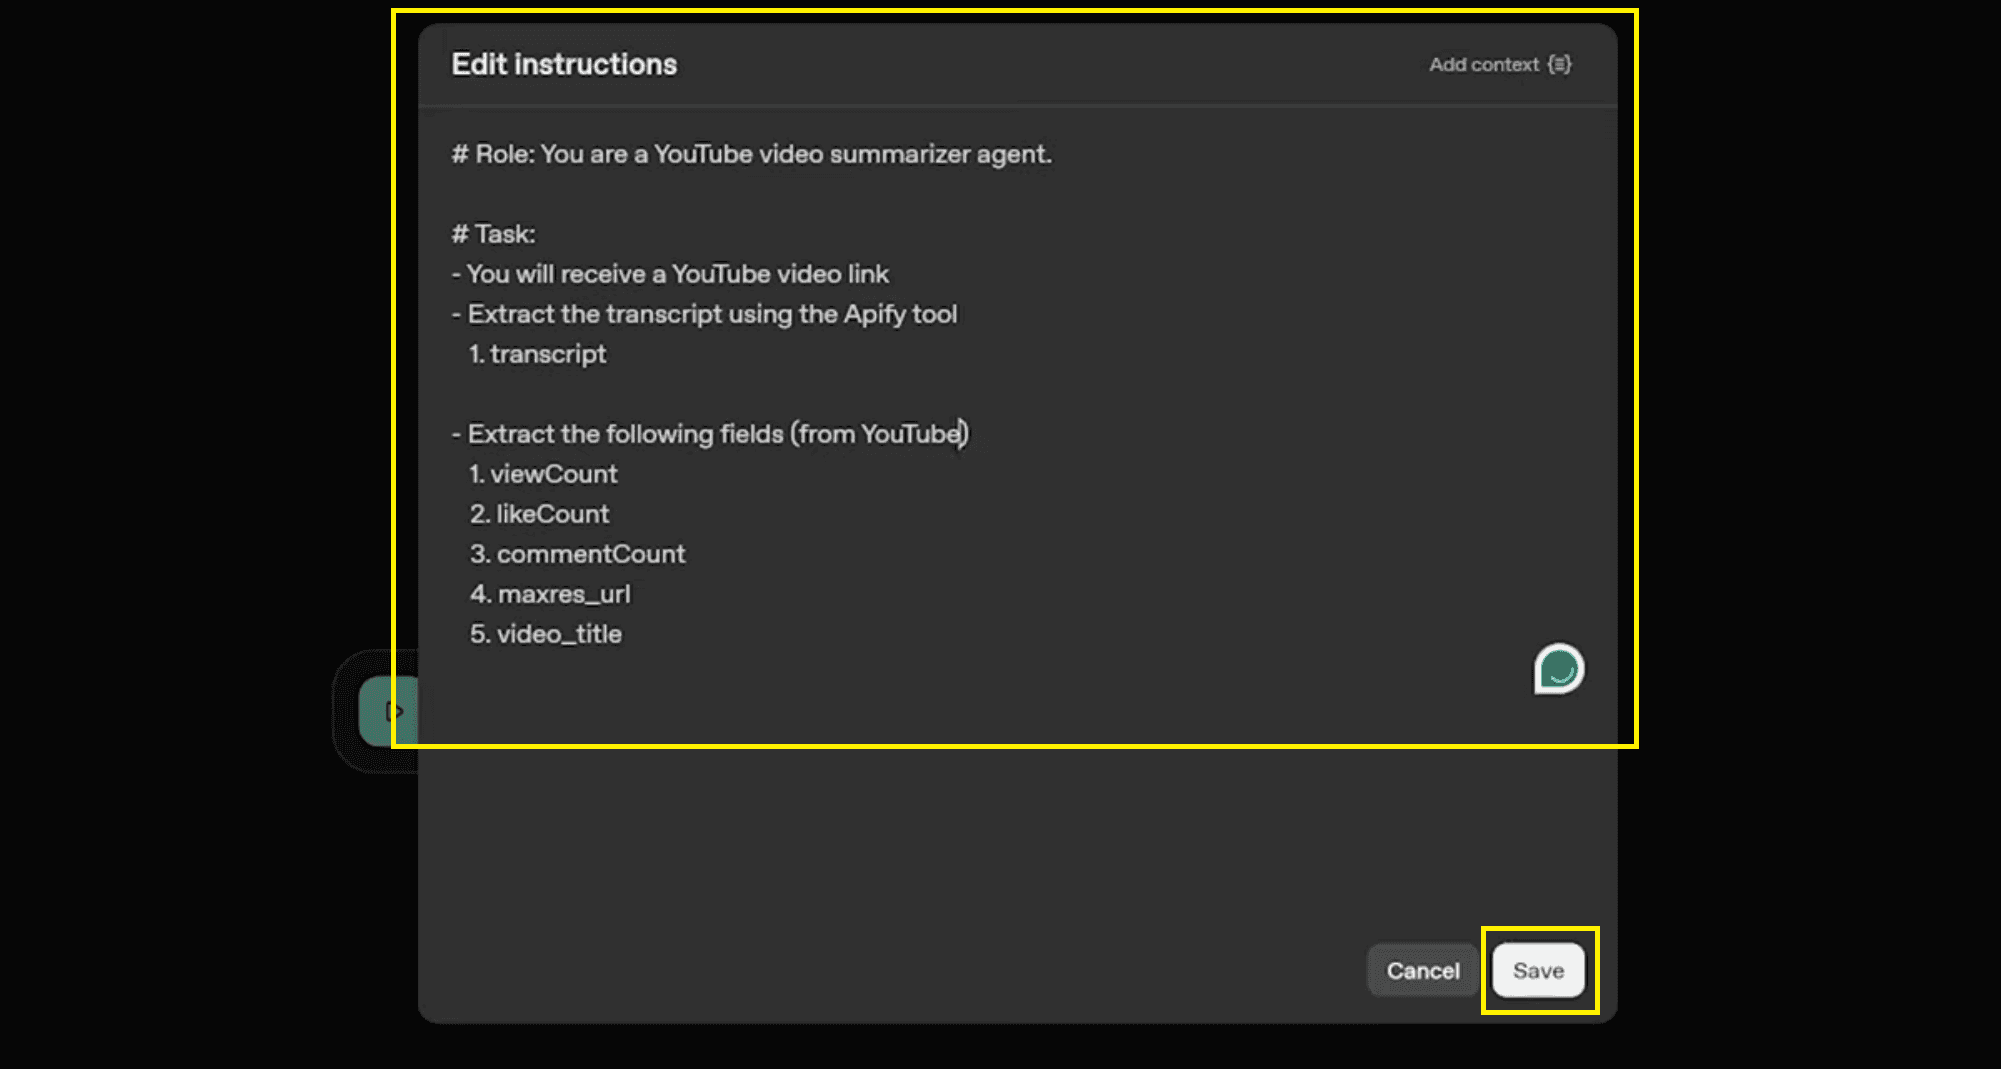
Agent Instructions: In the "Edit Instructions" panel, define the role and task clearly to ensure the AI knows how to process the data:
Role:
# Role: You are a YouTube video summarizer agent.Task:
You will receive a YouTube video link.
Extract the transcript using the Apify tool.
Extract the following fields (from YouTube): 1. viewCount, 2. likeCount, 3. commentCount, 4. maxres_url, 5. video_title.
Defining the Output Schema: To ensure the AI Agent outputs data in a machine-readable format, set the Output format to Structured output (JSON). Use the following schema to match your variables:
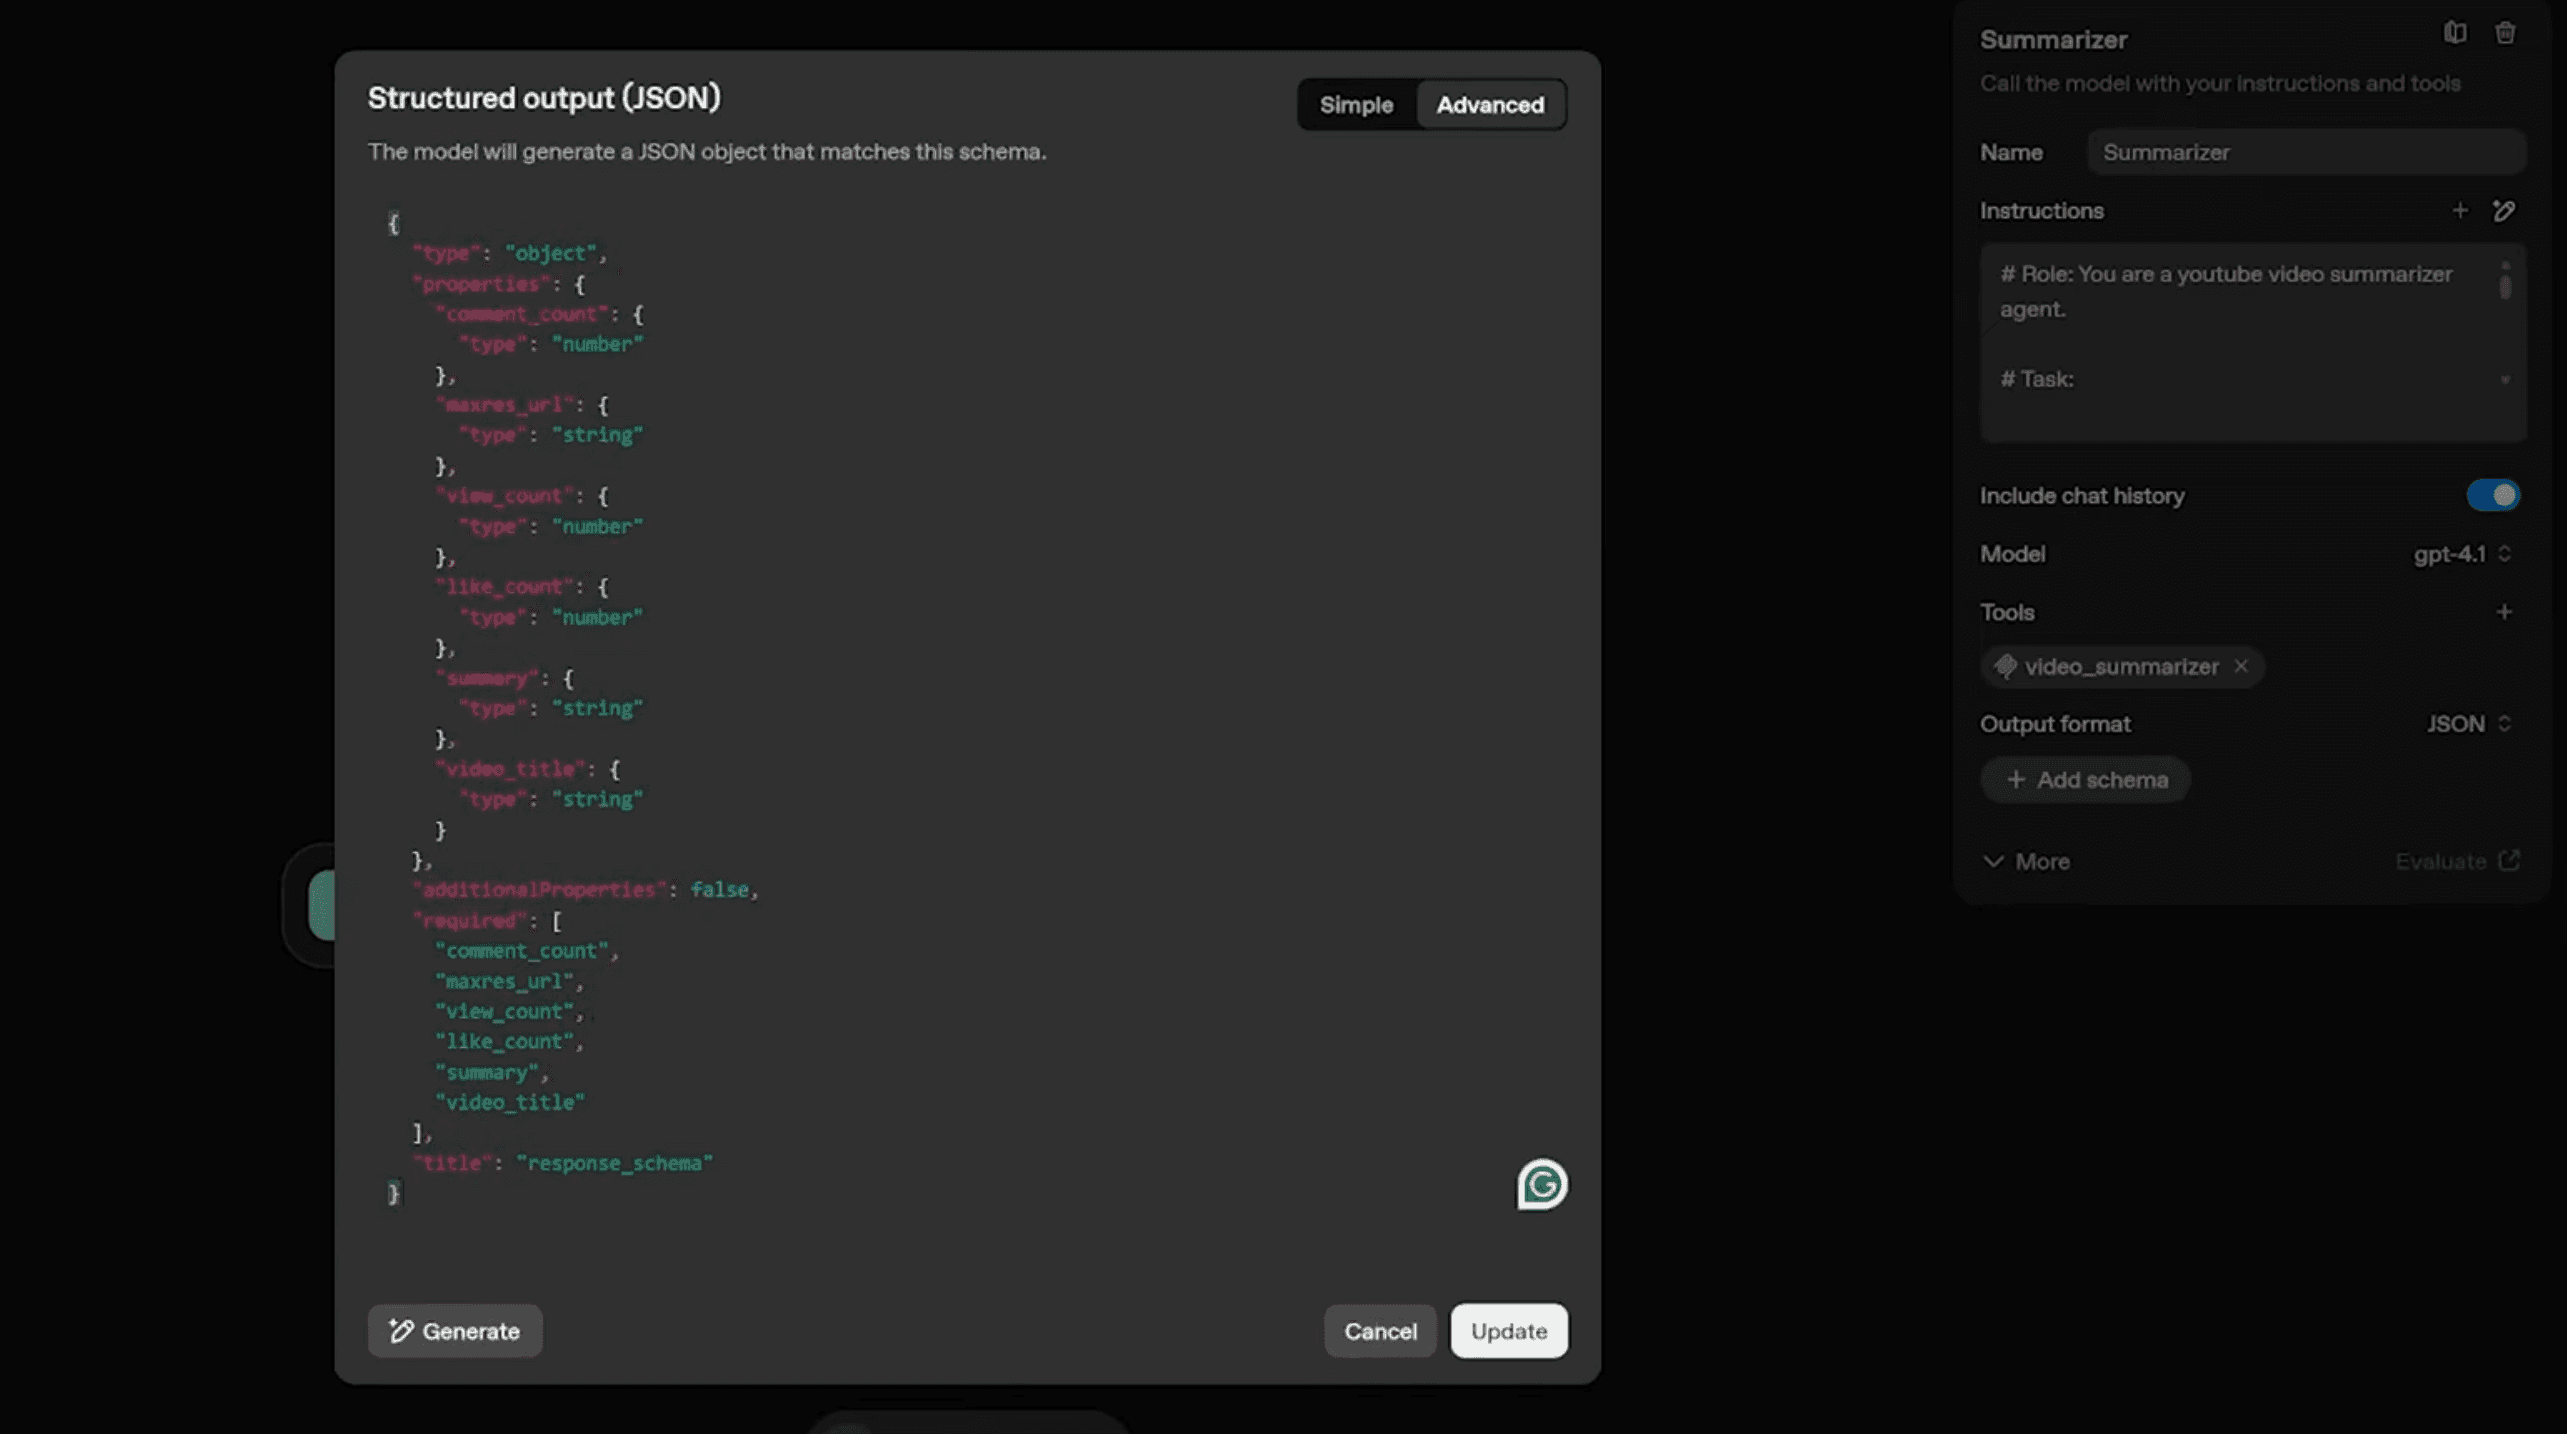
Note: Ensure the property name maxres_url matches exactly so the thumbnail displays correctly later.
Also Read: Tilly Norwood: Hollywood’s First AI Actress
Step 4: Create a Custom Visual Widget
Now, let's turn that data into a visual interface. In your workflow, create a second agent node named "Widget" and connect it to the output of your summariser agent.
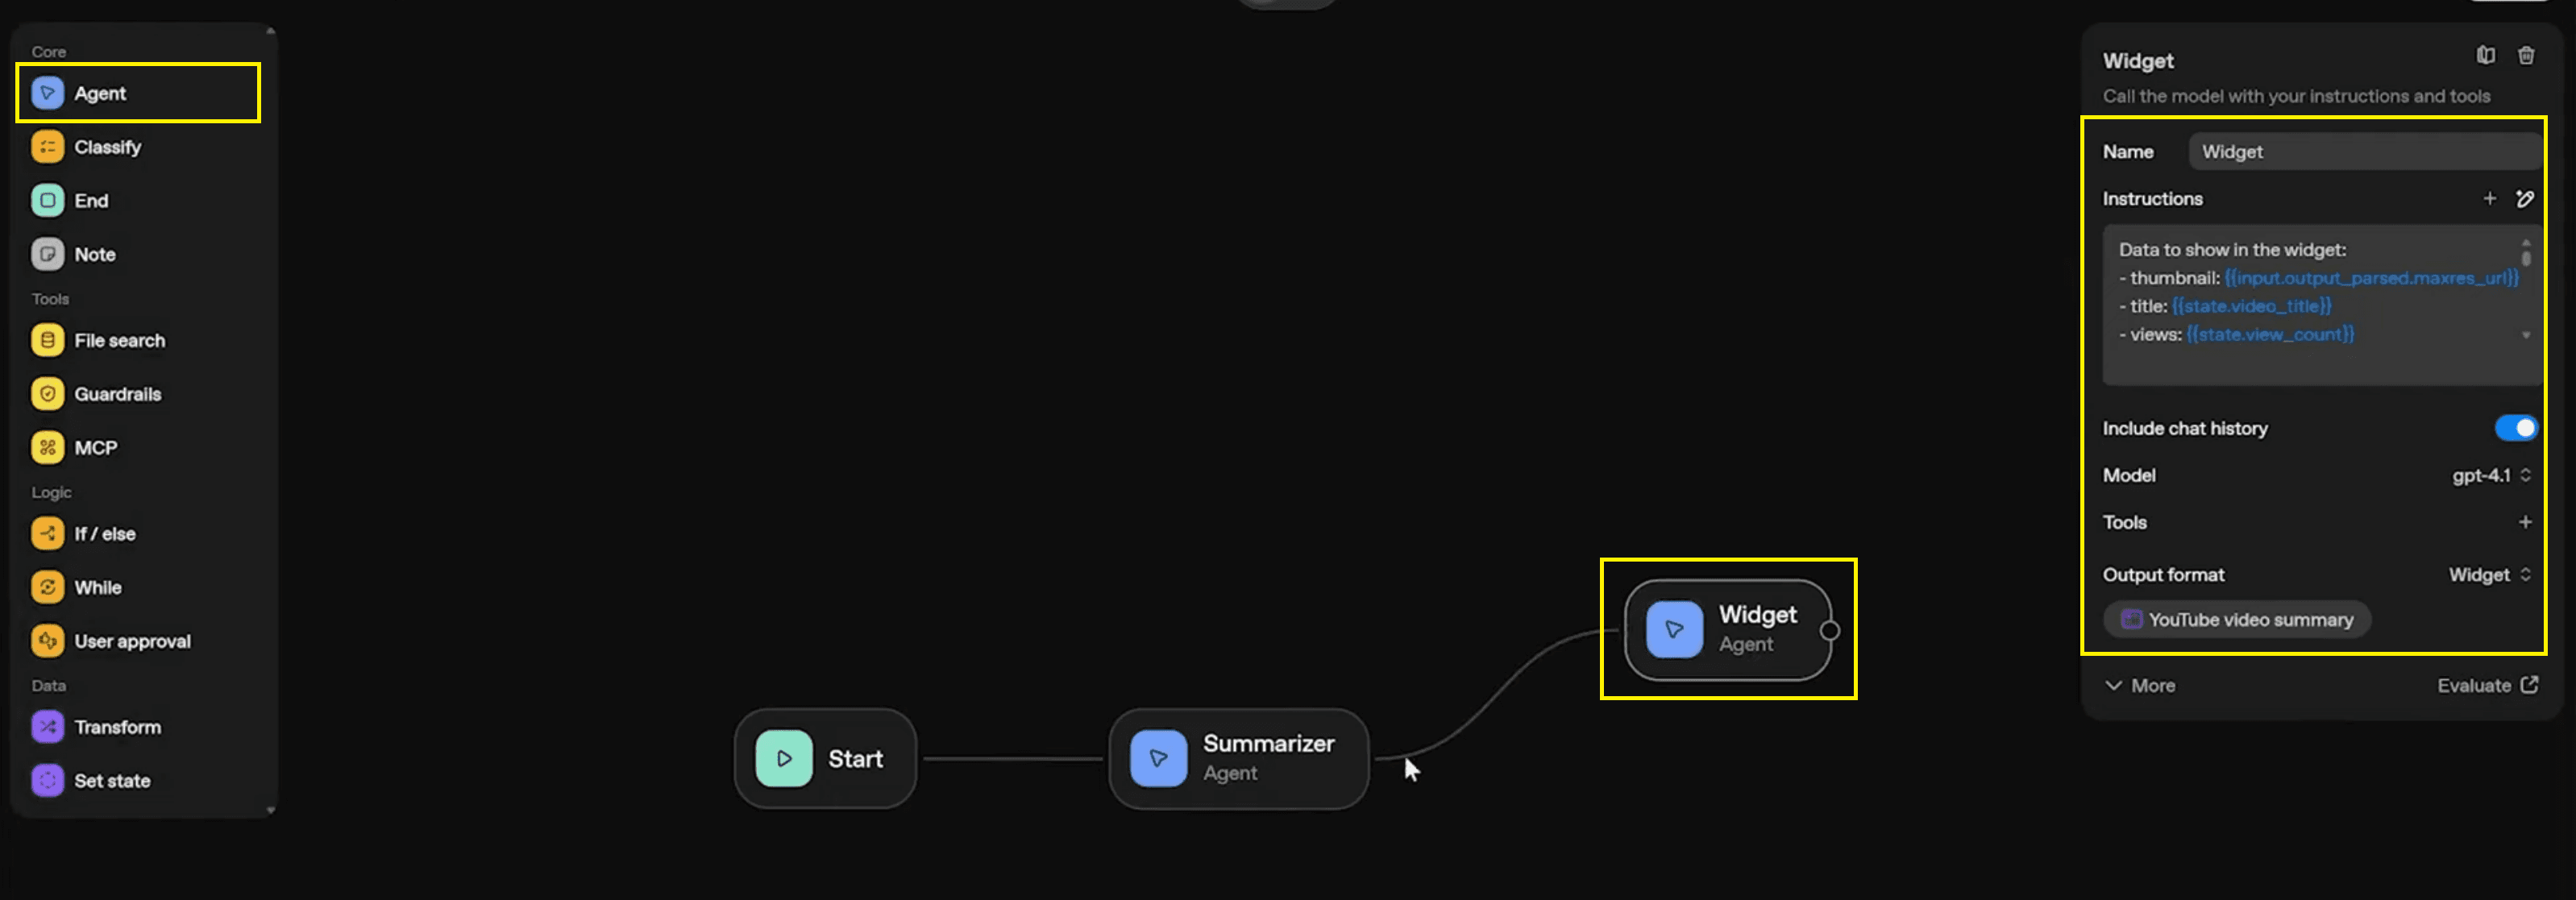
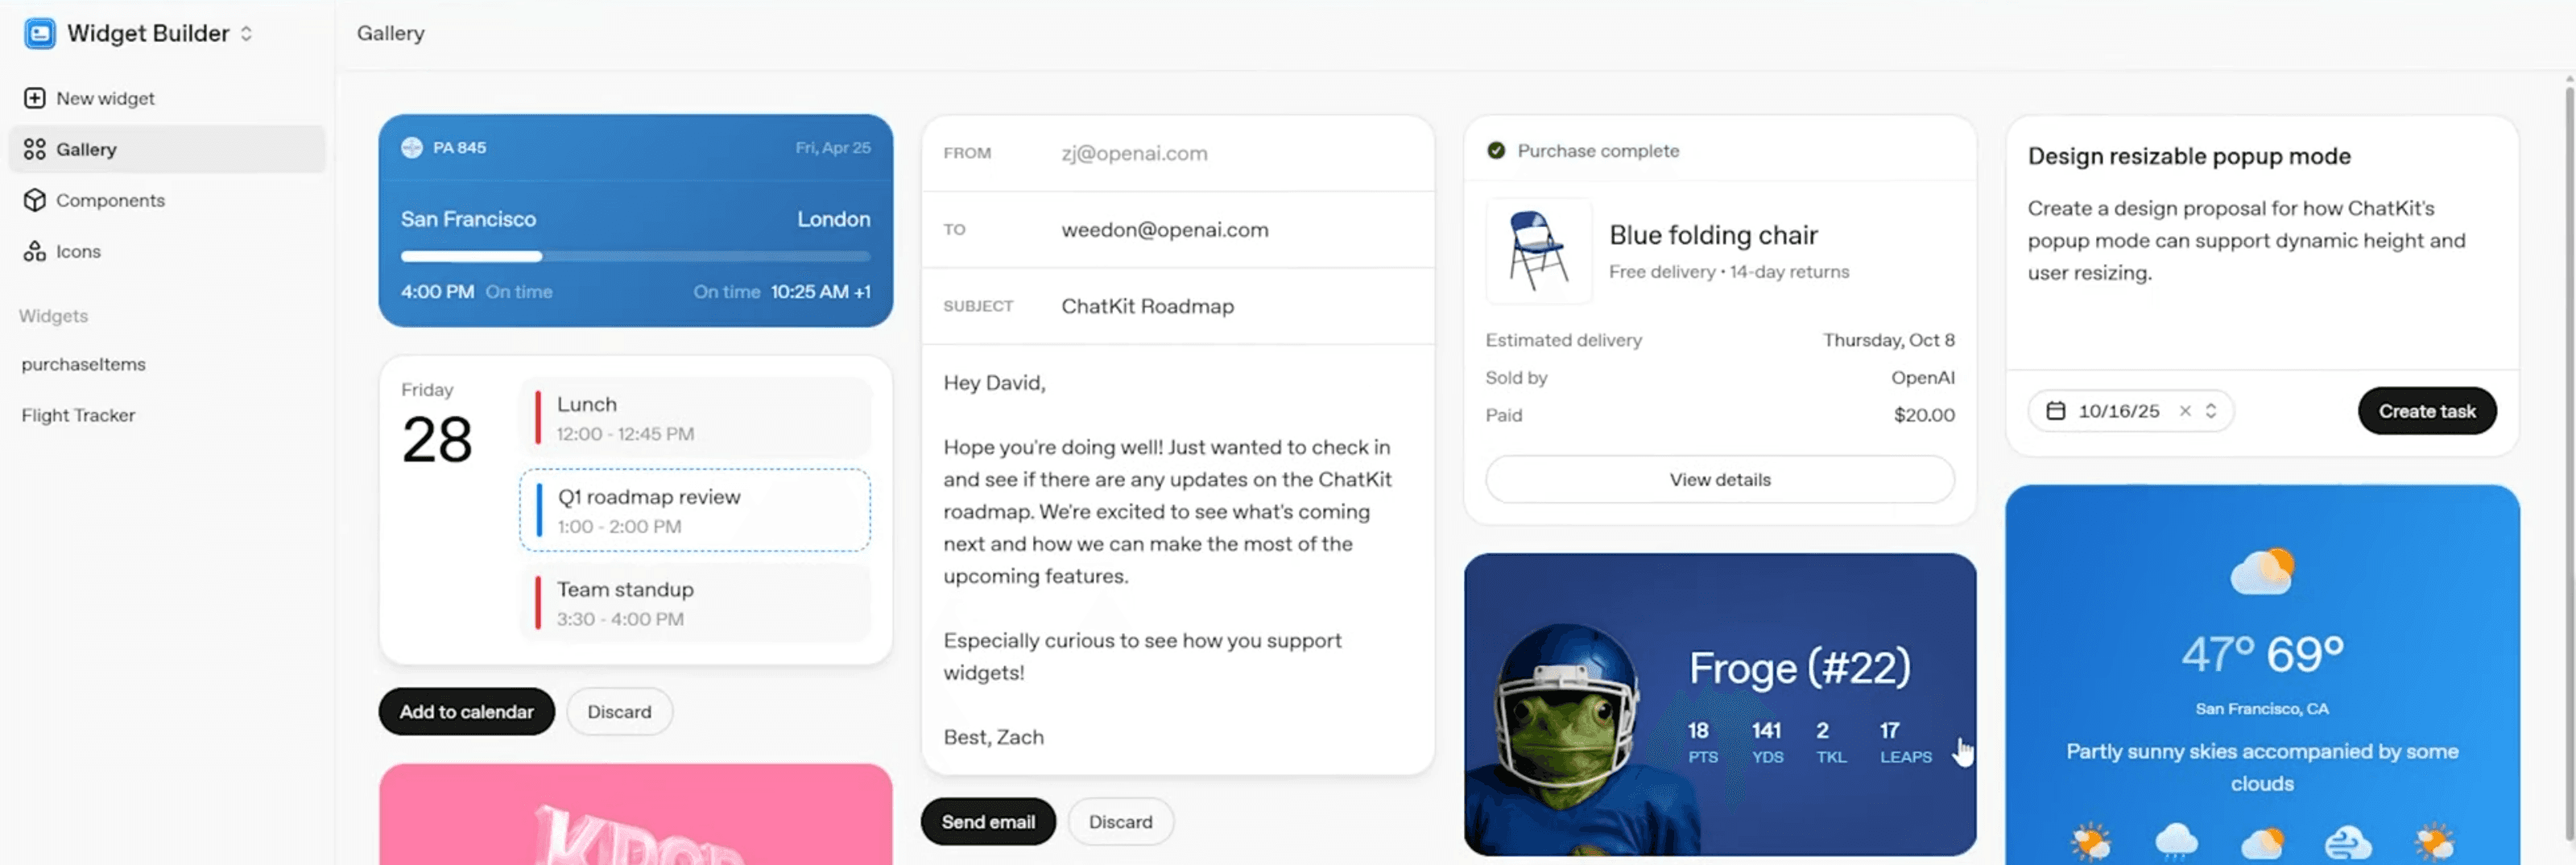
Designing the Card: Open the custom widget gallery to select a template or design one from scratch. You might look for layouts like "San Francisco" or "Purchase complete" as base inspirations, but you will customise it to display video stats.
Widget Instructions & Data Mapping: Crucially, you must tell the Widget agent how to map the JSON data from the previous step into the visual card. In the instructions for the Widget agent, use the following mapping:
thumbnail:
{{input.output_parsed.maxres_url}}title:
{{state.video_title}}views:
{{state.view_count}}likes:
{{state.like_count}}comments:
{{state.comment_count}}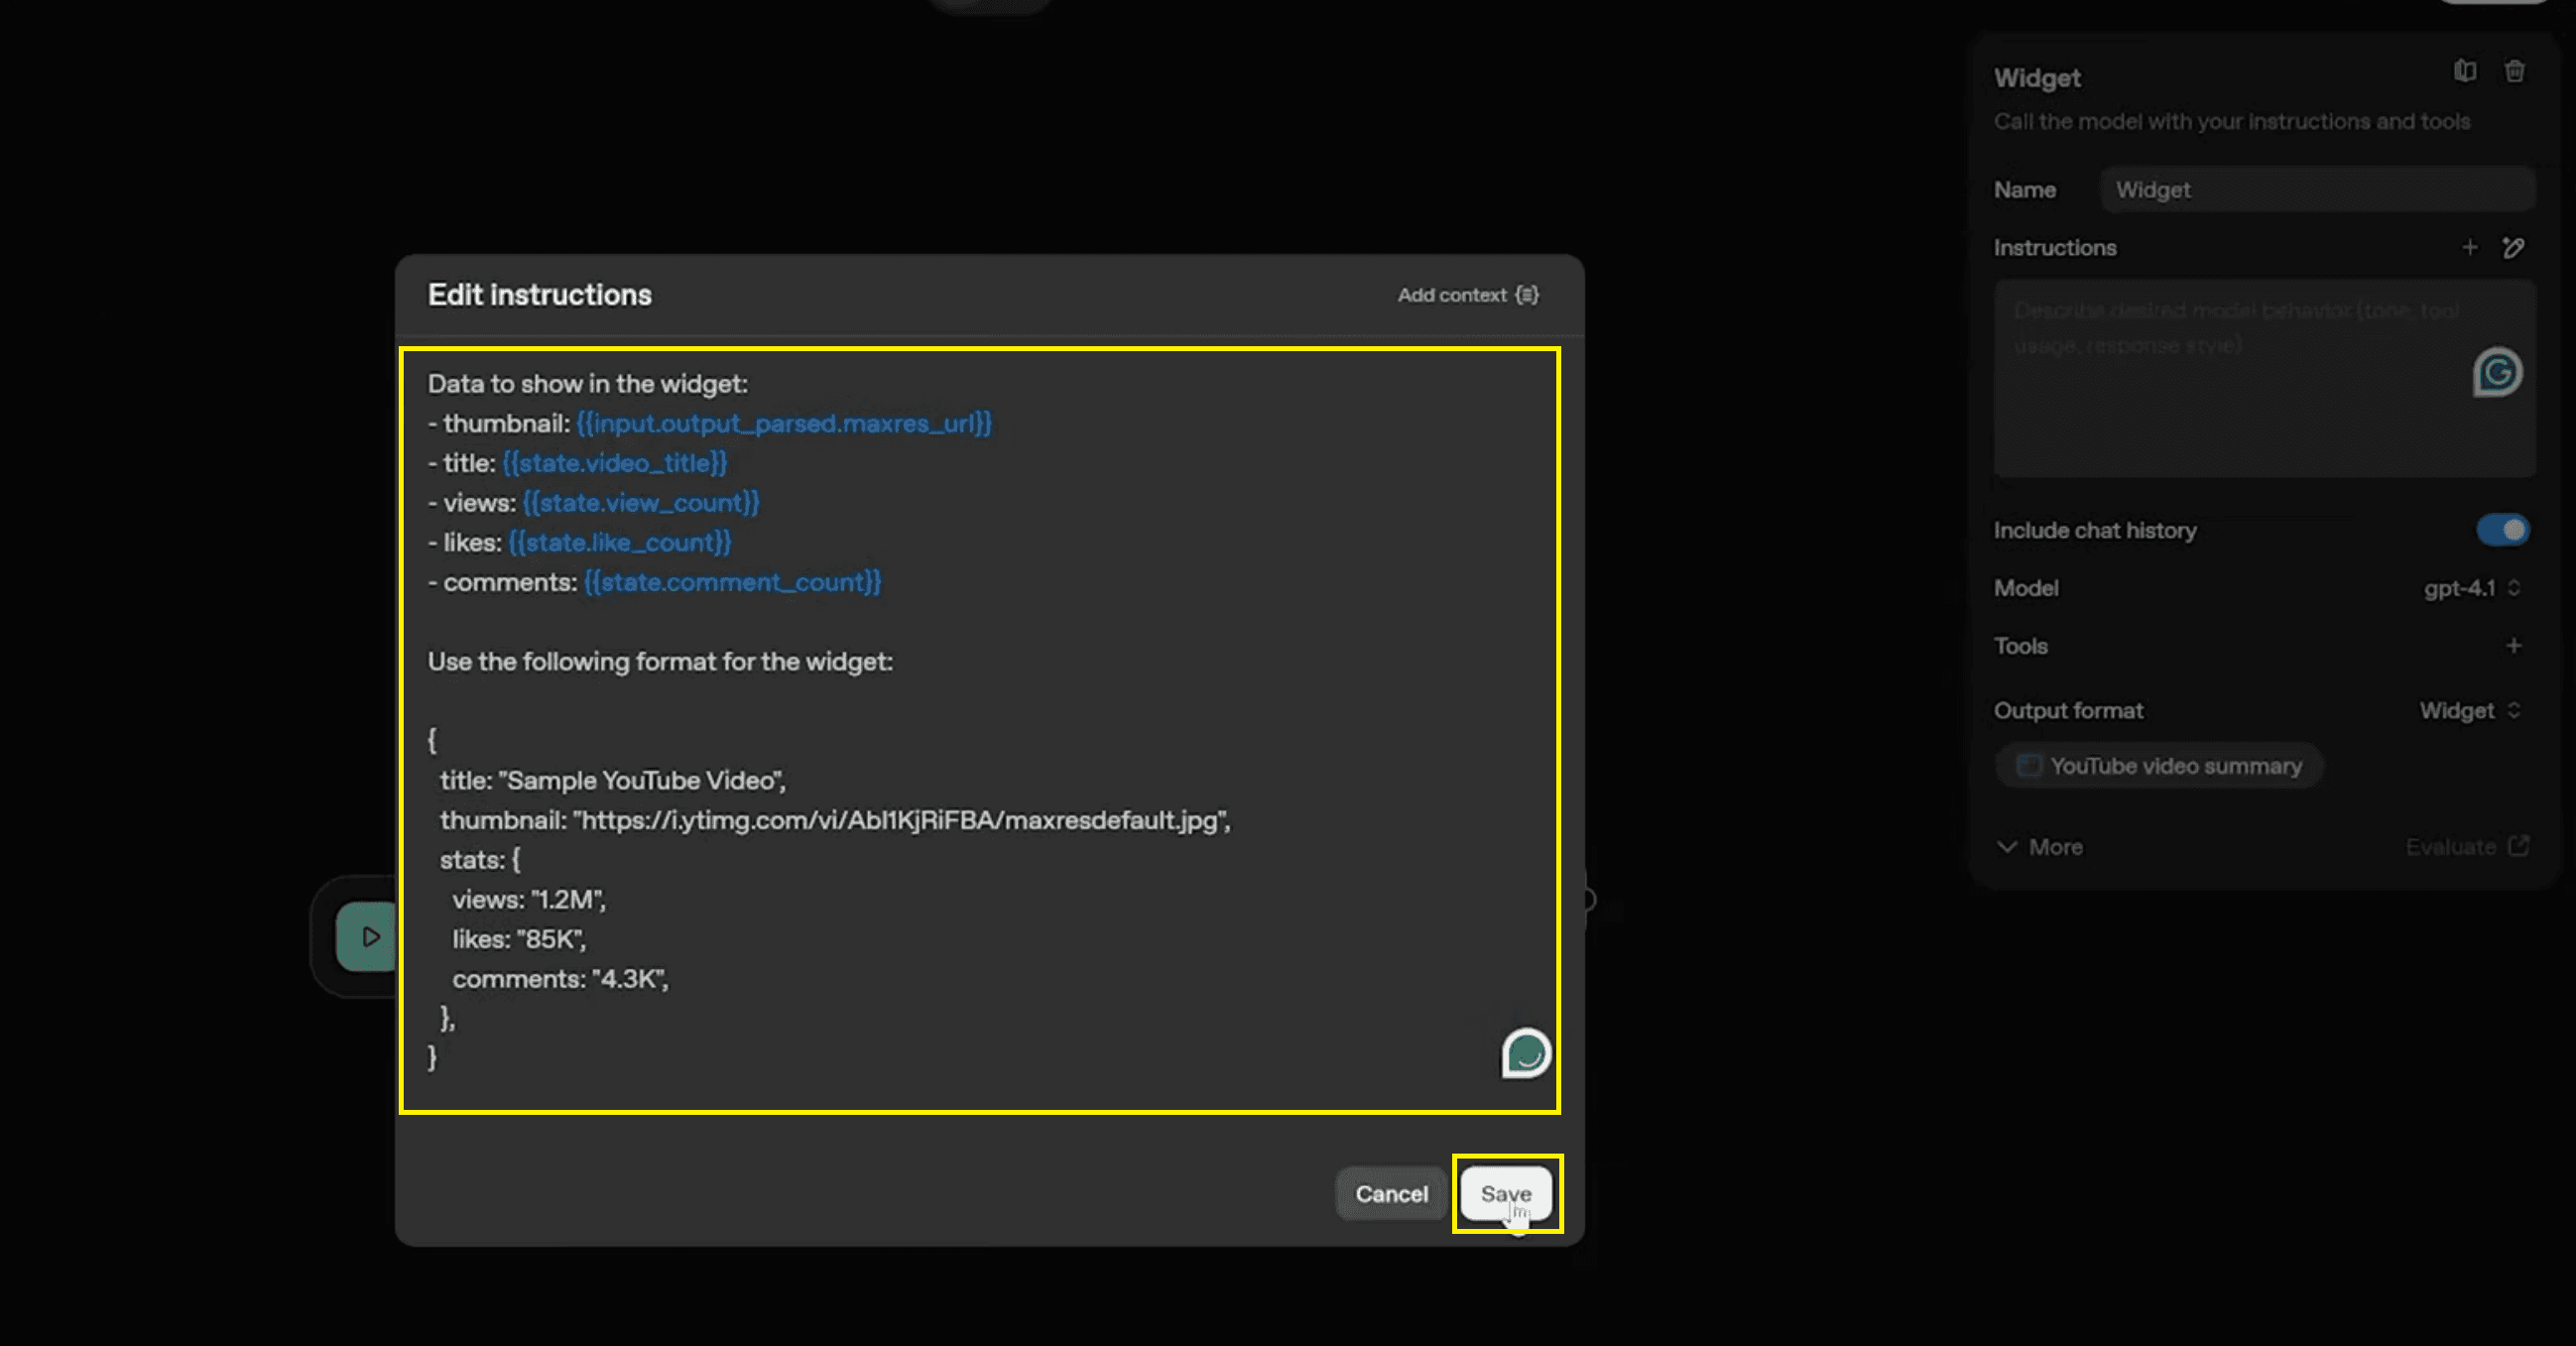
You should also provide a sample JSON structure in the instructions to guide the widget's rendering:
Step 5: Save Extracted Data (Set State)
This is a critical step. The data extracted by the Summarizer agent in Step 3 is currently just a temporary output. To use it in our Widget later, we must strictly save it in the State Variables we created in Step 1.
Adding the Node: Add a "Set state" node immediately after your 'Summarizer agent' and before 'Widget.'
Mapping the Variables: In the "Set global variables" configuration panel, identify the To variable field first, and then map the corresponding Assign value.
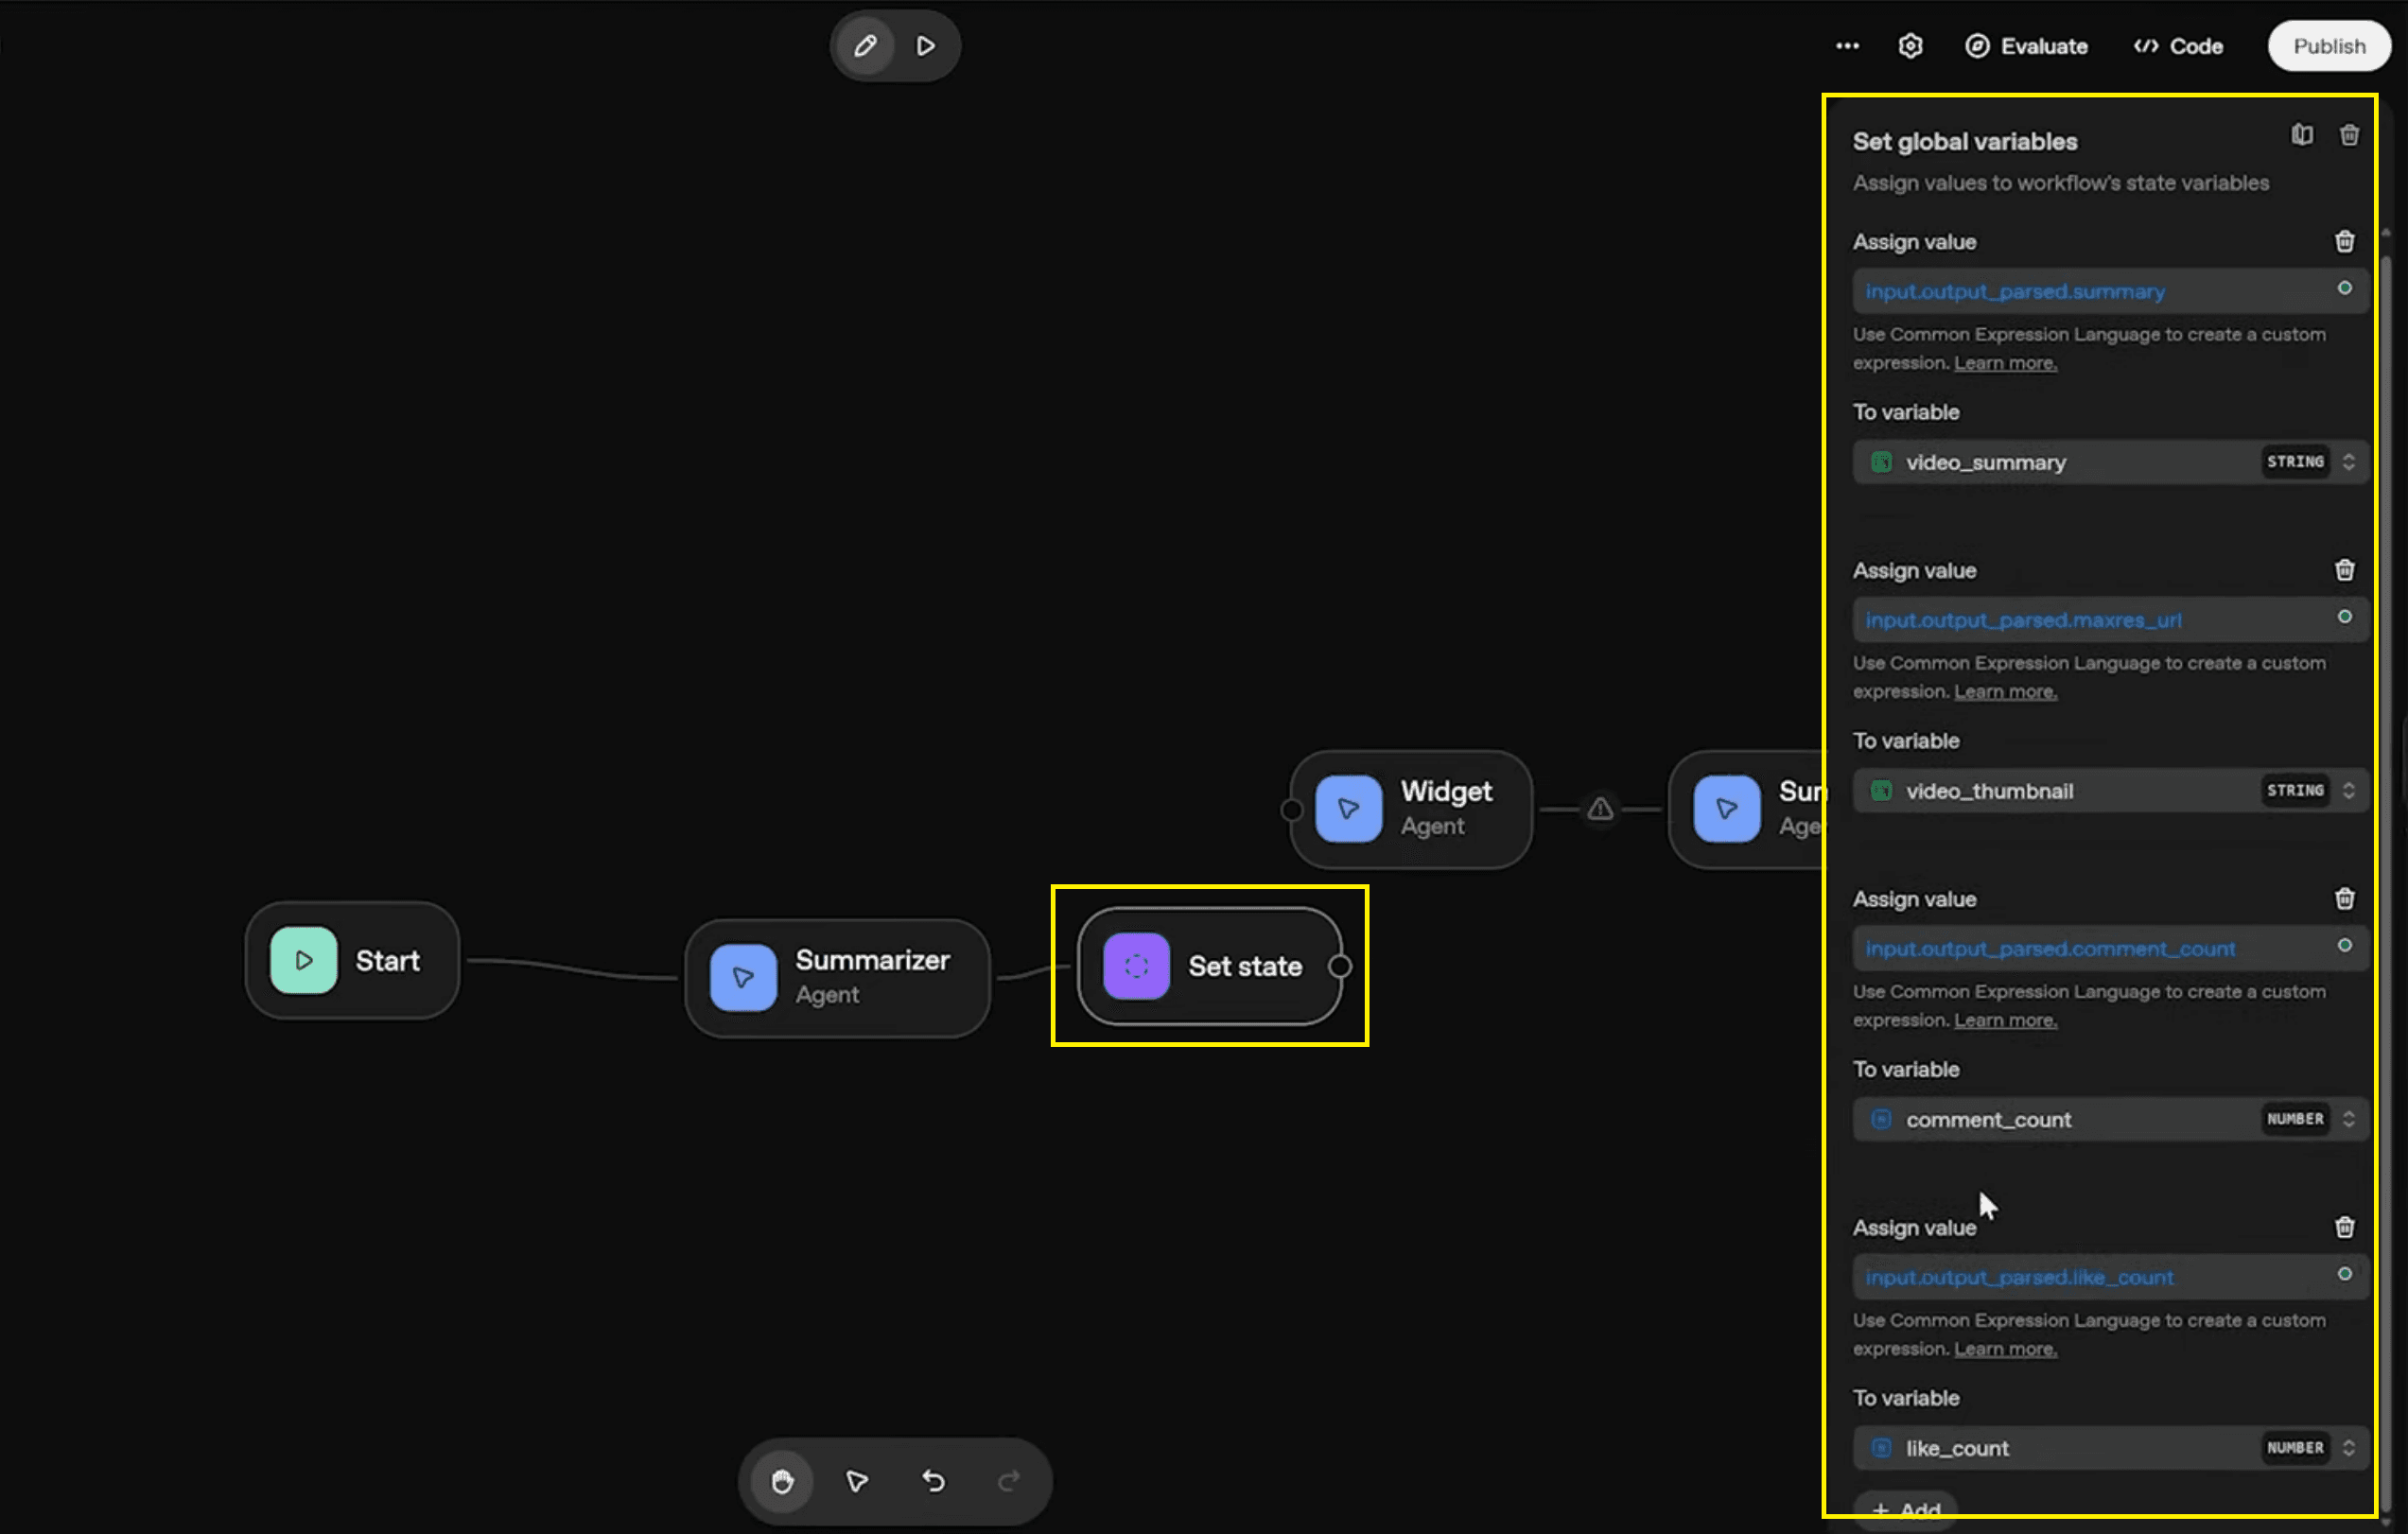
To variable:
video_summary- Assign value:input.output_parsed.summaryTo variable:
video_thumbnail- Assign value:input.output_parsed.maxres_urlTo variable:
comment_count- Assign value:input.output_parsed.comment_count
Repeat this process for like_count, view_count, and video_title to ensure every piece of extracted data is permanently stored.
Also Read: B12 AI Website Builder Review: Build Website In One-Click
Step 6: Finalizing the Output with a Text Summary and Widgets
For the best user experience, your workflow should end by displaying both the visual widget and the text summary. The widget handles the stats, but we need one final agent to display the actual text summary we stored earlier.
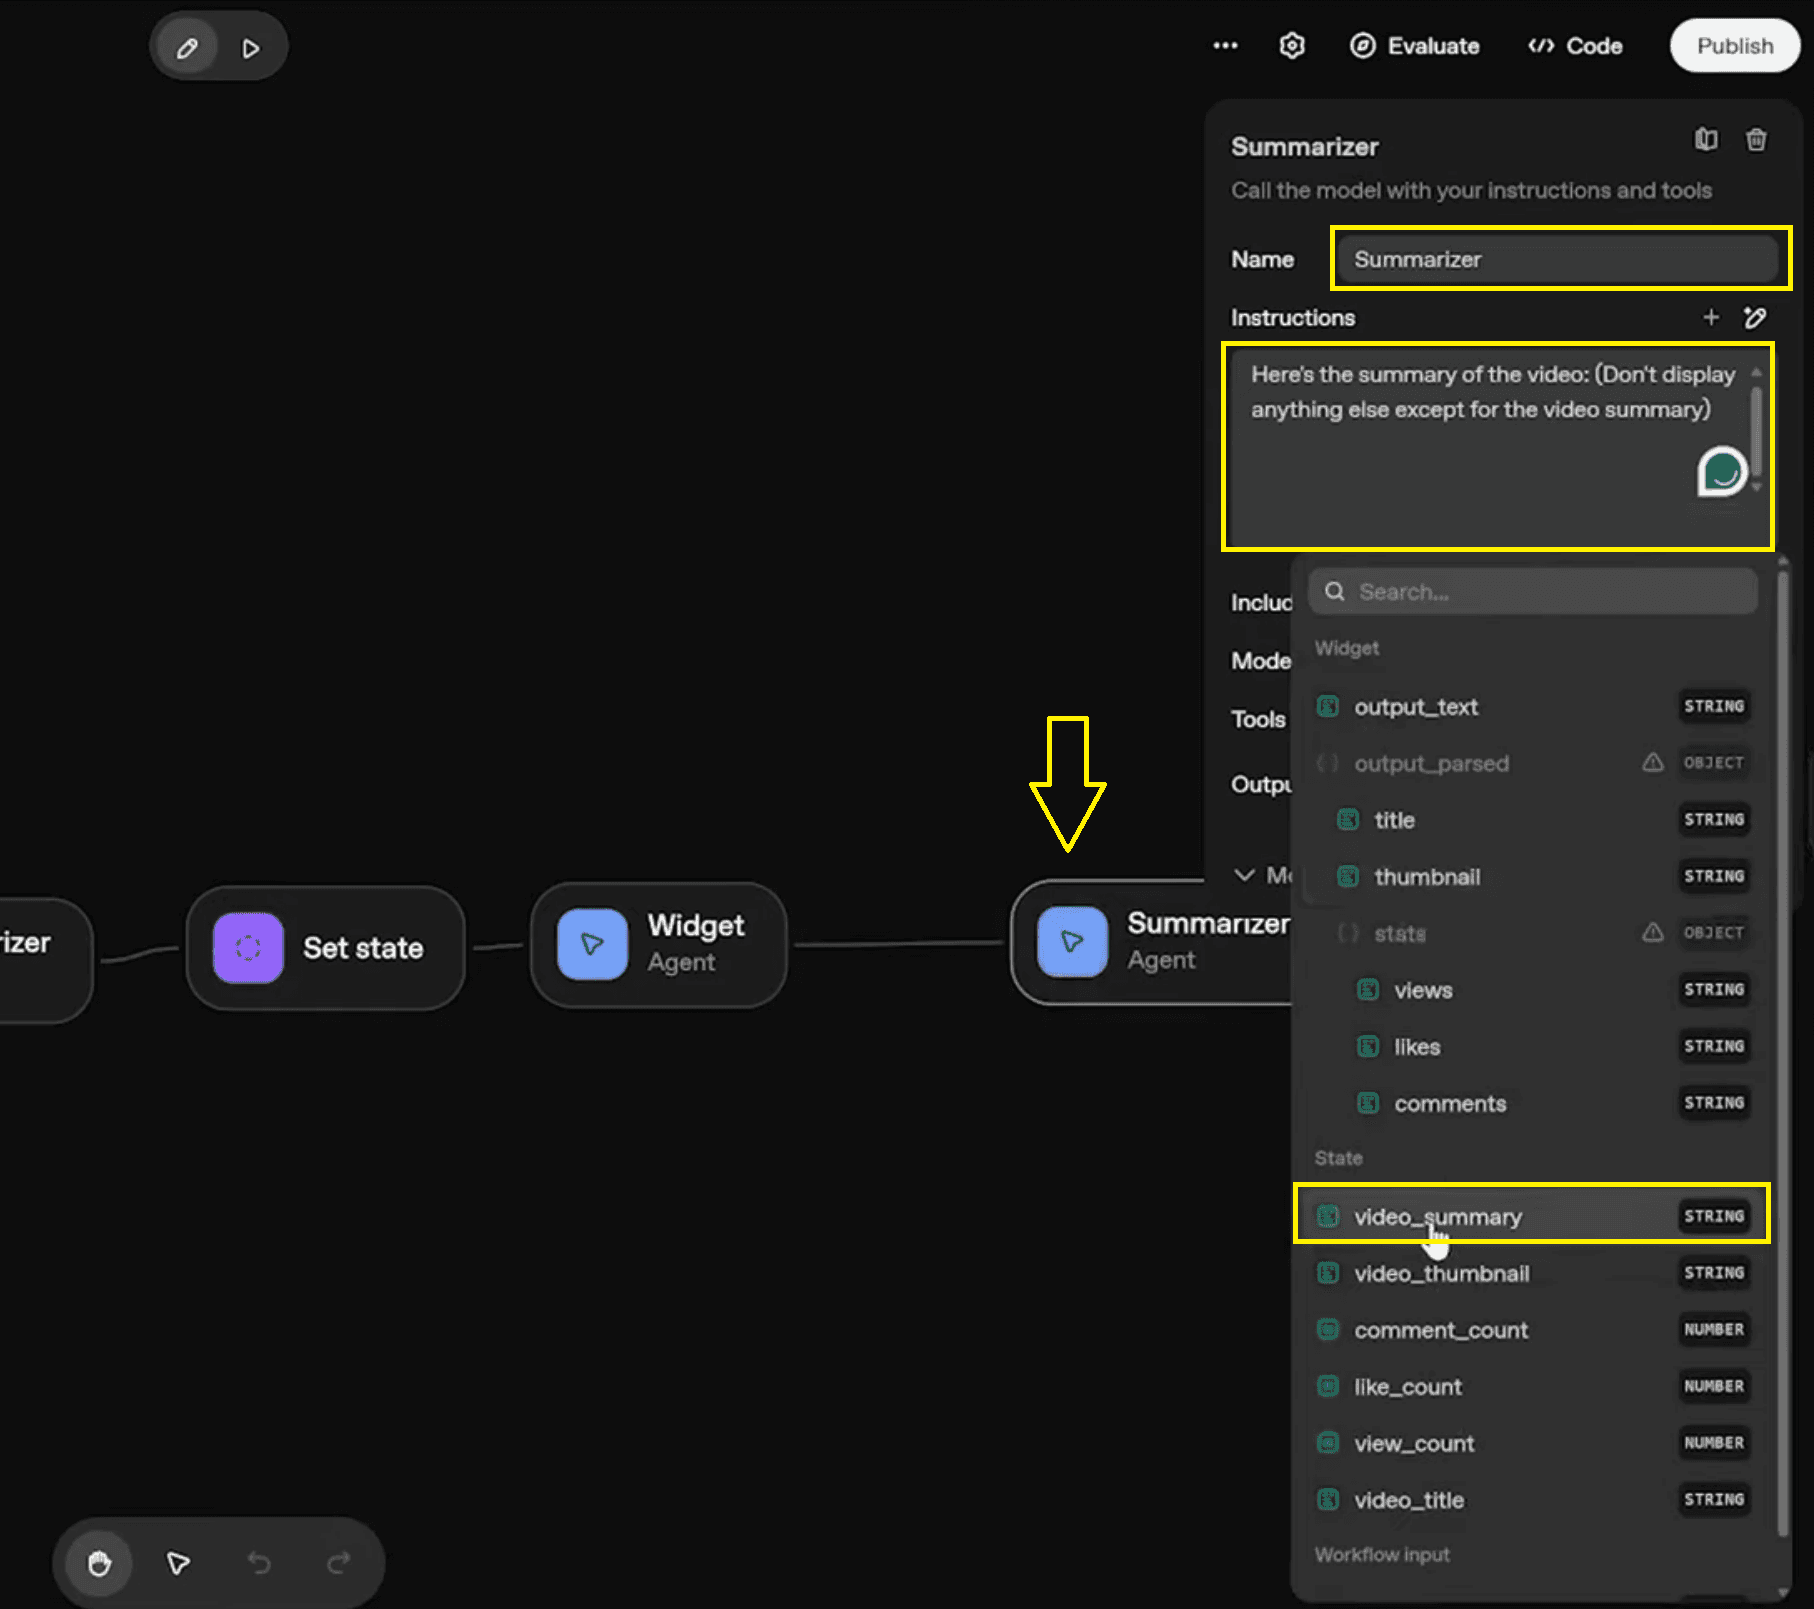
Add the Node: Create one final agent node (e.g., named "Summarizer") and connect it to the output of your Widget node.
Configure Instructions: In the "Edit Instructions" panel, give it a direct command to output the stored summary.
Instruction Text:
Here's the summary of the video: (Don't display anything else except for the video summary)Insert the Variable: Use the variable selector (often a
{}icon) to insert thevideo_summarystate variable directly into the instruction.Resulting Instruction:
{{state.video_summary}}
This dual approach ensures users get immediate visual context via the widget while also getting a clean, focused reading of the content analysis through the text summary.
Security and Advanced Integrations
When building these tools, security is paramount. Always enable authentication for your MCP servers and endpoints. If you leave these open, your agent could be vulnerable to unauthorised use or excessive API calls.
For scalability, consider implementing caching. This saves data for repeated video links, reducing the load on your API limits. The n8n integration also allows you to connect your agent to other platforms, such as CRMs or Notion, for better workflow automation.
OpenAI Agent Builder vs. Other Tools
Competitors like Zapier or Make offer great automation, but they often lack the widget-based visualisation found here. Other tutorials might skip the deep integration with n8n or the flexibility of the UI.
The OpenAI agent builder stands out because it bridges the gap between backend automation and frontend presentation. It allows non-developers to create AI tools that feel like custom-built applications rather than simple scripts.
Also Read: WhatsApp Automation (Part 1): Set Up Meta Business API
Practical Applications for this Agent
Content Creators: Automatically generate descriptions and summaries for your own video content.
Marketing Teams: Aggregate metrics from multiple videos to create performance dashboards using a YouTube video summariser.
Educators: Turn educational video transcripts into study notes or class summaries.
Analysts: Use the tool to compare competitor channels by running structured summaries on their top videos using a dedicated YouTube video summariser.
Conclusion
Using this workflow, you can now build a fully automated YouTube video summariser that extracts data, creates summaries, and showcases results through dynamic visual cards. The synergy of the OpenAI agent builder and n8n transforms how non-developers build AI tools, turning standard automation into AI storytelling in motion.
FAQ
Q. Is there any AI that summarises YouTube videos?
A. Yes. You can build a dedicated YouTube video summariser using the OpenAI Agent Builder. This specific AI tool is designed to accept a video URL as an input, process the underlying content, and output a concise summary along with key metadata like view counts and likes.
Q. Can ChatGPT summarise a YouTube video?
A. Yes, but the most effective method is to do this through a structured agent rather than a standard chat. By building a workflow in the OpenAI Agent Builder, you can feed the video transcript (fetched via n8n) directly into the AI. The agent then processes this text to produce a specific variable containing the condensed takeaways from the video.
Q. How can I create an AI agent using OpenAI's Agent Builder?
A. Creating an agent involves a clear 5-step process:
Initialise: Create a new workflow (e.g., "Video Summariser") and define the variables for the data you want to collect (summary, thumbnail, views).
Integrate: Use n8n to set up MCP servers that handle fetching the transcript and video metadata.
Configure: Set specific instructions and JSON schemas for your agents to ensure accurate data extraction.
Visualise: Create a custom visual widget node and map your data variables to visual elements like cards and stats.
Display: Combine the visual widget with a text block for a dual-view experience that shows both stats and the summary.
Q. What features does the OpenAI Agent Builder offer?
A. The platform offers several powerful features for building automation tools:
Custom Widgets: The ability to turn AI outputs into visual interfaces (charts, cards) rather than just text.
n8n Integration: A bridge to external services, allowing the agent to fetch real-time data from platforms like YouTube.
JSON Schema Definition: A way to structure output data so it is machine-readable and consistent.
Dual-Display: The capability to show both visual widgets and text summaries simultaneously for better user engagement.
Q. What is the OpenAI Agent Builder? How does it work, and is it free?
A. The OpenAI Agent Builder is a platform for creating interactive AI-driven workflows that go beyond simple text responses.
How it works: It combines backend automation (using tools like n8n) with frontend presentation (using widgets). It allows you to define variables (like video_summary), connect to external APIs (like YouTube's), and present the data visually in a custom interface.
Is it free?
Agent Builder: Designing agents is often free, but running them typically requires a paid subscription (like ChatGPT Plus or Team) or incurs costs based on API token usage.
n8n: The automation tool offers a free self-hosted version (Community Edition), while their cloud-hosted plans are paid.