How to Use OpenAI Agent Builder: Beginner’s Guide

Key Pointers:
Visual Building: Build smart AI agents just by dragging and dropping blocks—no coding required.
Real-World Skills: Give your agent "superpowers" to read your emails, check calendars, and search files.
Smart Logic: Teach your agent to think, make decisions, and follow plans step-by-step.
Safety First: Use built-in "Guardrails" to stop errors and keep your data private and secure.
Instant Start: Use ready-made templates to create your first working agent in minutes.
Table of Contents:
Introduction to OpenAI Agent Builder
Getting Started with OpenAI Agent Builder
Workflow Interface Overview and Canvas Use
Main Workflow Elements
Guardrails for Safety
MCP Integrations (Connecting External Apps & Services)
Logic & Flow Control
State, Transformations & Variables
Configuring Your Agent
Using Prebuilt Templates in Agent Builder
Planning Helper Example
Testing & Publishing
Real-World Testing Scenarios
Best Practices
Conclusion: Building Intelligent AI Agents
FAQ
The OpenAI Agent Builder is a visual workspace that helps you design, test, and deploy intelligent AI agents using a structured interface. Instead of writing long scripts or complex custom code from scratch, you can connect nodes, tools, and logic blocks to create clear and efficient agentic workflows. This allows you to build reliable automation systems that scale well and are easy to manage.
In this guide, we add to the video walkthrough. We look at every part inside the OpenAI interface, including tools, guardrails, MCP Servers, logic nodes, and templates like the Planning Helper. The goal is to help you convert your video into a clear, globally readable blog that is optimized for SEO and easy to understand for both beginners and advanced users.
You’ll also learn how the workflow area works, how to use drag-and-drop nodes, and how to control your agent behavior through structured decision-making. By the end, you’ll have a solid understanding of how OpenAI’s builder fits into modern automation and AI development workflows.
Getting Started with OpenAI Agent Builder
To begin using OpenAI’s Agent Builder, visit https://platform.openai.com/agentbuilder.
This page is where you create, edit, and manage your workflows. It provides direct access to existing automations and enables you to build new ones easily. The interface is designed so you can begin experimenting immediately.
Before you start, make sure your OpenAI account has enough credits. Go to Settings → Billing → Credits and ensure that you have a valid credit balance. Even a small amount like $10 is enough to activate the environment and run workflows reliably. Without credits, some model-based steps may not run. This is especially true for steps using the Responses API or model-generated outputs.
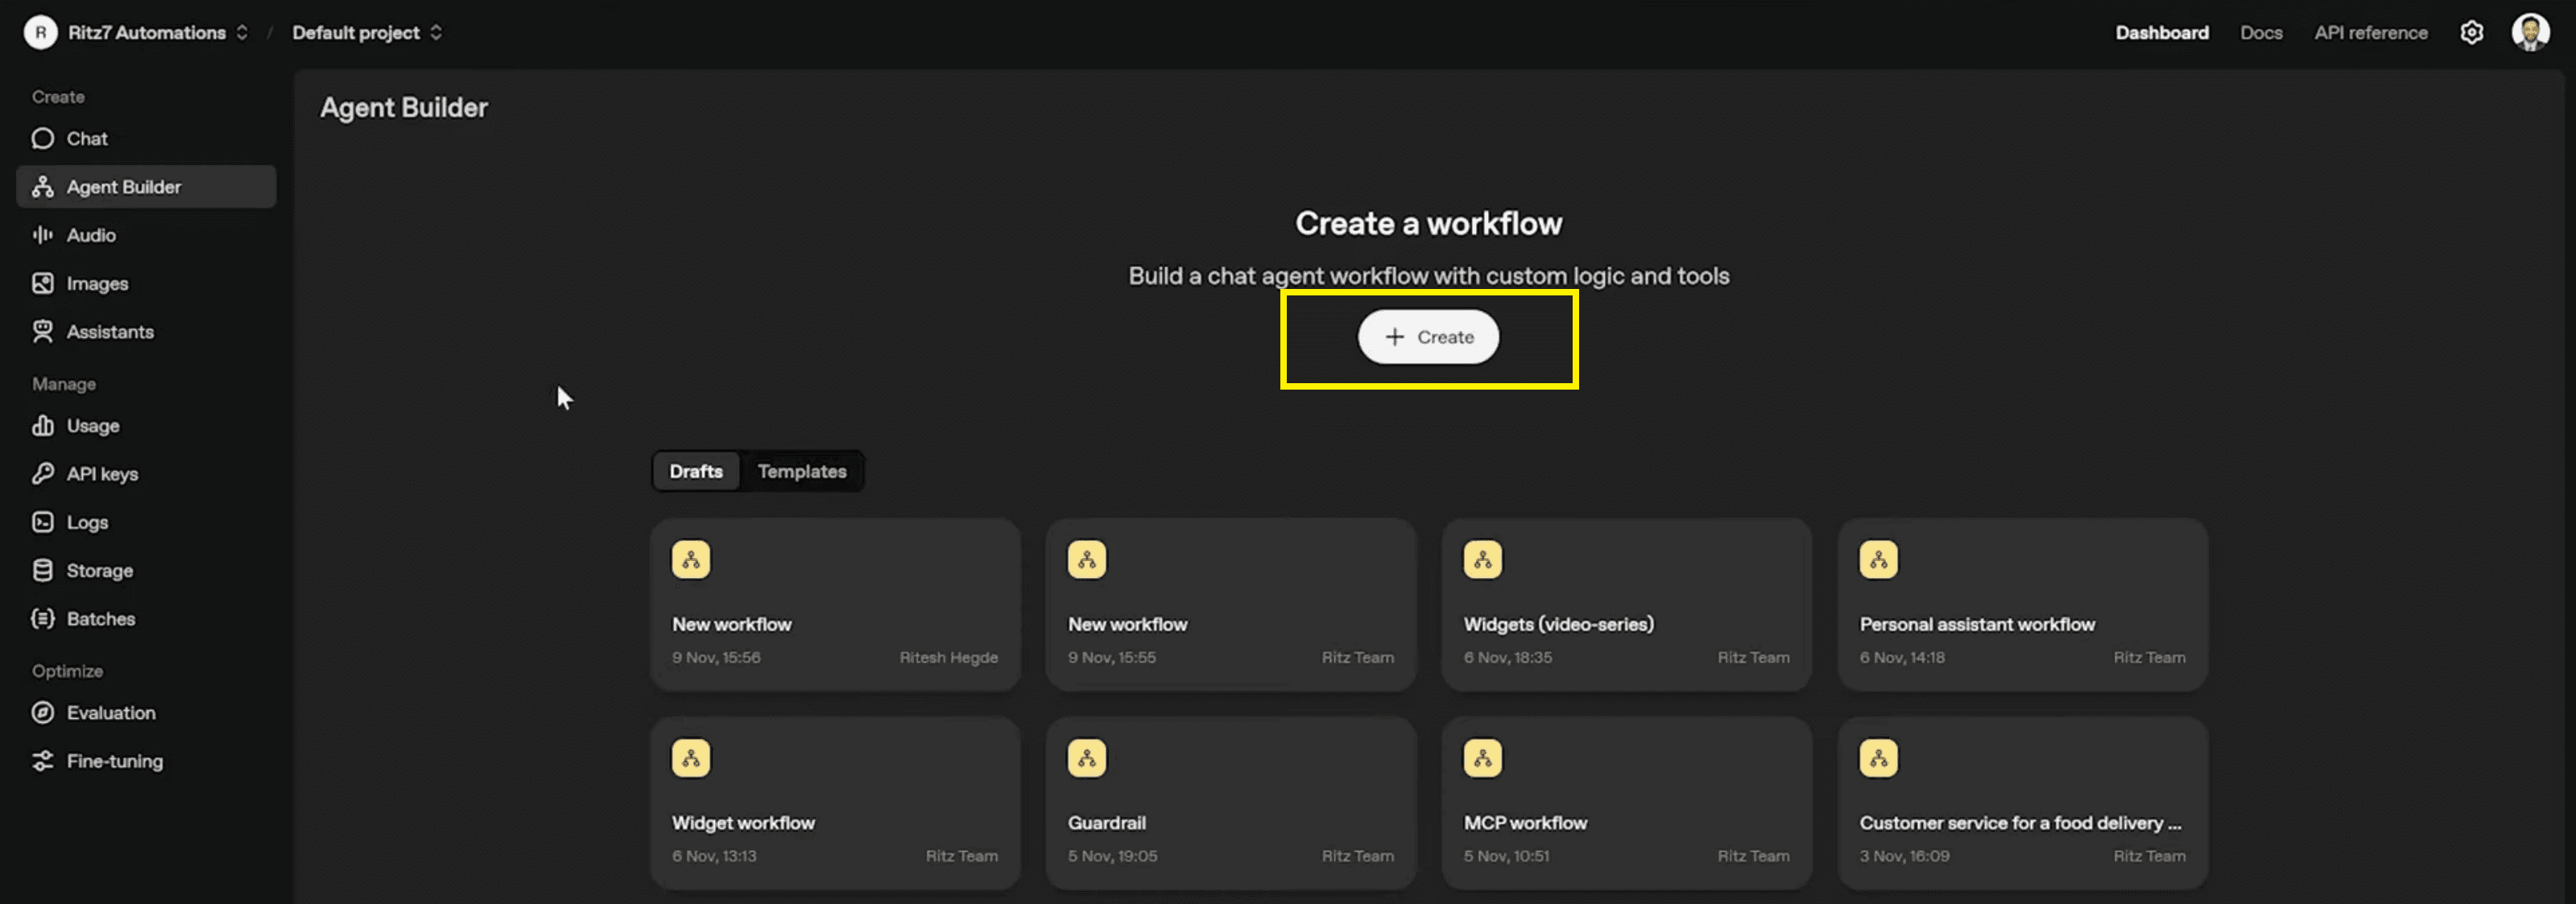
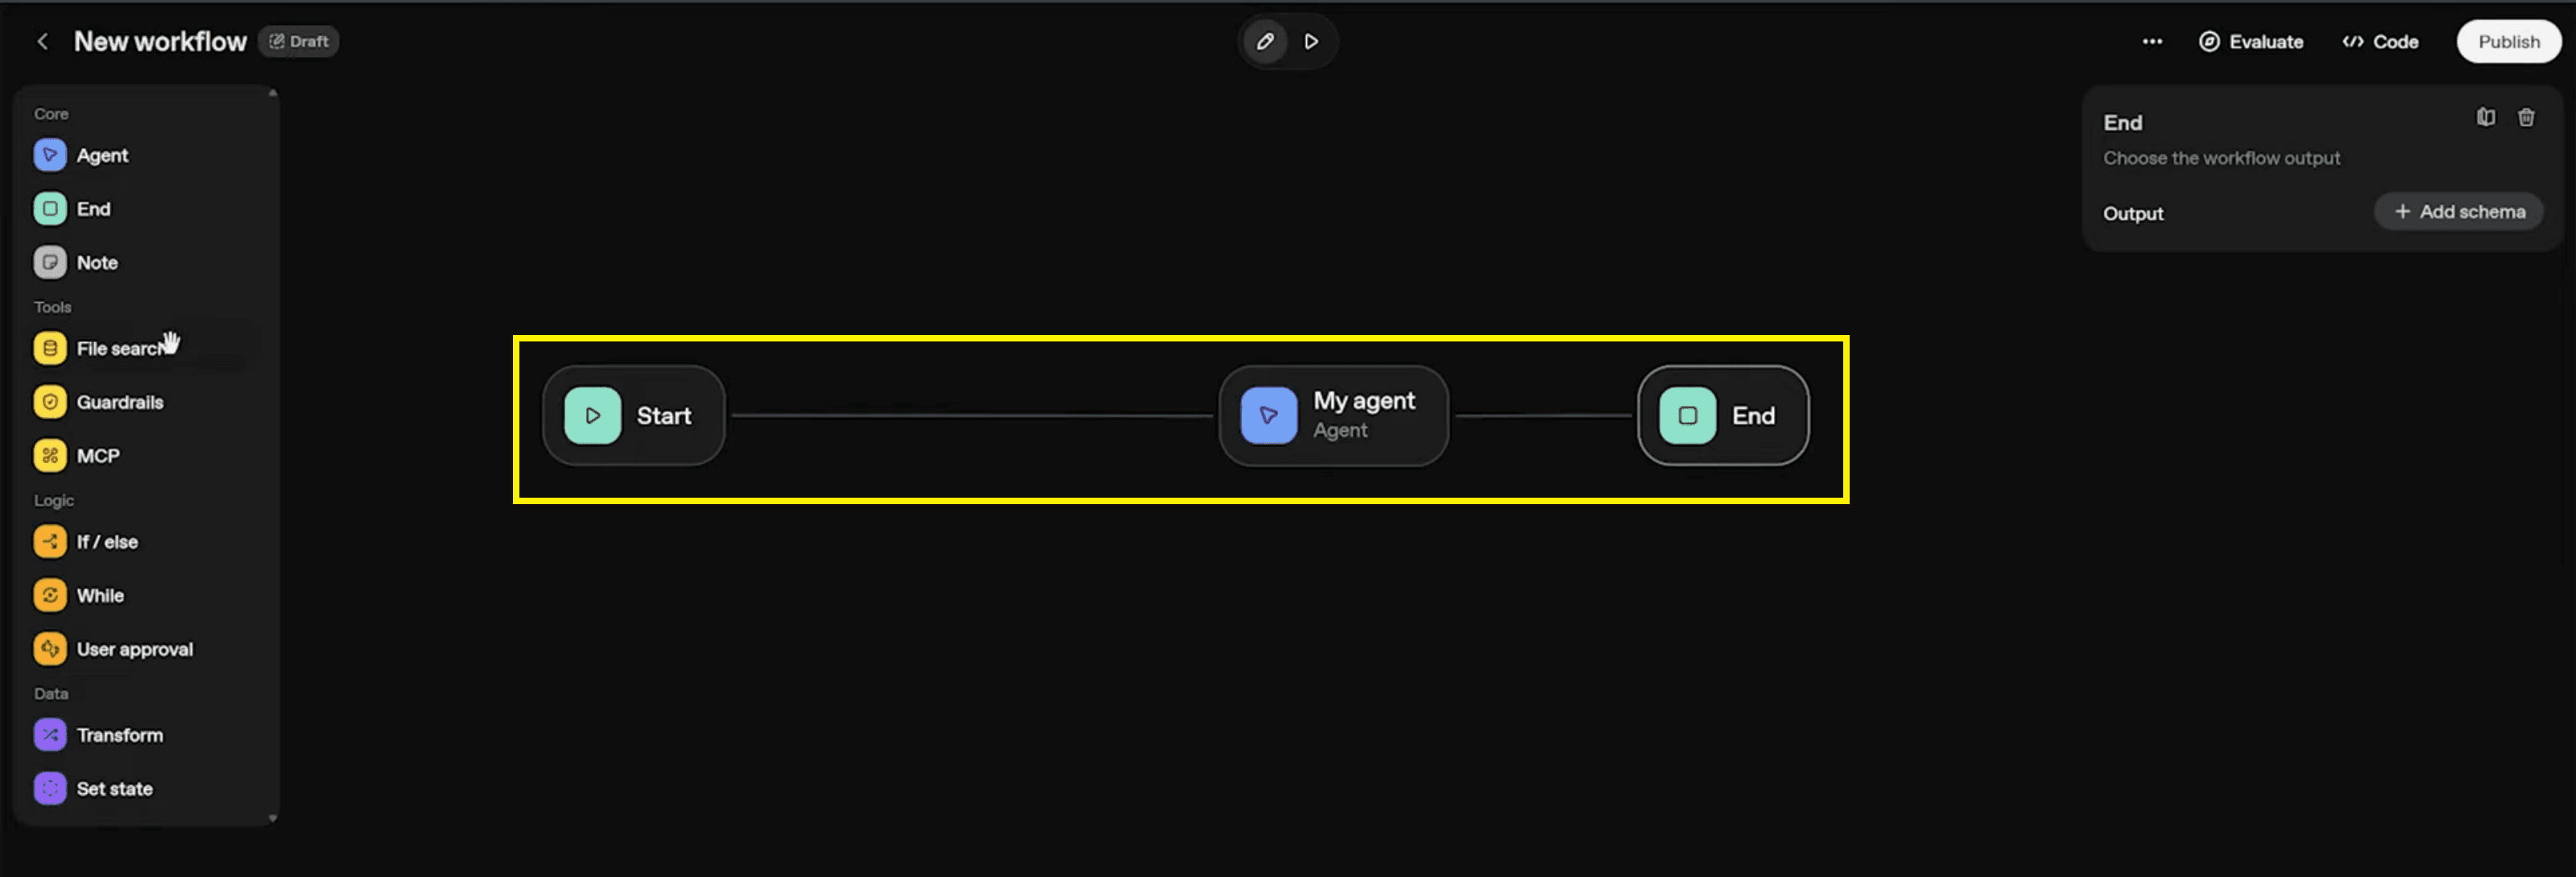
Once your credits are confirmed, click Create Workflow. The visual editor opens with the default nodes: Start, My Agent, and End. These nodes form your initial structure, and you can expand them using logic, state, and tool nodes as you build your automation.
Workflow Interface Overview and Canvas Use
When you open a new workflow, you land in the main workflow area, which acts like a canvas for building your automations. The interface uses drag-and-drop nodes to help you visually connect the different parts of your agentic workflows. Instead of juggling multiple files or scattered scripts, everything sits in one place, making it easy to see how data moves and how decisions are made.
At the top, you usually have access to global controls such as saving, publishing, templates, and the Play button for testing. On the left side, you’ll see node categories like tools, logic, state, guardrails, and MCP integrations. Each category expands into specific node types—like If-Else, While, file search, Guardrail node, and more—that you can drag into the canvas.
The center of the workflow includes:
Start Node – the entry point where the workflow begins running.
My Agent Node – your main agent configuration that processes inputs and calls tools.
End Node – the final point where the workflow stops executing.
Connected elements – logic, tools, MCP actions, and guardrails placed between these anchors to form complex behavior.
This structured layout gives you a clear visual map of how your AI agents operate, how information flows between nodes, and how different parts of the workflow respond to user inputs.
Main Workflow Elements
The main workflow elements are the building blocks of your agent design. These are the nodes you’ll use again and again to structure the flow, control the behavior, and make your system more understandable at a glance. In the transcript, you saw several of these being quickly wired together to show how they work in practice.
Key elements include:
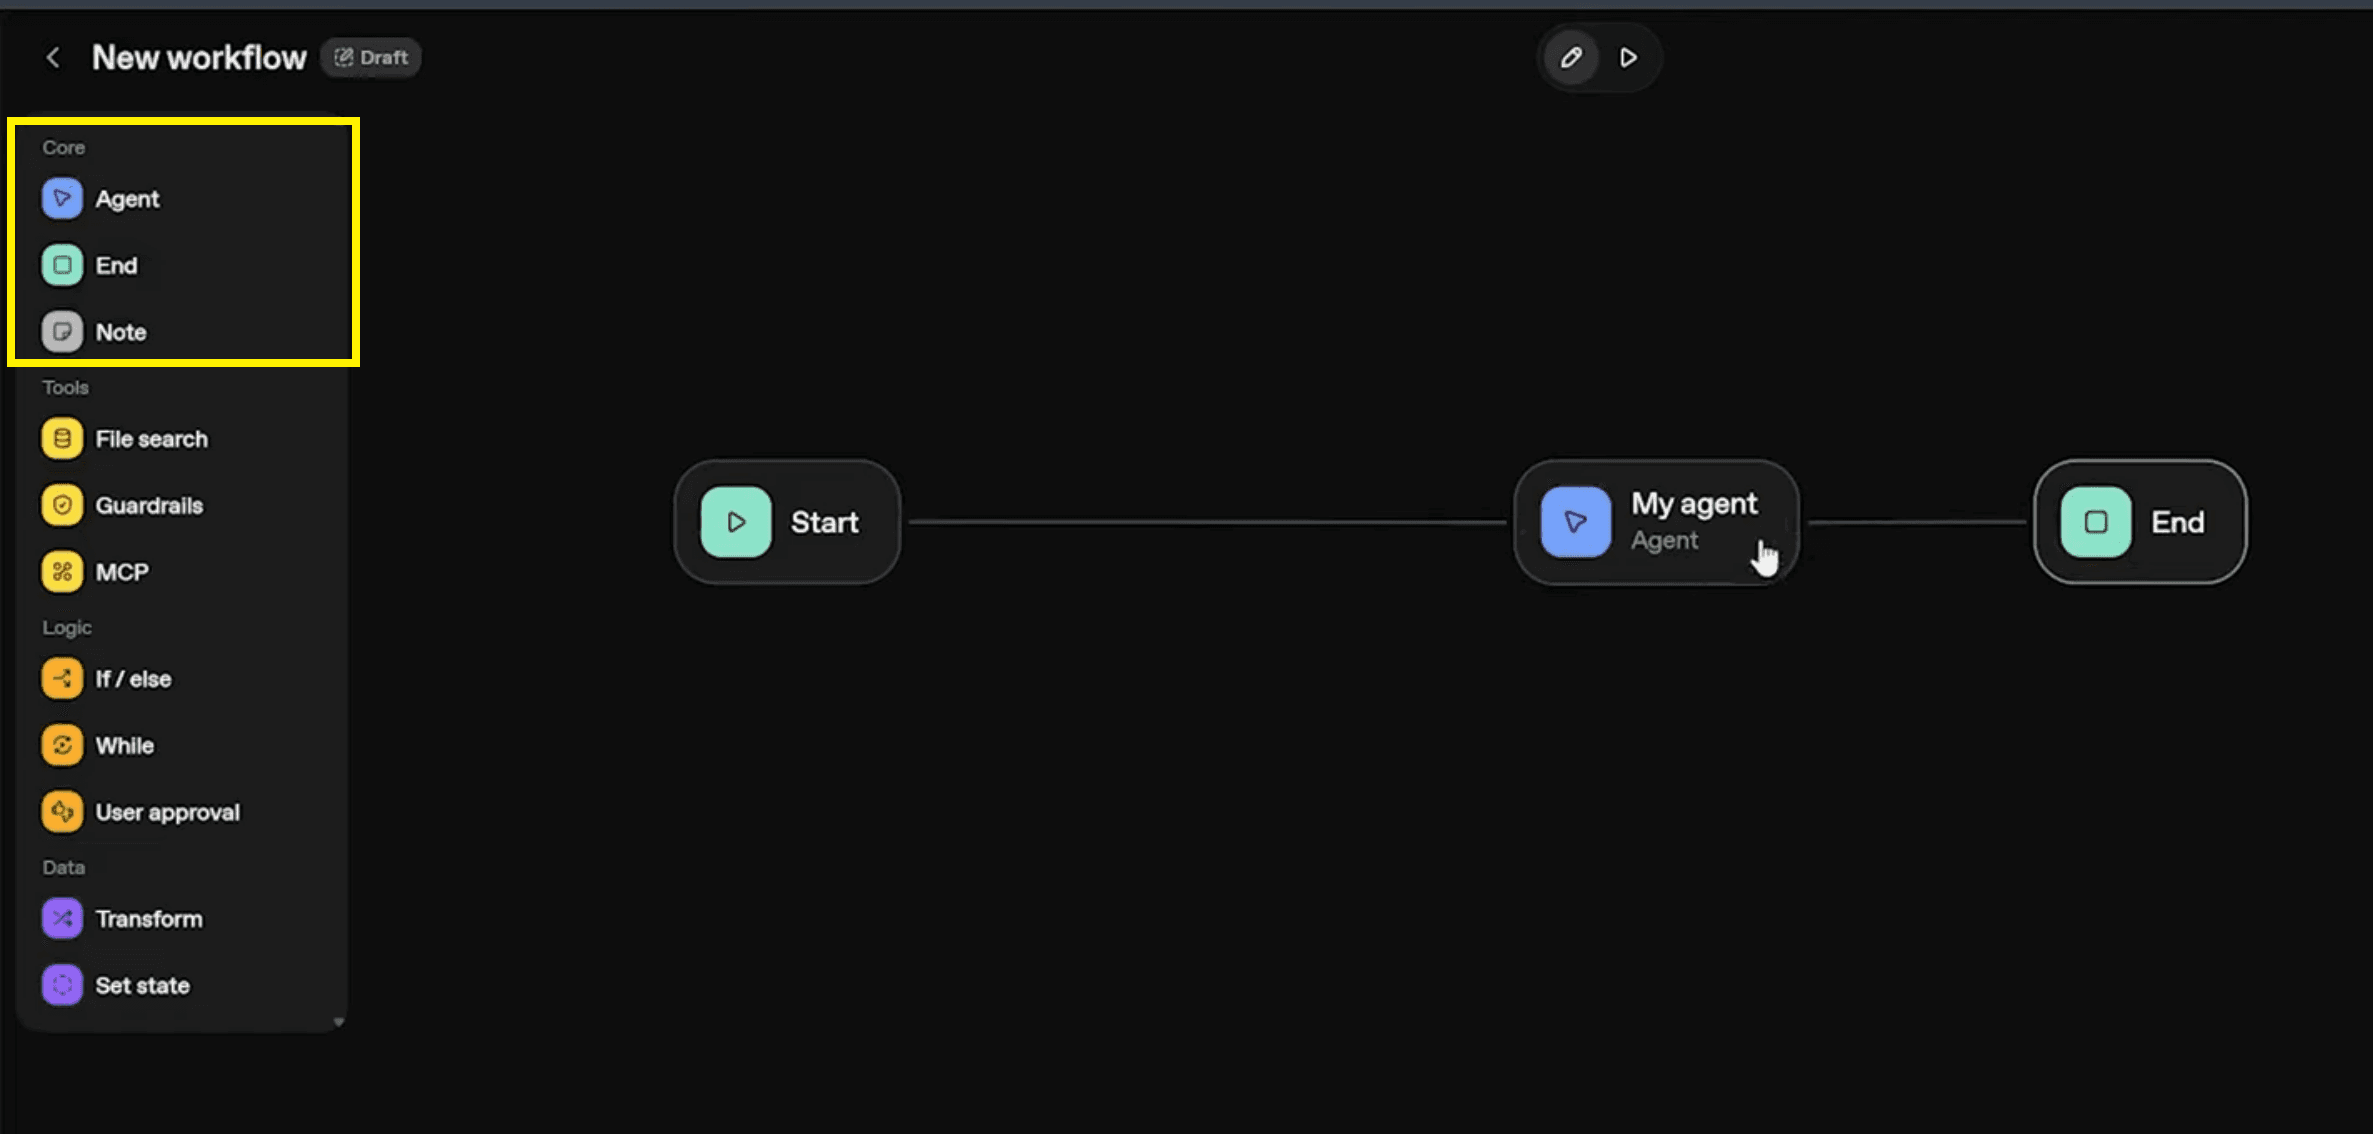
Start / End Nodes: Every workflow begins at a Start node and finishes at an End node. This defines a clear, predictable execution path for your AI system. The Start node kicks off the run, while the End node represents the point at which no more actions or agents will execute in that particular workflow.
My Agent Node: This represents the core agent setup where you define instructions, tools, and models. It’s the “brain” of the workflow that processes input, calls tools, and produces responses based on your configuration. You can have multiple agent nodes in one workflow for more advanced multi-step logic.
Notes: Notes function like sticky notes on the canvas. They are purely for documentation and don’t affect the workflow execution. You might use them to explain what a particular agent does, describe the purpose of a condition, or remind yourself of assumptions and design decisions.
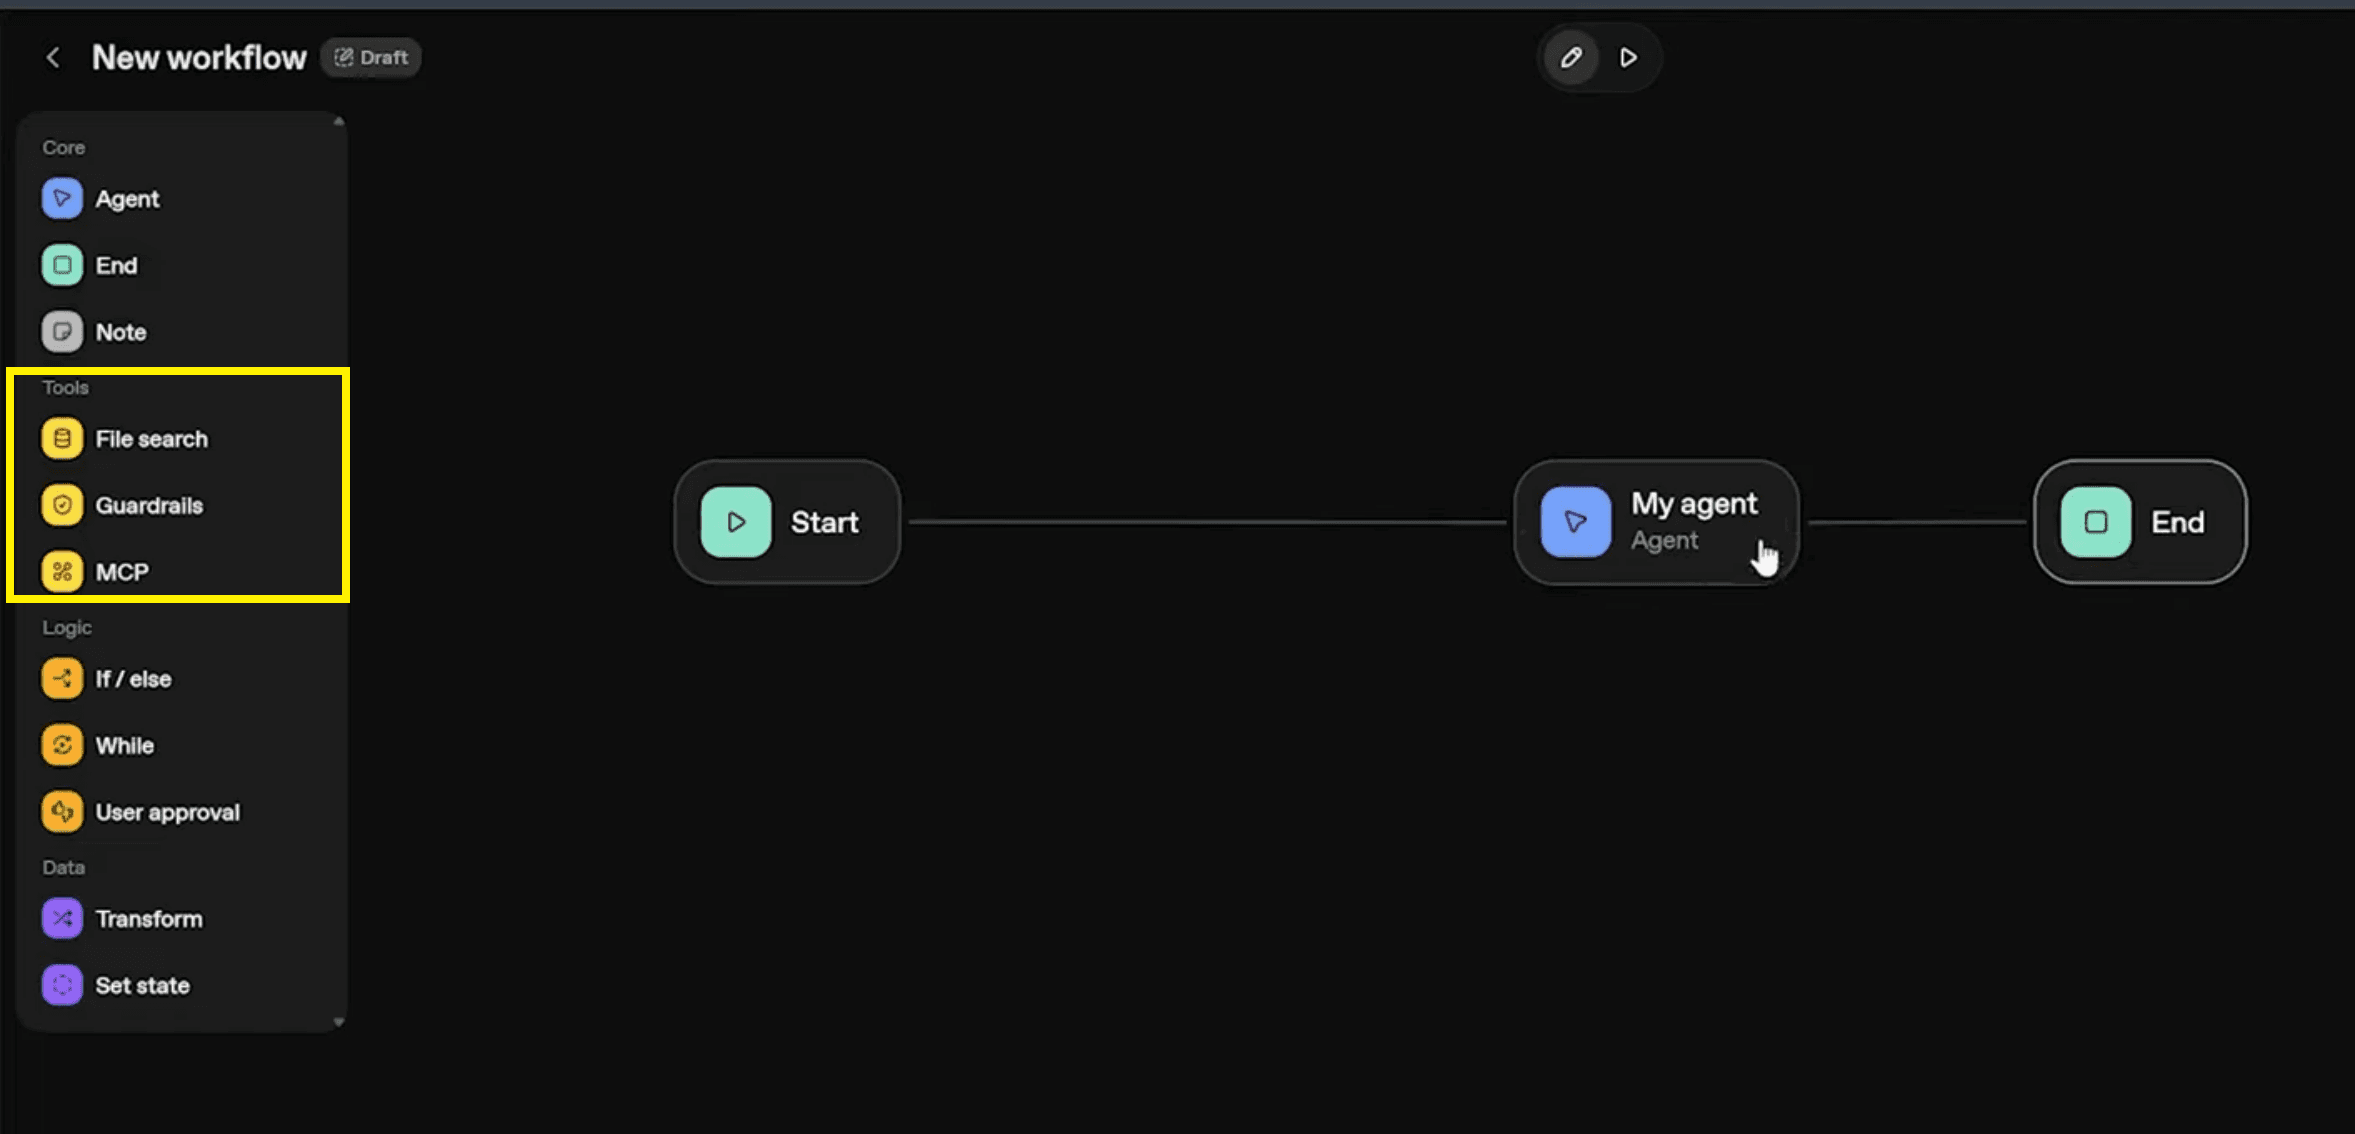
Tools (e.g., file search / Vector Store): Tool nodes let agents access external capabilities such as file search, querying a Vector Store, or using other built-in tools. For example, a file search tool allows the agent to query your uploaded documents or vector stores for relevant information, which is especially helpful for Retrieval-Augmented logic or knowledge-heavy responses.
These elements form the foundation of your workflows, and as you build more complex systems, you’ll find yourself combining them with logic, state, and integrations to create stronger agent behavior.
Guardrails for Safety
Guardrails are a dedicated set of controls designed to keep your AI agents safe, compliant, and aligned with expected behavior. In the Agent Builder, you add a Guardrail node to inspect inputs and outputs before the agent responds or continues execution. This is especially important when your workflows interact with sensitive data or external users at scale.
How Guardrails Work:
Detect and redact personal info (PII) such as names, email addresses, or sensitive identifiers to reduce data leakage risks.
Moderate harmful content by blocking unsafe, abusive, or policy-violating text before it leaves the system.
Identify prompt injection or jailbreak attempts to prevent users from overriding instructions or exposing hidden logic.
Validate outputs to reduce hallucinations, ensuring responses align with approved knowledge sources.

The guardrails can also be configured with an error path. If a guardrail encounters a runtime issue or unexpectedly fails, the workflow can follow an alternate route instead of stopping completely. This helps keep your AI system stable and dependable, even when something goes wrong. When combined with strong control-flow logic, guardrails make your workflow more trustworthy, predictable, and ready for production-level environments.
MCP Integrations (Connecting External Apps & Services)
MCP Servers enable your AI agents to connect to real-world tools and services, allowing workflows to interact with external data and applications. In the Agent Builder, a dedicated MCP node is available for adding these integrations directly into your workflow. It enhances OpenAI Agent Builder’s power by connecting with external services. Built-in and third-party integrations include:
Google Suite: Gmail, Drive, Calendar
Microsoft Apps: Outlook, SharePoint, Teams
Other Services: Dropbox, Shopify, Zapier, Intercom
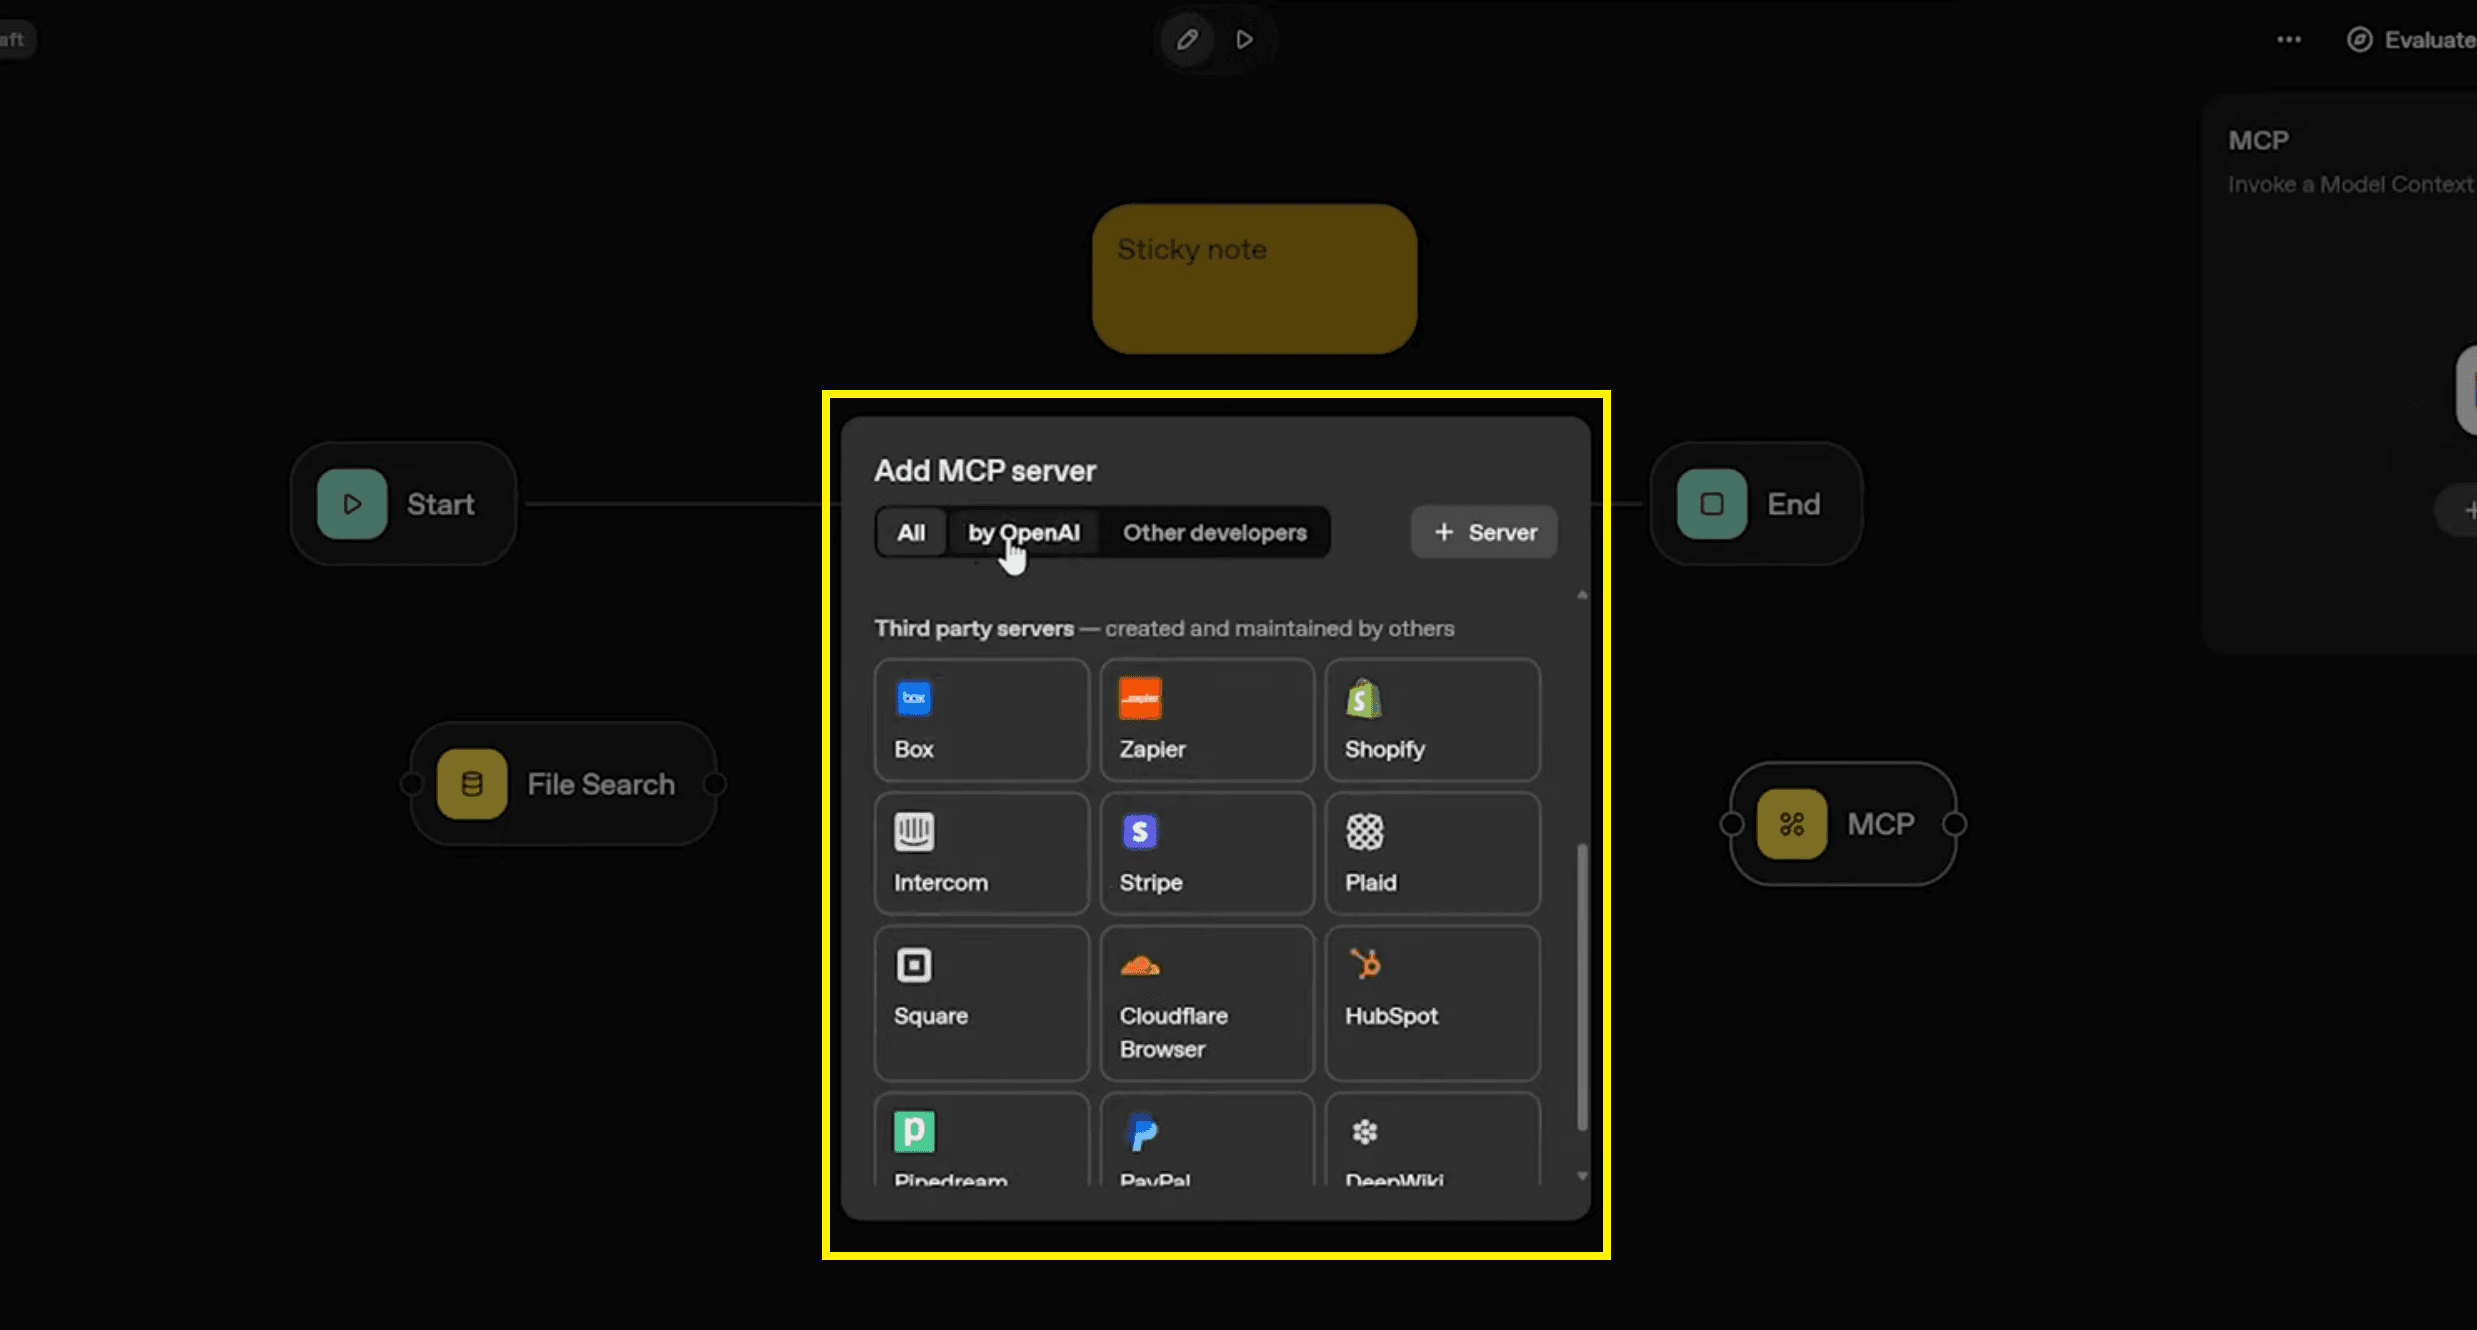
All of these integrations are managed through a Connector Registry, which acts as a catalog of available MCP nodes. Some MCPs are created and maintained by OpenAI, while others are built by independent developers or organizations. This lets you mix and match connectors based on your project needs. You can read emails, access documents, or trigger workflows in other systems.
From within a workflow, MCP nodes can be called by your agent when needed. For example, your agent setup might include a tool that sends summaries to email, fetches calendar events, or retrieves files from a central repository. MCP Servers work with the Agent SDK or other integration options. They let your agent workflows do more than just talk. They interact with the tools your teams already use.
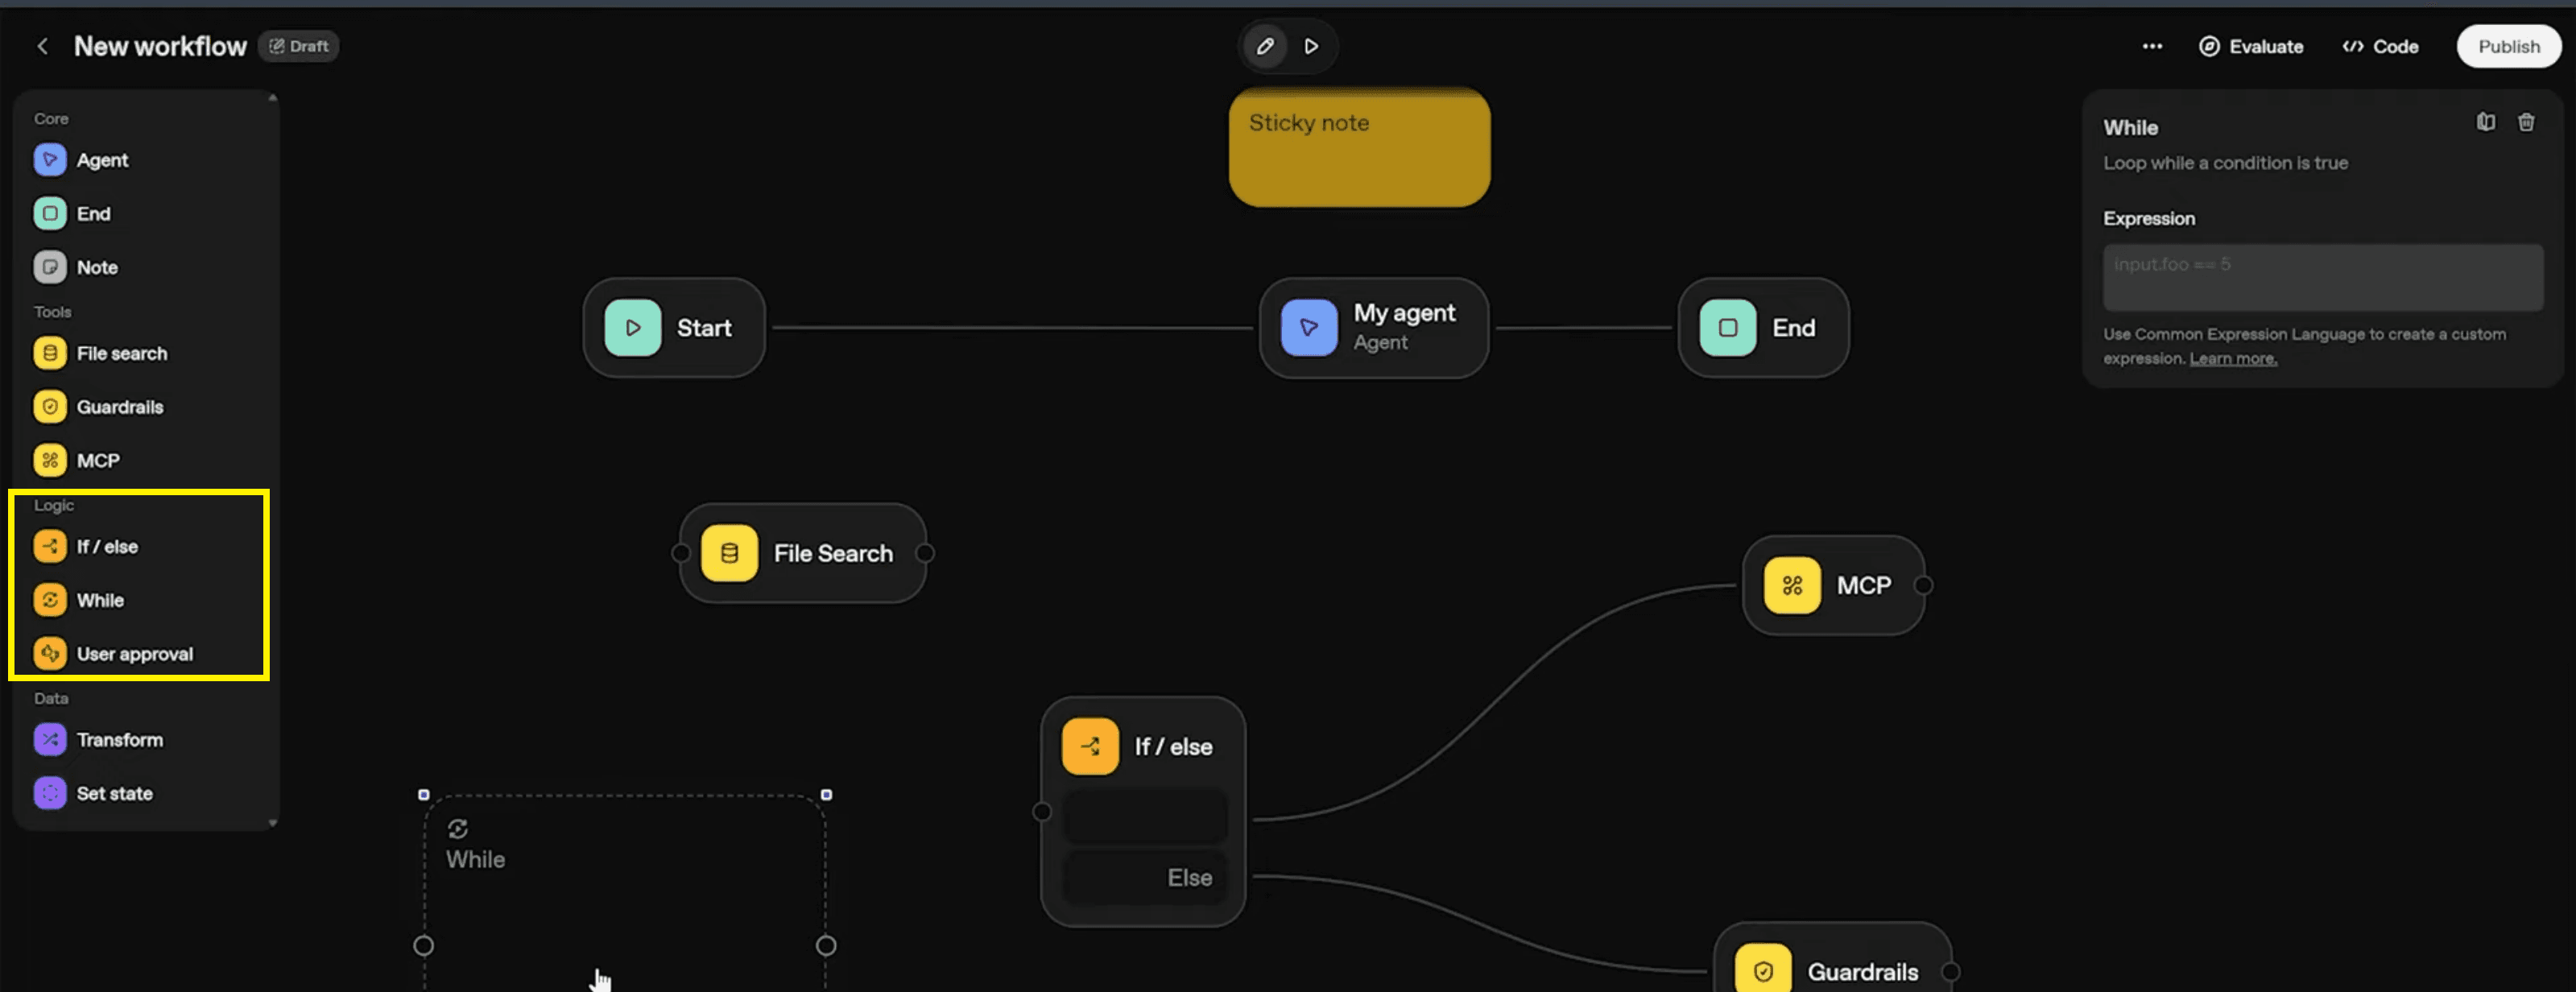
Logic & Flow Control
To make workflows truly intelligent and structured, you need solid control-flow logic. The Agent Builder provides Logic Nodes that help you branch, loop, and incorporate human decisions into your flows. These logic elements change a simple single-agent setup into a flexible, multi-step, and condition-aware process.
Common logic elements include:
If–Else Condition: This node evaluates a condition and chooses between two paths: true or false. For example, you might check whether a field like
has_all_detailsis true in the previous agent’s JSON output. If it’s true, the workflow can move forward to an execution agent; if false, it might route to a data-collection agent.While Loop: The While loop node repeats a set of steps until a particular condition is met. You might use this for iterative validation, repeated checks, or stepping through multi-part information gathering. Behind the scenes, this often pairs with variables and state to keep track of counts or flags.
User Approval: This node introduces human-in-the-loop review. Whenever a decision needs manual approval, the workflow can pause at a User Approval node. The user can approve, reject, or modify the proposed action, and only then does the workflow proceed toward the next node or end.
These Logic Nodes are key to building reliable agent workflows. They make sure decisions are clear, easy to follow, and easy to change as your use case grows.
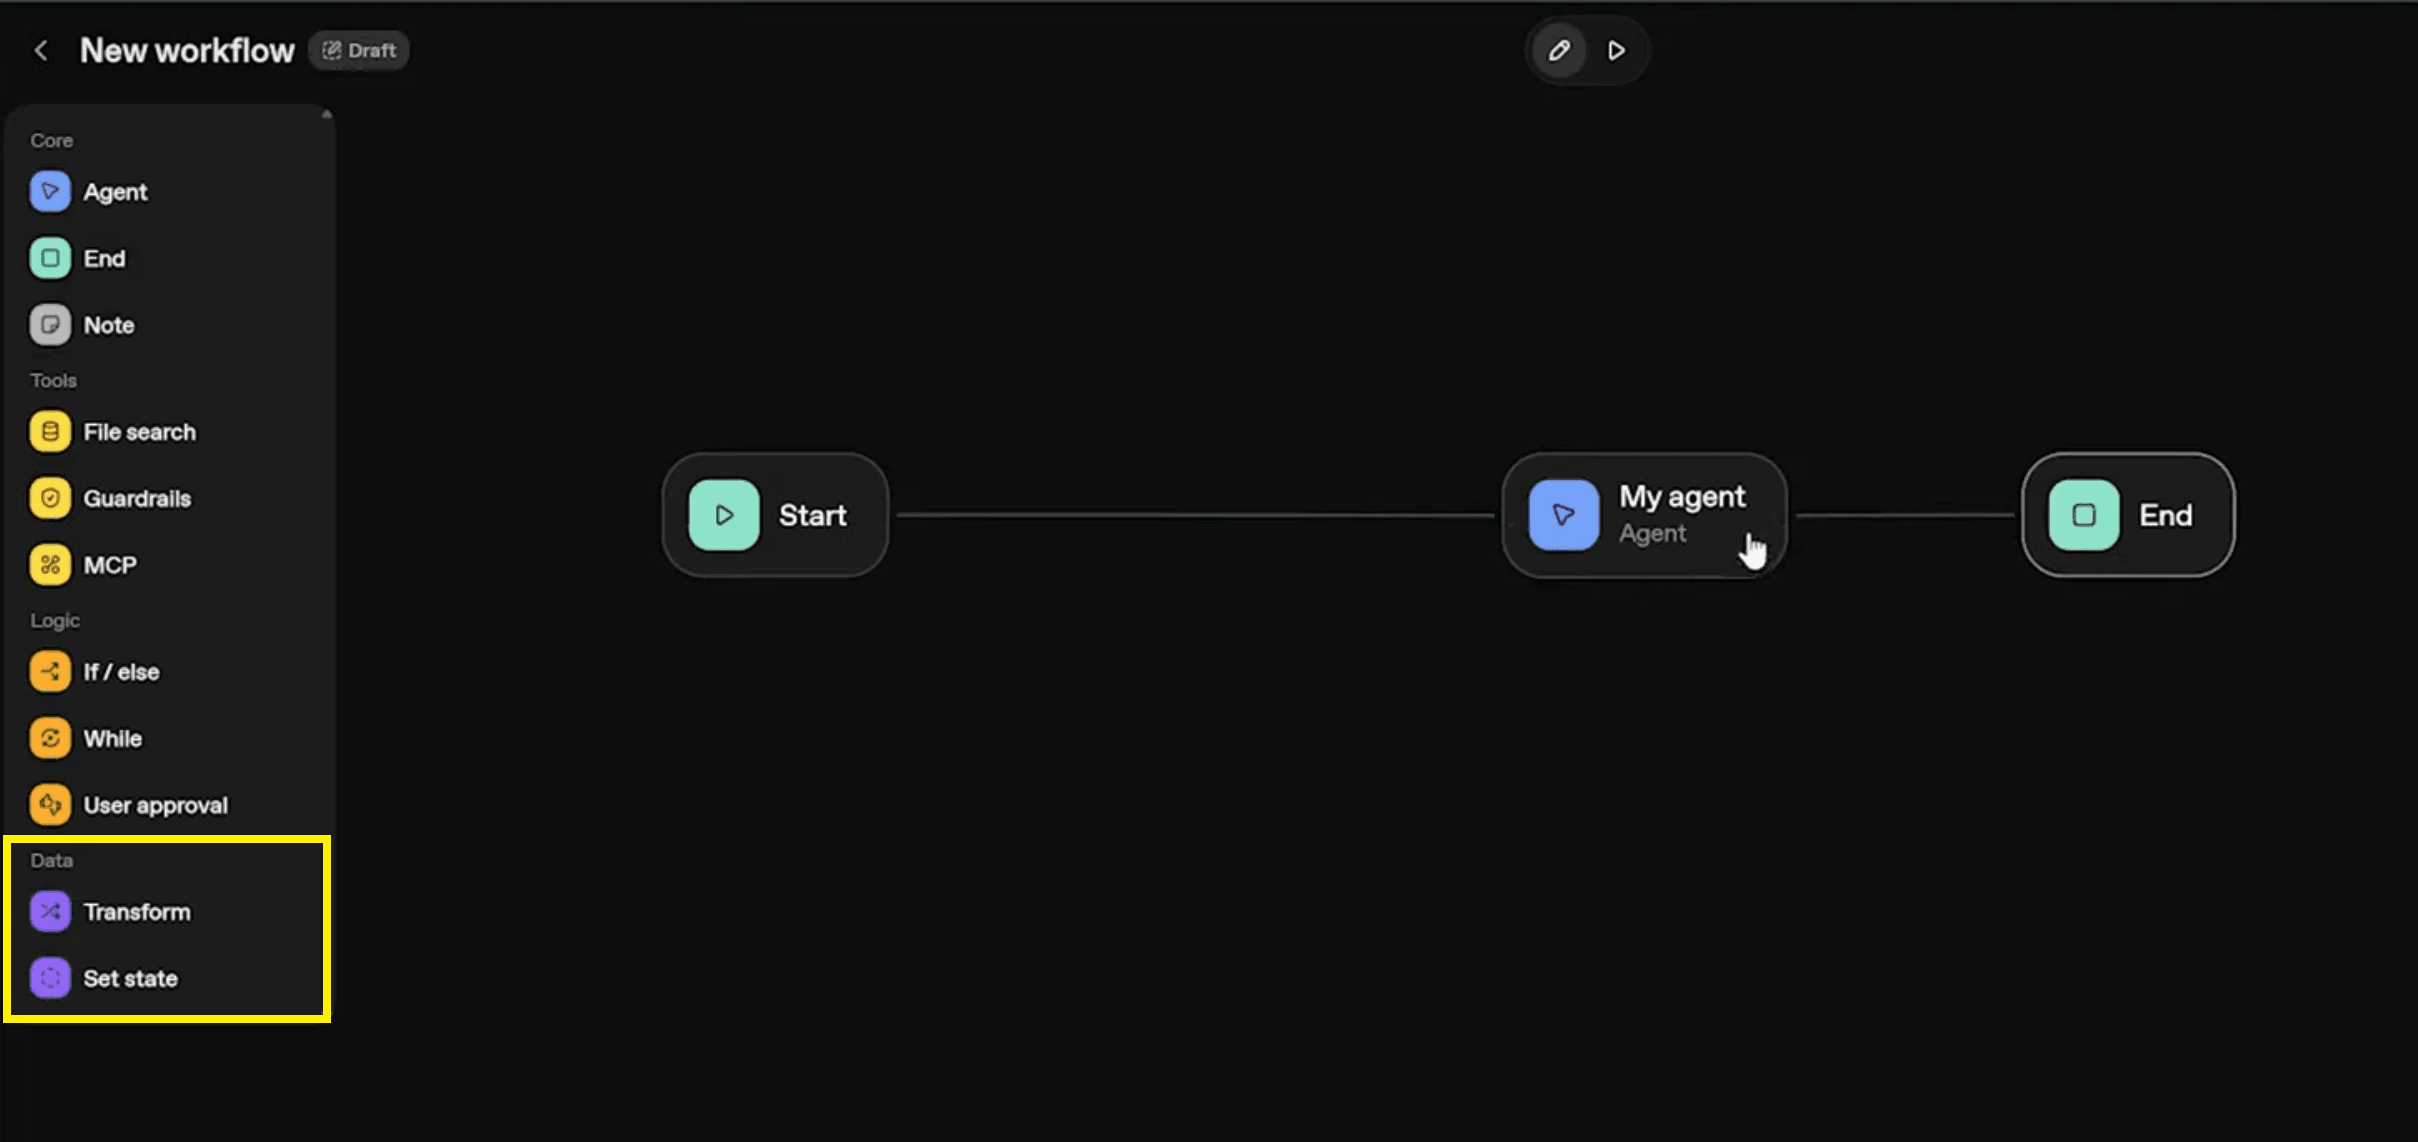
State, Transformations & Variables
To build dynamic workflows, you need to maintain and update the two main states during execution. The Agent Builder includes nodes that let you define variables and transform data on the fly. This combination is what allows an AI system to behave more like a procedural or event-driven program with memory and logic.
The two main nodes are:
Set State: This node lets you define variables such as counters, flags, or contextual values. For example, you might create a variable called
countwith a default value of1. These state variables can then be referenced in other nodes, including agents, conditions, or transforms, making your workflow adaptable and context-aware.Transform: The Transform node allows you to modify existing data and state. You can design transformations using expressions or object structures, and in many cases, define data formats using JSON Schema. This is useful when you want to increment a variable (for example,
count + 1), reformat data, or prepare structured payloads to send to a tool, external service, or REST API.
Together, Set State and Transform nodes let you build more complex, data-driven logic flows. They also pair very well with Logic Nodes, enabling you to create loops, counters, and conditions that reflect real-world logic rather than single-turn conversation patterns.
Configuring Your Agent
The My Agent node is where you define the core behavior of your AI agents. This configuration panel is very important. It sets the tone, personality, and abilities of the agent inside your workflow. You can give the agent a descriptive name, provide detailed system instructions, and add user-facing context that guides how it should respond.
In the agent setup, you can choose to include conversation history. This helps the agent understand past messages and keep the conversation going. You then choose the model (for example, GPT-4.1 or GPT-4.1 Mini) and optionally adjust reasoning effort settings. These choices directly affect quality, latency, and cost, especially when invoked via the Responses API or Agent SDK.
You can also attach tools to the agent, such as web search, file search, MCP Servers, and code interpreter. These built-in tools extend the agent’s capabilities without needing heavy custom code around them. Finally, you choose the output format: plain text, JSON Schema-based structured output, or widget-based responses. This structured output can later be consumed by other systems or steps in the workflow.
Using Prebuilt Templates in Agent Builder
If you don’t want to start from a completely blank workflow, OpenAI provides templates in the Agent Builder. Templates are prebuilt workflows that combine agents, logic, and tools to demonstrate how everything fits together. They’re ideal for learning the core concepts and for quickly adapting existing flows to your own use cases.
To access templates, you simply click on the Templates section in the Agent Builder interface. From there, you’ll see several options tailored to specific business scenarios or common agent patterns. Each template shows a fully wired set of nodes, including one or more agents, logic conditions, and possibly MCP nodes or tool calls.

These templates are also useful when you are learning how to combine tools like file search, Vector Store queries, and conditional branches. Instead of having to design everything from scratch, you can study how the template’s control-flow logic is constructed and then adjust node names, instructions, and tool settings to match your own goals.
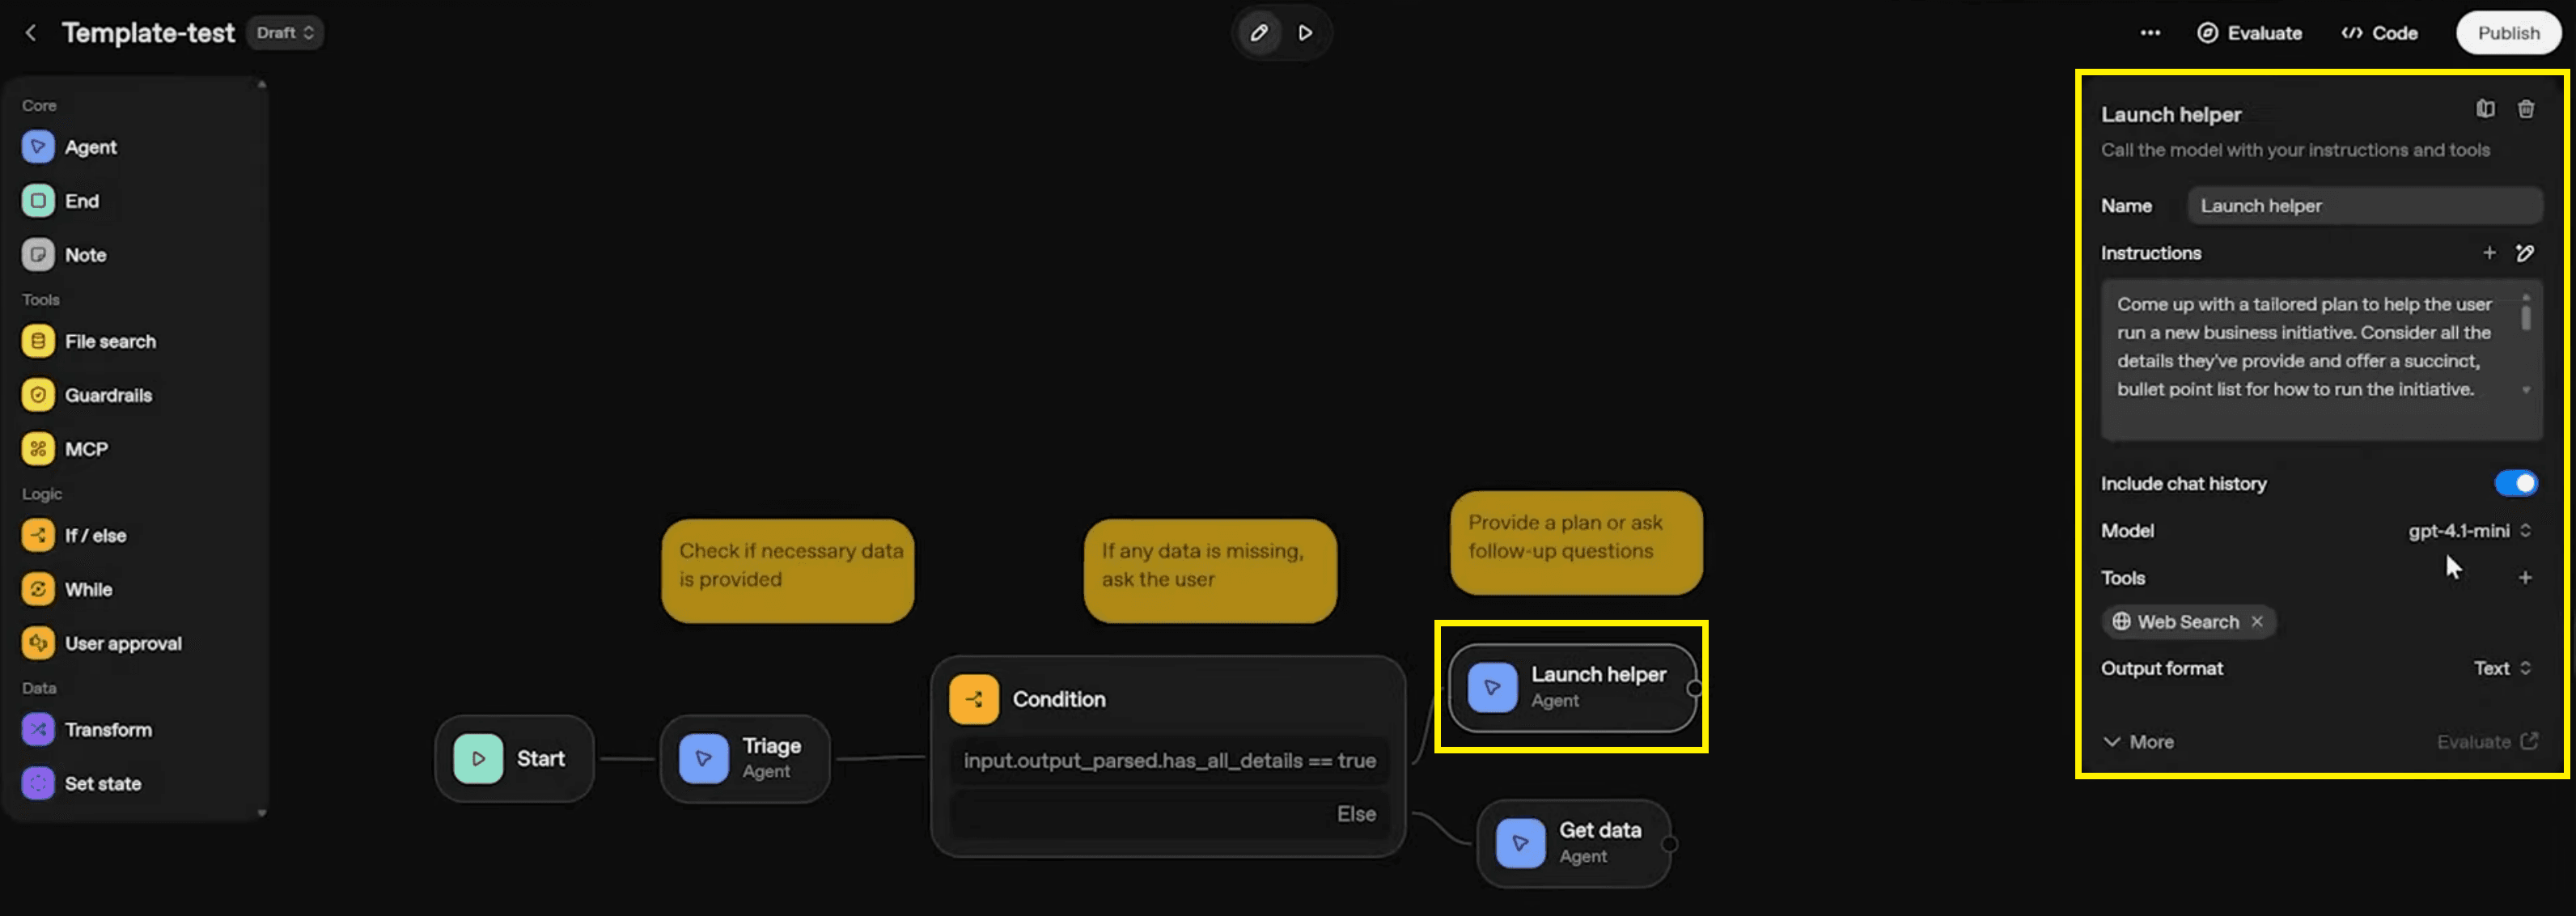
Planning Helper Example
The Planning Helper template discussed in the video is a great illustration of a multi-step agentic workflow built inside OpenAI Agent Builder. This workflow collects key details about a business initiative. Then it creates a tailored plan once it has all the needed information. It’s a practical example that shows how multiple agents and conditions can work together.
The template uses three key agent-related nodes:
Triag Agent: This agent scans the conversation history to extract fields like initiative goal, target completion date, or timeframe, and available resources. It outputs a structured JSON object using a structured output property defined via JSON Schema, including a Boolean field like
has_all_details.Condition (If–Else): The Condition node checks whether the JSON output from the Triag agent indicates that
has_all_details == true. If it is true, it routes the workflow toward the Launch Helper agent; if not, it routes to another agent that collects missing data from the user, ensuring the workflow never moves forward with incomplete information.Launch Helper Agent: This agent uses the collected details to generate an actionable plan. It can also leverage web search as a tool to gather extra context and best practices, then synthesize a structured and helpful answer. Combined with prior nodes, it forms a robust example of how to design well-structured, multi-agent workflows.
Studying this template gives a clear example. One AI agent handles extraction, another handles planning, and a Condition node controls the logic between them.
Testing & Publishing
Once your workflow is set up, you’ll want to test it thoroughly before exposing it broadly. The Agent Builder provides a Play button inside the interface, where you can run your workflows with sample prompts and watch how each node executes. This makes debugging far easier, especially when complex logic or multiple agents are involved.
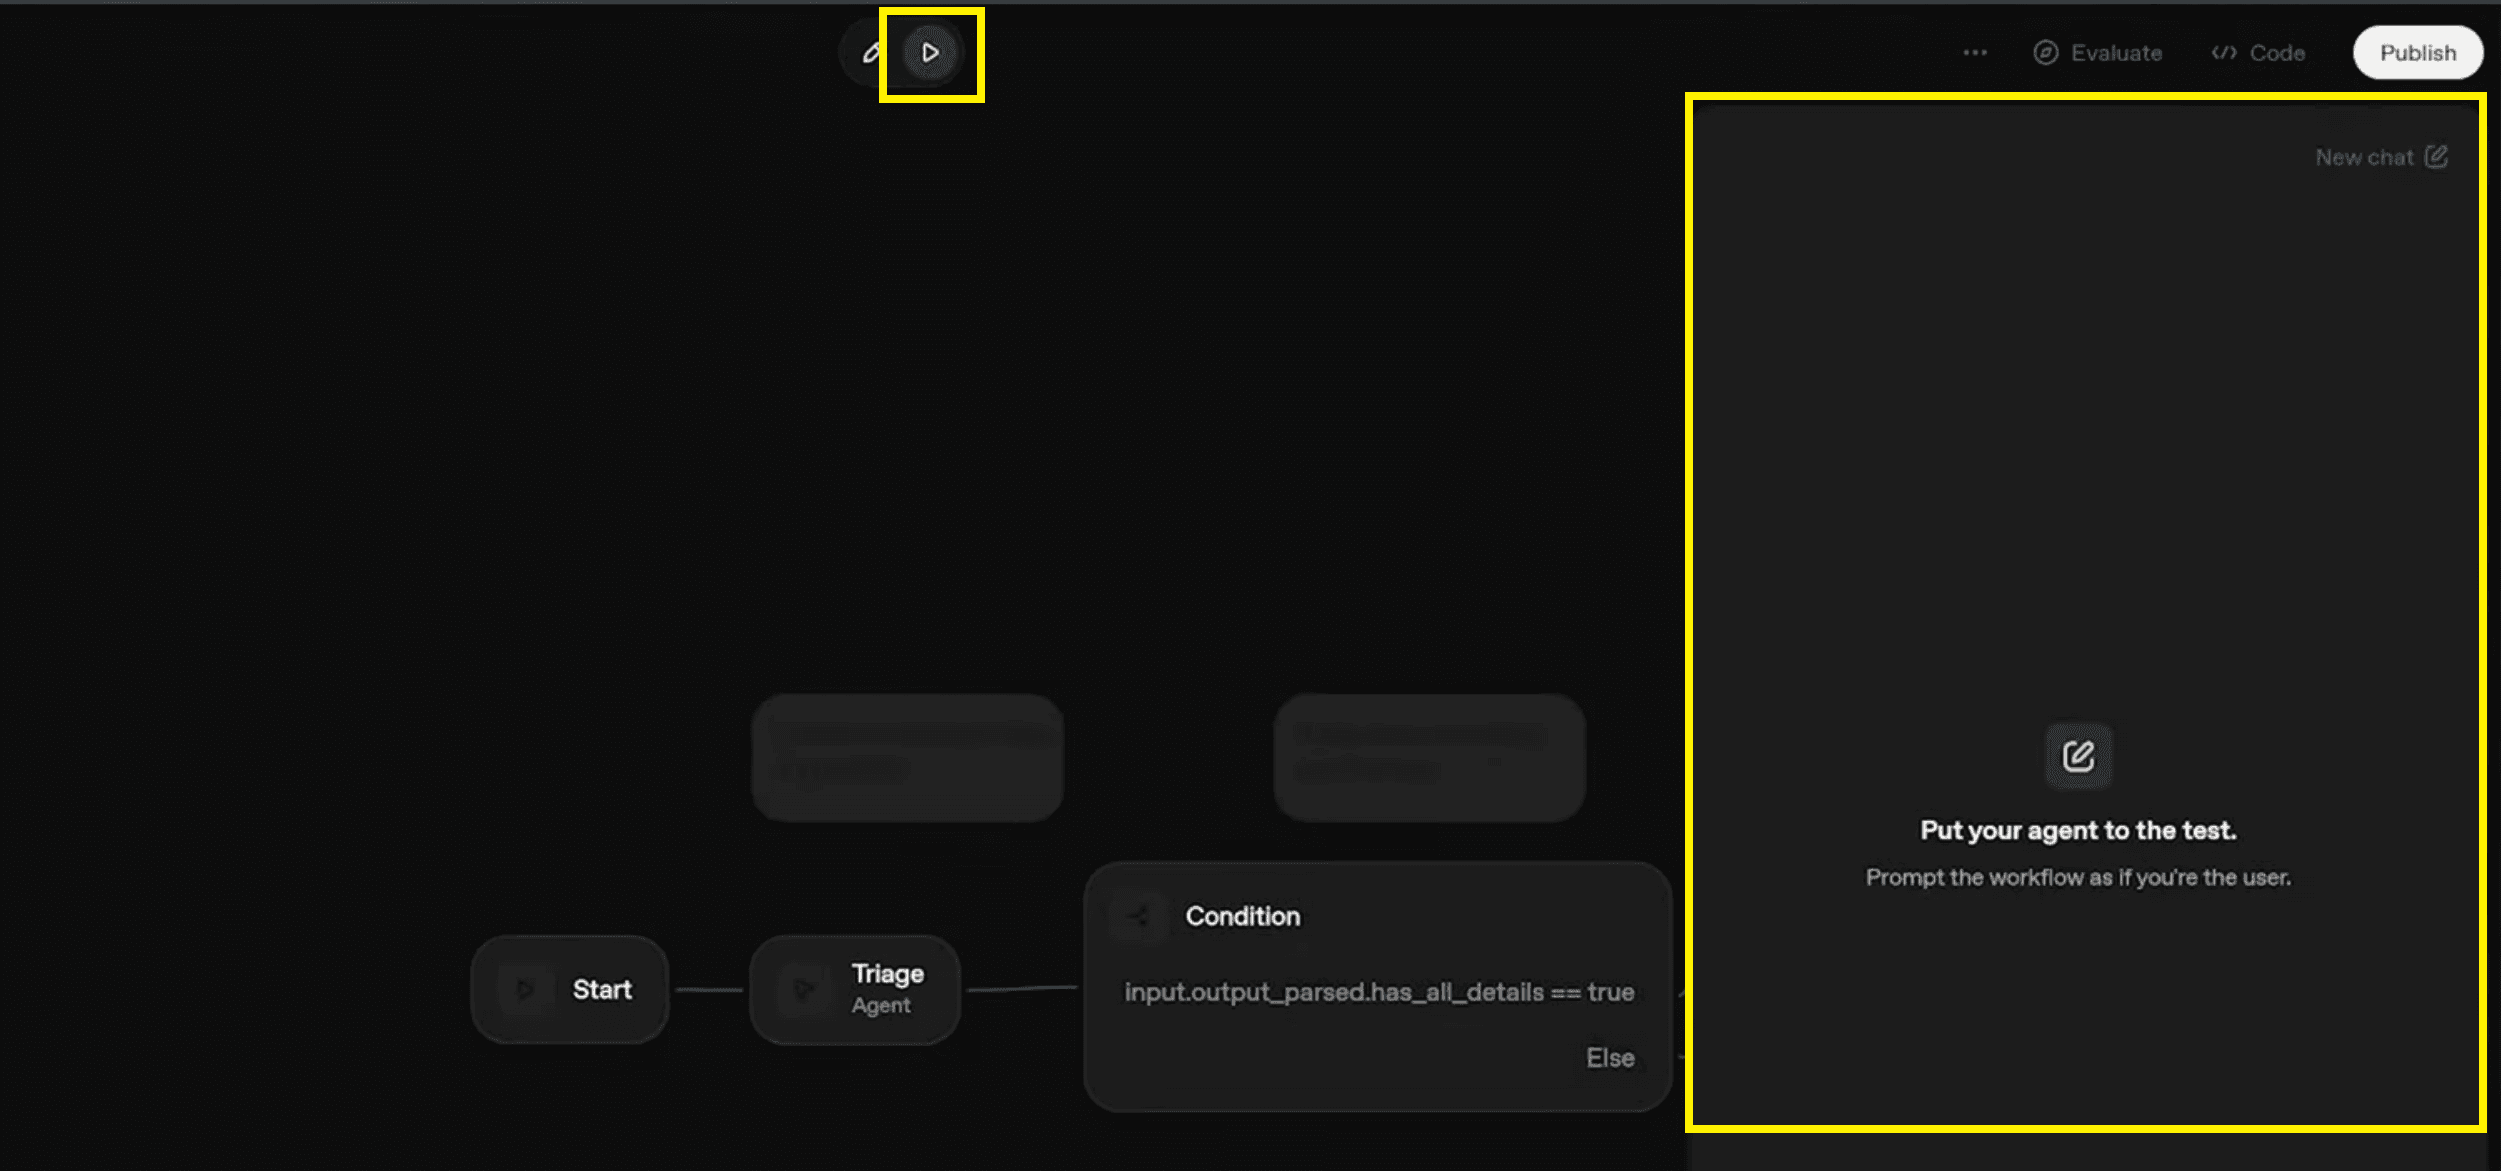
During testing, you can see which nodes activate, what inputs and outputs they receive, and how variables and guardrails behave. You will find issues like wrong conditions, missing variables, or model access errors here. For example, switching from a restricted model to a standard GPT-4.1 can fix a workflow runtime error.
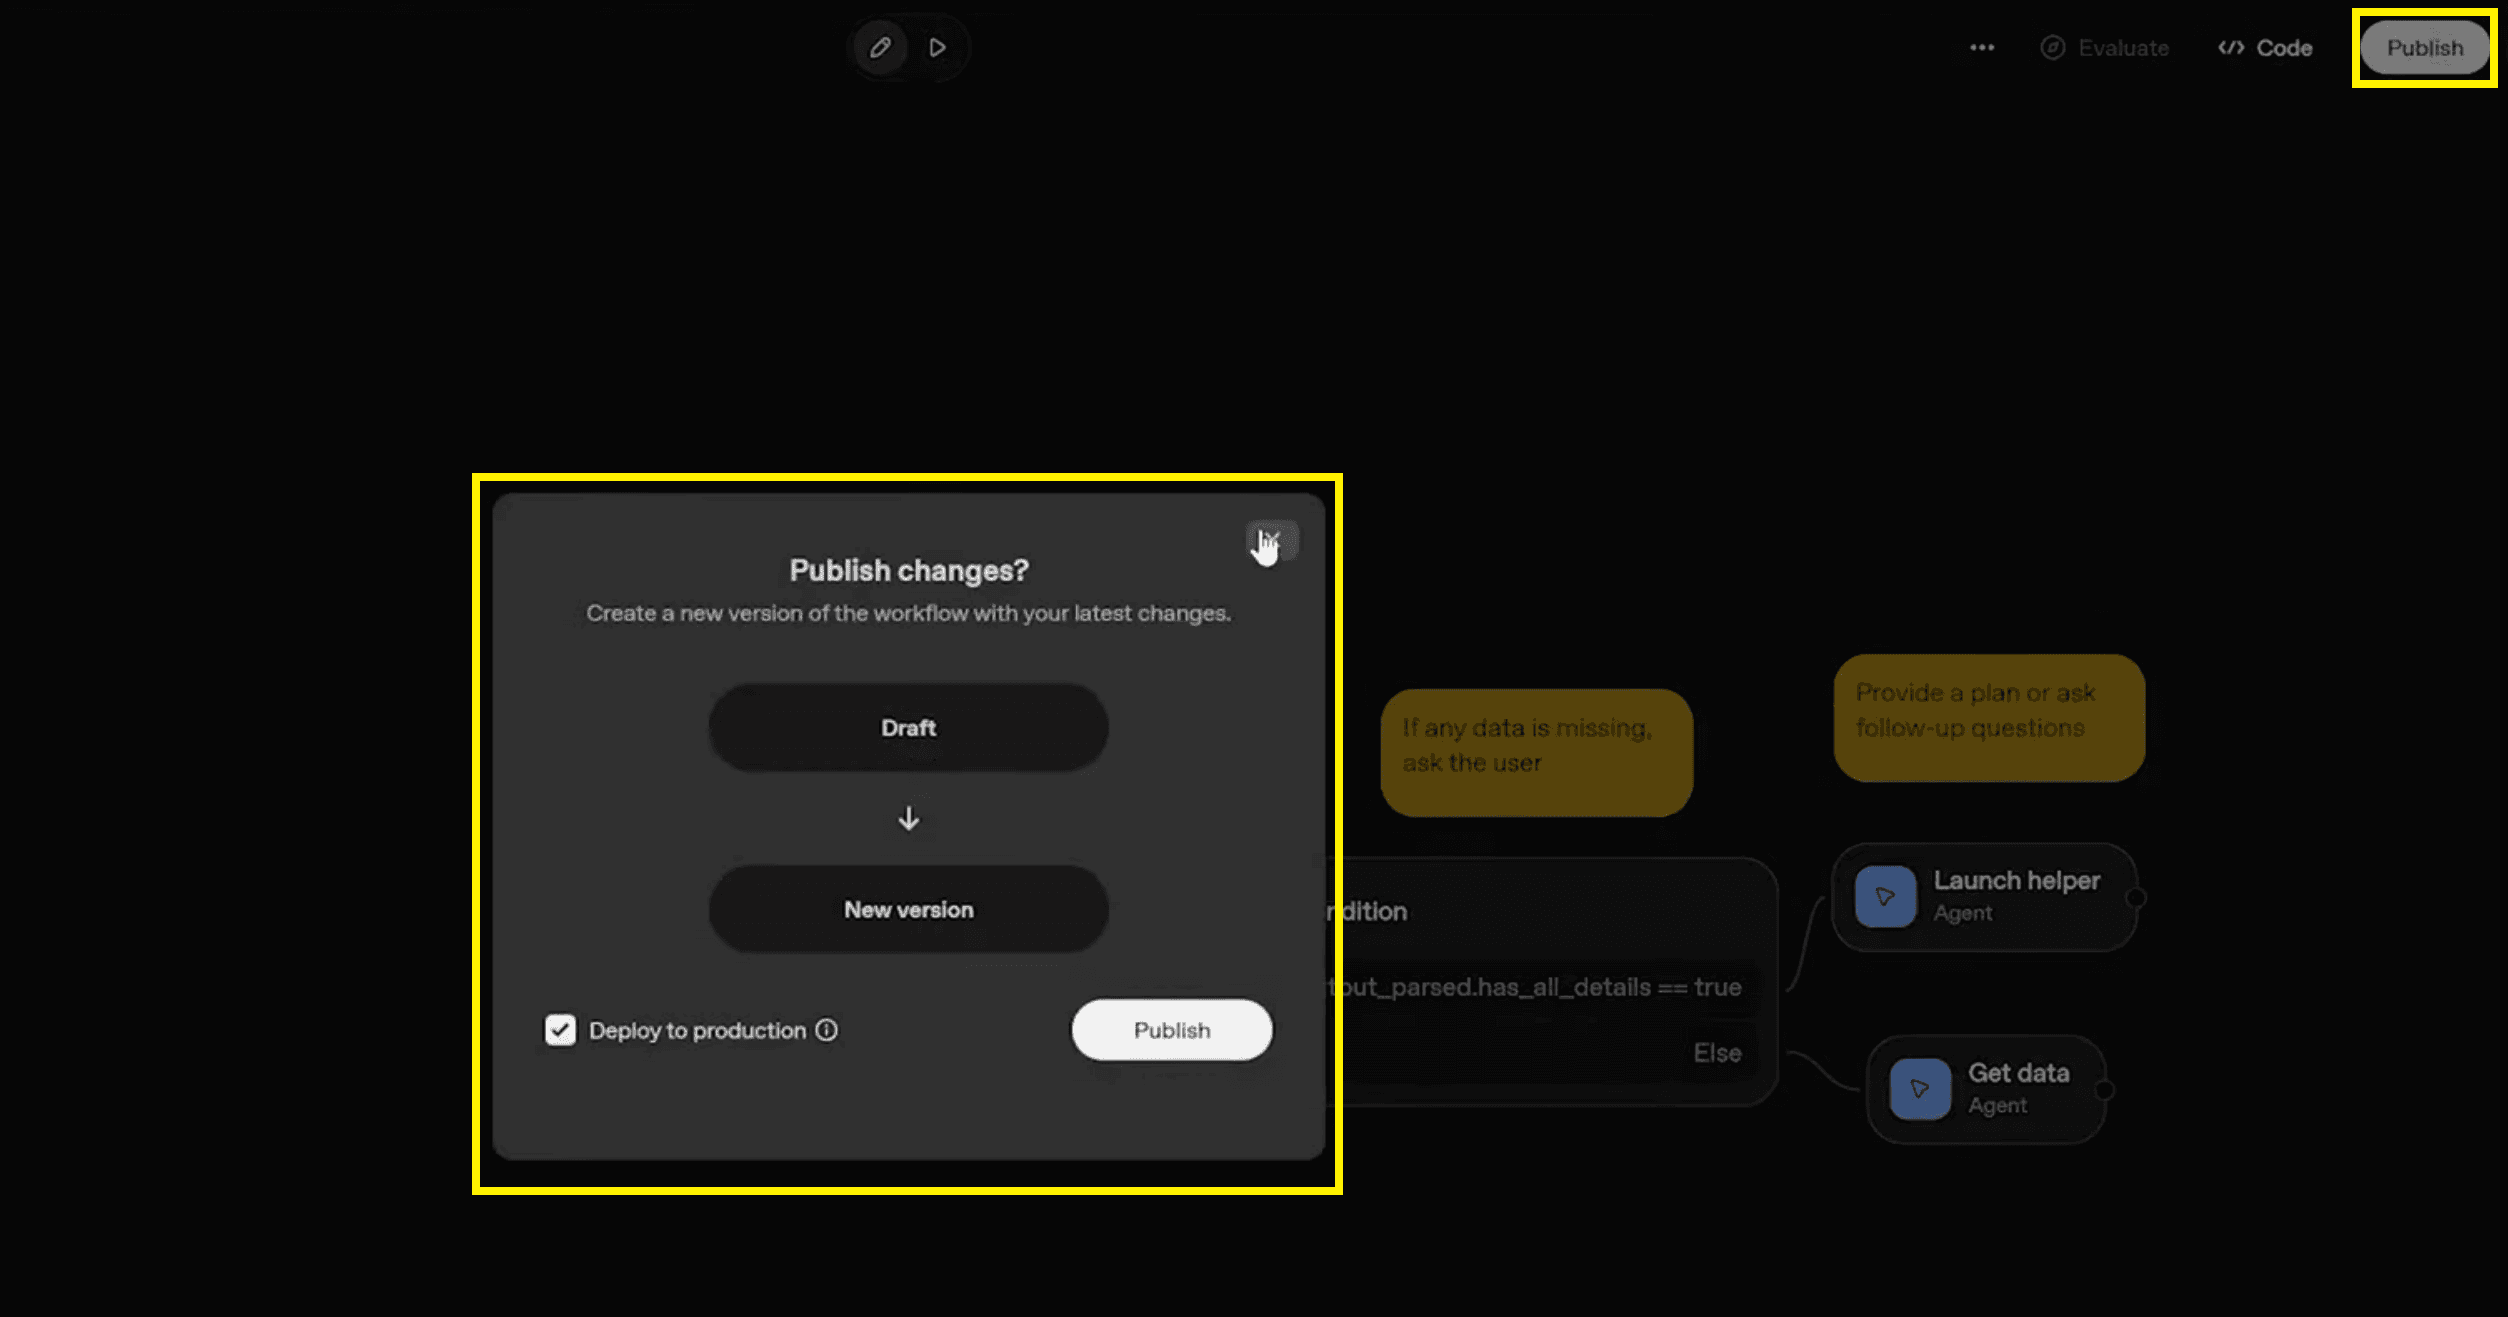
After you’re satisfied, you can publish the workflow. Publishing makes the workflow available outside the builder. Other systems can trigger it, or you can access it through the Agent SDK, Agent Development Kit, or API calls with your API Key and auth token. At that point, your workflow becomes a reusable component of your broader AI stack.
Real-World Testing Scenarios
To make everything more concrete, the video walked through several realistic prompts that simulate business scenarios. These scenarios help you validate that your workflow correctly checks for required information and handles both complete and incomplete inputs. They also demonstrate how the workflow can use web search and tools to enhance its responses.
Some of the example scenarios included:
Cloud Migration Plan: A team planning to migrate internal tools from AWS to Google Cloud with a defined budget, engineering capacity, and a six-month timeline. This scenario is ideal for testing whether the Triag agent correctly extracts the initiative goal, timeframe, and resources in one go.
Employee Wellness Program: A companywide wellness initiative with clear goals, timing, and budget. Because all required fields are present, the Condition node sends the workflow directly to the Launch Helper agent, showing the “happy path” where no further data collection is needed.
Sustainability Initiative with Missing Data: A plan to improve sustainability without a defined budget or specific timeline. Here, the Condition node identifies missing details, triggers the “Collect Missing Data” agent, and prompts the user for additional information. Once the user provides the missing pieces, the workflow proceeds toward planning.
By testing such cases, you verify that your control-flow logic is correct and that your AI system behaves predictably under different levels of input completeness.
Best Practices
To get the most out of OpenAI Agent Builder, it helps to follow a few practical best practices as you design and iterate on your workflows. These practices are based on how real-world teams gradually refine their agentic workflows and integrate them into larger systems.
Follow these guidelines:
Start Simple: Begin with a small workflow that includes just one or two agents and basic condition logic. Once you have that working, incrementally add more nodes like guardrails, MCP Servers, or state. This prevents you from getting overwhelmed and makes debugging much easier.
Use Guardrails Early: Add a Guardrail node near the beginning or right before user-visible outputs to protect against unsafe content, prompt injection, and unexpected behavior. Think of it as your safety net, especially when you later plug into external applications via the Agent SDK.
Design Clear Control-Flow Logic: Use Logic Nodes such as If–Else and While to define explicit decision points. Give meaningful names to your conditions and variables so that you or your teammates can quickly understand what the workflow is doing when revisiting it later.
Leverage Tools and Integrations: Combine built-in tools like web search and file search with MCP nodes and the Connector Registry. This allows your AI agents to interact with real data sources and business systems, turning your workflow from a simple chatbot into a capable automation agent.
These practices help keep your workflows maintainable, explainable, and easier to scale over time.
Conclusion: Building Intelligent AI Agents
The OpenAI Agent Builder is more than just a UI for running prompts—it’s a modular development environment for building rich agentic workflows. You can create smart and strong AI agents. Use drag-and-drop nodes, clear control-flow logic, guardrails, MCP Servers, and tools like file search and web search. The Planning Helper template shows how multiple agents and conditions work together. They solve specific business problems in a structured and repeatable way.
Features like JSON Schema for structured outputs, the Agent SDK, and additional development options make it easier to build advanced and dependable workflows. As you create more automations, these concepts become second nature and help you move confidently toward production-ready systems. By applying the patterns outlined here, your video-to-blog content stays clear, easy to scan, and highly valuable for learners.
To continue growing your skills and stay connected with others who are exploring OpenAI Agent Builder, we invite you to join our community group. It’s a space where peers exchange ideas, experts share guidance, and everyone learns together in a supportive environment.
FAQ
1. What is OpenAI Agent Builder, and how do I start using it?
OpenAI Agent Builder is a visual, drag-and-drop platform that lets you create intelligent AI agents without writing complex code. It provides a workflow area where you connect nodes, tools, logic conditions, and integrations to build automated processes. This makes it ideal for building planning agents, task automation agents, or multi-step workflows.
To start using it, go to platform.openai.com/agentbuilder, ensure you have credits added under Settings → Billing, and then click Create Workflow. When the workflow opens, you’ll see the default Start, My Agent, and End nodes—your foundation for building the entire automation flow.
2. What are the basic steps to build an AI agent with OpenAI Agent Builder?
You can build an AI agent in just a few clear steps:
Create a workflow and open the visual canvas.
Configure the My Agent node, including instructions, model selection, and tool access (file search, web search, MCP Servers, etc.).
Add logic nodes like If-Else, While loops, or User Approval to control decision-making.
Use tools and integrations—such as Vector Store queries, file search, or external apps via MCP nodes—to enhance your agent’s capabilities.
Test the workflow using the Play button to verify the flow and outputs.
Publish your workflow once everything works smoothly.
These steps reflect exactly how workflows are built in the interface shown in the article.
3. What features does OpenAI Agent Builder offer for AI development?
OpenAI Agent Builder includes a rich set of features for building strong, reliable AI automations:
Visual workflow canvas with drag-and-drop nodes.
My Agent configuration for instructions, tools, models, and output format.
Built-in tools like file search, web search, Vector Store, and code interpreter.
Guardrail node for moderation, PII detection, prompt-injection defense, and hallucination checks.
Logic nodes such as If-Else, While loops, and User Approval.
State & Transform nodes to manage variables using JSON Schema or expressions.
MCP Servers for connecting Gmail, Google Drive, Calendar, Outlook, Teams, SharePoint, Dropbox, and more.
Testing & publishing tools to deploy workflows through APIs or the Agent SDK.
These features allow you to build complex, multi-step agent workflows without needing to write custom code.
4. How do I integrate OpenAI Agent Builder agents with third-party applications?
You integrate your agents with third-party applications using MCP Servers (Model Context Protocol Connectors). The Agent Builder includes a dedicated MCP node that lets your workflow connect to real-world services.
Supported applications include:
Gmail
Google Calendar
Google Drive
Outlook Email & Calendar
Microsoft Teams
SharePoint
Dropbox
Zapier, Shopify, Intercom (third-party MCPs)
These integrations are available through the Connector Registry, where you select and activate the services you need. Once connected, your AI agent can send emails, fetch files, read calendars, or perform external tasks directly from the workflow.
5. How can I create and deploy an AI agent using OpenAI Agent Builder?
To create an agent, start by configuring the My Agent node with system instructions, user instructions, model selection, output format, and tools. Build the logic around it using If-Else, While loops, guardrails, and state nodes. Add tools like file search, Vector Store, or MCP integrations to give your agent real-world capabilities.
Once your workflow is ready, test it thoroughly using the Play button. After validating the logic and output, click Publish to generate a deployable version. You can then use the workflow through the Agent SDK, API calls, or embed it into your applications using your API Key and authentication tokens.


