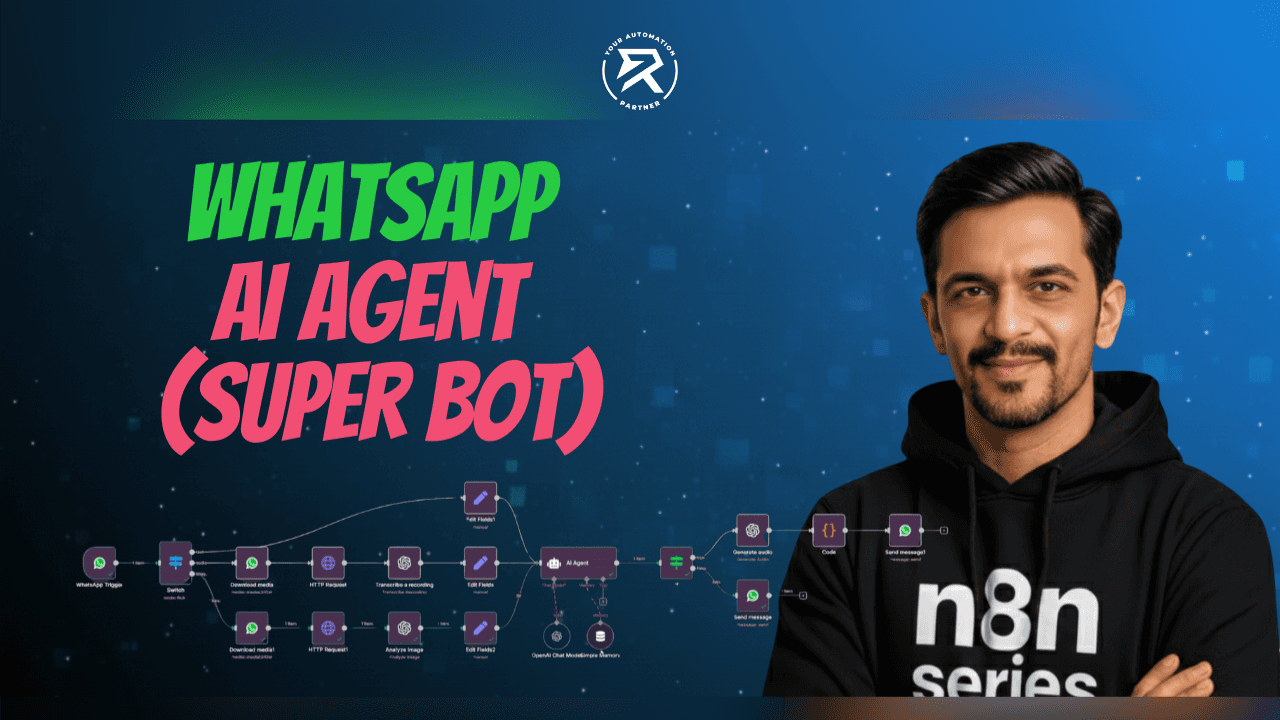
How to Build a WhatsApp AI Agent with n8n | Ritz7
Key Pointers:
Super Smart Bot: Build an assistant that can chat, listen to voice notes, and look at photos.
No Coding Needed: Just drag and drop blocks to create your bot—no complex programming required.
Knows What to Do: The bot automatically sorts your messages, handling texts, sounds, and images separately.
Has a Memory: It remembers what you said earlier, so the conversation feels real and natural.
Talks Back: Send a voice note, and the bot will reply with its own spoken audio message!
Table of Contents:
Why Build a WhatsApp AI Agent with n8n?
Which Tools and Accounts Are Required?
Step 1: Set Up the WhatsApp Message Trigger
Step 2: Add a Switch Node to Handle Message Types
Step 3: Generate Text Responses Using the AI Agent
Step 4: Send Automated Replies via WhatsApp Business Cloud
Step 5: Add 'IF' Condition to Decide Audio vs Text Response
Video Tutorial: How to Create a WhatsApp AI Agent
Step 6: Download Incoming Voice Message
Step 7: Convert Audio URL to Binary
Step 8: Transcribe Voice Message
Step 9: Generate Voice Reply
Step 10: Send Audio Reply to WhatsApp
Step 11: Process Image Messages
Step 12: Analyze Image Content
Step 13: Send Text Inputs to AI Agent
Step 14: Maintain Conversation Context
Step 15: Send Text Reply to WhatsApp
Step 16: Activate and Test the Workflow
How to Extend WhatsApp AI Agent With Advanced Features
Common Errors and How to Fix Them
Security and Scalability Considerations
Performance and Cost Optimisation
Final Testing and Deployment
Conclusion
Building a WhatsApp AI Agent using n8n workflow automation has never been easier. With the rise of no-code platforms, artificial intelligence, and advanced automation solutions, businesses can now deploy intelligent AI-powered WhatsApp chatbots without heavy development effort.
In this step-by-step guide, you’ll learn how to create a multi-modal WhatsApp AI agent capable of understanding text, analysing images, and transcribing voice messages. The solution uses n8n, the WhatsApp Business API, OpenAI GPT, large language models, and OpenAI Vision, all combined into a single automated workflow.
This tutorial is perfect for developers, automation builders, small business owners, and customer support teams who want to improve customer experience, user experience, and operational efficiency on WhatsApp.
Why Build a WhatsApp AI Agent with n8n?
n8n is a powerful visual builder and agent studio that enables users to design scalable conversation flows using a low-code or no-code approach. It allows seamless integration with APIs, databases, and AI models while maintaining full control over conversation logic.
By integrating n8n workflow, WhatsApp Business API, and OpenAI GPT, you can build AI-powered WhatsApp agents that automate conversations and respond intelligently across multiple message formats.
Key benefits of using n8n for a WhatsApp AI agent include:
24/7 automation for customer support, sales agents, and service workflows
Intelligent handling of text-to-text reply, voice-to-voice reply, and image response
Reduced manual workload through automation solutions
Enhanced response accuracy using training data and memory
Improved Customer Experience with fast, consistent replies
The use of multi-modal conversational AI allows the agent to process text, voice, and images, resulting in more natural and human-like interactions.
Which Tools and Accounts Are Required?
To build and deploy this WhatsApp AI agent, you’ll need the following tools and accounts properly configured. Each component plays a role in message handling, AI processing, and delivery.
Required setup includes:
n8n Account (cloud or self-hosted) to design automation workflows
WhatsApp Business Cloud API connected to a verified WhatsApp Business Account
Meta Business Manager with an approved business portfolio and business description
Active phone number enabled for WhatsApp messaging
OpenAI API Key for GPT models, Whisper API, and OpenAI Vision
Basic JSON knowledge for handling message payloads
This setup ensures reliable session management, secure customer data handling, and scalable deployment.
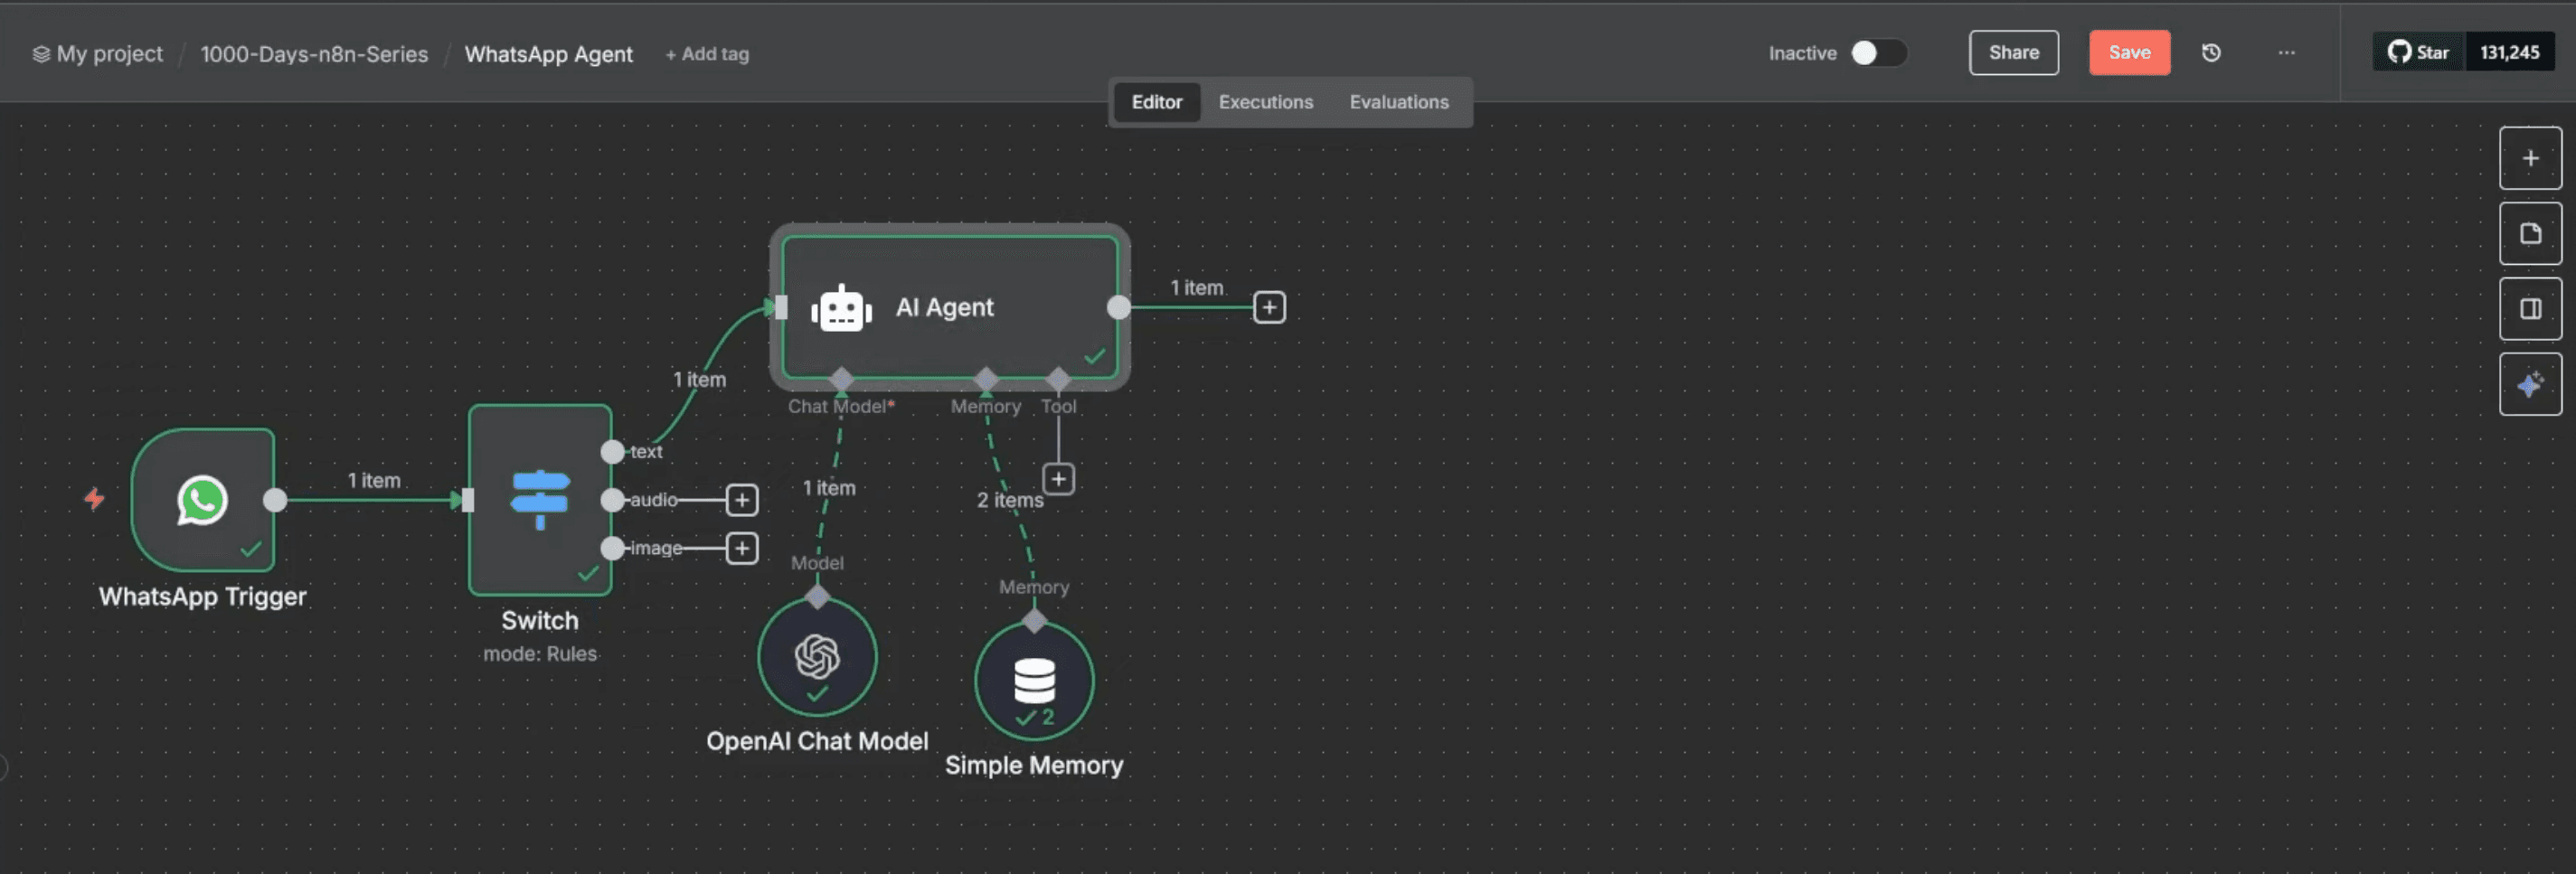
Step 1: Set Up the WhatsApp Message Trigger
Start by creating a new n8n workflow. From the n8n dashboard, click “Create Workflow”, then click the “+” (Add Node) button on the canvas and search for WhatsApp.
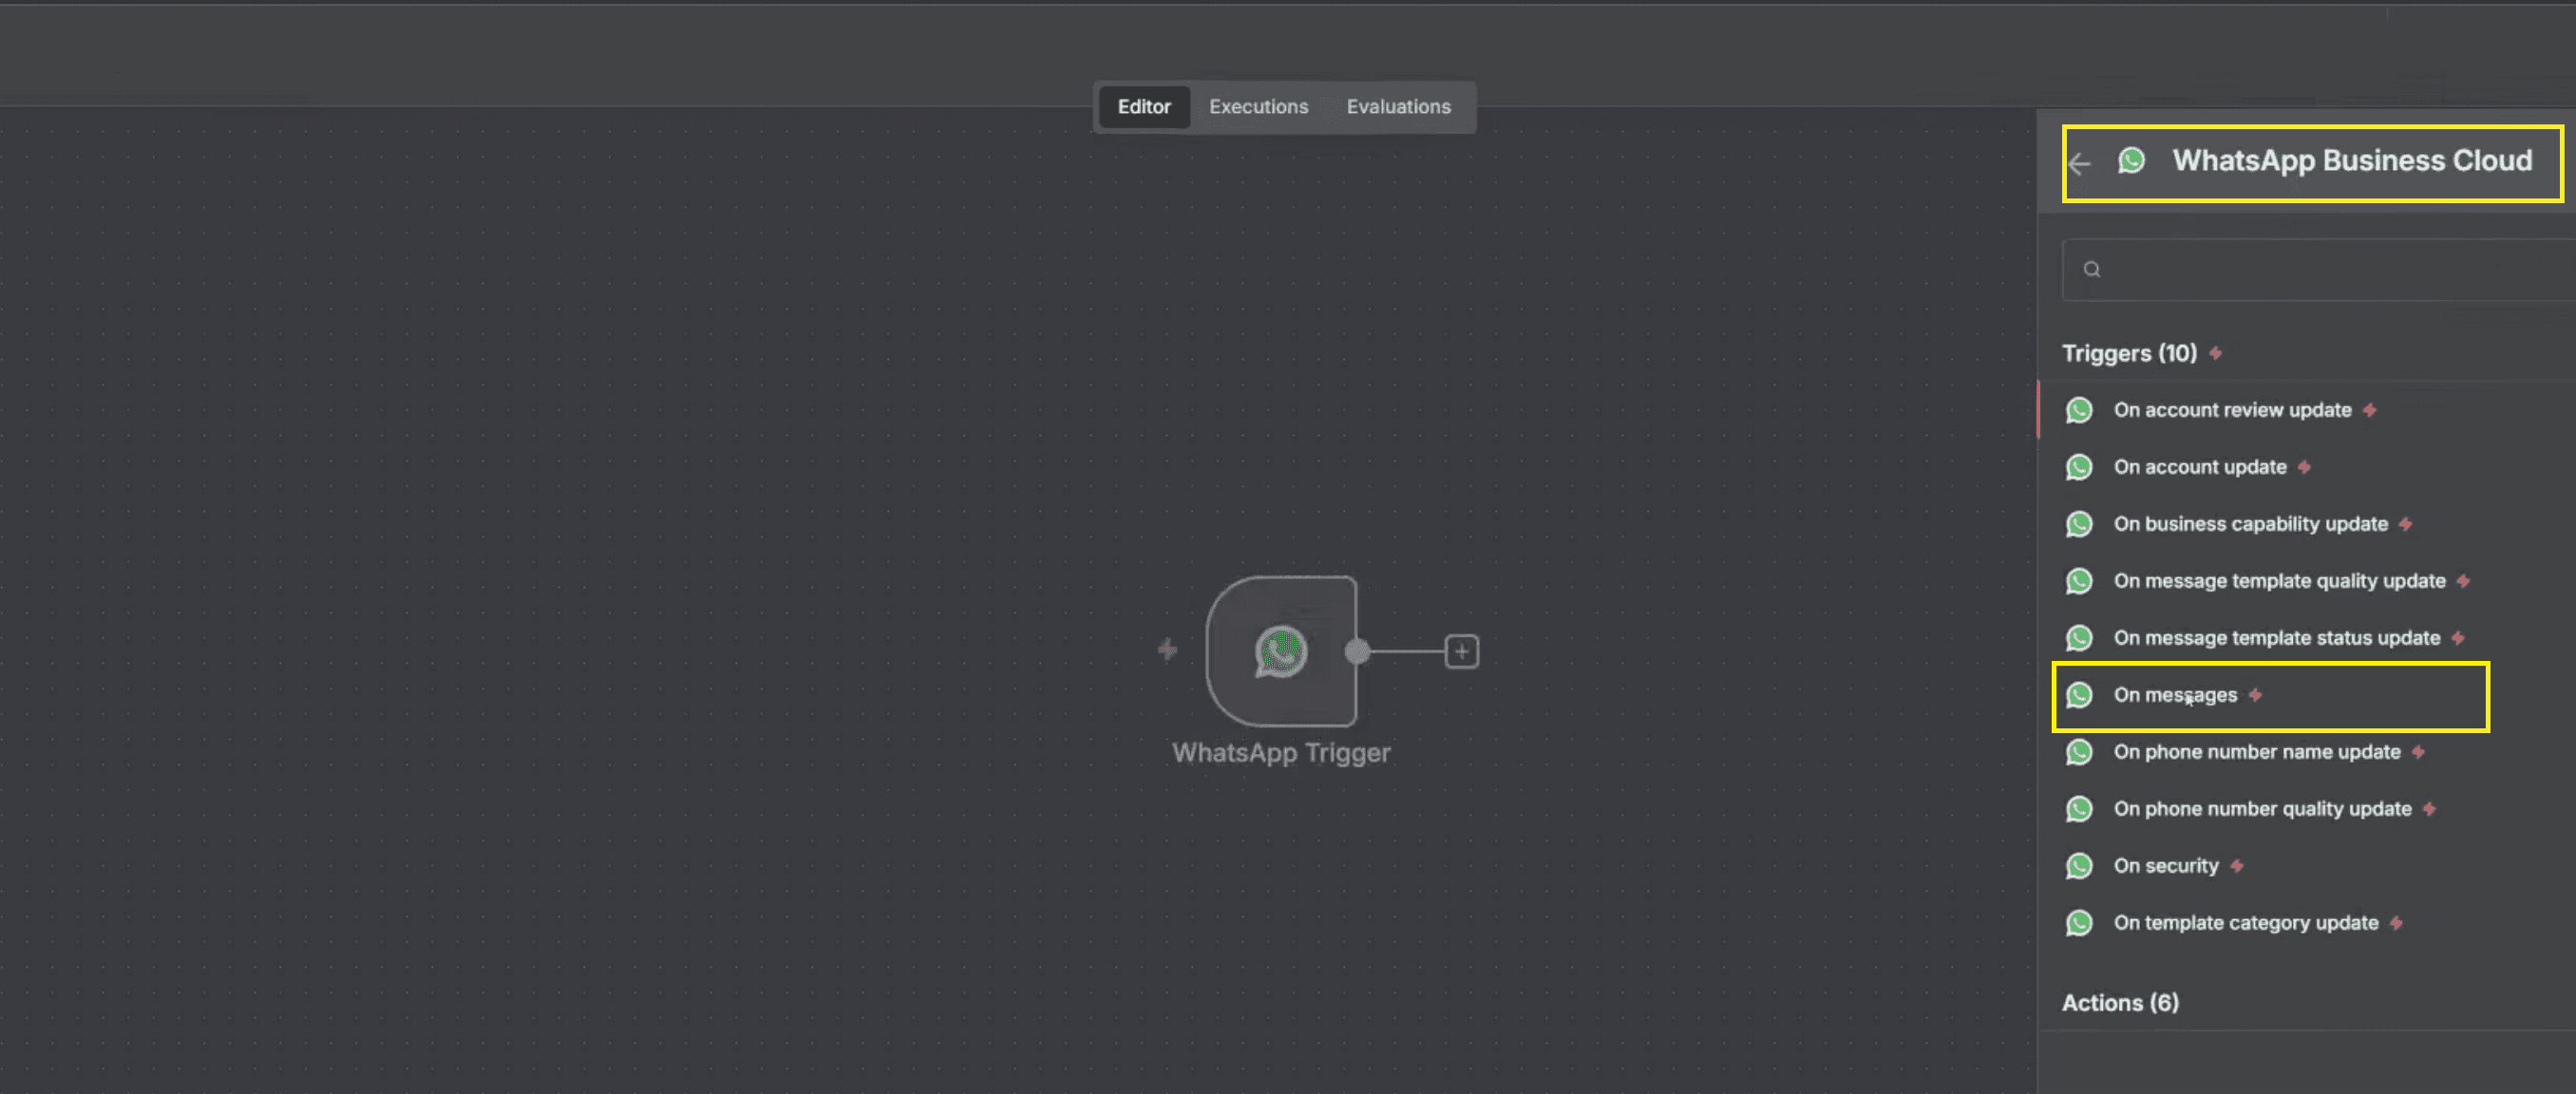
Select the WhatsApp Business Cloud, then choose the “On Message” trigger option. This configures the workflow to listen for incoming messages sent to your WhatsApp Business Profile.
Once configured, click Execute Node and send a test message to your connected phone number via WhatsApp. When the message arrives, the trigger fires automatically, capturing sender details and message content. This node acts as the foundation of your AI WhatsApp chatbot, enabling real-time message processing and session tracking.
Step 2: Add a Switch Node to Handle Message Types
After the WhatsApp trigger, click the “+” icon on the right side of the trigger node. Search for Switch and add a Switch Node to the workflow.
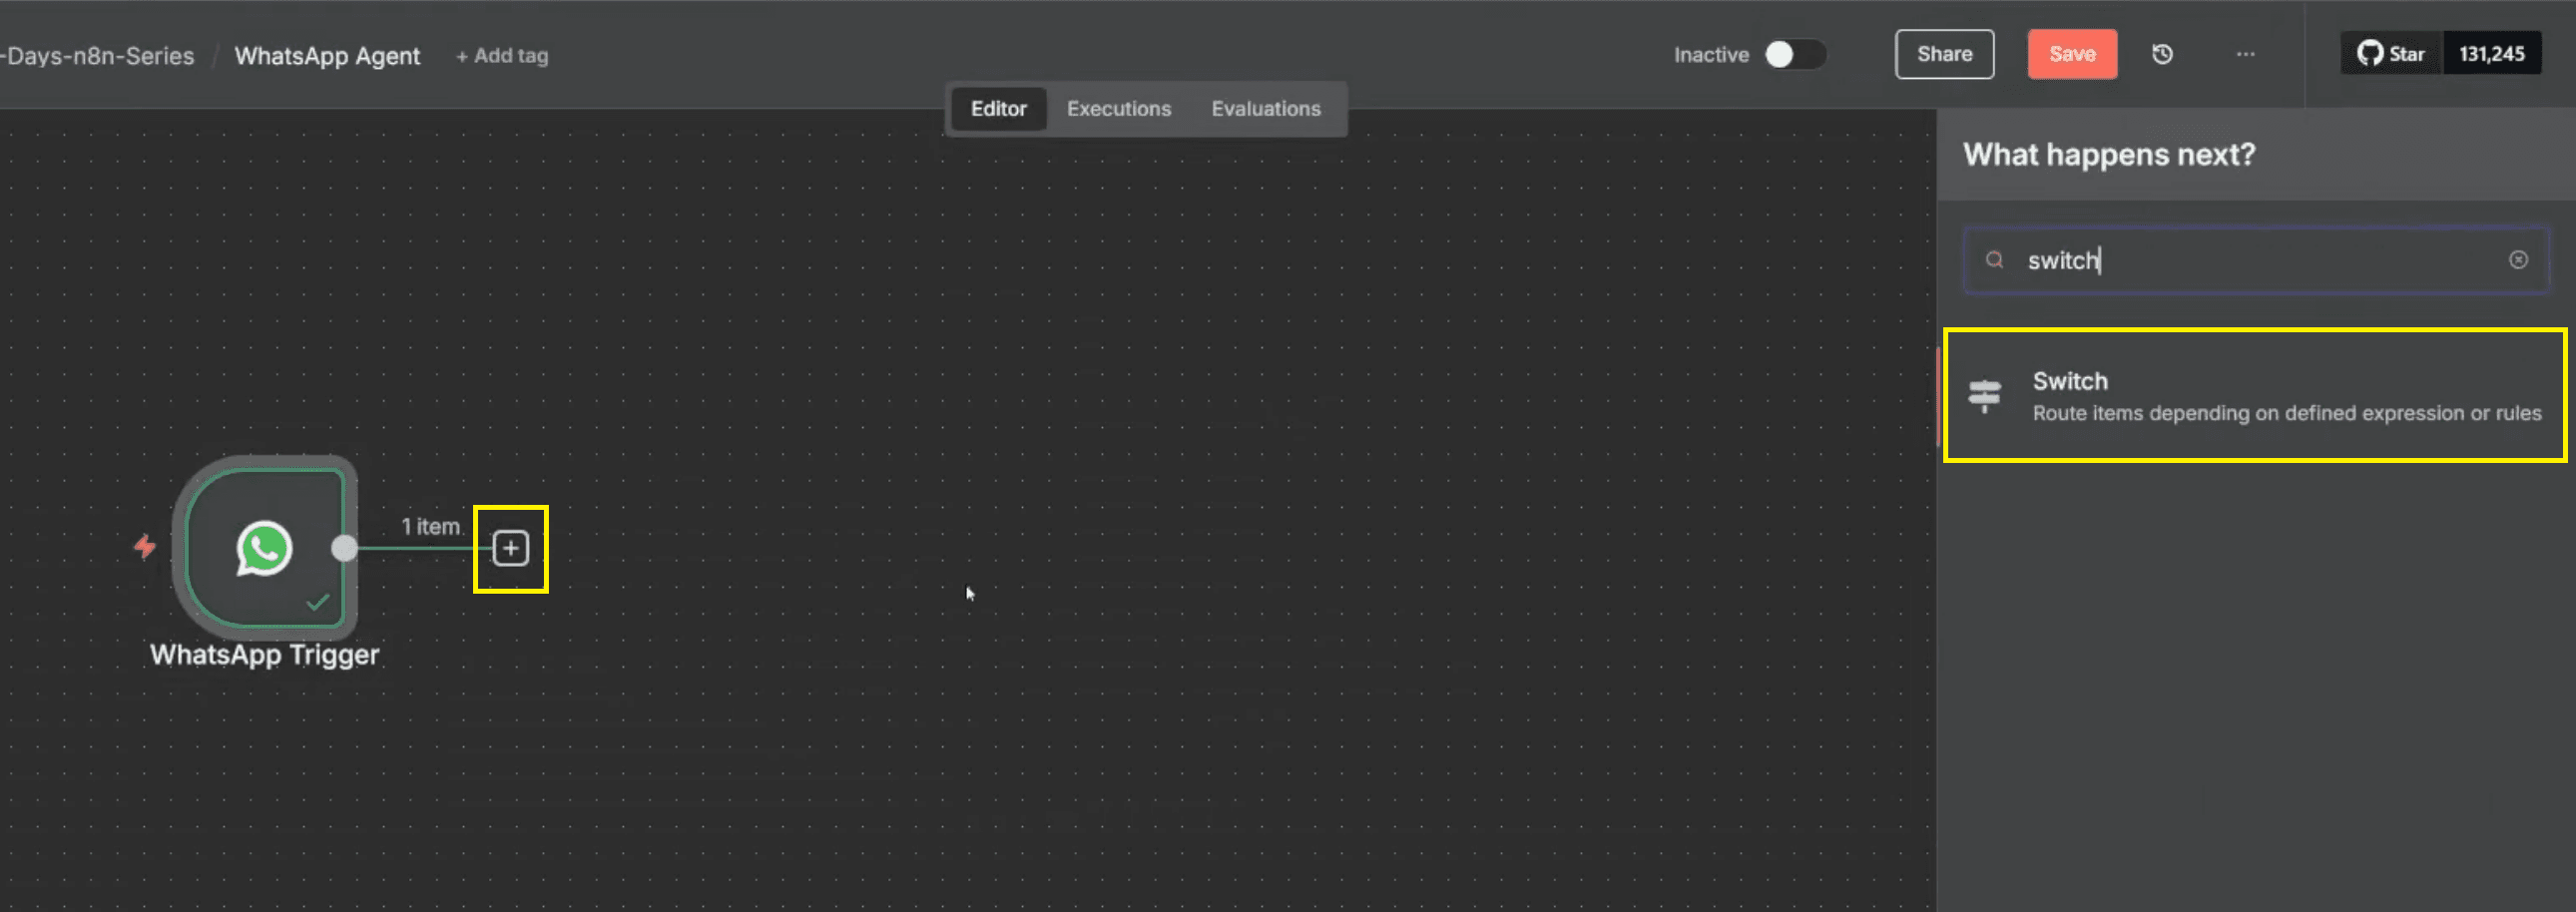
Inside the Switch Node, configure conditions based on the incoming message type field from the WhatsApp trigger payload. Create separate rules to detect text, audio, and image messages by comparing the message type value.
Configure the routing rules in the Switch Node as follows:
Rule 1
Condition: text type is equal to text
Output name: text
Connect this output to the text processing flow.
Rule 2
Condition: text type is equal to audio
Output name: audio
Connect this output to the voice transcription flow
Rule 3
Condition: text type is equal to image
Output name: image
Connect this output to the image analysis flow
This routing ensures clean conversation logic, improves user experience, and allows the AI agent to respond accurately regardless of whether the user sends text, voice, or images.
Step 3: Generate Text Responses Using the AI Agent (OpenAI GPT)
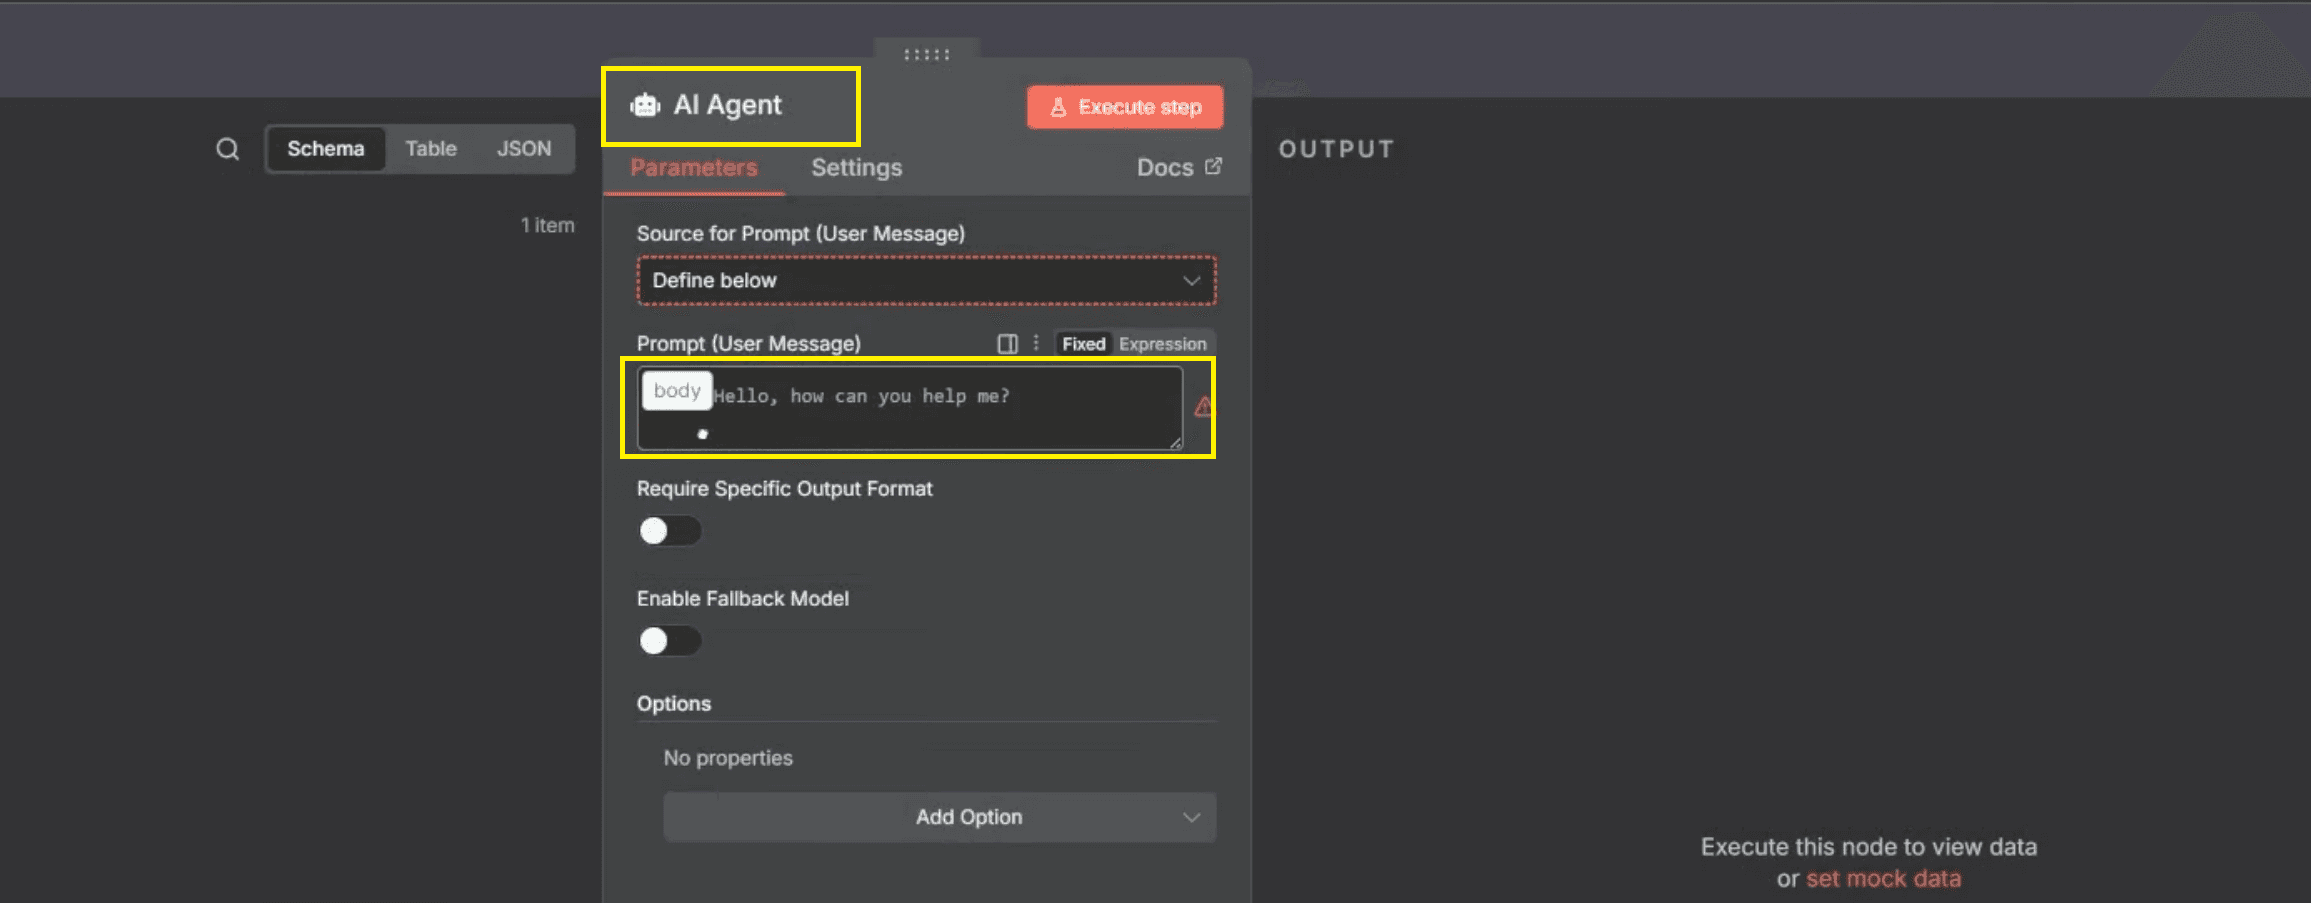
From the text route output of the Switch node, click Add Node on the n8n canvas and search for AI Agent. Select the AI Agent node from the list. This node acts as the central controller that connects the chat model, memory, and system instructions into one conversational workflow.
The AI Agent node ensures that incoming WhatsApp messages are processed consistently and routed through the correct large language model with memory support, making it ideal for building a scalable AI-powered WhatsApp chatbot.
Key actions in this step:
Click Add Node from the text route
Search and select an AI agent.
Use this node as the orchestration layer for chat, memory, and logic.
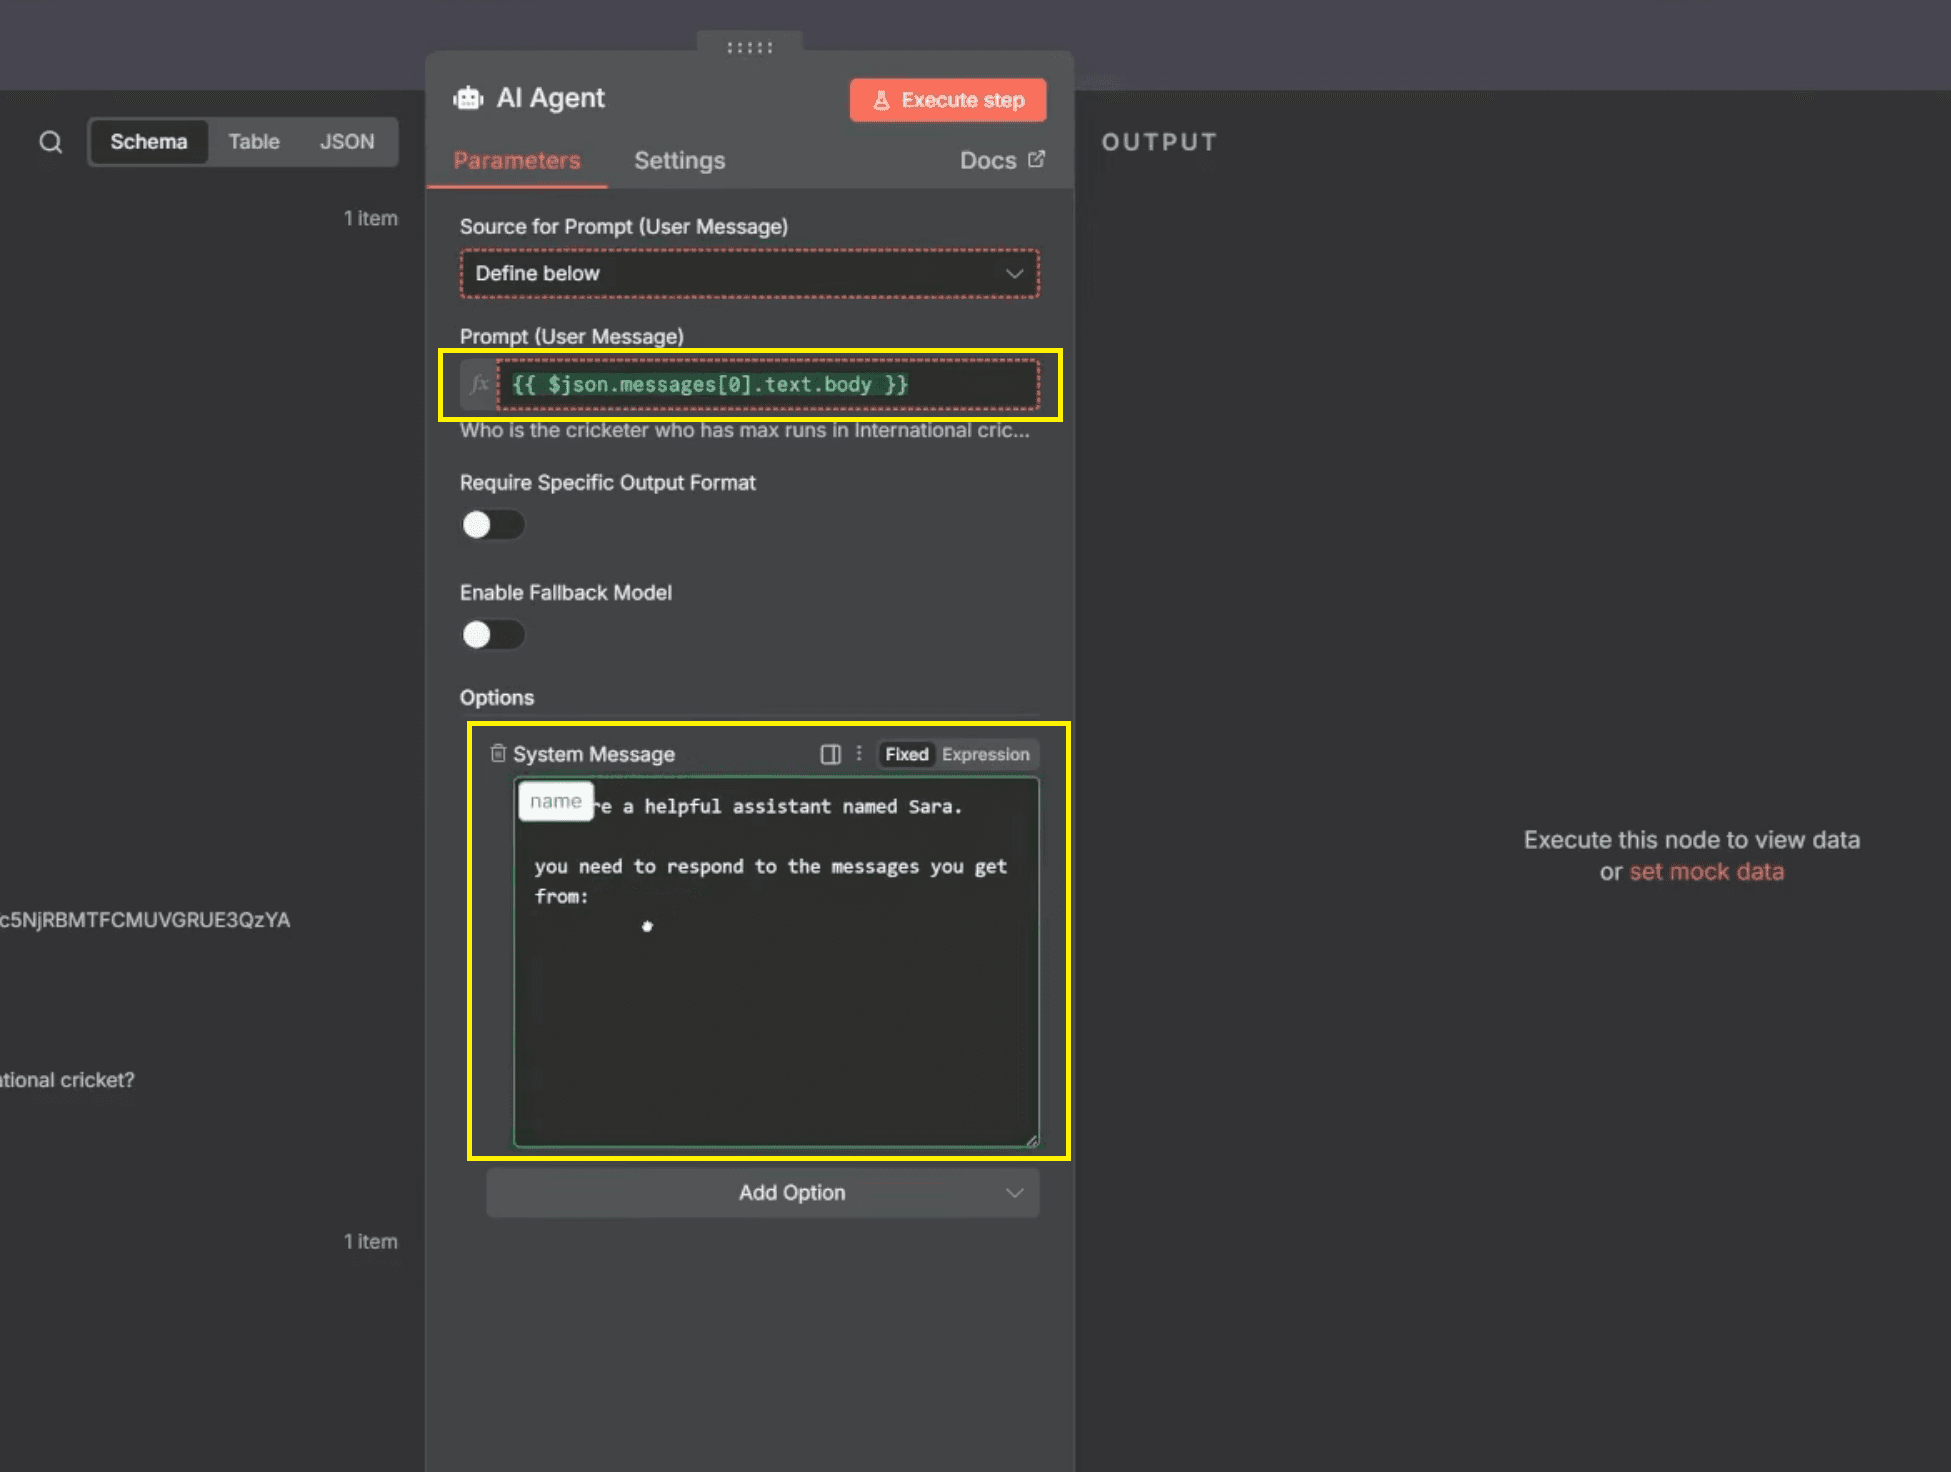
1. Configure User Message Input in AI Agent
Inside the AI Agent parameters, locate the Source for Prompt (User Message) setting and set it to Define below. This allows you to manually control what data is passed into the AI agent as the user’s message.
In the Prompt (User Message) field, you must map the actual WhatsApp message content. From the left input panel, drag the body field and drop it directly into the prompt input. This ensures the AI agent receives the exact text sent by the user on WhatsApp.
User message mapping details:
Source for Prompt: Define below
Drag the body from the left panel.
Drop it into Prompt (User Message)
1.1 Add and Configure System Message (Agent Personality):
To define how the AI Agent behaves, add a System Message inside the AI Agent node. Click Add Option, select System Message, and enter the instruction text that controls tone, role, and behaviour.
In the system message content, include personalisation by referencing the WhatsApp contact’s name. From the left panel, drag contacts → profile → name and insert it into the system message. This allows the AI agent to generate personalised, human-like responses.
System message configuration:
Click Add Option → System Message
Enter:
You are a helpful assistant named Sara. You need to respond to the messages you get from{{contact.name}}.Drag the contact name from the left panel into the message.
2. Connect the OpenAI Chat Model to the AI Agent
Below the AI Agent node, connect the Chat Model connector and add the OpenAI Chat Model node. This node provides the actual Large Language Model intelligence used to generate responses.
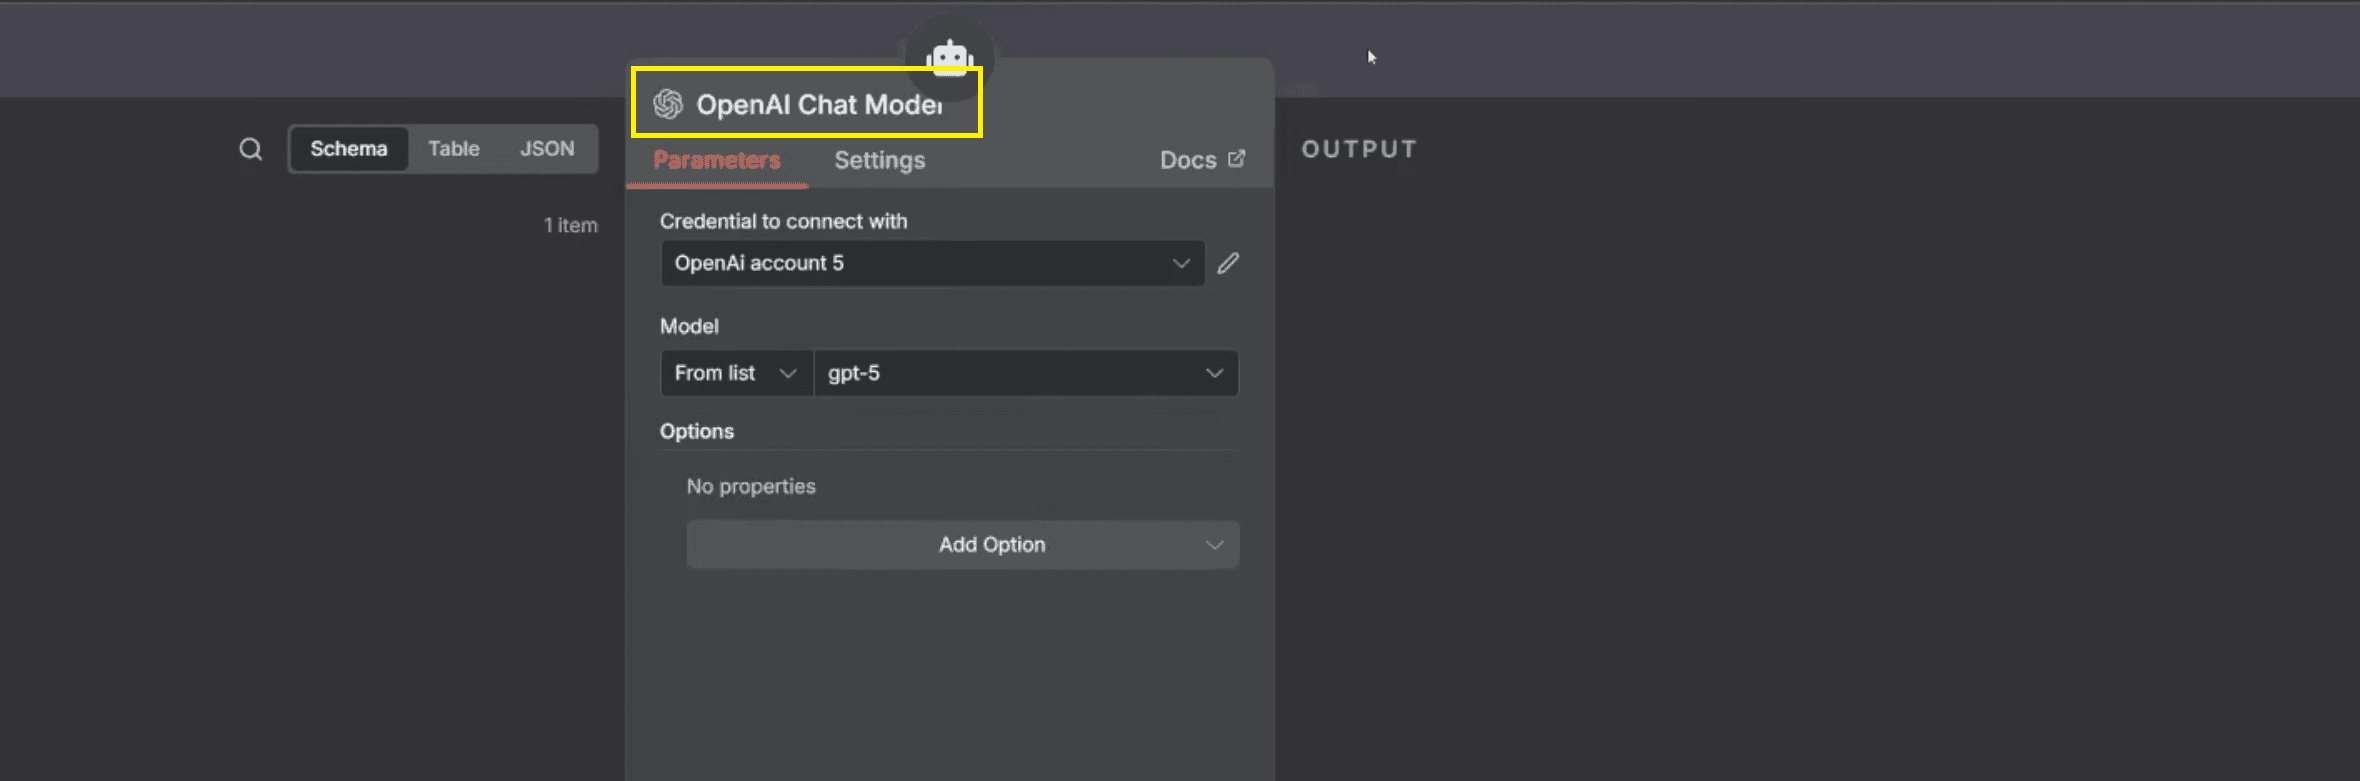
Select your OpenAI credentials and choose the required model (for example, gpt-5). No additional tuning is required unless you want to customise response behaviour, such as temperature or output style.
Chat model setup steps:
Click the Chat Model connector.
Add OpenAI Chat Model
Select credentials and model (e.g., gpt-5)
3. Attach and Configure Simple Memory for Context
To maintain conversation continuity, connect the Memory connector from the AI Agent node and add the Simple Memory node. This enables the chatbot to remember previous messages within a session.
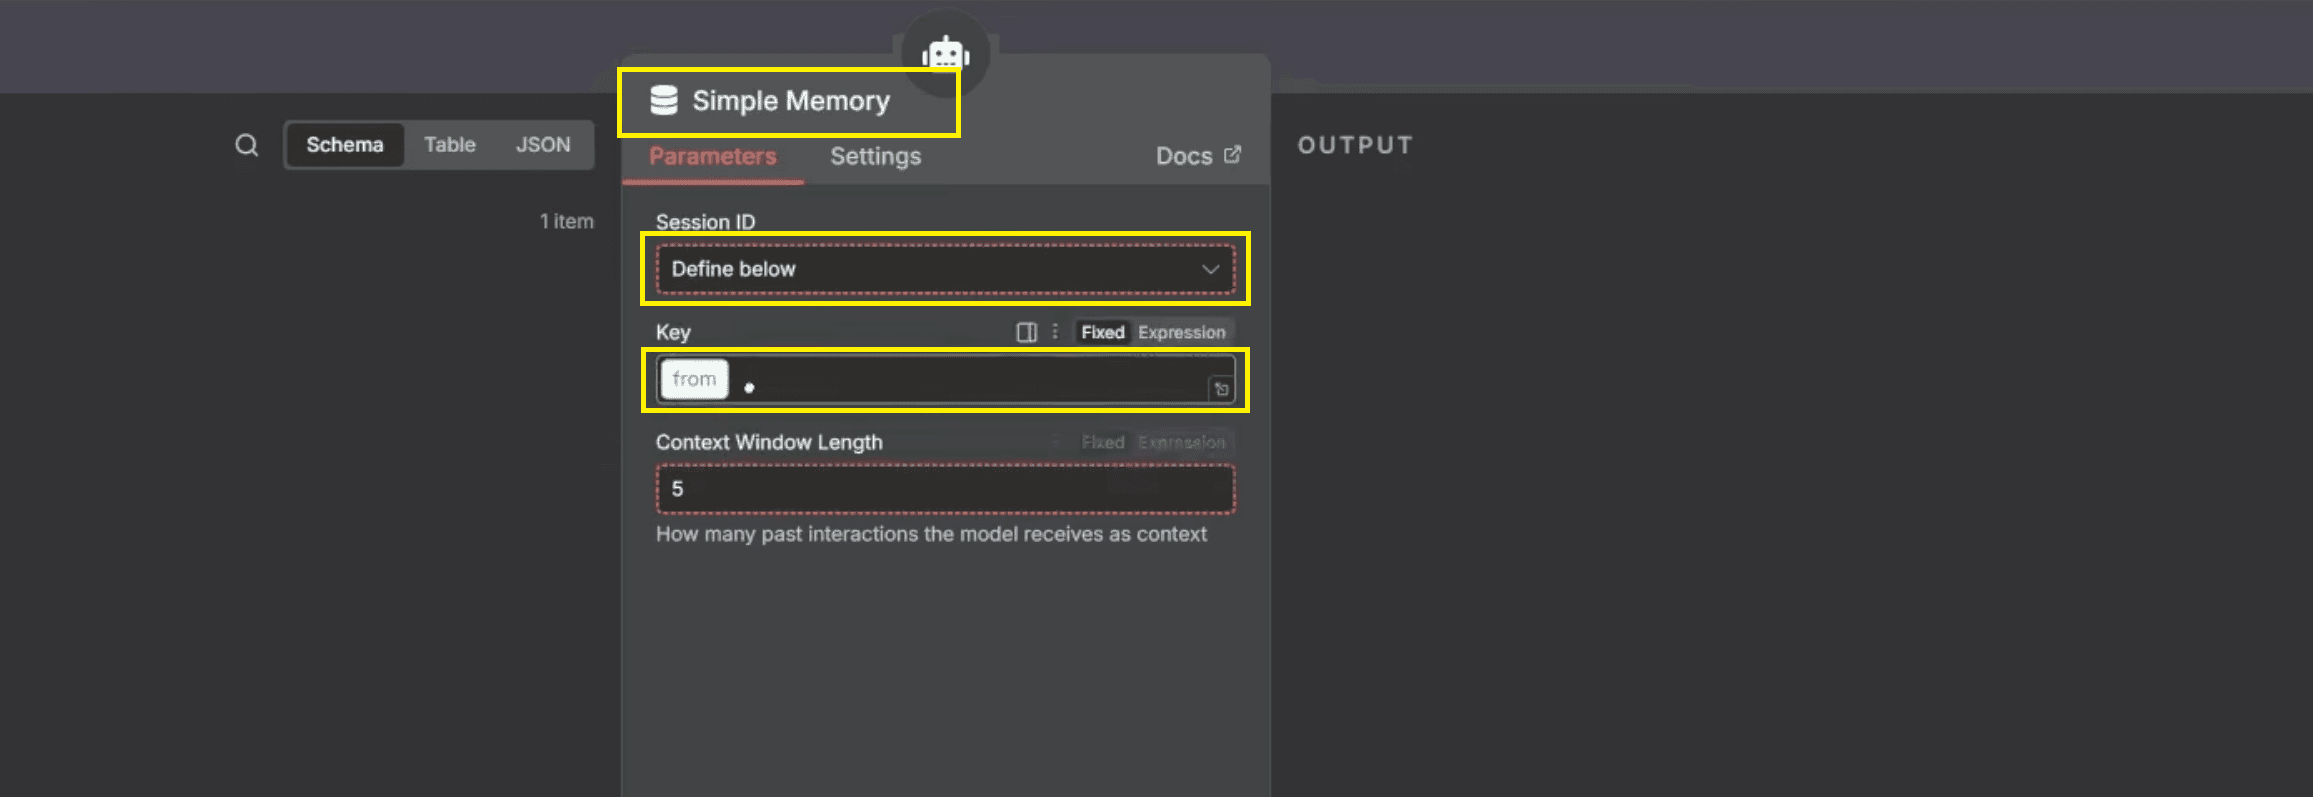
In the Simple Memory parameters, set the Session ID / Key to Define below. From the left input panel, drag the 'from' field and drop it into the 'Key' field. Set the context window length to 5 so the last five interactions are used as context.
Memory configuration details:
Add Simple Memory via the Memory connector
Drag from into the Key field
Set context window length to 5
4. Why This Configuration Is Important
This configuration ensures that the AI agent receives accurate user input, responds with a consistent personality, and maintains conversation history per WhatsApp user. Each message is processed using the correct context, improving both response accuracy and user experience.
By combining the AI Agent, OpenAI Chat Model, and Simple Memory, you create a reliable and scalable conversational AI setup that can handle real-world WhatsApp conversations smoothly.
What this setup enables:
Personalised responses using contact data
Context-aware replies across multiple messages
Stable session-based memory per phone number
Production-ready AI WhatsApp chatbot behaviour
Step 4: Send Automated Replies via WhatsApp Business Cloud
After the AI Agent node generates a response, click Add Node on the canvas and search for WhatsApp Business Cloud. From the available actions, select Send message to deliver the AI-generated reply back to the user through the WhatsApp Business API.
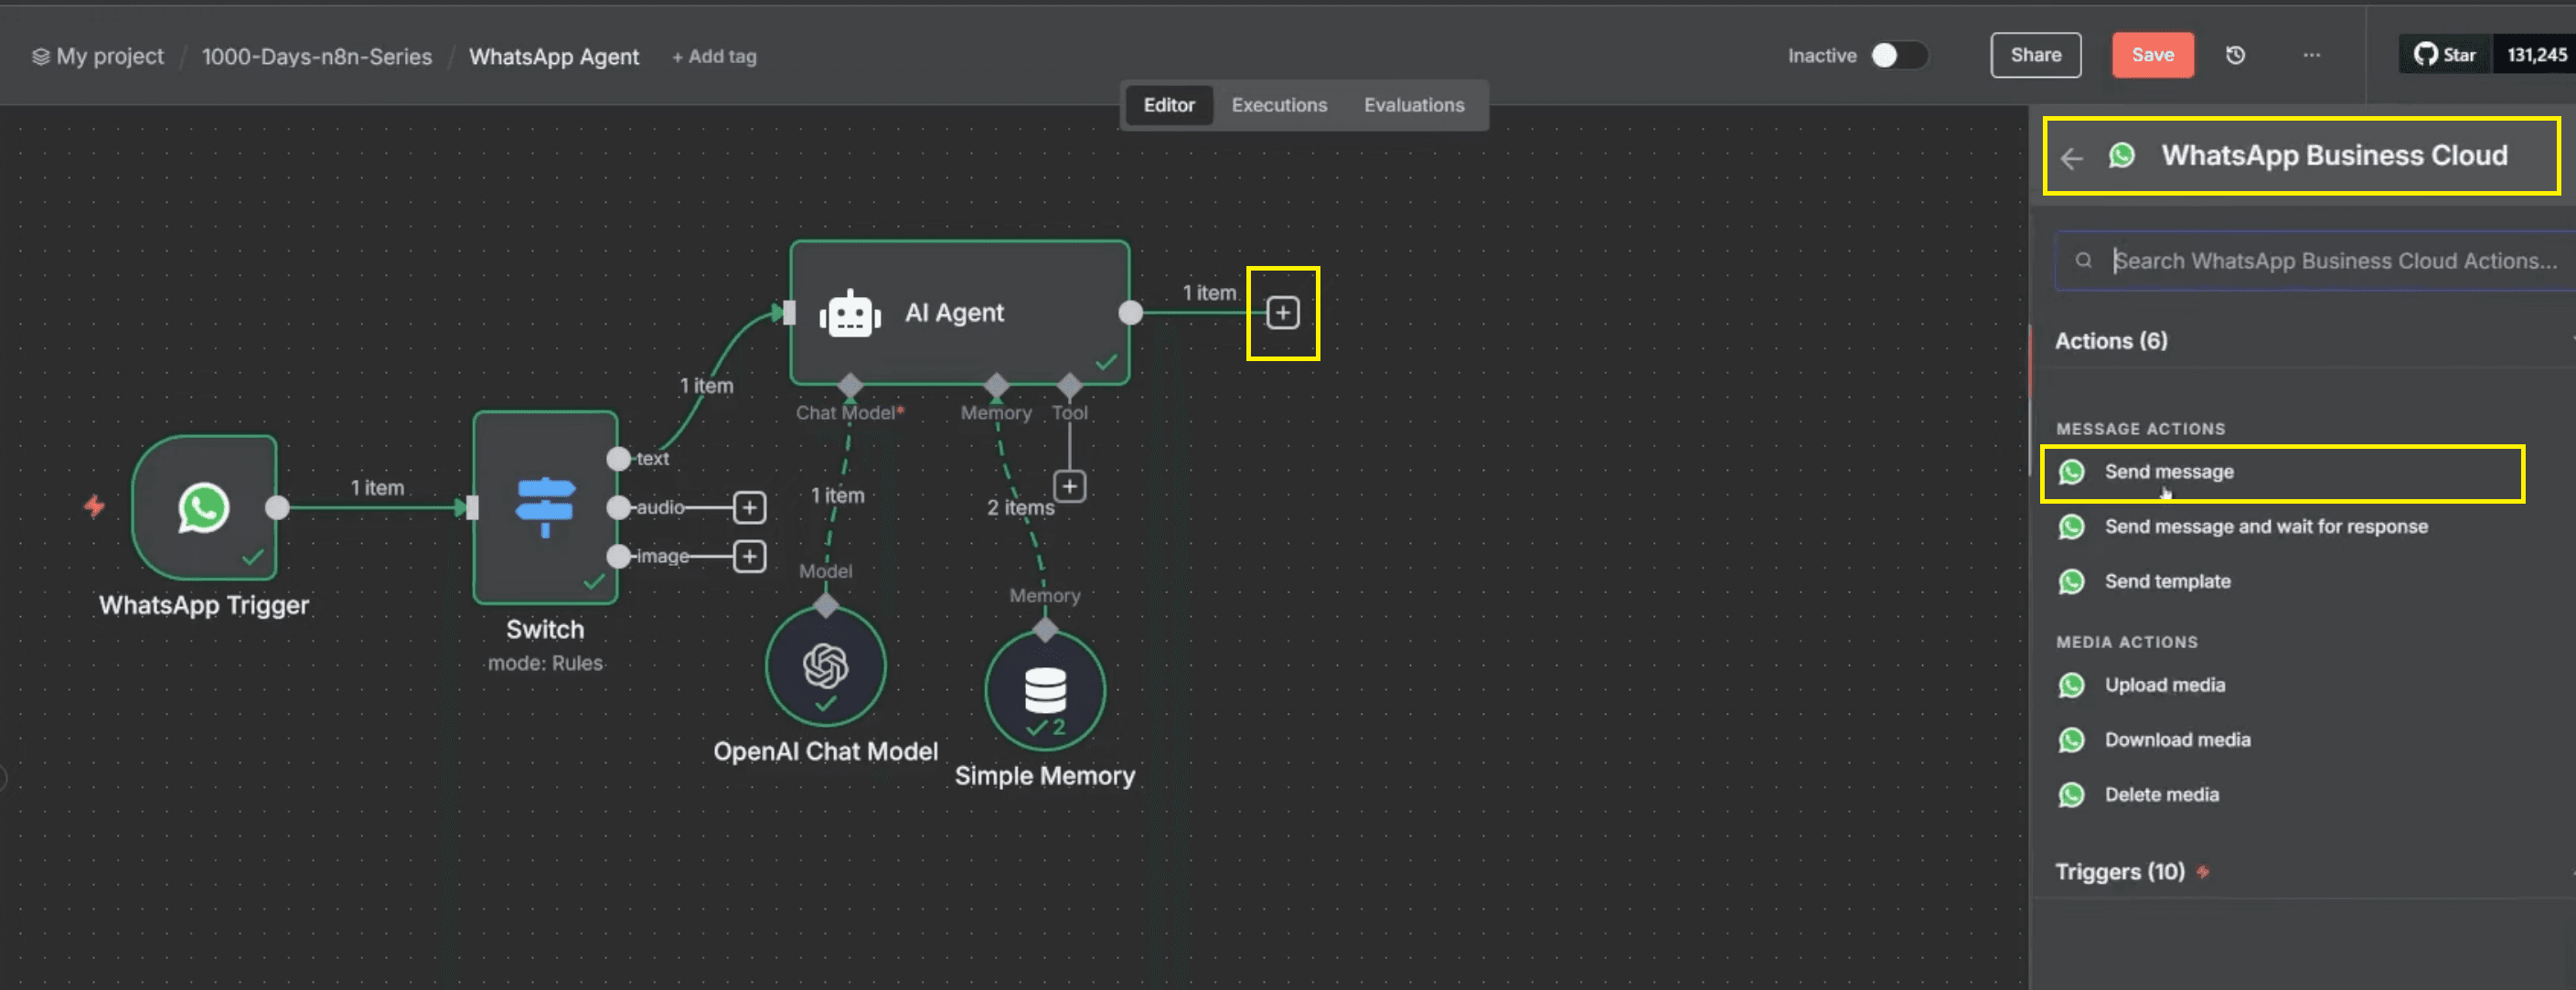
In the Send message node parameters, configure the basic message settings such as credentials, resource, and operation. Ensure the node is set to send a standard text message so the response can be delivered instantly to the user’s WhatsApp chat.
To send the AI’s reply, you must map the output generated by the AI agent into the message body field. This ensures that the response produced by the AI is passed directly to WhatsApp without any transformation or loss of data.
Message mapping configuration:
In Message Type, select Text.
In the Text Body field:
Drag the output field from the AI Agent node in the left input panel.
Drop it directly into the Text Body field.
This ensures the exact response generated by the AI agent is sent back to the user without modification.
Messages sent through this node can include:
Standard text replies generated by the AI agent
Approved message templates when required by WhatsApp policies
Contextual responses related to order status or support ticket queries
This step completes the automated response loop between users and the AI-powered WhatsApp agent, enabling real-time, accurate replies directly inside WhatsApp conversations.
Step 5: Add 'IF' Condition to Decide Audio vs Text Response
After the AI agent generates the response, you need to determine how the reply should be delivered—either as an audio message or a text message. This decision is made using an IF condition that checks the original WhatsApp message type.
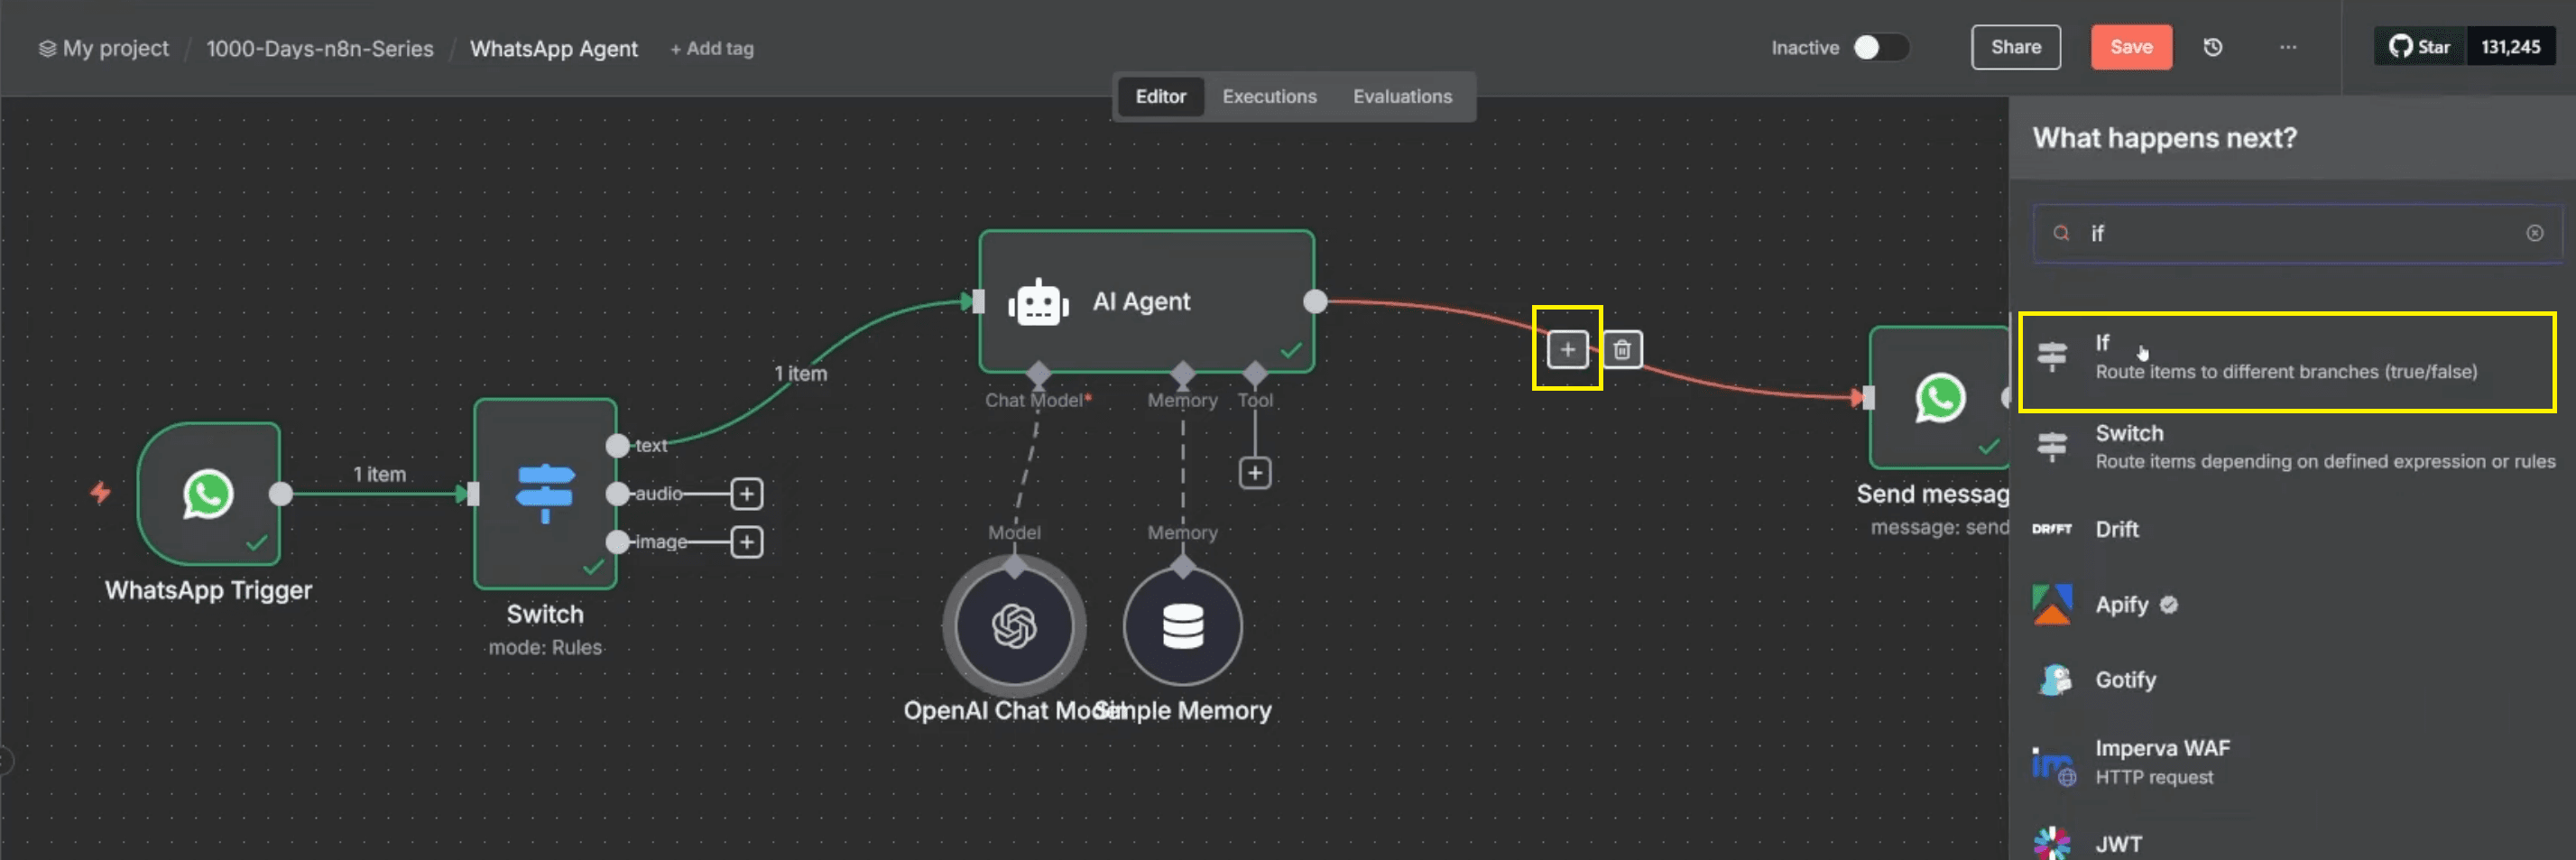
On the workflow canvas, click the “+” (Add Node) icon between the AI Agent and the WhatsApp Send Message node. From the node picker, search for IF and add the IF condition node. This node will evaluate the incoming message type and split the workflow into two branches.
Inside the IF node parameters, configure the condition to check whether the incoming message is an audio message.
IF condition configuration (as shown in the setup):
Left value (expression):
{{ $('WhatsApp Trigger').item.json.messages[0].type }}Operator: is equal to
Right value: audio
This condition evaluates the message type sent by the user and determines whether the workflow should proceed with an audio response or a text response.
Branch Routing Logic:
Once the IF condition is configured, connect each branch to the appropriate WhatsApp response node.
True branch (audio):
Connect to the WhatsApp Send Audio Message node
This branch is triggered when the user sends a voice message.
False branch (not audio):
Connect to the WhatsApp Send Message (Text) node
This branch handles text- and image-based inputs.
This ensures that audio messages receive audio replies, while all other message types receive text responses.
Why This IF Condition Is Important
Using an IF condition at this stage ensures that responses match the user’s interaction format. It improves user experience, keeps conversation logic clean, and prevents sending mismatched response types.
Placing the IF node directly between the AI Agent and the WhatsApp Send Message node keeps the workflow aligned with the final implementation and avoids unnecessary complexity.
Video Tutorial: How to Create a WhatsApp AI Agent
Step 6: Download Incoming Voice Message
(WhatsApp Business Cloud – Download Media Node)
When a user sends a voice message on WhatsApp, the platform does not send the audio file directly. Instead, it provides a media ID that must be used to retrieve the audio. To handle this, you need to explicitly download the media file from WhatsApp before any AI processing can begin.
From the audio route of the Switch node, click the “+” (Add Node) icon and search for WhatsApp Business Cloud. Select the Download media action and configure it to use the audio media ID from the incoming message. This node returns a media URL pointing to the audio file hosted by WhatsApp.
Key points in this step:
Node used: WhatsApp Business Cloud – Download media
Input: Audio media ID from WhatsApp Trigger
Output: Audio file URL
Purpose: Retrieve the raw audio file location
Step 7: Convert Audio URL to Binary
(HTTP Request Node)
AI transcription services cannot process media URLs directly. They require the actual audio file in binary format. To convert the WhatsApp media URL into a usable file, an HTTP Request node is required.
Click Add Node after the Download media node and search for HTTP Request. Configure the node with method GET, use the audio URL from the previous step, add the Authorization Bearer token from Meta, and set the response format to File / Binary. Executing this node downloads the audio file as binary data.
Key points in this step:
Node used: HTTP Request
Method: GET
Headers: Authorization → Bearer (Meta access token)
Response format: Binary
Purpose: Convert an audio URL into a binary audio file
Step 8: Transcribe Voice Message
(OpenAI Whisper / Google Speech-to-Text Node)
Once the audio file is available in binary format, it can be transcribed into text. This allows voice messages to be handled using the same AI logic as text messages.
Click Add Node and search for OpenAI – Transcribe a Recording (Whisper API) or Google Speech-to-Text. Drag the binary audio file from the HTTP Request node into the transcription input field and execute the node. The output is the text version of the user’s voice message.
Key points in this step:
Node used: OpenAI Whisper API or Google Speech-to-Text
Input: Binary audio file
Output: Plain text
Purpose: Convert speech into text for AI reasoning
Step 9: Generate Voice Reply
(OpenAI Text-to-Speech + Code Node)
If the IF condition determines that the response should be sent as audio, the AI-generated text must be converted back into speech. This enables true voice-to-voice conversations on WhatsApp.
From the true (audio) branch of the IF node, click Add Node and select OpenAI – Text-to-Speech / Generate Audio. Map the AI Agent output text into the audio input field to generate an MP3 file. Since WhatsApp requires a specific audio format, add a Code Node immediately after to convert the audio into a WhatsApp-compatible format.
Key points in this step:
Nodes used: OpenAI Text-to-Speech, Code
Input: AI Agent output text
Output: WhatsApp-compatible audio file
Purpose: Convert AI response into a voice reply
Step 10: Send Audio Reply to WhatsApp
(WhatsApp Send Message – Audio)
After the audio file has been converted into the correct format, it must be delivered back to the user through WhatsApp. This completes the audio response flow.
Click Add Node after the Code node and select WhatsApp Business Cloud – Send message. Change the message type to Audio and map the processed audio file into the media input field. Executing this node sends the voice reply back to the user.
Key points in this step:
Node used: WhatsApp Business Cloud – Send message
Message type: Audio
Input: Processed audio file
Purpose: Deliver a voice response to the user
Step 11: Process Image Messages
(WhatsApp Download Media + HTTP Request Nodes)
When users send images, WhatsApp again provides only a media ID. To analyze images, they must first be downloaded and converted into binary format.
From the image route of the Switch node, click Add Node and select WhatsApp Business Cloud – Download media using the image media ID. Then add an HTTP Request node to fetch the image URL as binary data, using the same configuration as audio conversion.
Key points in this step:
Nodes used: Download media, HTTP Request
Input: Image media ID
Output: Binary image file
Purpose: Prepare image for AI analysis
Step 12: Analyze Image Content
(OpenAI Vision – Analyze Image Node)
With the binary image file available, the workflow can now extract information from images. This is useful for reading questions, documents, or visual context sent by users.
Click Add Node and select OpenAI Vision – Analyze Image. Pass the binary image file into the node and define a prompt such as “Extract the question from this image and return only the question.” The output is structured text that can be sent to the AI Agent or directly back to WhatsApp.
Key points in this step:
Node used: OpenAI Vision – Analyze Image
Input: Binary image
Output: Extracted or analyzed text
Purpose: Understand and respond to image-based queries
Step 13: Send Text Inputs to AI Agent
(Text Route → AI Agent Node)
For users who send text messages, the workflow routes the message directly from the text branch of the Switch node into the AI Agent. This ensures that text-based questions are handled without unnecessary processing.
From the text route, connect the output directly to the AI Agent node. The AI Agent uses the incoming text as its user prompt and generates a contextual response using the configured Chat Model and system instructions.
Key points in this step:
Node used: AI Agent
Input: Text message body
Purpose: Handle text-based conversations
No transcription or conversion required
Step 14: Maintain Conversation Context
(Simple Memory Node)
To allow the AI Agent to understand follow-up questions and maintain context, Simple Memory is attached to the AI Agent. This memory stores recent interactions per user session.
Inside the AI Agent, connect a Simple Memory node. Set the session key by mapping the from (phone number) field so each WhatsApp user has an isolated conversation history.
Key points in this step:
Node used: Simple Memory
Session key: User phone number
Context window: Last few messages
Purpose: Enable multi-turn conversations
Step 15: Send Text Reply to WhatsApp
(WhatsApp Send Message – Text)
When the IF condition evaluates to false (not audio), the workflow sends a standard text response back to the user.
From the false branch of the IF node, click Add Node and select WhatsApp Business Cloud – Send message. Set the message type to Text and map the AI Agent output into the text body field.
Key points in this step:
Node used: WhatsApp Business Cloud – Send message
Message type: Text
Input: AI Agent output
Purpose: Deliver text responses for text and image inputs
Step 16: Activate and Test the Workflow
Once all branches are connected, save the workflow and click Activate. This enables real-time processing of WhatsApp messages.
Test the setup by sending:
A text message → expect text reply
A voice message → expect audio reply
An image with a question → expect text reply
Verify that memory works by sending follow-up questions from the same phone number.
Key points in this step:
Action: Activate workflow
Test all input types
Validate audio, text, and image flows
Confirm memory continuity
Video Tutorial on How to Create a WhatsApp AI Agent
How to Extend WhatsApp AI Agent With Advanced Features
Once your core WhatsApp AI agent is functional, you can extend it with advanced capabilities to improve customer experience, scalability, and automation depth. These enhancements allow you to tailor the AI behaviour, support global users, and handle higher traffic efficiently.
Custom Personality and Brand Voice: You can define a unique personality for your AI WhatsApp chatbot by modifying the system prompt in OpenAI GPT. This allows the AI agent to respond using a brand-specific tone, such as professional, friendly, or sales-focused. Custom personality helps align conversations with business goals across Customer Support, Sales CRM, and Support Hub use cases.
Multi-language Support for Global Users: By integrating translation steps using the Google Translate API, your chatbot can support multilingual functionality. Incoming messages are translated into a base language for processing and then translated back into the user’s preferred language. This is especially useful for international businesses managing diverse customer needs on WhatsApp.
Web Search Capability for Real-Time Answers: You can integrate external search plugins or APIs to allow the AI-powered WhatsApp agent to fetch real-time information. This is useful for answering dynamic queries such as product availability, policy updates, or public data that is not part of the chatbot’s training data.
Performance Optimisation for High Traffic: For large-scale deployments, use queues, throttling nodes, or workflow branching in n8n workflow automation. These controls help manage peak traffic, prevent API overuse, and stay within WhatsApp Business API and OpenAI GPT rate limits without degrading user experience.
Common Errors and How to Fix Them
While building and deploying a WhatsApp AI Agent, certain issues can occur due to API constraints, payload formatting, or workflow logic. Understanding these errors helps reduce downtime and improve system reliability.
Error 400 – Invalid Message Format: This error occurs when the WhatsApp payload is structured incorrectly. Ensure that message text is always placed inside the
text.bodykey. Proper formatting is critical when sending replies through the WhatsApp Business API.Token Expired Error: WhatsApp access tokens expire regularly, usually every two weeks. Refresh the token from Meta Business Manager and update it in n8n to maintain uninterrupted message delivery from your WhatsApp Business Account.
AI Response Delay: Delayed responses often result from excessive context or unused memory nodes. Optimise your conversation logic by trimming unnecessary history and ensuring that only relevant data is passed to OpenAI GPT.
n8n Workflow Stuck or Not Executing: Complex branching can cause workflows to stall. Enable manual execution mode in n8n to debug each node step-by-step, especially when working with HTTP request nodes and conditional logic.
Security and Scalability Considerations
Security is essential when handling customer data, voice notes, and images on WhatsApp. All API keys for OpenAI, WhatsApp, and third-party services should be stored in environment variables instead of hardcoded into workflows. This prevents accidental exposure and improves compliance with security requirements.
For scalability, deploy n8n on cloud infrastructure such as AWS, Render, or DigitalOcean. To prevent performance bottlenecks, it is recommended to split resource-intensive tasks such as image analysis and audio processing into separate, dedicated workflows when building automation with n8n workflow automation. Keeping workflows modular allows each process to run independently, improves scalability, and reduces execution overhead as traffic grows. This approach helps maintain stable session management and ensures consistent performance under high message volume, which aligns with established n8n workflow best practices for building scalable and maintainable automations.
Performance and Cost Optimisation
Optimising both performance and cost is crucial for the long-term sustainability of an AI WhatsApp chatbot. Understanding usage patterns allows you to fine-tune workflows while maintaining high response accuracy.
WhatsApp Business API Costs: Pricing typically ranges between $0.01 and $0.02 per user conversation, depending on region and conversation type.
OpenAI GPT API Costs: Pricing is based on the number of tokens processed, with rates varying by model and usage tier, typically ranging from approximately $0.003 to $0.02 per 1,000 tokens, as outlined in the OpenAI API Pricing documentation.
Storage and Memory Costs: Use n8n-integrated cache systems such as Redis or local storage to maintain short-term conversation memory at minimal cost.
You can batch messages and limit conversational history to the last five interactions. This reduces token use a lot while keeping the conversation context.
Final Testing and Deployment
Before going live, ensure that all components of the AI-powered WhatsApp agent are fully connected and tested. This includes WhatsApp triggers, switch nodes, AI responses, audio generation, and image recognition flows.
Test the system using different message formats such as text, voice notes, and images to confirm reliability. This stage usually includes beta testing. It also checks user acceptance and makes sure the system meets business needs before production release.
Conclusion
Creating a WhatsApp AI Agent with n8n, the WhatsApp Business API, and OpenAI GPT enables businesses to automate conversations across text, voice, and image channels with minimal manual effort. The solution is flexible, scalable, and adaptable to real-world business needs.
Once deployed, the AI-powered WhatsApp chatbot becomes a true multi-modal assistant capable of chatting, listening, and interpreting images. It provides continuous engagement for customer support, order management, and conversational commerce, operating reliably around the clock.


