Build a WhatsApp AI Agent with n8n: 2026 Step-by-Step Guide

Why Automate WhatsApp with n8n?
24/7 Instant Engagement: Never miss a lead again by providing sub-5-second response times, even outside of business hours.
Drastically Reduce Support Costs: Automate up to 70% of repetitive FAQs, allowing your team to focus only on high-value human interactions.
Increase Conversion Rates: Drive higher sales by responding to customer inquiries at the moment of peak interest, right in their favorite messaging app.
Human-Like Interactions: Use OpenAI to understand complex intent and natural language, ensuring your bot feels like a helpful assistant rather than a rigid menu.
Scale Without Extra Effort: Handle 1,000+ concurrent conversations effortlessly without hiring additional staff or increasing your overhead.
Unified Multi-Channel Logic: Seamlessly sync your WhatsApp data with CRMs, Google Sheets, or Email to keep your entire business ecosystem updated automatically.
Automating WhatsApp conversations is significantly easier with n8n, especially when combined with the WhatsApp Business Cloud API. This guide explains how to use WhatsApp as both a trigger and an action, allowing you to build intelligent, real-time chatbot workflows without writing complex code.
By integrating AI tools such as the OpenAI assistant, you can create conversational experiences that automatically understand user intent, respond instantly, and scale customer interactions across sales, support, and marketing teams.
Table of Contents:
Prerequisites: Setting Up the Foundation
Step 1: Add WhatsApp Business Cloud as a Workflow Trigger
Step 2: Verify Incoming Message Data
Step 3: Integrate OpenAI for Automatic AI Replies
Step 4: Send Automated WhatsApp Messages Back to the User
Step 5: Save, Activate, and Test the Workflow
Video Tutorial: WhatsApp Automation (Part 2)
Additional Customisation Ideas
Troubleshooting and Best Practices
Wrap-Up: Building Smarter WhatsApp Automation with n8n
Prerequisites: Setting Up the Foundation
Before starting the WhatsApp automation workflow setup in n8n, it is essential to complete the Meta configuration for WhatsApp Business Cloud. These credentials ensure secure authentication and reliable message delivery between WhatsApp and your automation workflows.
You must have the following parameters available from your Meta Developer account:
Client ID: This uniquely identifies your Meta application and enables n8n to authenticate API requests securely when connecting to WhatsApp Business Cloud services.
Client Secret: This functions as a private security key used together with the Client ID, ensuring that only authorised workflows can access your WhatsApp API.
Access Token: This token allows n8n to send and receive WhatsApp messages programmatically and must remain valid for uninterrupted automation execution.
Phone Number ID: This represents the WhatsApp Business number registered with Meta and is required for triggering workflows and sending automated replies.
If you need guidance on obtaining these credentials, read WhatsApp Automation (Part 1) – Set Up Meta Business API
Step 1: Add WhatsApp Business Cloud as a Workflow Trigger
The first step in this WhatsApp automation is configuring WhatsApp as a WhatsApp workflow trigger. This trigger listens for incoming messages and initiates the workflow automatically whenever a user sends a WhatsApp message.
Add the trigger node
In your n8n workspace, click 'Add first step' to begin building the workflow using the visual workflow builder.
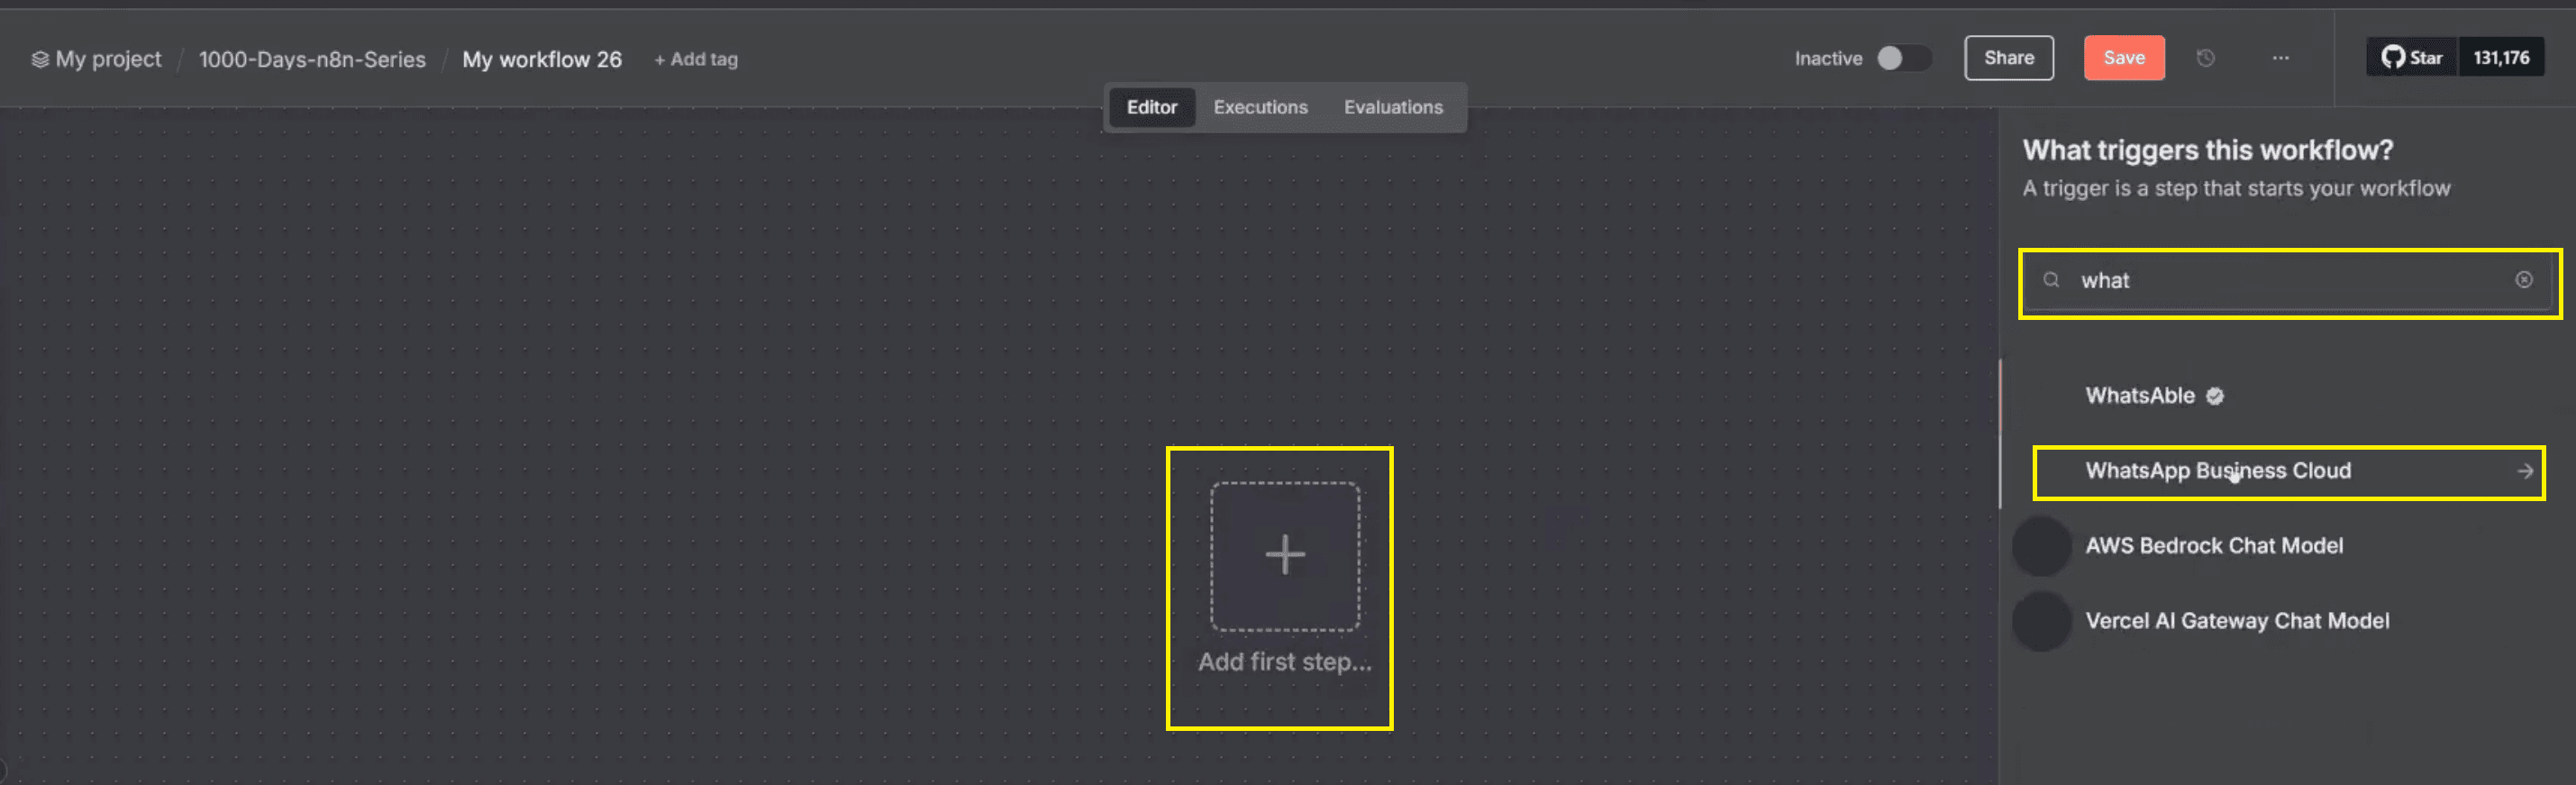
In the node search field, type WhatsApp Business Cloud and select the integration from the list of available connectors.

Choose the event On Message, which allows n8n to react immediately to incoming WhatsApp messages.

This configuration enables chat triggers and allows WhatsApp to act as a real-time entry point into your workflow automation.
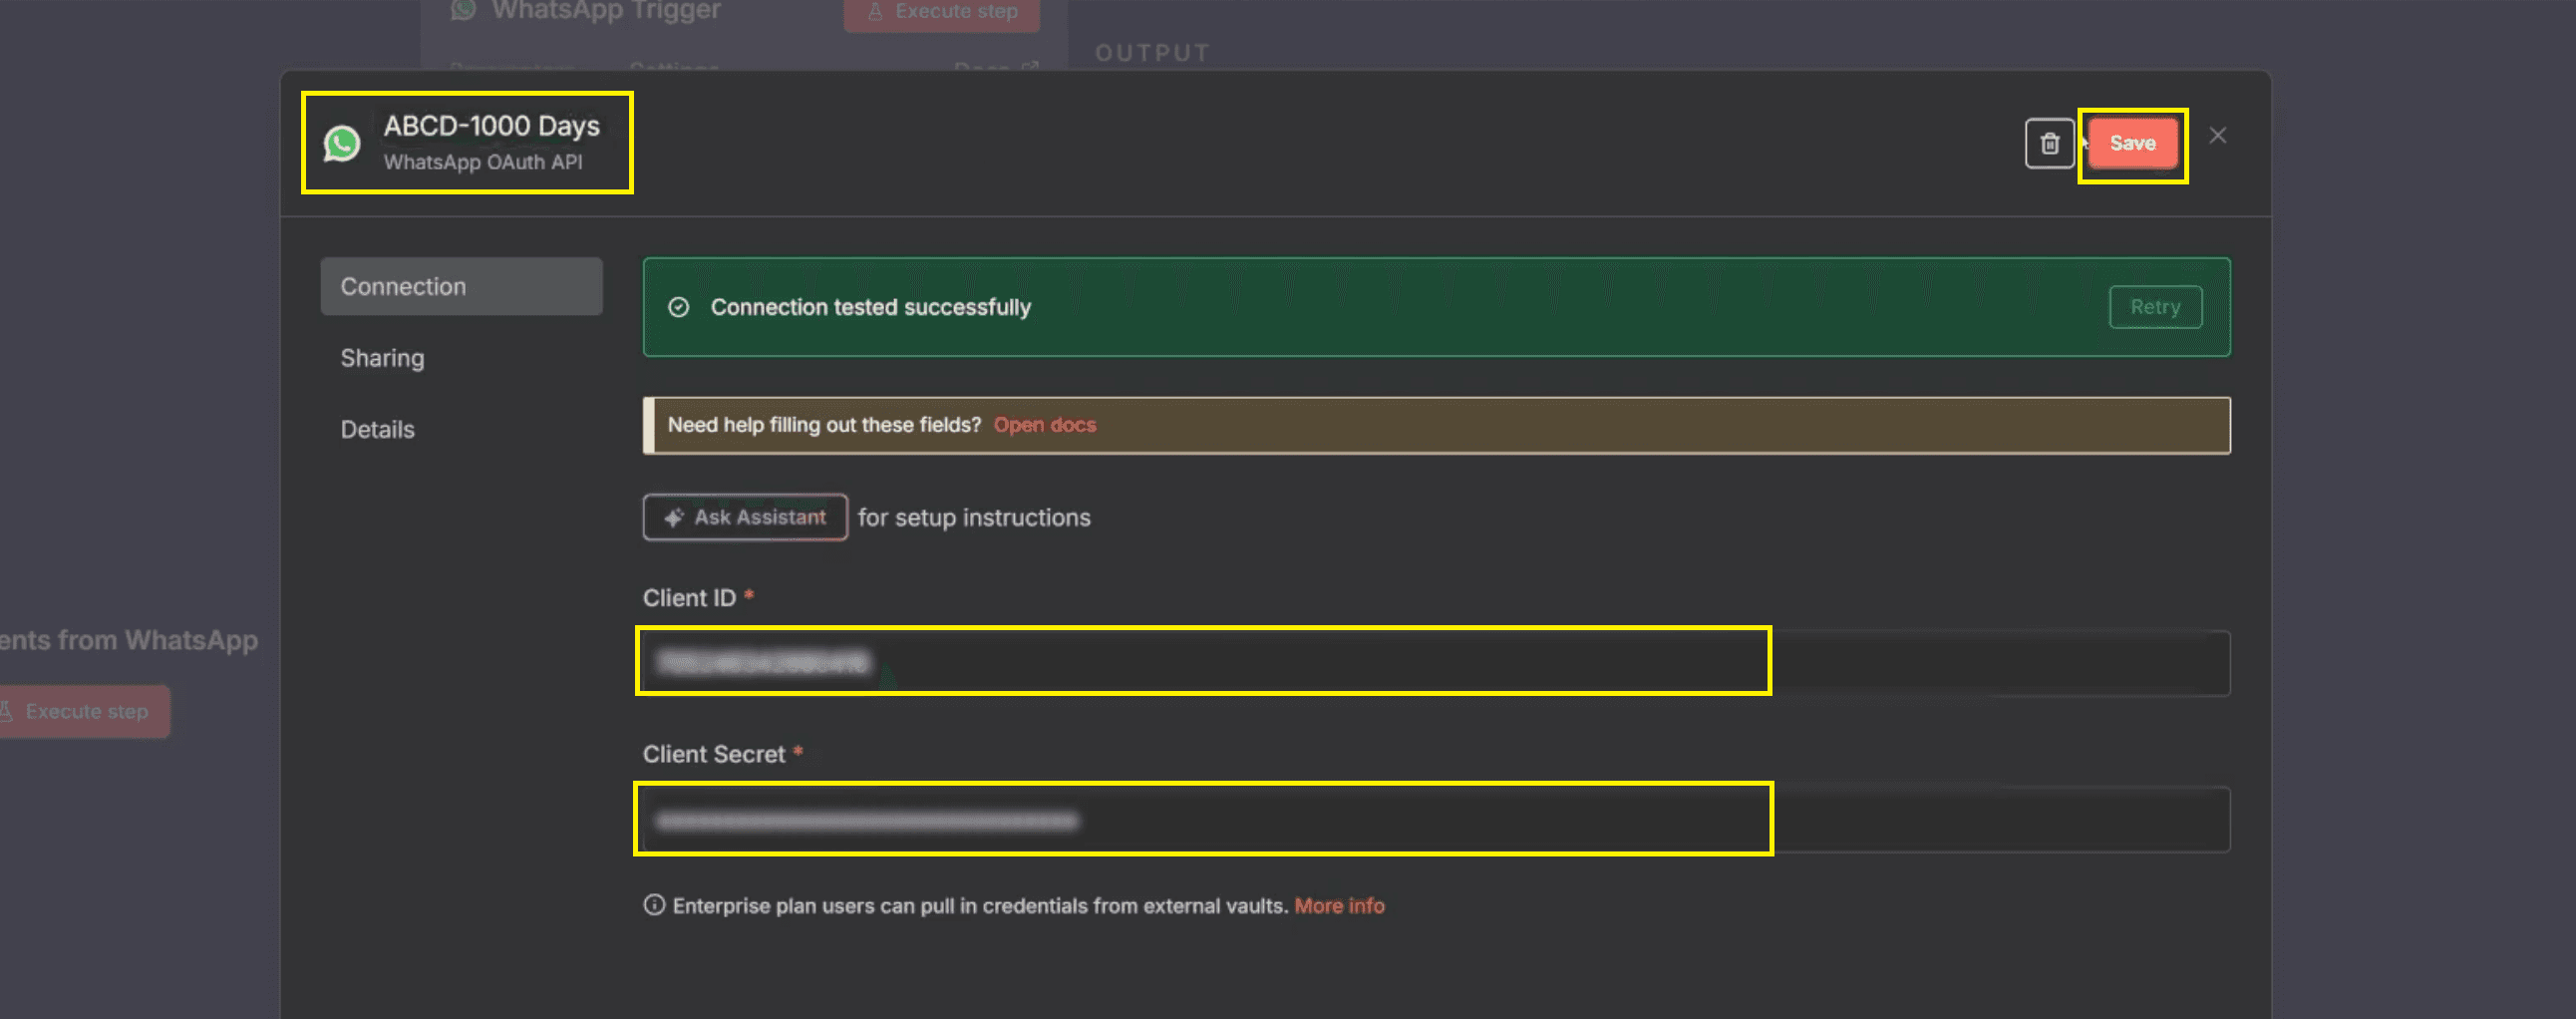
Create WhatsApp credentials
In the credentials section, click 'Create new credential' to securely connect n8n with Meta’s WhatsApp API.

Enter your 'Client ID' and 'Client Secret' exactly as shown in your Meta Developer dashboard to avoid authentication errors.
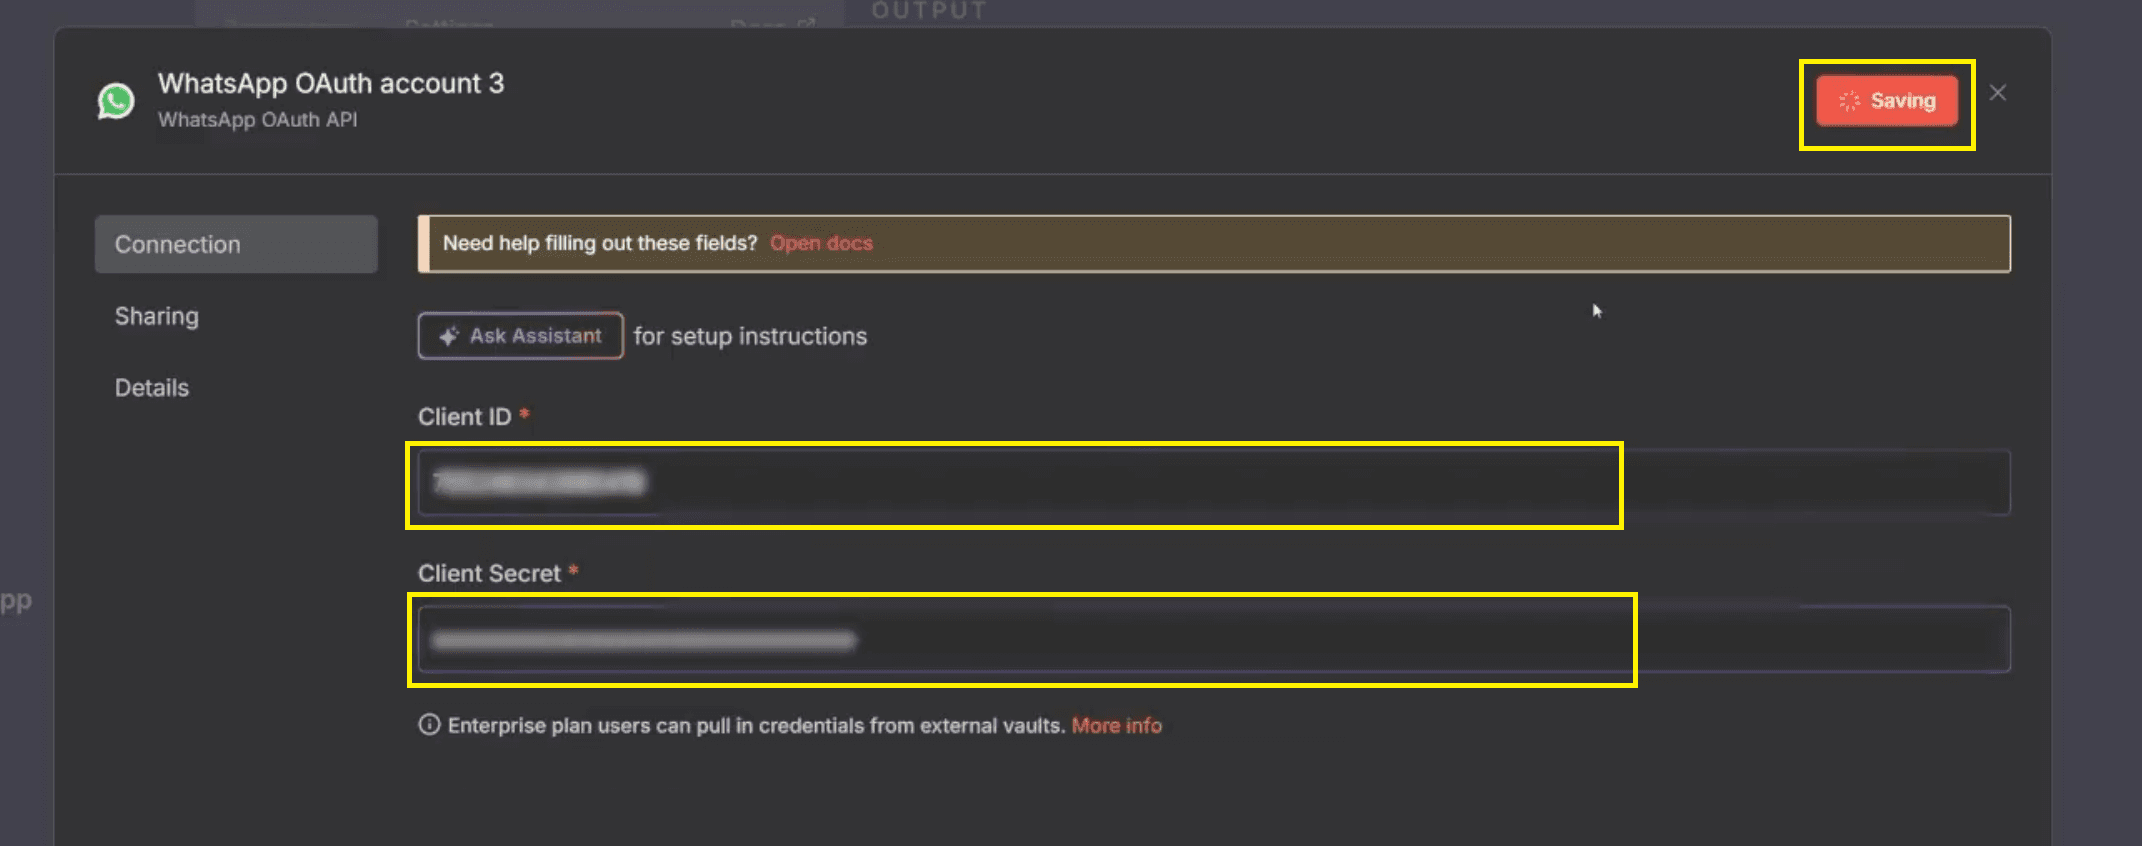
Rename the credential with a clear label and click 'Save', making it easier to manage credentials across multiple workflows.
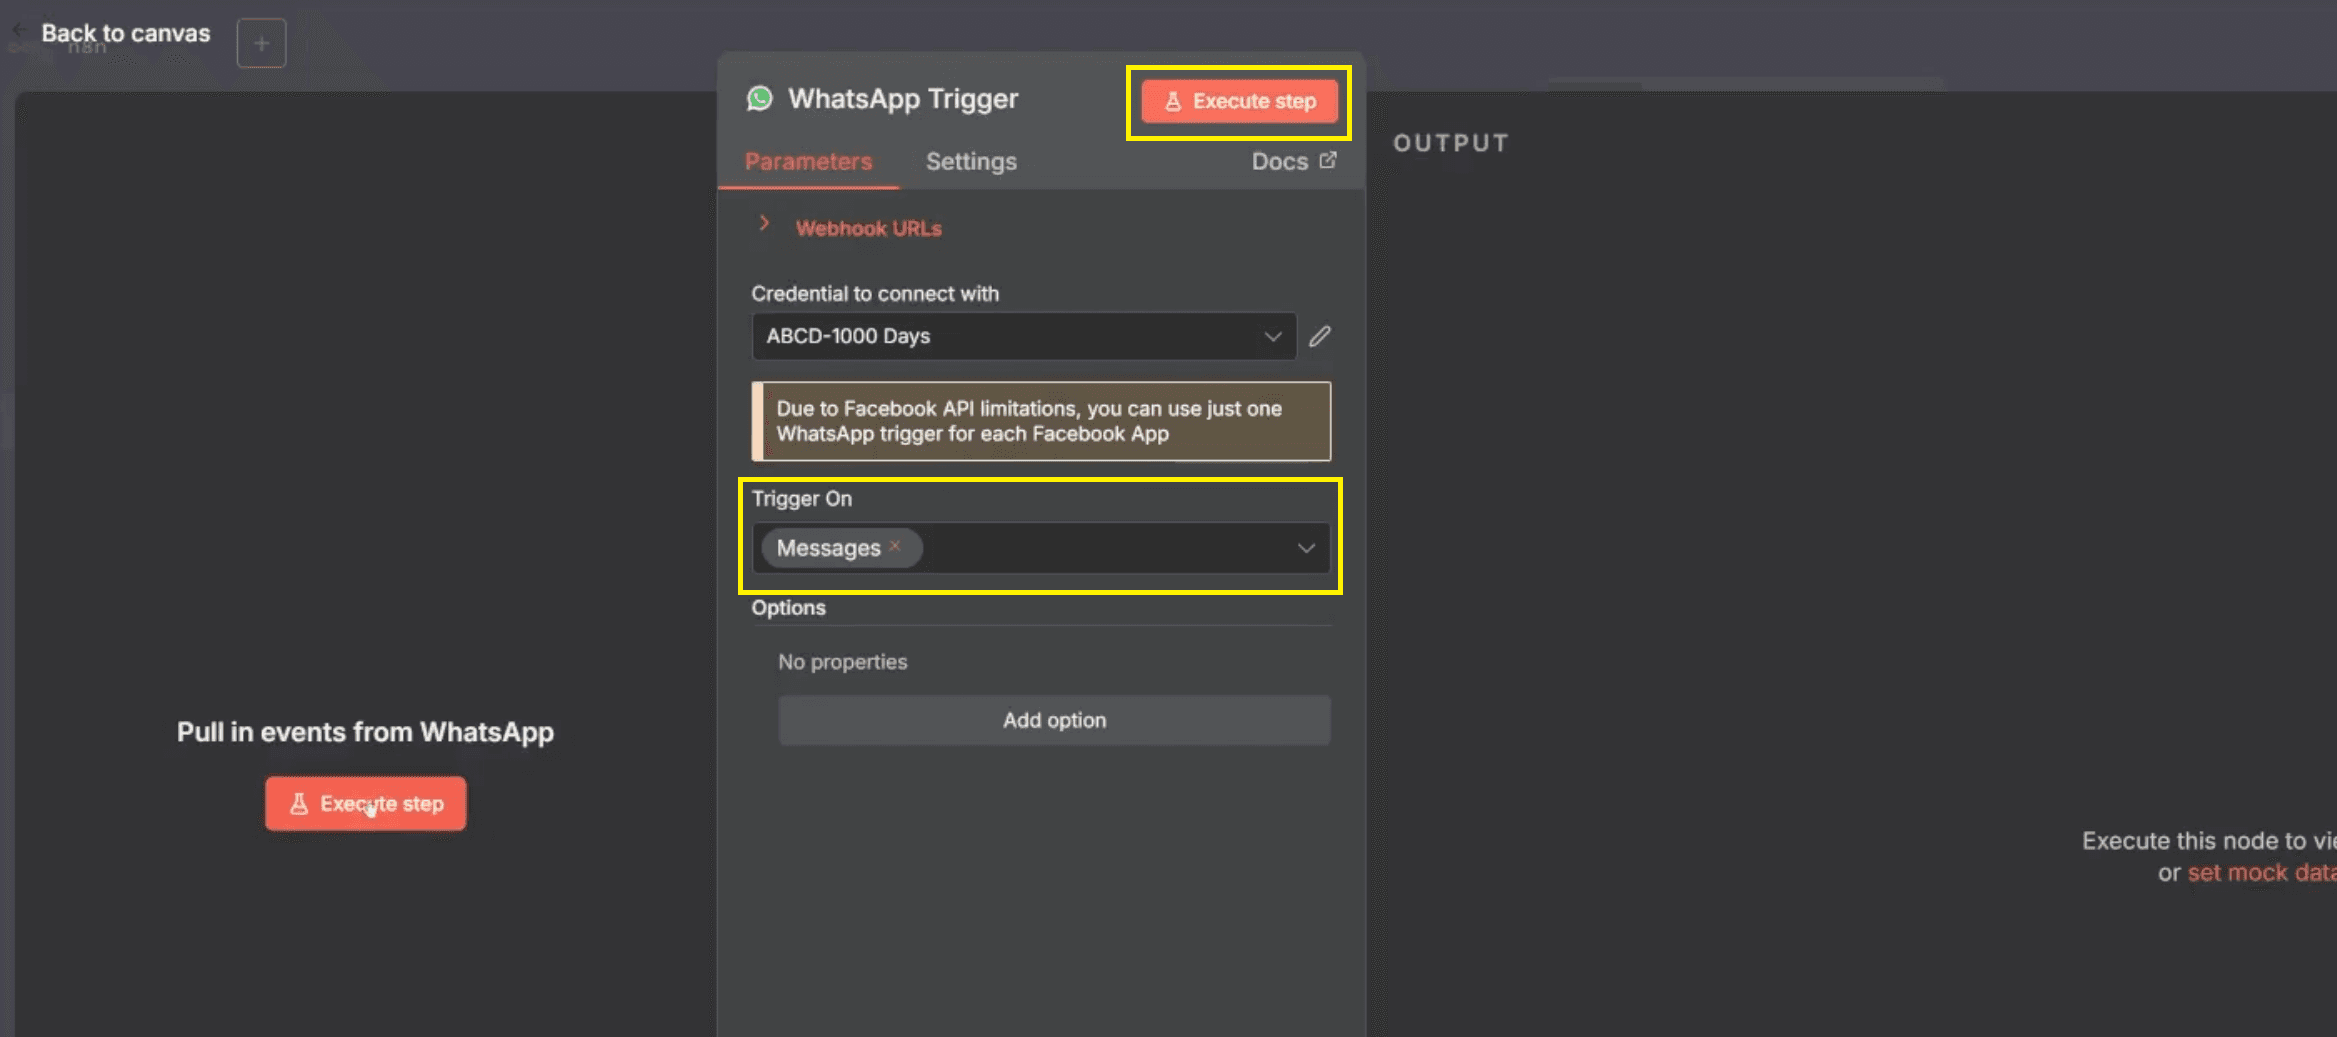
Test the trigger connection
After configuring the WhatsApp Business Cloud trigger, ensure that Trigger On is set to Messages. This tells n8n to listen specifically for incoming WhatsApp messages sent to your business number.
Once selected, click Execute Step to temporarily activate the WhatsApp workflow trigger for testing purposes. This allows n8n to pull live events from WhatsApp and display incoming message data in the output panel.
Also Read: How to Use OpenAI Agent Builder: Beginner’s Guide
Step 2: Verify Incoming Message Data
Before adding AI or automation logic, it is important to verify that WhatsApp messages are being captured correctly and consistently by the workflow trigger.
Send a message such as “Hello, how are you?” to your WhatsApp Business number from a personal device.

In the output, you will clearly see the following details:
Your WhatsApp Business phone number/testing phone number, confirming which business number received the message
The sender’s personal phone number identifies the user who initiated the WhatsApp conversation
The message text sent by the user, such as “Hello, how are you?”, is captured exactly as received
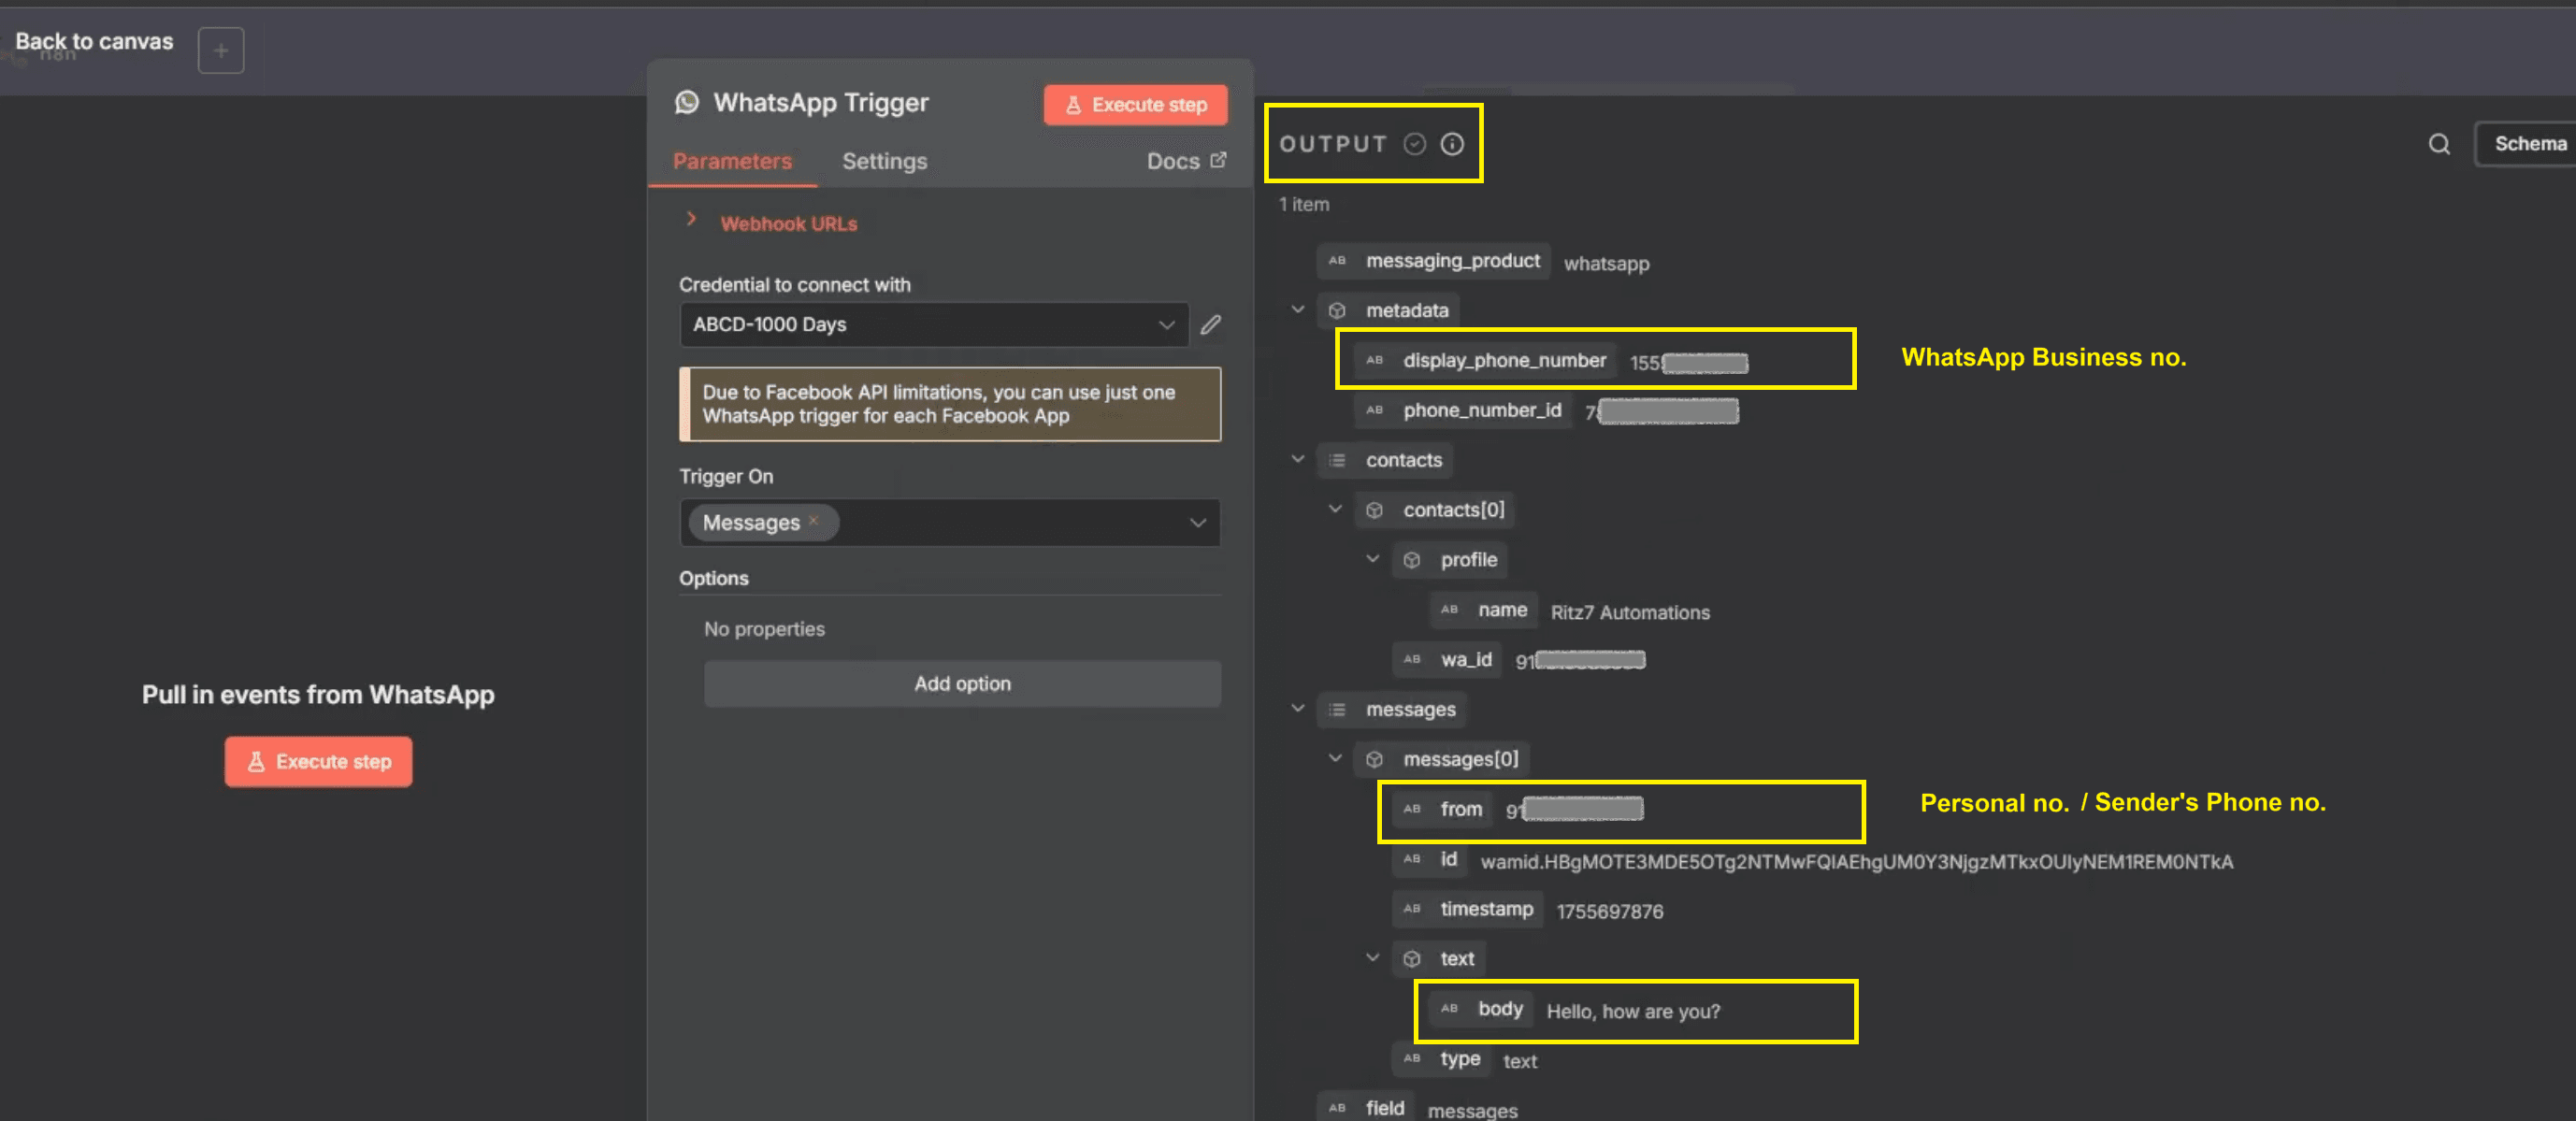
On the right-side output panel, verify that critical message data—such as the sender ID and message body—is displayed correctly. In the trigger output, confirm the presence of the following fields.
contacts → wa_id, which identifies the sender and is used for replying
messages → text → body, which contains the actual message text
These values will later be reused using drag-and-drop mapping
This confirmation ensures WhatsApp is successfully connected to n8n and ready for further workflow automations and AI-driven responses.
Step 3: Integrate OpenAI for Automatic AI Replies
This step adds intelligence to your no-code AI automation by sending incoming WhatsApp messages to an AI model, which then generates a relevant and human-like reply.
Add the OpenAI node
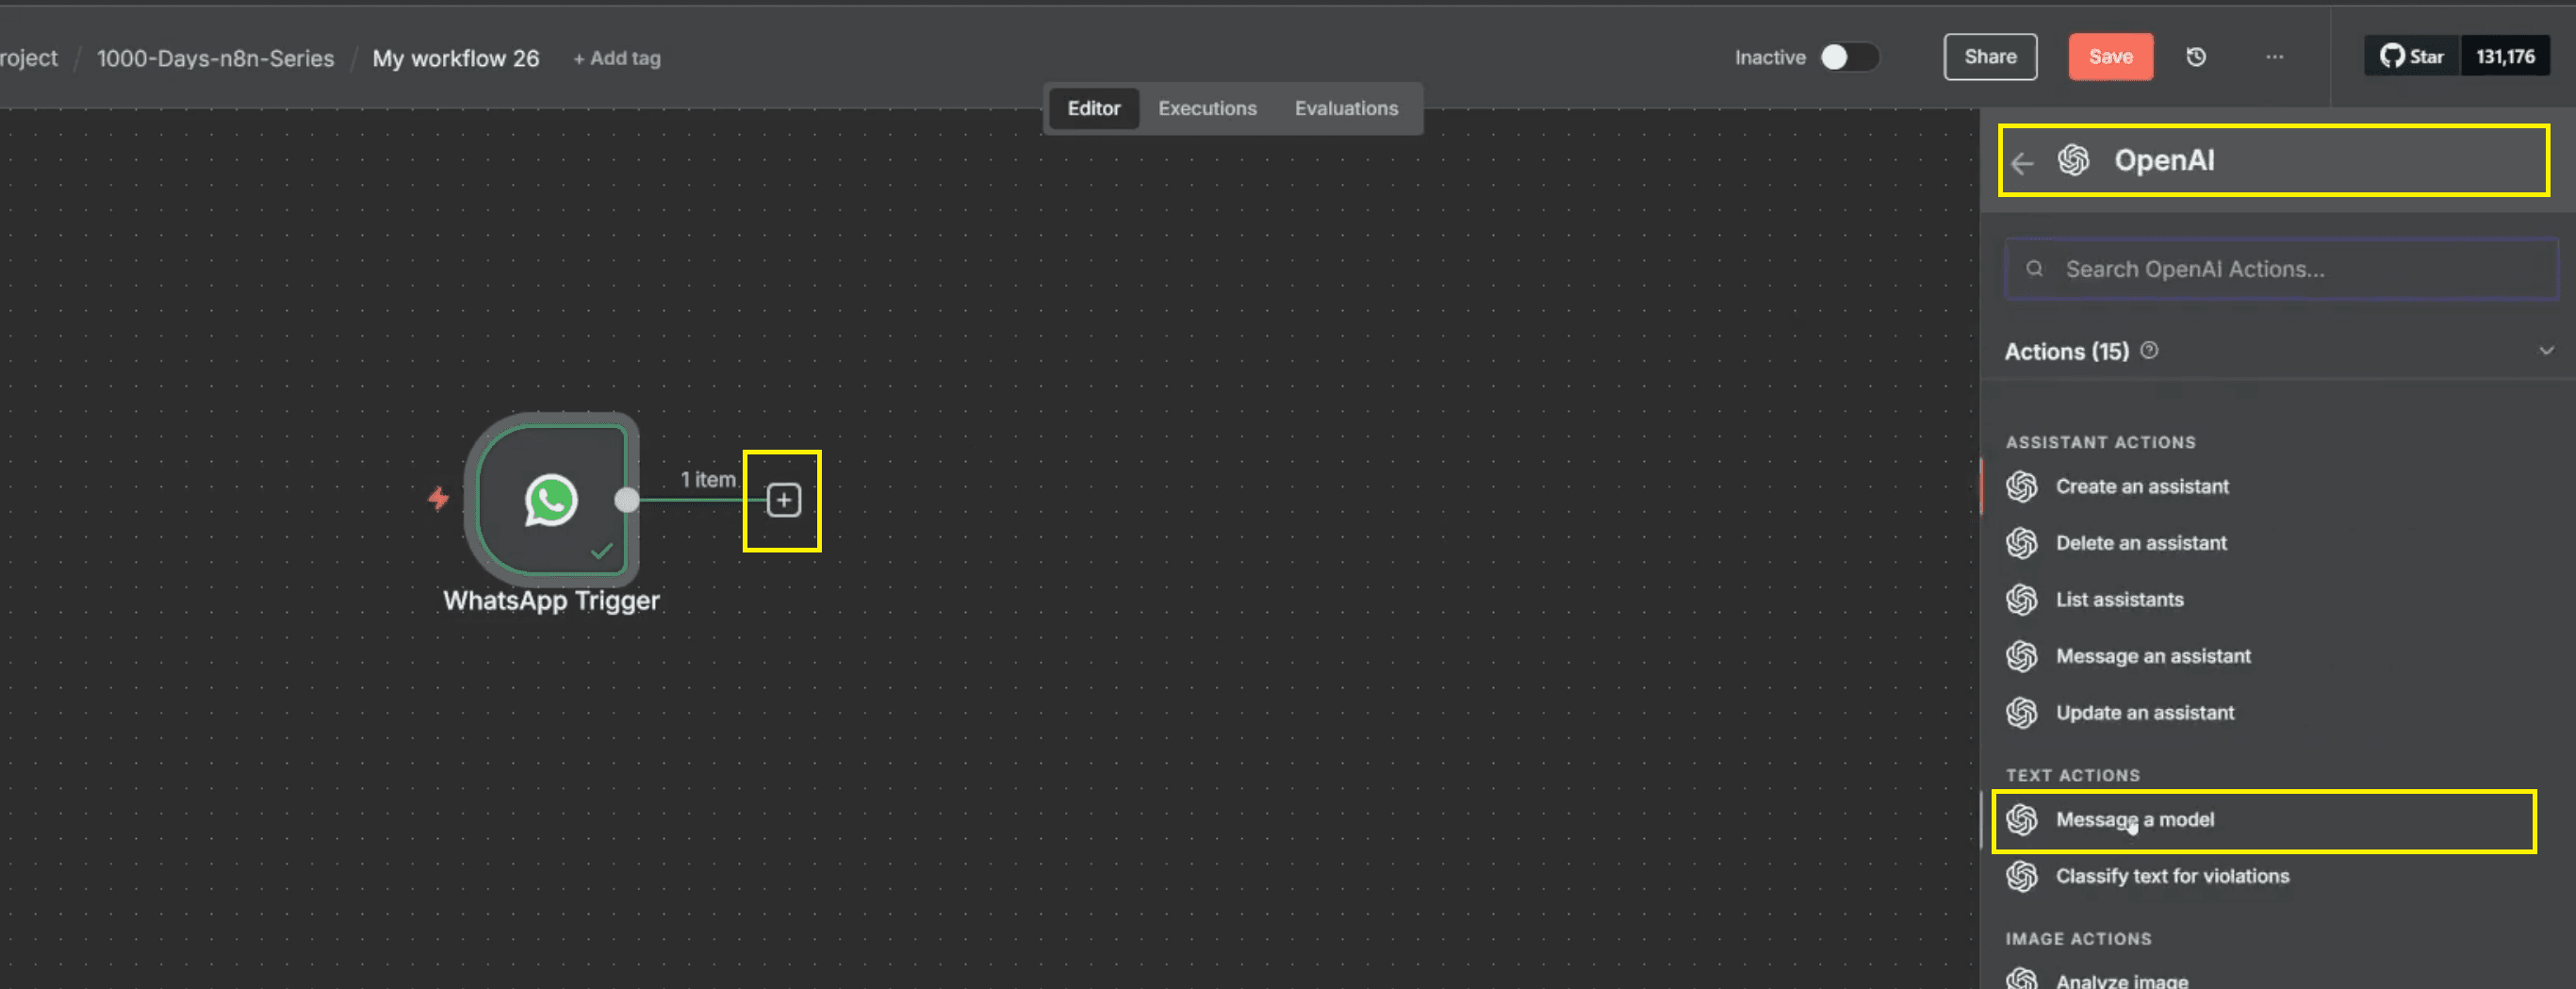
Click the “+” icon next to the WhatsApp trigger node to add a new step in the workflow.
Search for OpenAI and select Message a Model, which allows WhatsApp messages to be processed by AI agents.
Configure the OpenAI node
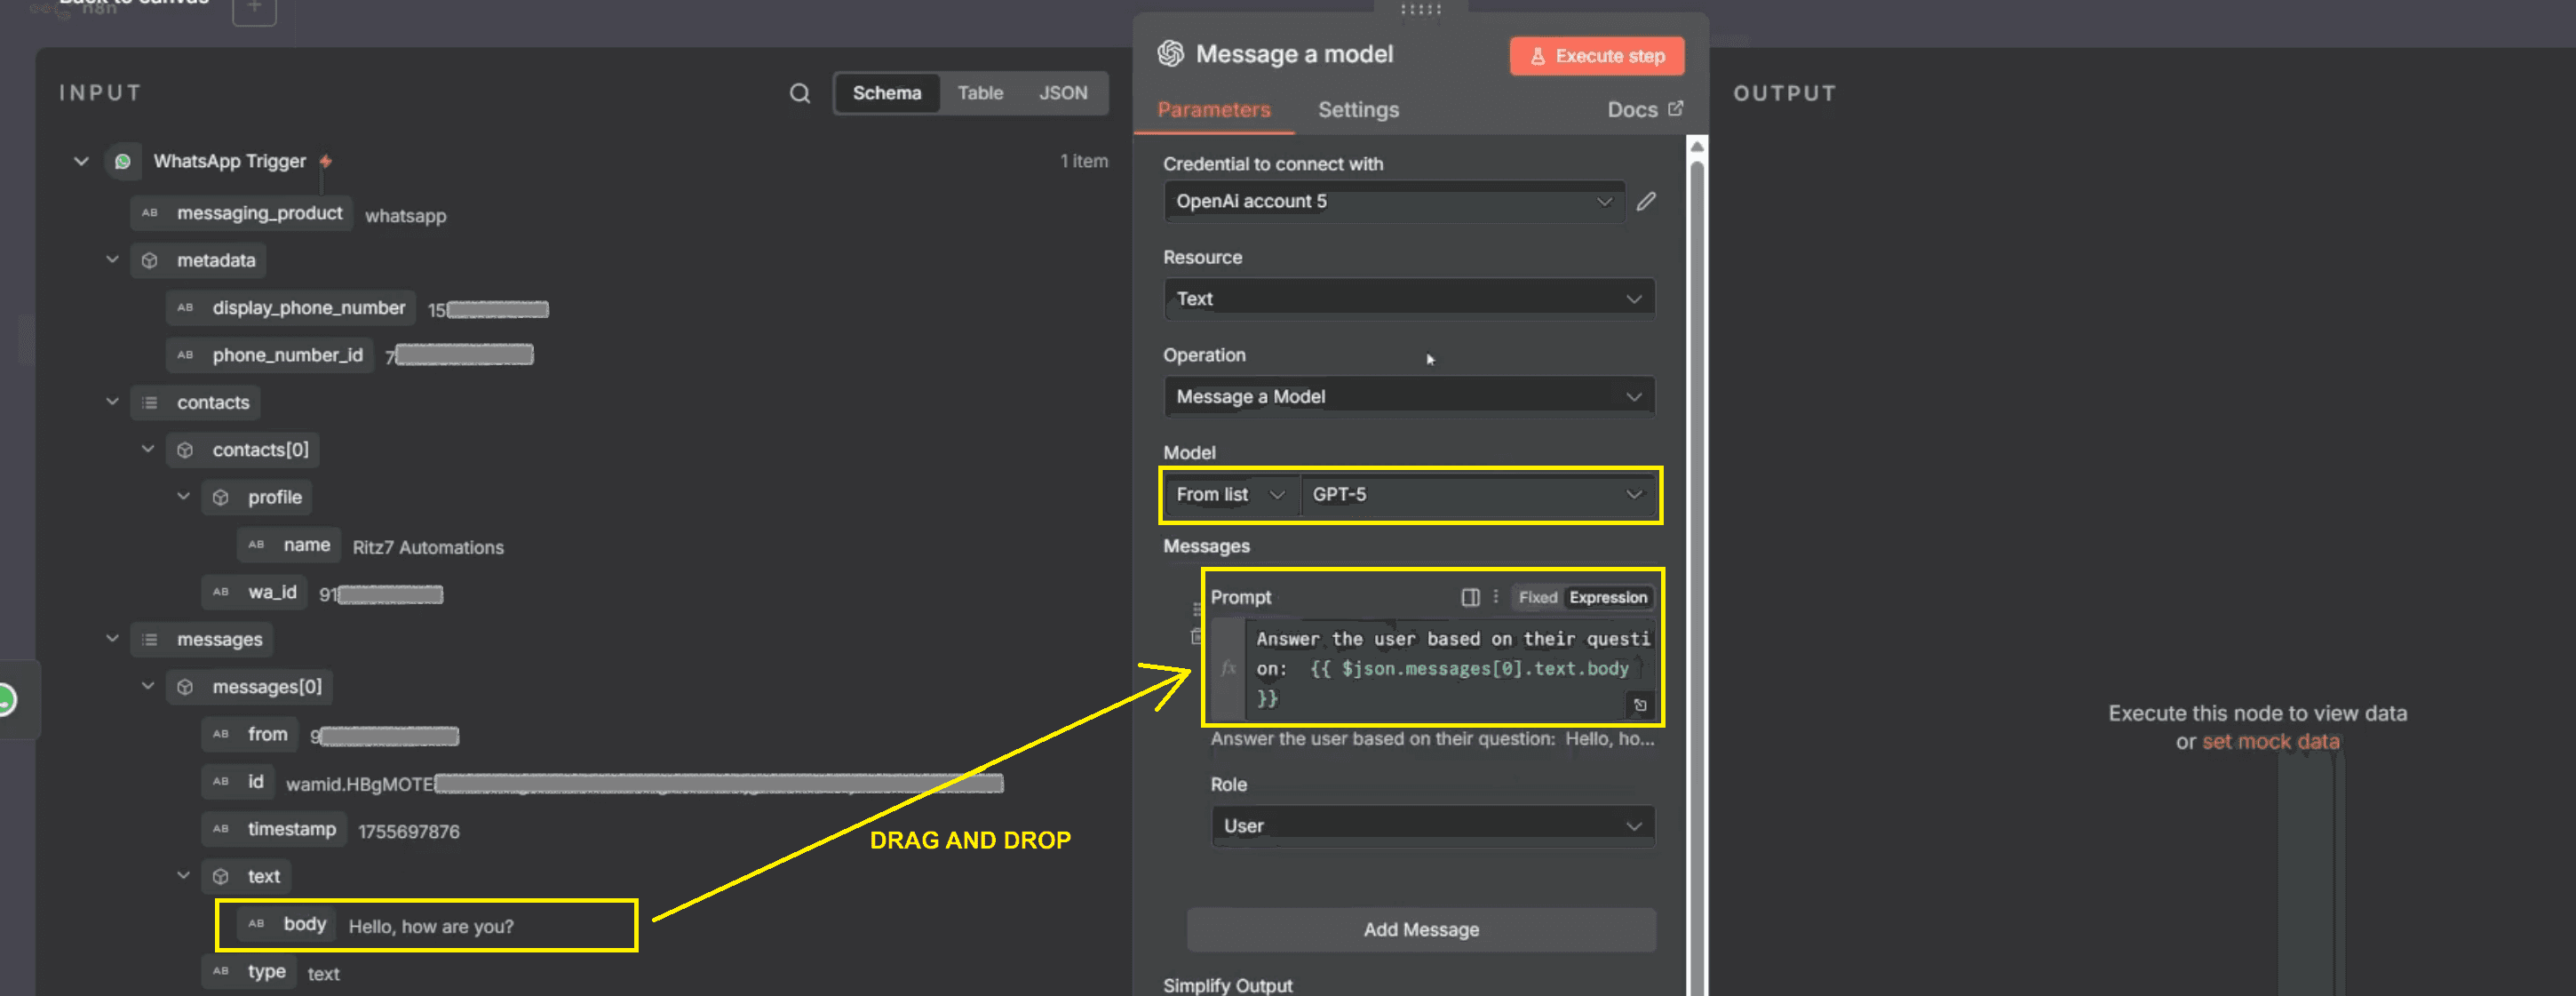
Choose the latest available GPT model, such as GPT-4 or GPT-5, to ensure high-quality conversational responses.
In the prompt field, type an instruction such as "Answer the user based on their question."
From the left panel, expand:
WhatsApp Trigger → messages → text → body
Drag and drop the message body field from the left panel into the prompt input, ensuring the AI responds directly to user messages.
Test the AI output
Click Execute Step to test the OpenAI node.
In the output panel, verify that the AI response appears under message → content, confirming successful AI processing.
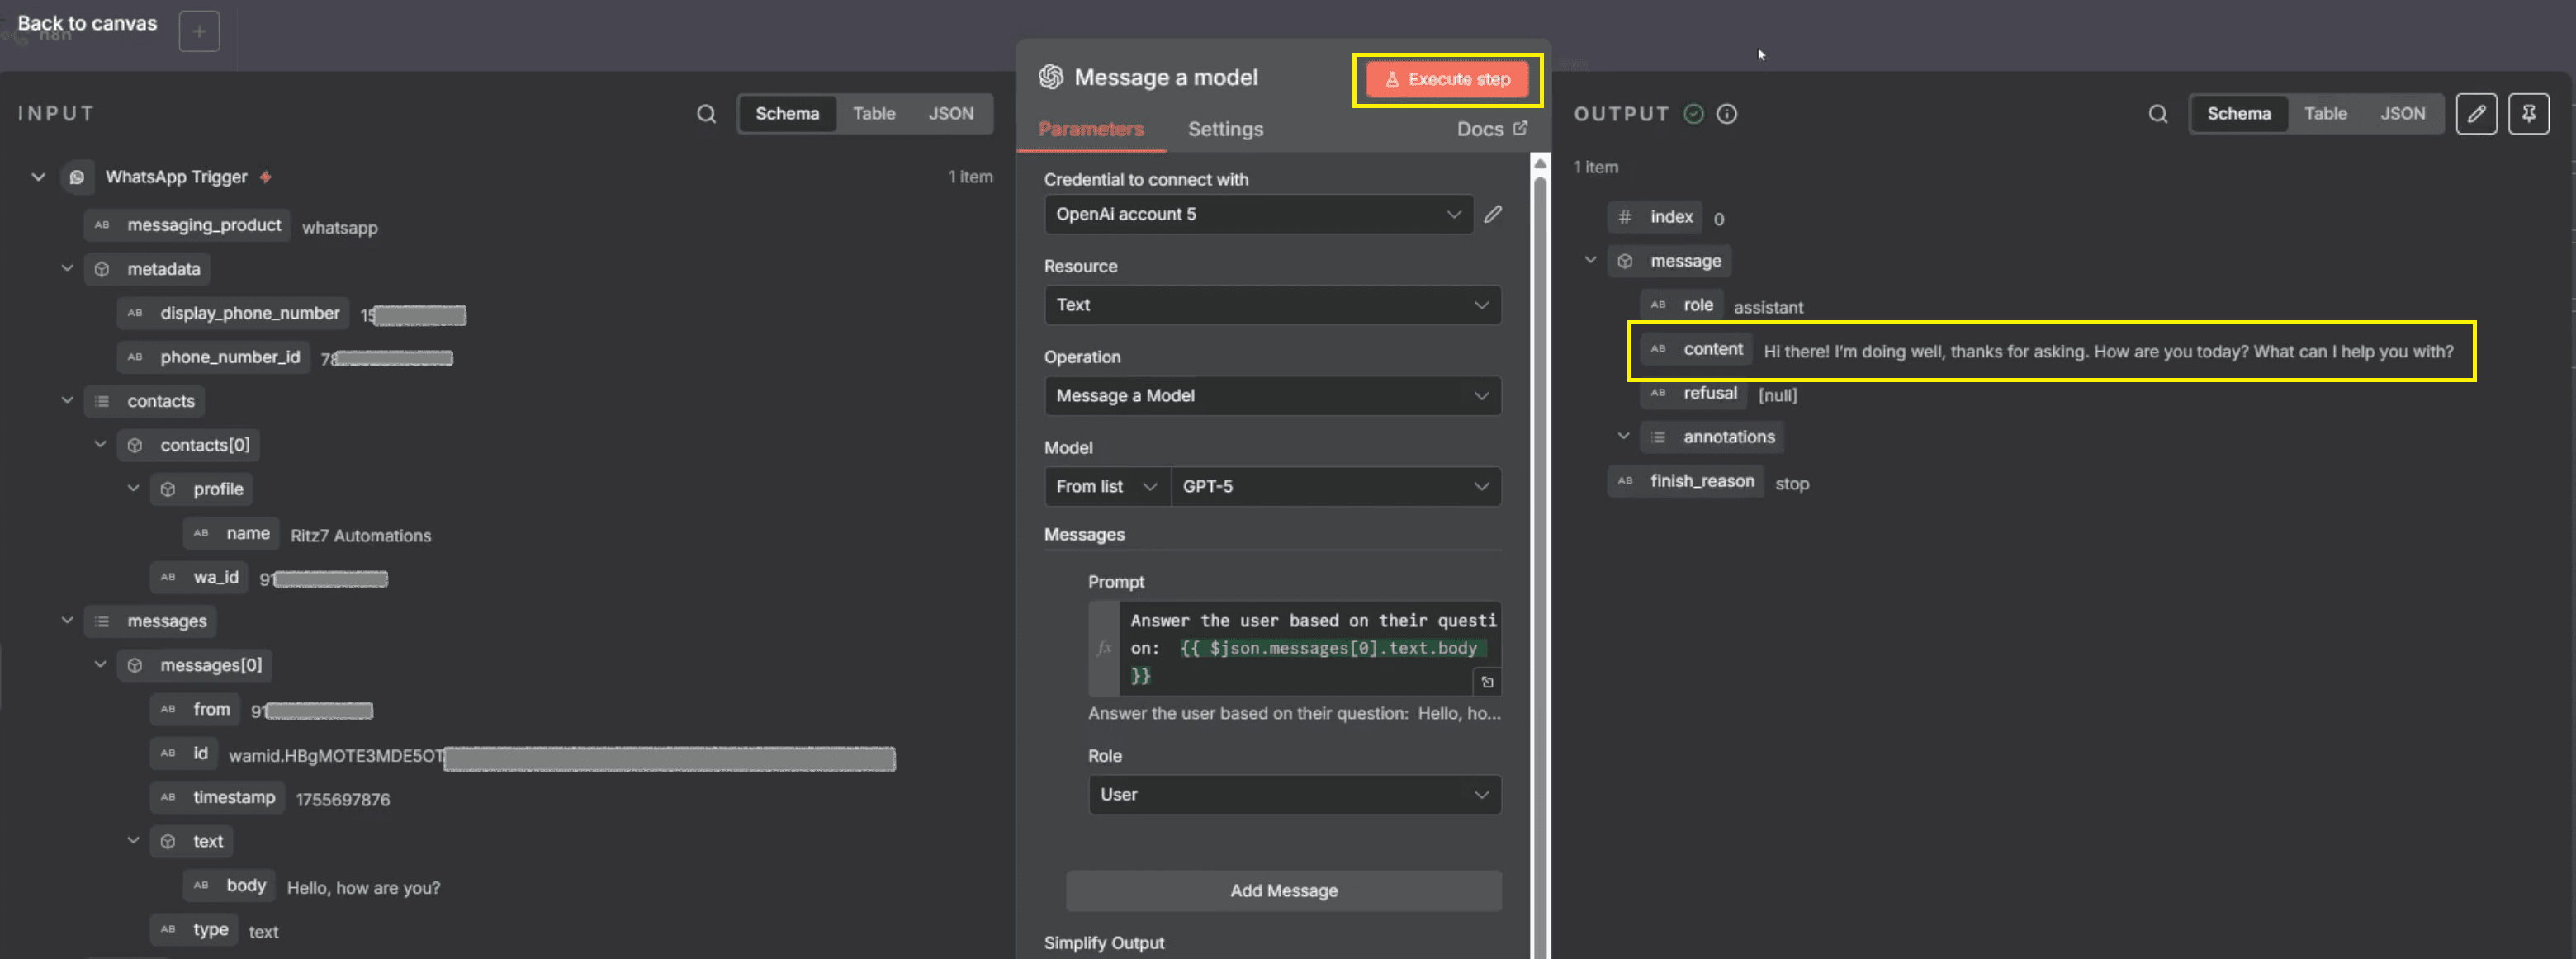
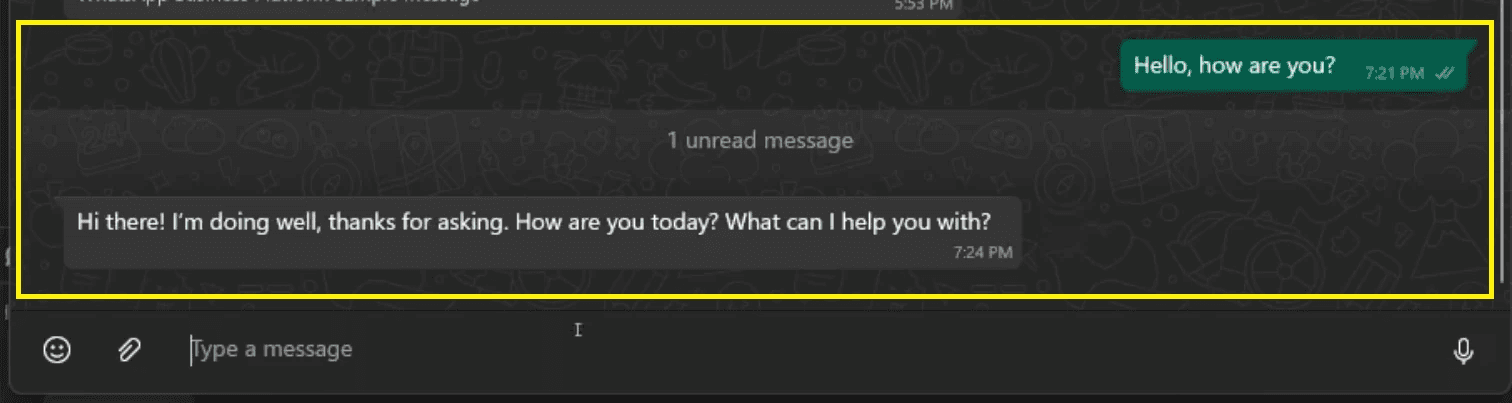
After clicking Execute Step, n8n sends the AI-generated reply back to WhatsApp automatically.
Now, open WhatsApp on your phone and check the same chat where you sent the test message. You should see an AI reply appear instantly, such as a friendly response to “Hello, how are you?” This confirms that the OpenAI node and WhatsApp Send Message action are working correctly.
Also Read: Automate Email Replies from Form Submission in n8n
Step 4: Send Automated WhatsApp Messages Back to the User
This step completes the workflow by automatically sending the AI-generated reply back to the user on WhatsApp. Once the AI processes the incoming message, n8n uses the WhatsApp Business Cloud action to deliver the response in real time. This ensures users receive fast, accurate, and conversational replies without any manual effort.
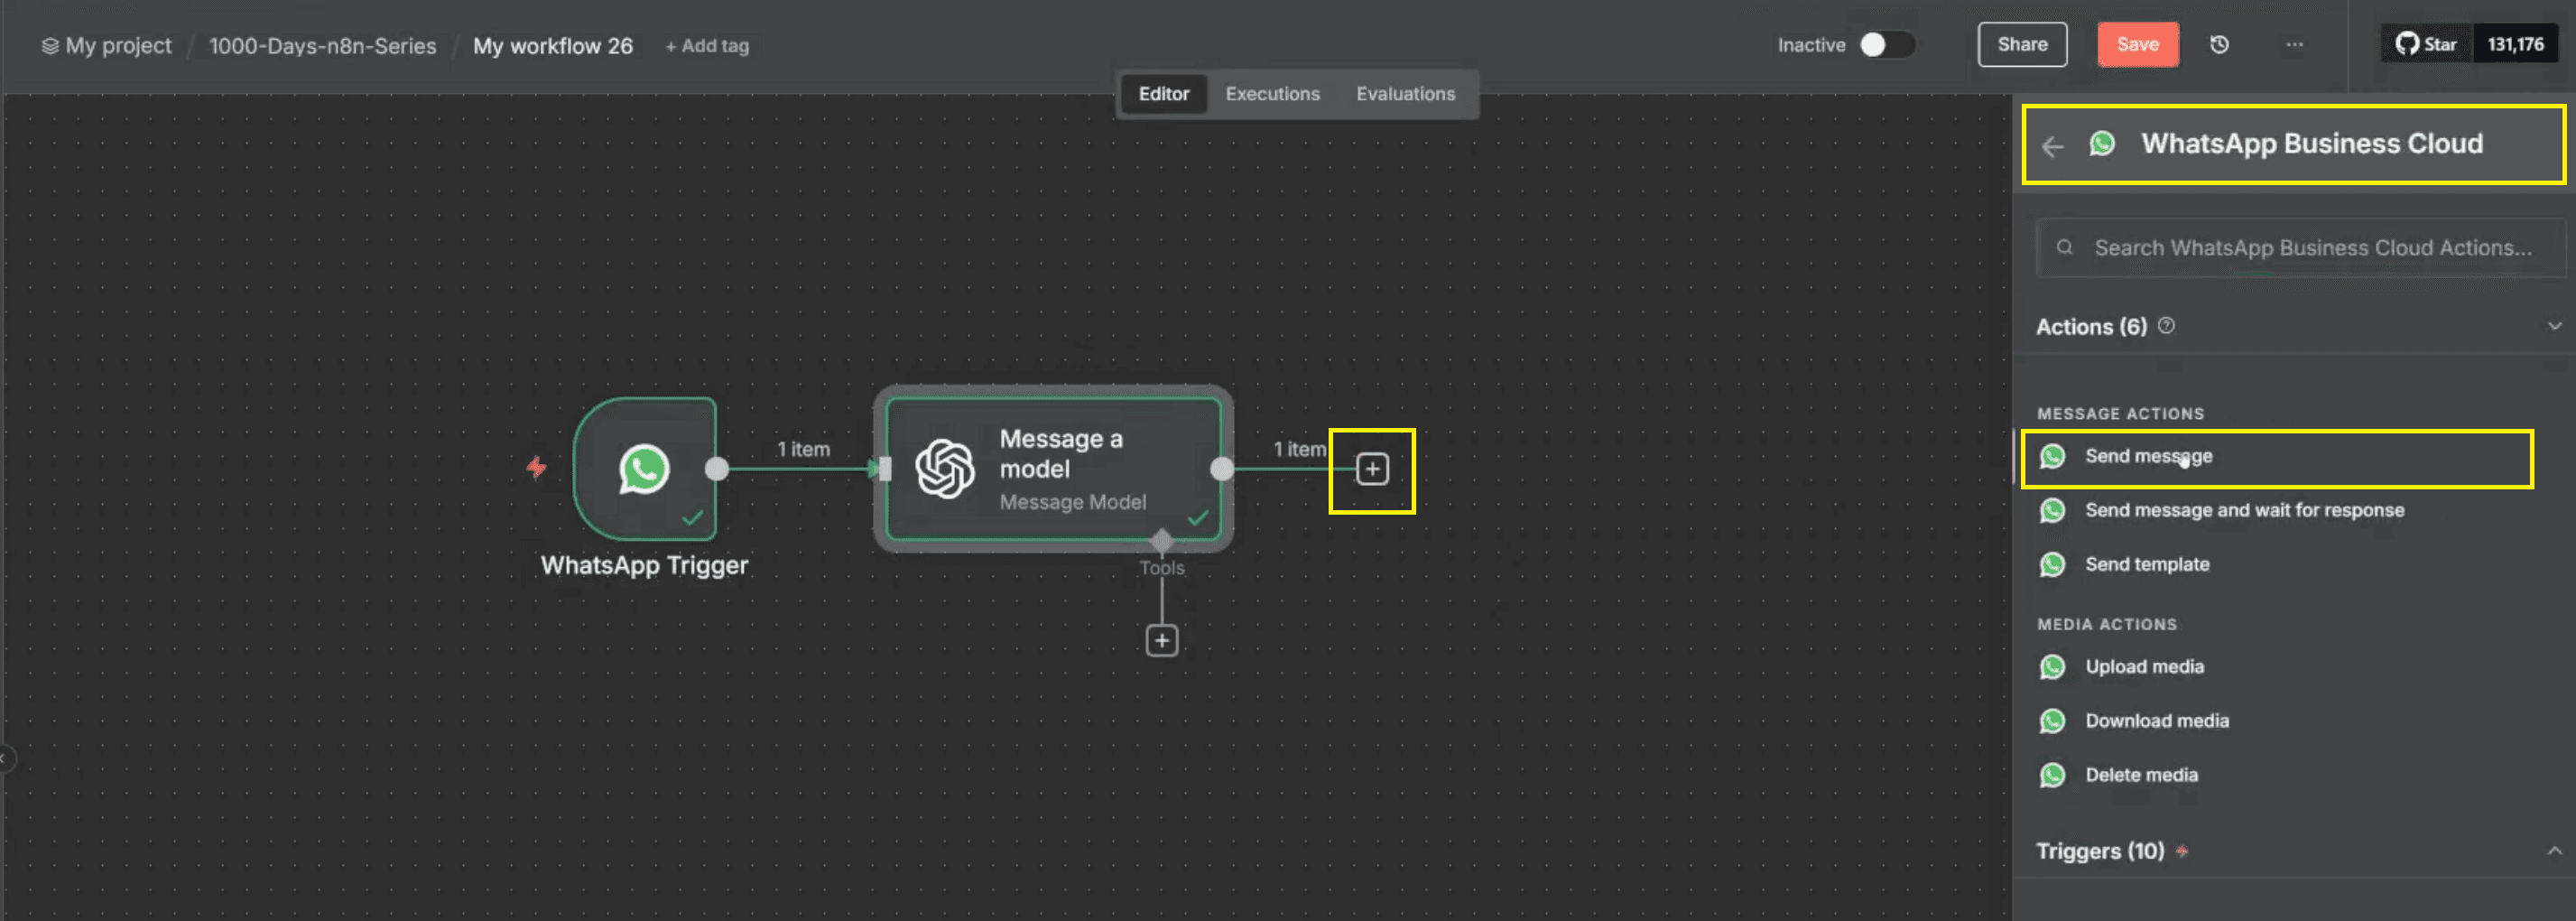
Add a WhatsApp Send Message node
Click the “+” icon next to the OpenAI node to add another workflow step.
Search for WhatsApp Business Cloud and select the Send Message action.
Create Send Message credentials
Click 'Create new credential' and
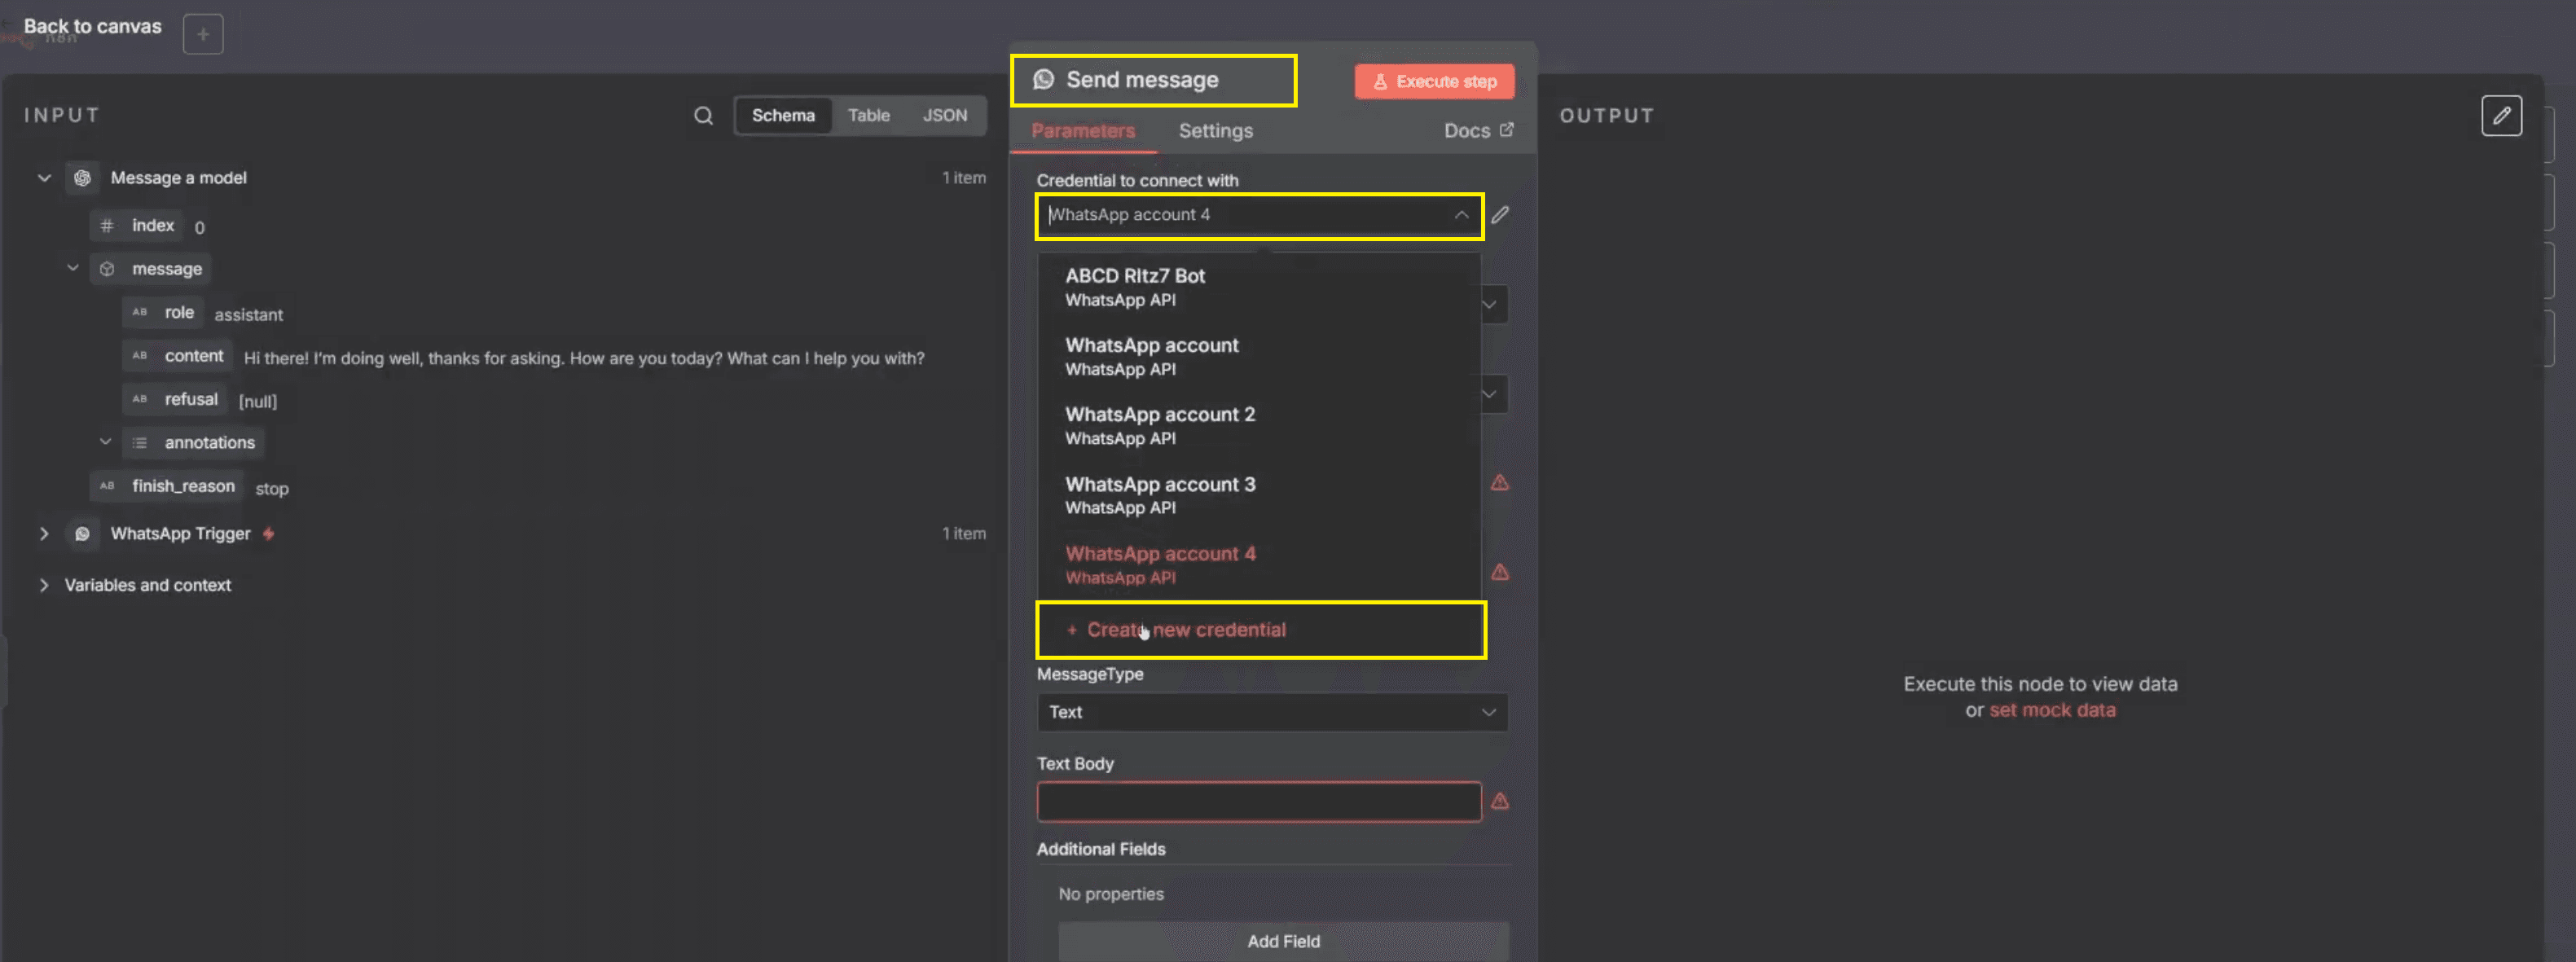
Enter your 'Access Token' and 'Business Account ID'.
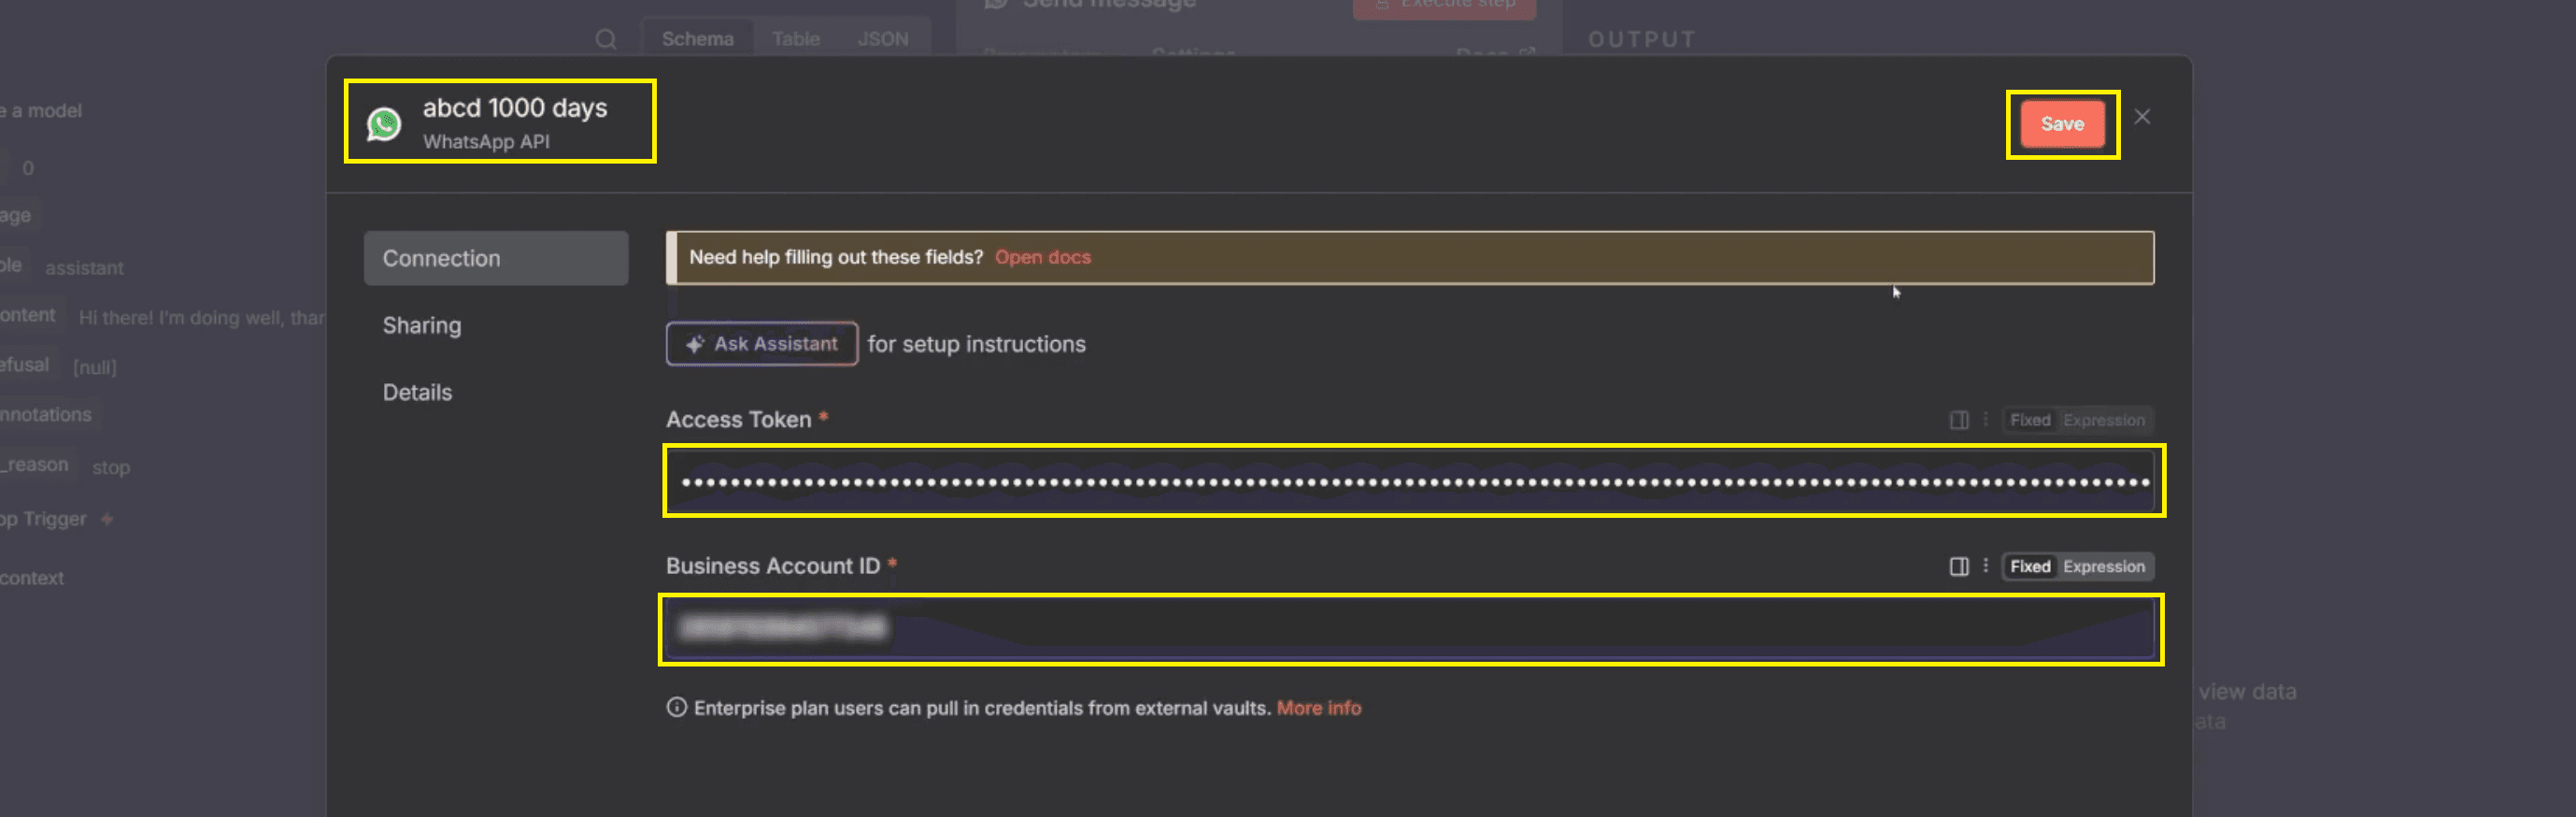
Save the credentials to authorise automated WhatsApp messages.
Configure Send Message fields
Select the sender phone number, choosing your registered WhatsApp test or production number.
For Recipient Phone Number, drag contacts → wa_id from the WhatsApp trigger in the left panel.
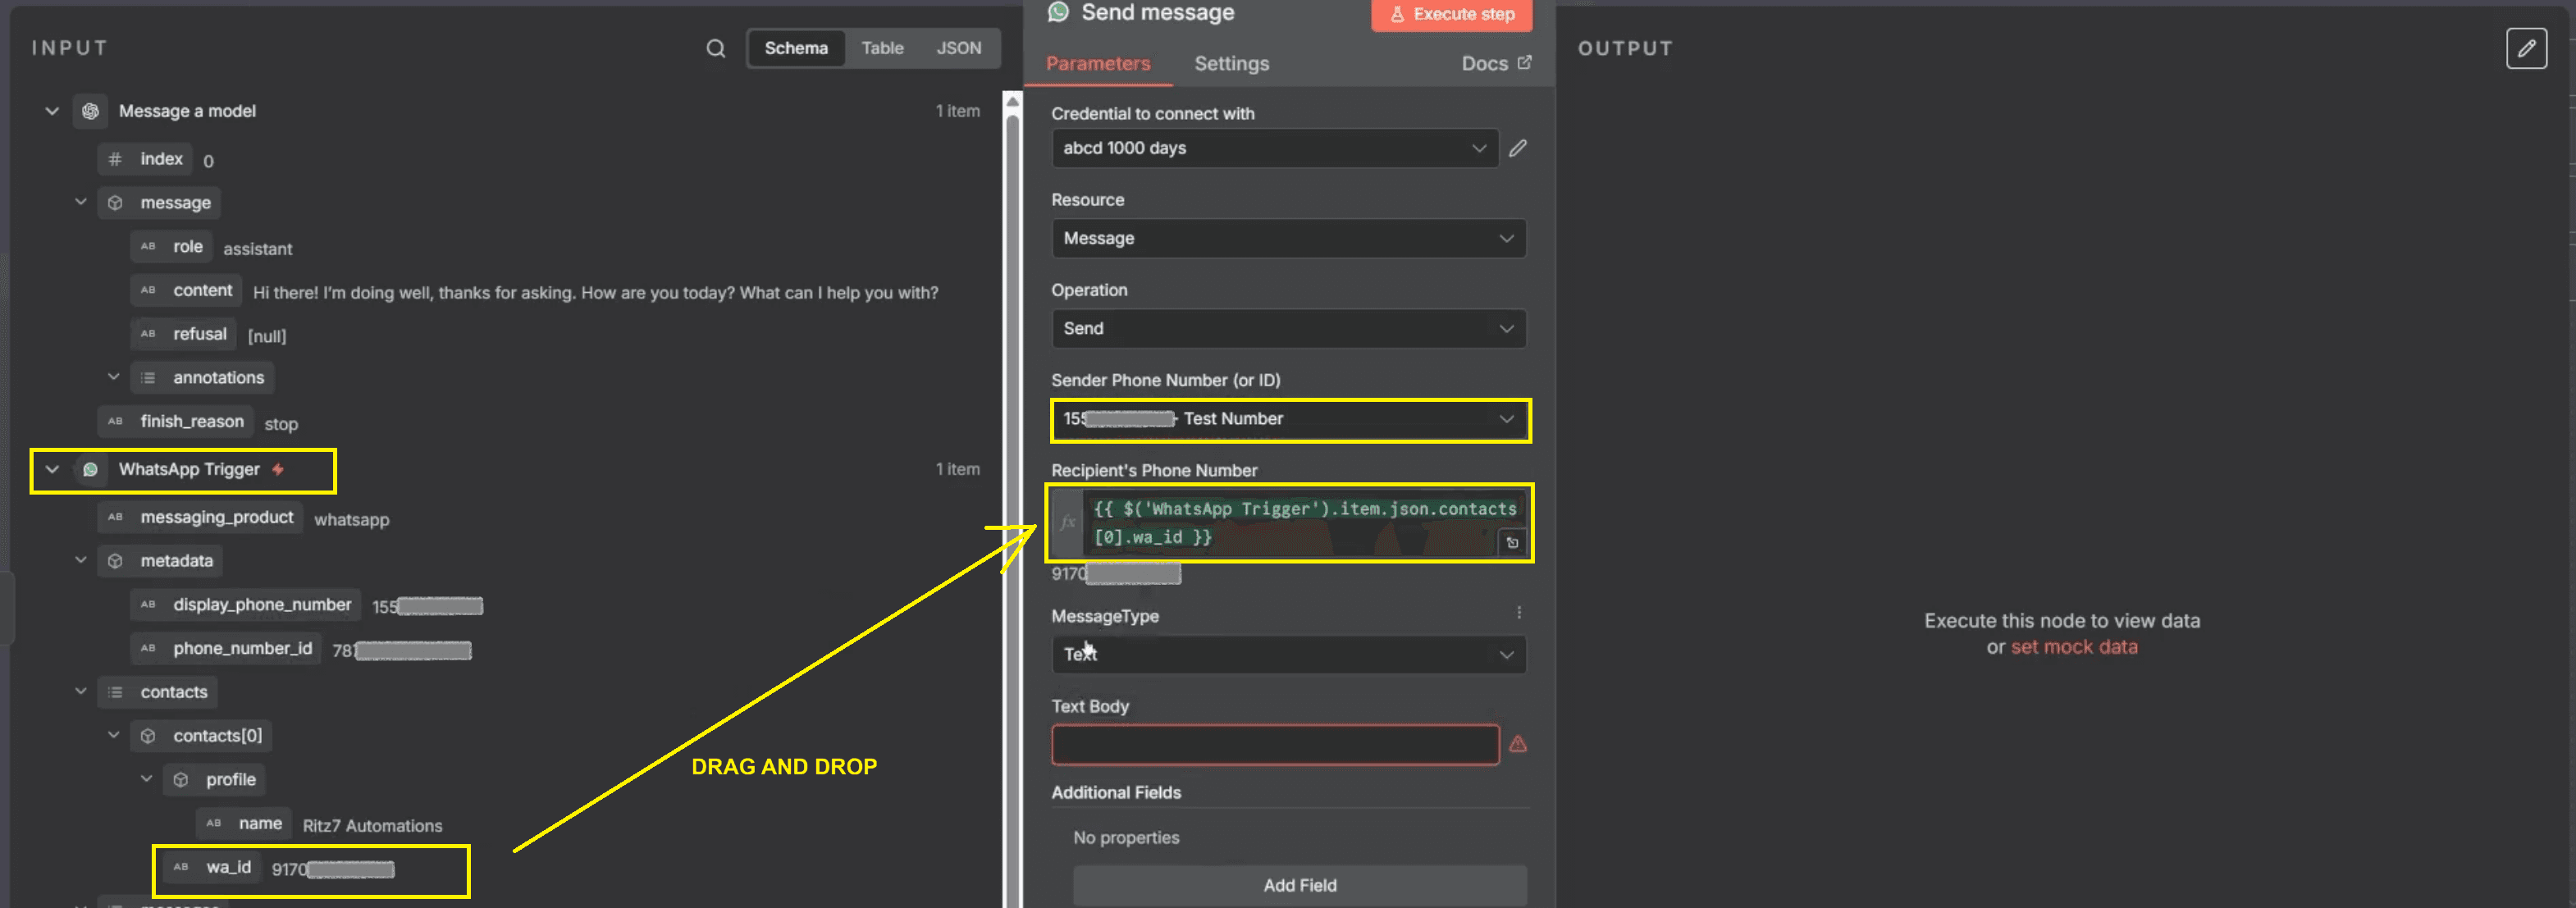
Set Message Type to Text, which is suitable for chatbot responses.
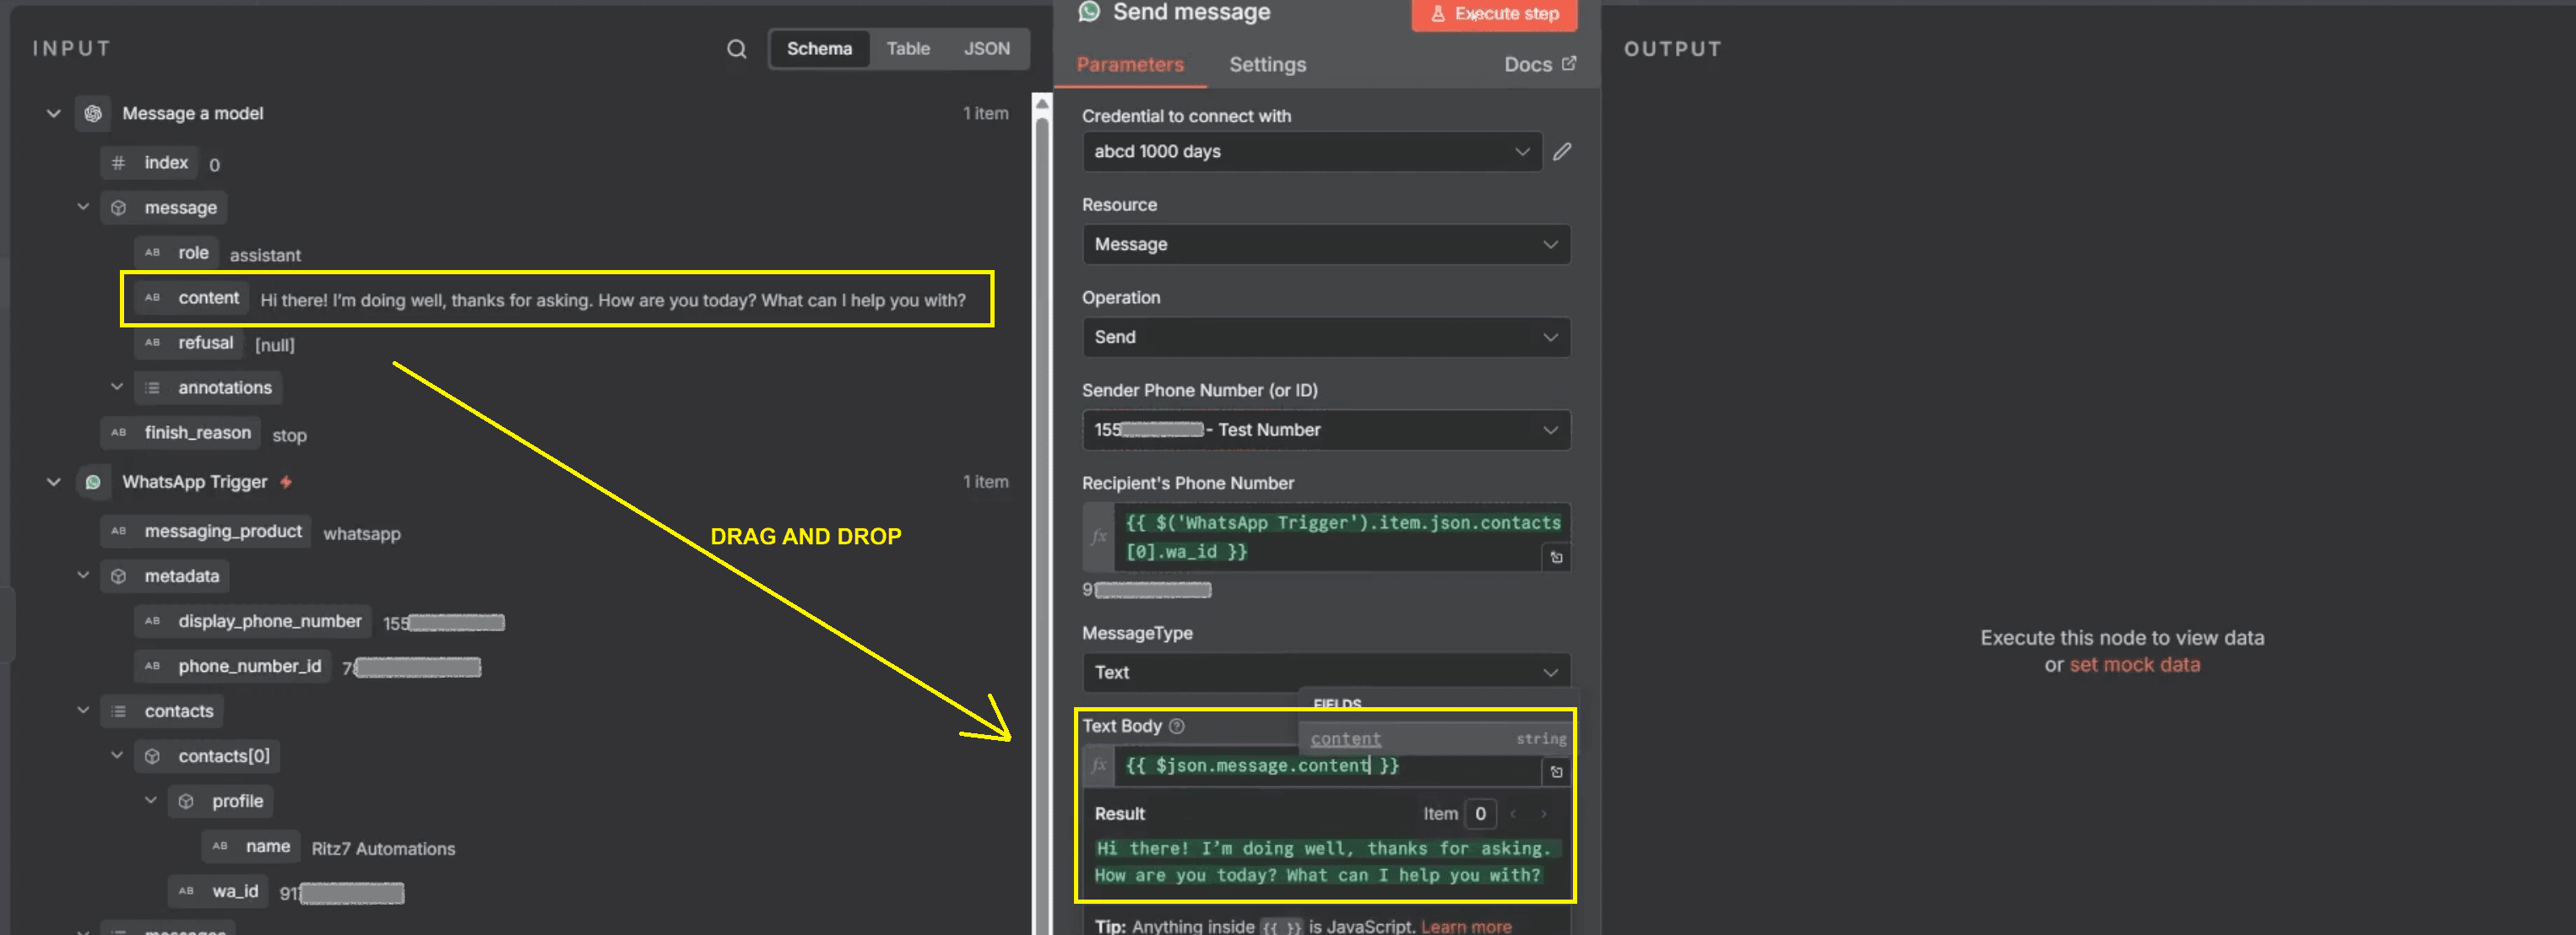
In the Text Body field, drag message → content from the OpenAI node to send the AI response.
Test message delivery
Click Execute Step and confirm that the automated WhatsApp message is delivered instantly.

Also Read: Step-by-Step Guide: Create a Telegram-Calendar Bot in n8n
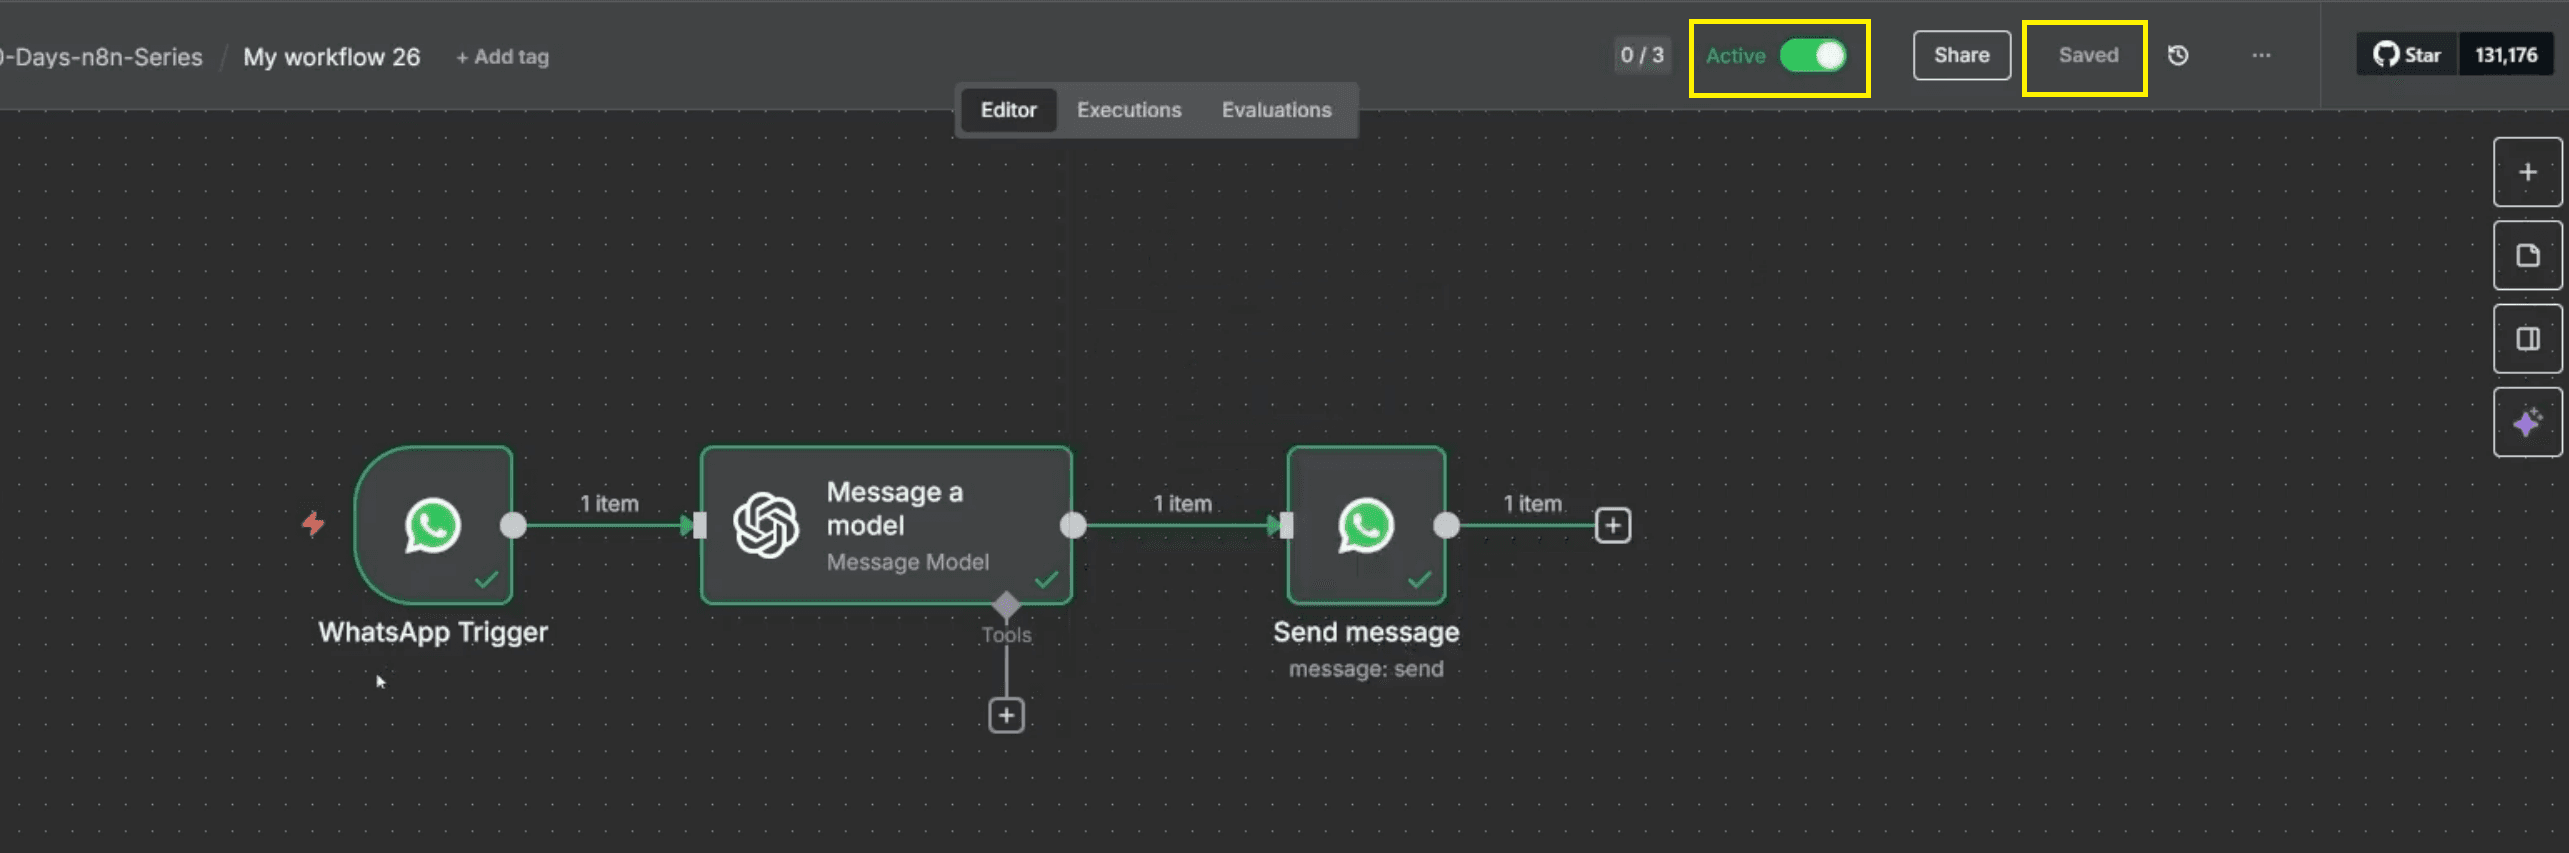
Step 5: Save, Activate, and Test the Workflow
Once all steps are connected and tested successfully, activate the workflow to enable real-time automation.
Click Save to store the workflow configuration securely.
Toggle the workflow status to Active so it can process live WhatsApp messages.
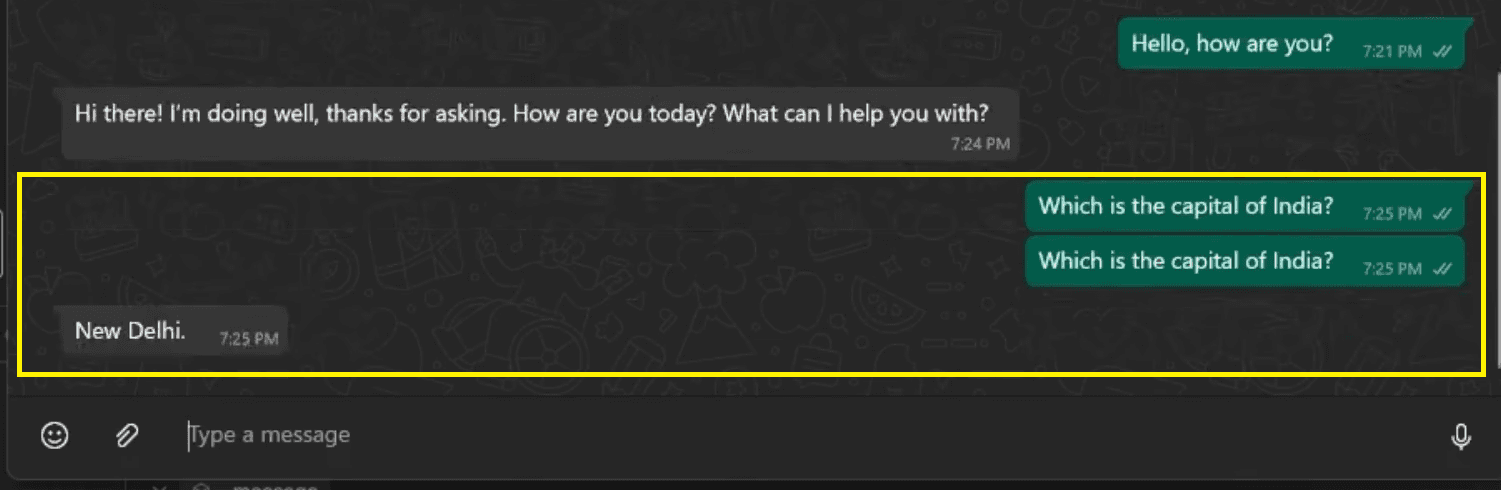
Send a test question such as “What is the capital of India?” and verify that the response is delivered correctly.
Video Tutorial: WhatsApp Automation (Part 2)
You Might Like: 5 Ways to Make Money with n8n AI Automation | Ritz7
Additional Customization Ideas
Once the basic automation is in place, you can extend this setup in several ways:
Integrate different AI models: Swap OpenAI with alternatives like Anthropic Claude, Google Gemini, or Mistral for varied conversational styles.
Use WhatsApp Message Templates: Automate predefined message formats for announcements, confirmations, or marketing campaigns.
Connect to internal apps: Route WhatsApp messages to CRM systems, Notion databases, or Google Sheets using n8n’s vast integrations.
Train a custom AI bot: Use fine-tuned prompts or private datasets for domain-specific chatbots such as customer support or lead qualification.
Troubleshooting and Best Practices
If your workflow doesn’t respond instantly, double-check:
That all credentials (Client ID, Secret ID, and Access Token) are valid.
Your WhatsApp Business Cloud webhook is properly active and linked to n8n.
Nodes in your flow are orderly connected (Trigger → OpenAI → WhatsApp Send).
The workflow is enabled and saved successfully after editing.
Occasionally, n8n may show “Workflow changed by someone else” warnings—usually harmless refresh issues. Simply re‑save the workflow before running again.
Wrap-Up: Building Smarter WhatsApp Automation with n8n
By combining WhatsApp Business Cloud and n8n, you can automate two-way messaging flows, respond intelligently using AI, and even build robust customer-support chatbots. With just a few nodes and credentials, you can transform your WhatsApp presence from static to interactive.
In upcoming explorations, you can also learn how to create WhatsApp message templates and schedule automated campaigns, taking your business communication efficiency to the next level. If you found this walkthrough helpful, share it with others and continue exploring automation possibilities with n8n!