Step-by-Step Guide: Create a Telegram-Calendar Bot in n8n

Table of Contents
Why you should use Telegram to automate Google Calendar?
Getting to Know the Core Tools
What is n8n Automation Platform?
Google Calendar is the place to find events
Telegram as a way to talk to people
Step-by-Step Guide:
Step 1: Setting Up the Telegram Trigger
Step 2: Send a text Message (Using Telegram to Send Replies)
Step 3: Edit fields (Preparing Inputs for Consistency)
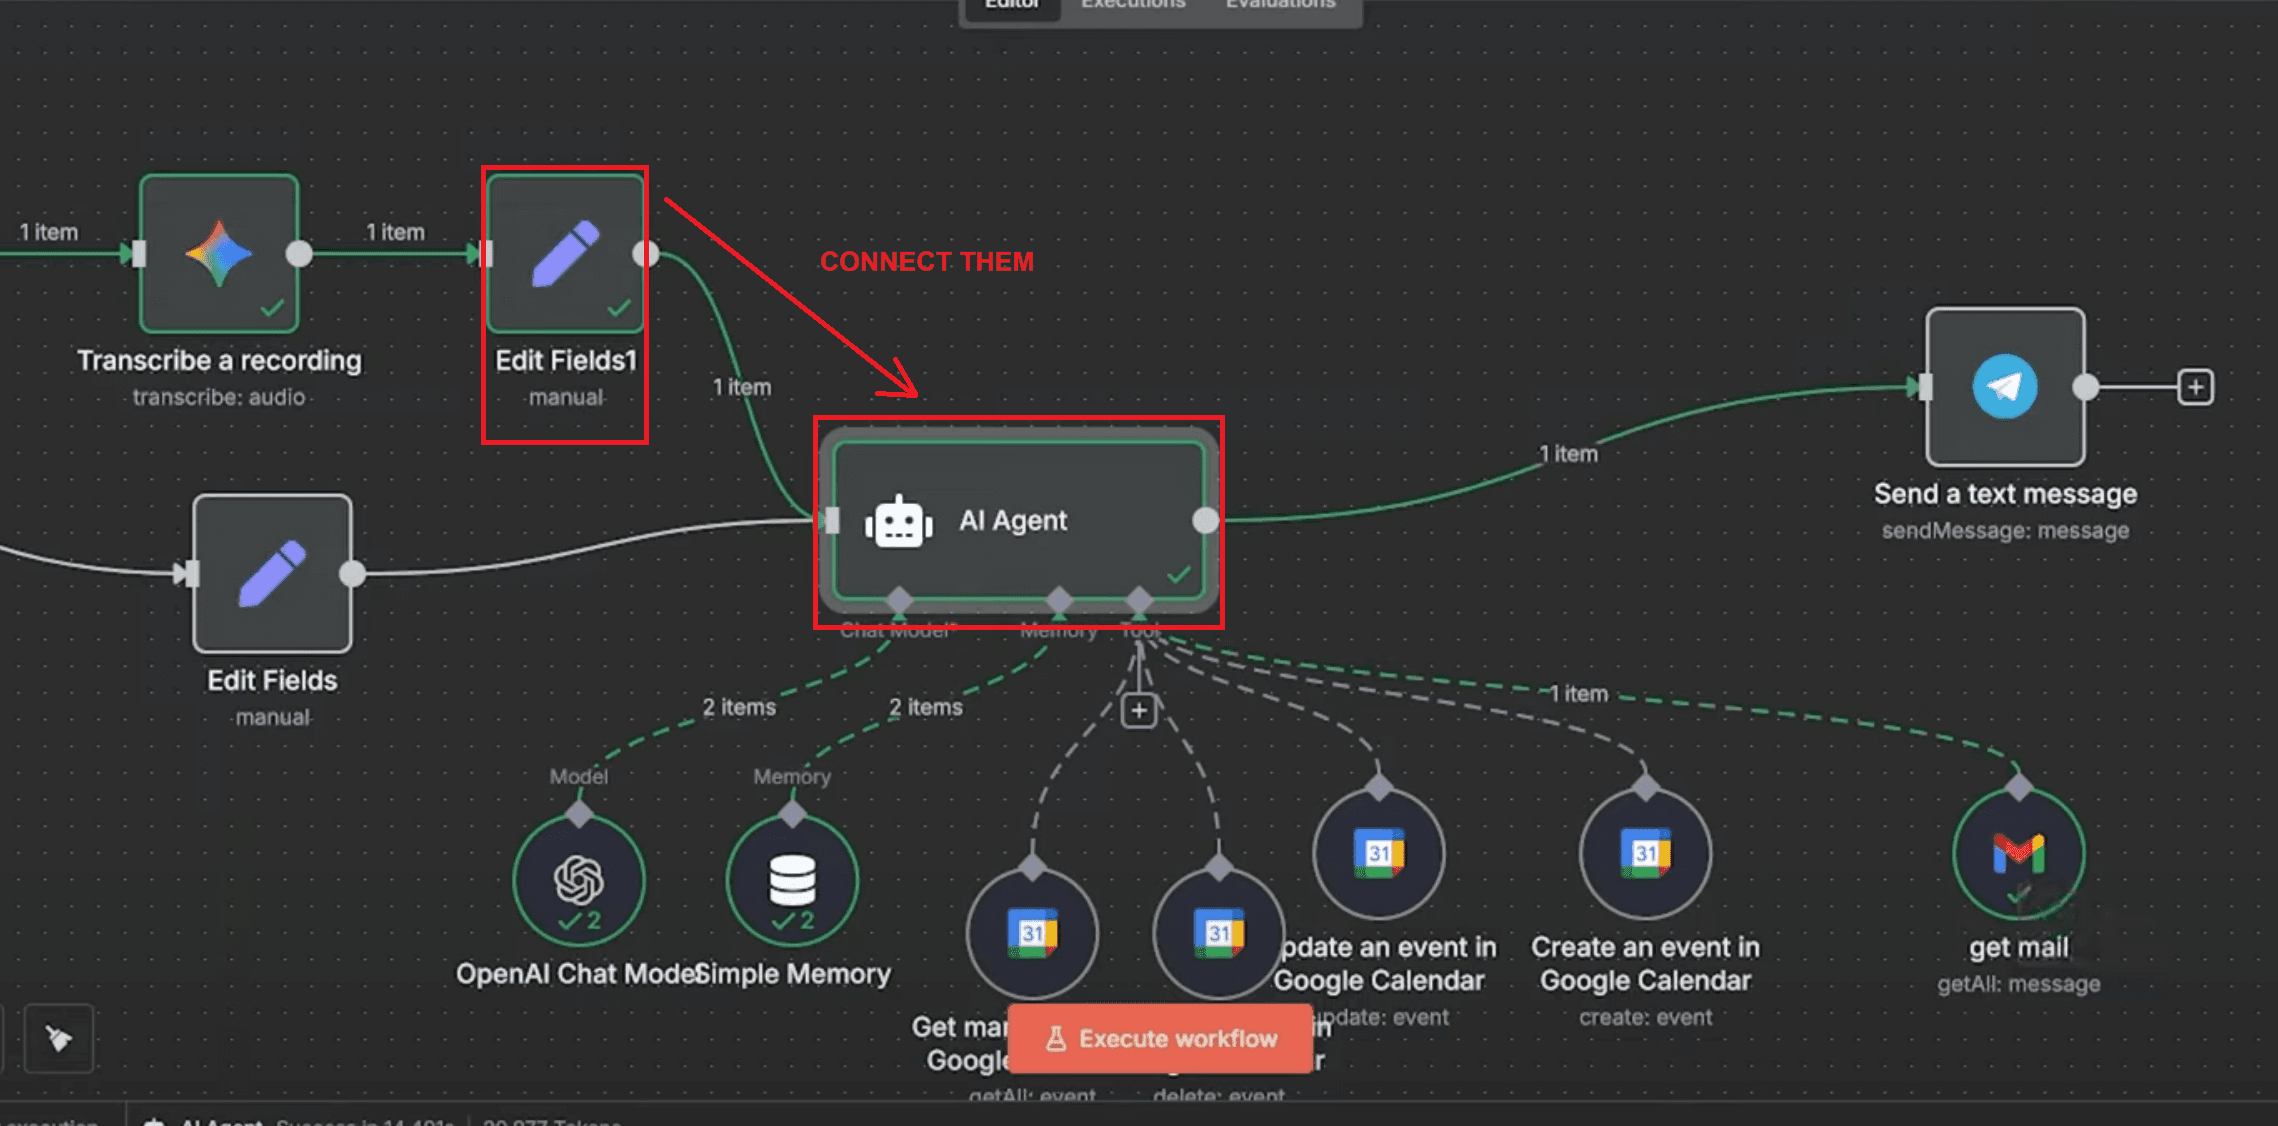
Step 4: Adding an AI Agent
Setting Up the Chat Model
Setting Up Simple Memory
Setting Up Edit Fields
Step 5: Connecting Tools - Google Calendar Tool (Looking at events in Google Calendar)
Step 6: Sending a Text Message in Telegram
Step 7: Create Events in Google Calendar
Step 8: Update events in Google Calendar
Step 9: How to Delete Events in Google Calendar
Step 10: Integrate Gmail in n8n (Connect Gmail Tool for Email Validation)
Step 11: Add a Switch Node to Detect Voice or Text Messages
Step 12: Get and Transcribe Voice Recordings
Step 13: Link the Voice and Text Paths to the AI Agent
Final n8n Workflow Structure
Questions that are often asked:
When you do the same things every day, managing a calendar can get boring very quickly. It sometimes takes a lot of clicks and manual entries to check today's events, set up new meetings, change current ones, and delete ones that are no longer needed. With the correct automation, you can replace this boring task with straightforward, natural language instructions in an app you already know how to use. Telegram, Google Calendar, and n8n are all used by a Telegram calendar bot. It makes scheduling easy to handle. It makes things easier and cuts down on blunders.
The bot or your custom AI assistant hears messages via Telegram. It uses AI to figure out what you want. After that, it handles event creation, other calendar tasks, and sends unambiguous confirmation messages. It can take both text and voice commands so that you can schedule things in more than one way. The system makes sure that rules are followed, including always needing an event title. It also validates the email IDs of events before making changes or deleting them. This stops mistakes that happen a lot when you type things in by hand. This method makes things easier and more accurate over time. It makes arranging a quick chat smooth and reliable instead of a bunch of steps.
Why you should use Telegram to automate Google Calendar?
Every day, people take care of calendars. Doing the same thing again and over again might waste a lot of time. Using Telegram to automate things ensures that scheduling may happen in the same place where many talks currently take place. This connection makes things easier. Users can now just submit a simple message like "Create a KPI meeting at 4:30 pm for 30 minutes" instead of accessing Google Calendar, filling in the details, and saving them. The bot then turns that request into a correctly formatted event in Google Calendar.
Automation not only makes things easier, but it also makes them more accurate by following a set of rules. For instance, the telegram bot always needs a title to create an event, and it never changes or deletes an event without the right ID.
This keeps everything from getting mixed up, stops accidental changes in calendar management, and makes sure the calendar stays clear and organized. Using simple text or voice also makes the process easier for everyone. If you prefer talking, you can just send a voice note, and the bot will turn it into text and use it like a normal instruction.
Getting to Know the Core Tools
What is n8n Automation Platform?
n8n is a platform for automating tasks that lets you connect different services through a visual interface. Each service is shown as a "node" that does one thing, such as reading a message on Telegram or making an event on Google Calendar. You don't have to move full nodes around; instead, you can add nodes from the sidebar and set them up one at a time. You can drag individual data fields, like chat ID, message text, or event ID, from the output panel of one node to the input field of another node. This method makes the workflow easy to follow and change.
Google Calendar is the place to find events
Google Calendar is the place to find events. It keeps track of events by using structured data like titles, times, participants, and IDs. You can use the API to create, change, delete, or get events programmatically. This reliability makes sure that the AI assistant or bot does everything right in the user's calendar. Using the "Google Calendar node" in n8n lets automation safely control events while always showing the most up-to-date status in Telegram.
Telegram as a way to talk to people
Telegram is the chat app that lets you send and receive messages. It is a way to talk to people. Because its bot framework lets people talk to each other in real time, it is a perfect front end for automation. In one chat, users can ask about their schedule, set up meetings, or update events. With Telegram and n8n working together, scheduling turns into an easy and accurate conversation.
Step-by-Step Guide:
Step 1: Setting Up the Telegram Trigger

This automation is built on the Telegram Trigger node. It checks for new messages and starts the workflow every time the bot gets one. The system wouldn't know when to start without this node; therefore, nothing else could happen. It makes sure that both text and speech inputs are ready for more processing by storing every message as structured data.
- -

How to get around the node:
Click the + sign to add the first step.
Find the node by searching for "Telegram Trigger."
Change the operation to "On New Message" so that the workflow starts when a new message comes in.
- -

Select the "credentials" to connect with your Telegram bot account. This step makes sure that your Telegram bot and the automation workflow can talk to each other safely. It makes sure that every message delivered to your AI assistant is found and sent to the system for processing. Without this connection, the workflow will be unable to receive or respond to communications.
- -

After the credentials are linked, save the workflow to make sure everything is set up correctly. Start Telegram and type something brief like "Hello". If the connection works, the node status will change to say that it is "listening for test event." This means that the Telegram Trigger is now live and can get messages instantly.

Also Read - AI Automation Trends in 2025: Turning Ideas into Reality
Step 2: Send a text Message
(Using Telegram to Send Replies)
The bot should respond to a message to let the user know it is still operational. The Telegram Send a Text Message node takes care of replies right in the same chat. This stage is helpful for testing because it shows that the workflow is working and can offer feedback. After calendar operations are done, the same node is utilized to deliver comprehensive confirmations.
- -

How to get around the node:
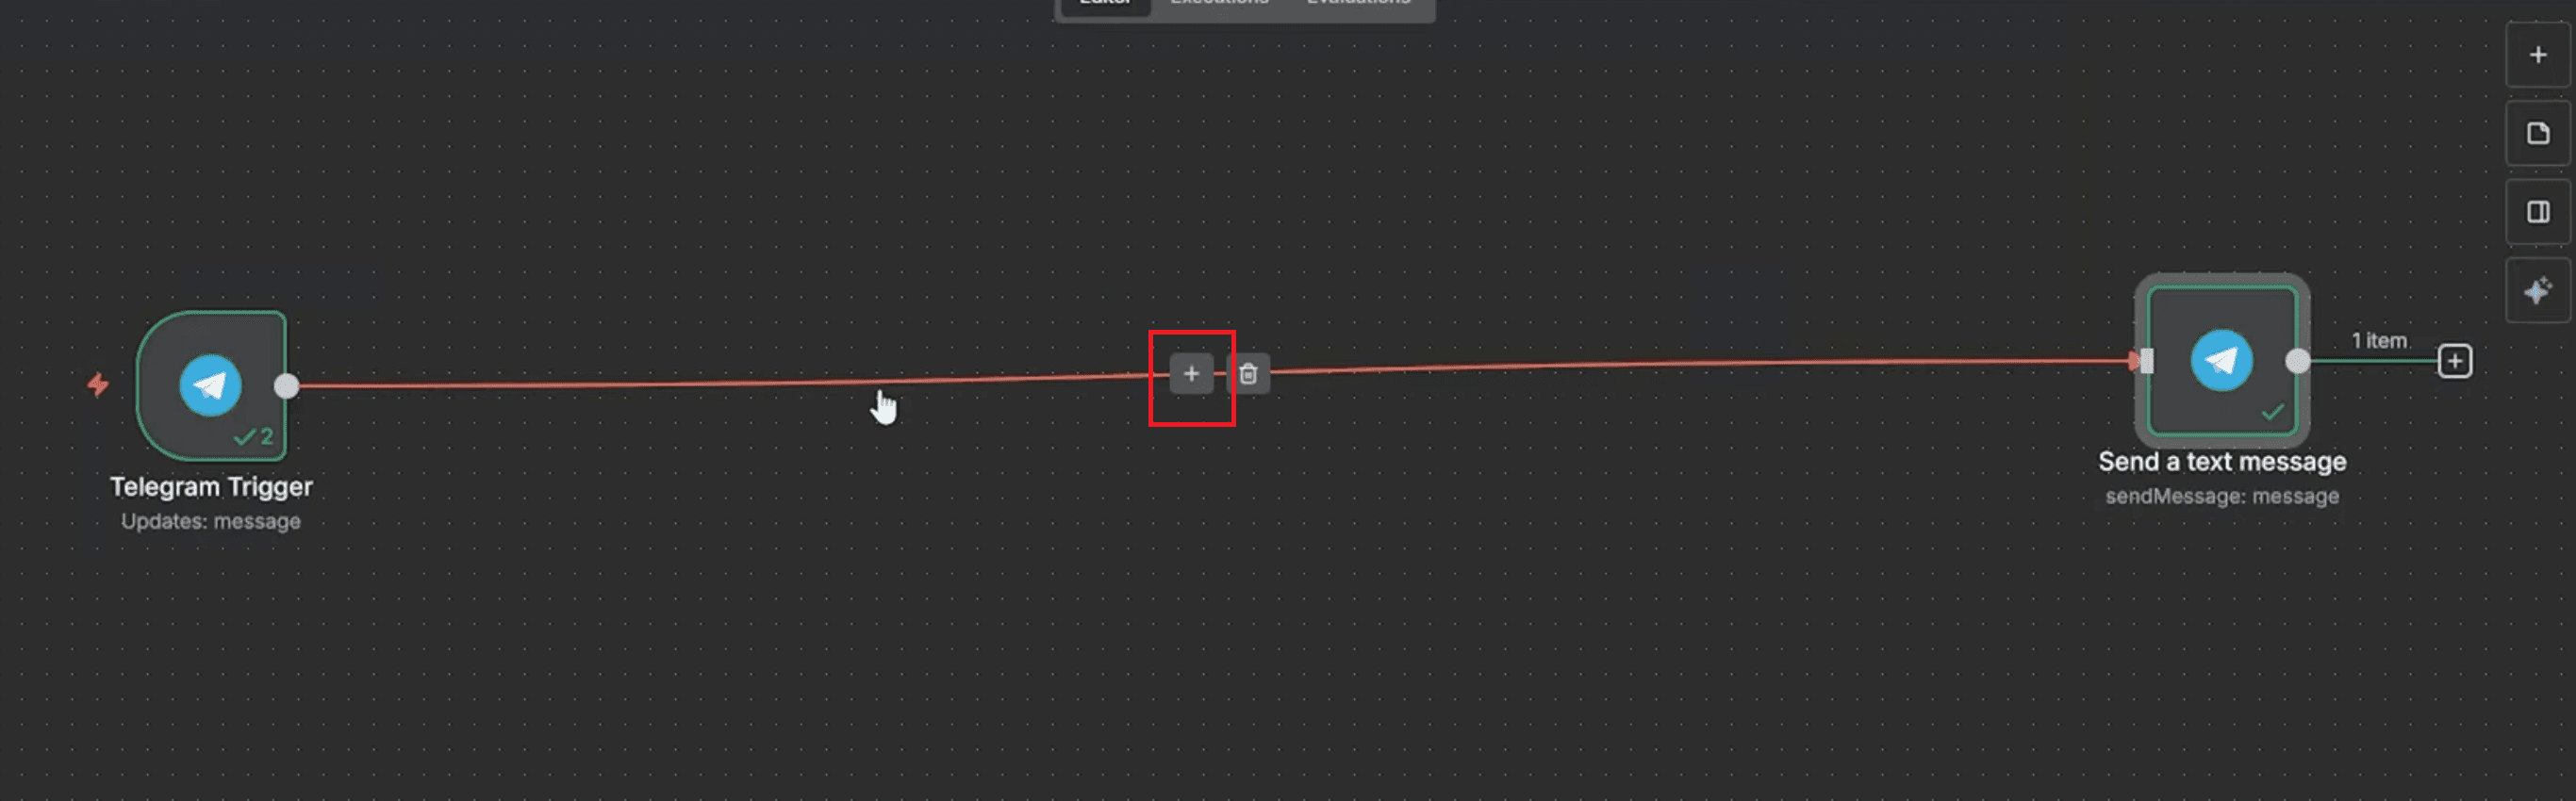
Use the + button to add a new node, then type "Telegram" into the search box and click "Send a Text Message".
Open the output panel of the Telegram Trigger node and look for the Chat ID column. Put the value that says "Chat ID" into the input field.
Type a short answer like "Done" in the Text box.

Send a message to the bot and save the workflow. The bot should answer in the same chat if everything is correct. Keep in mind that the Chat ID is just the conversation's unique address. Dragging it makes sure that answers always go back to the appropriate location.
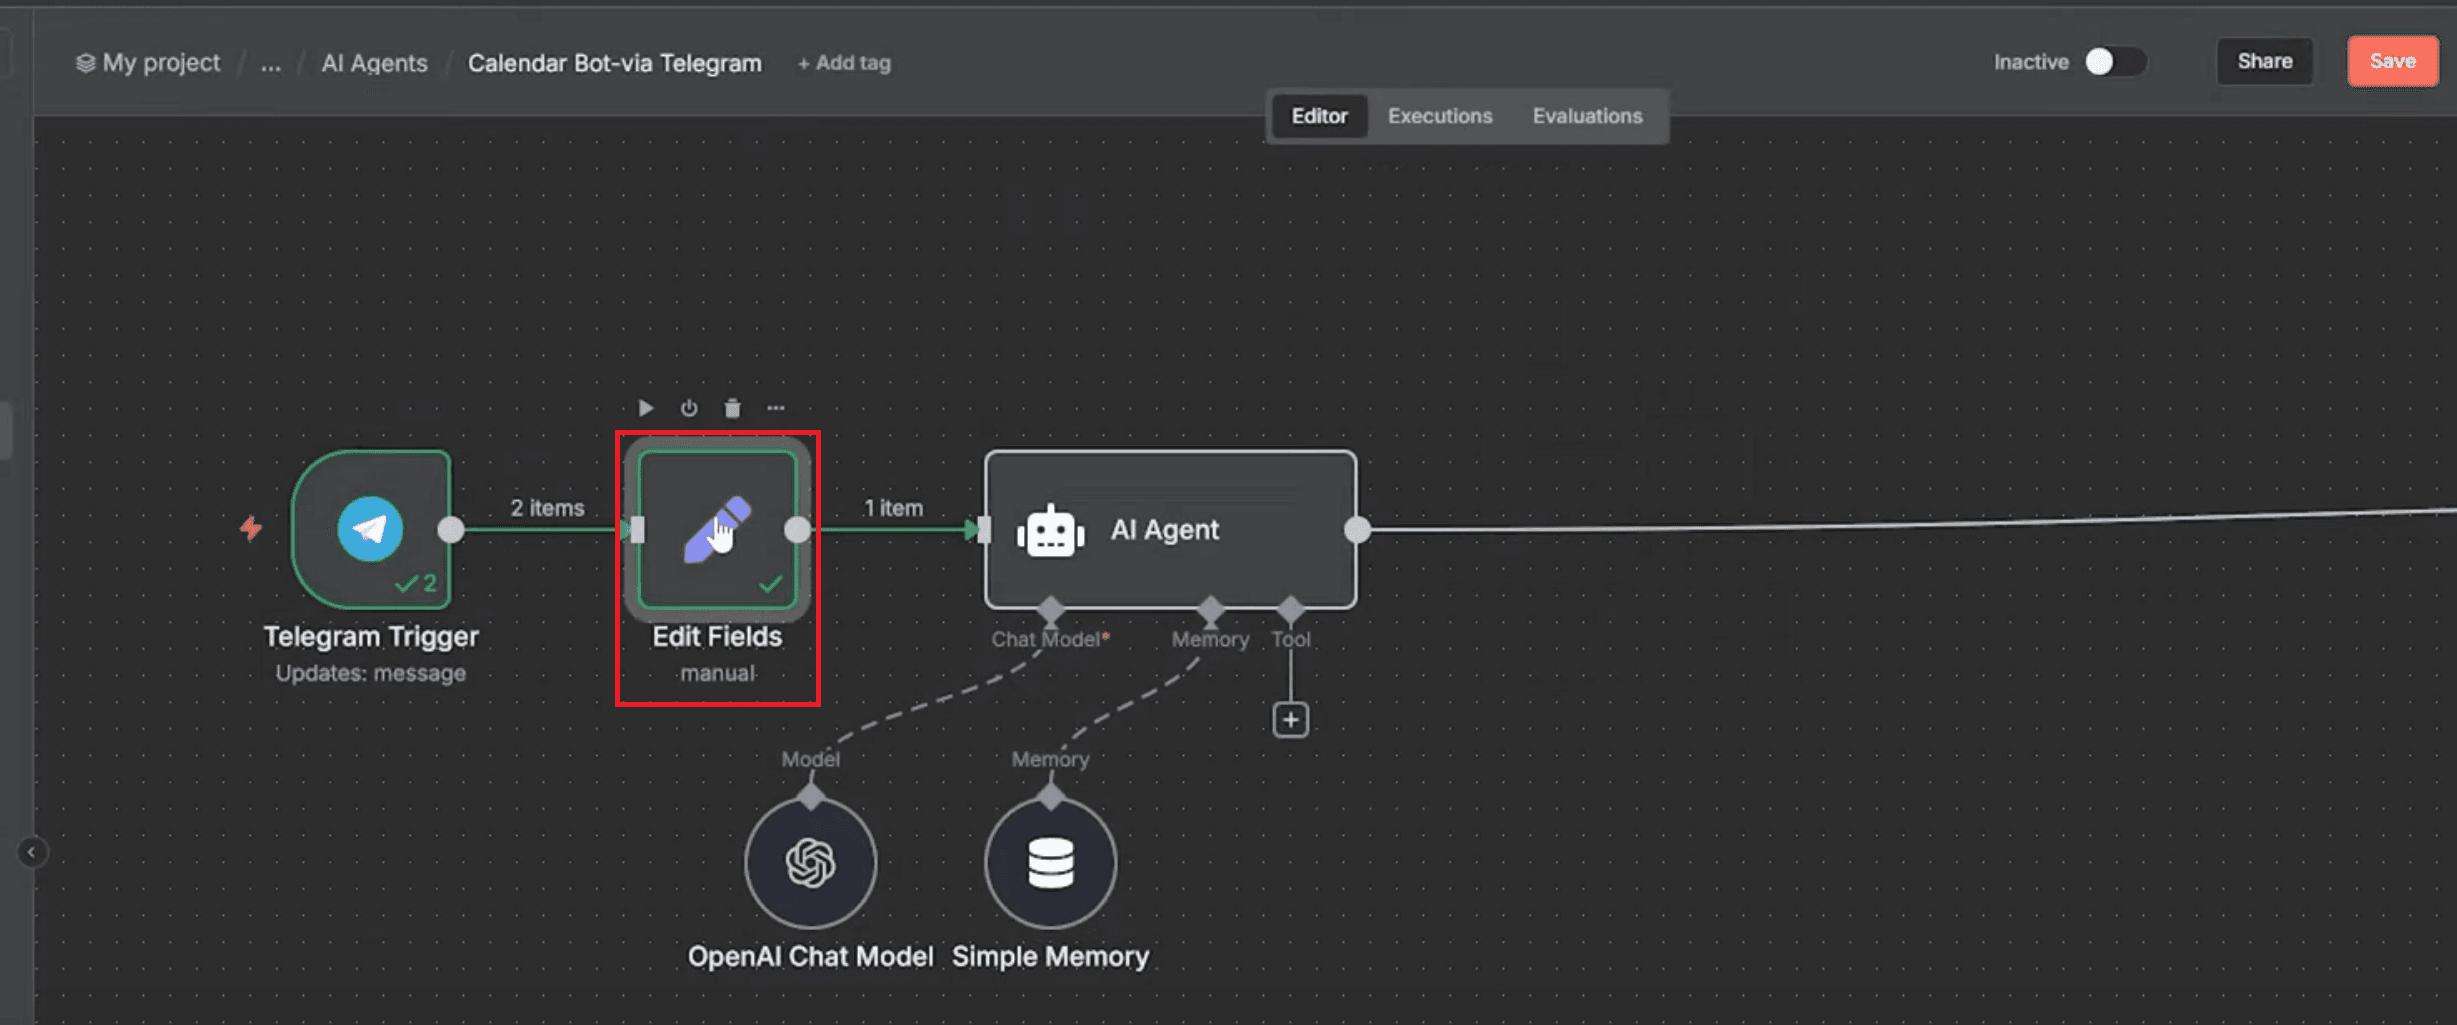
Step 3: Edit fields
(Preparing Inputs for Consistency)
The text from Telegram needs to be set up correctly so that the bot can understand messages. The Edit Fields (Set) node does this by making structured data that later nodes can easily read. By creating a field called "message," you make sure that all Telegram messages are saved in the same way. This makes it easier for the AI agent to understand what users want when they are scheduling tasks like making, updating, or deleting events.
How to get around and set up the node:
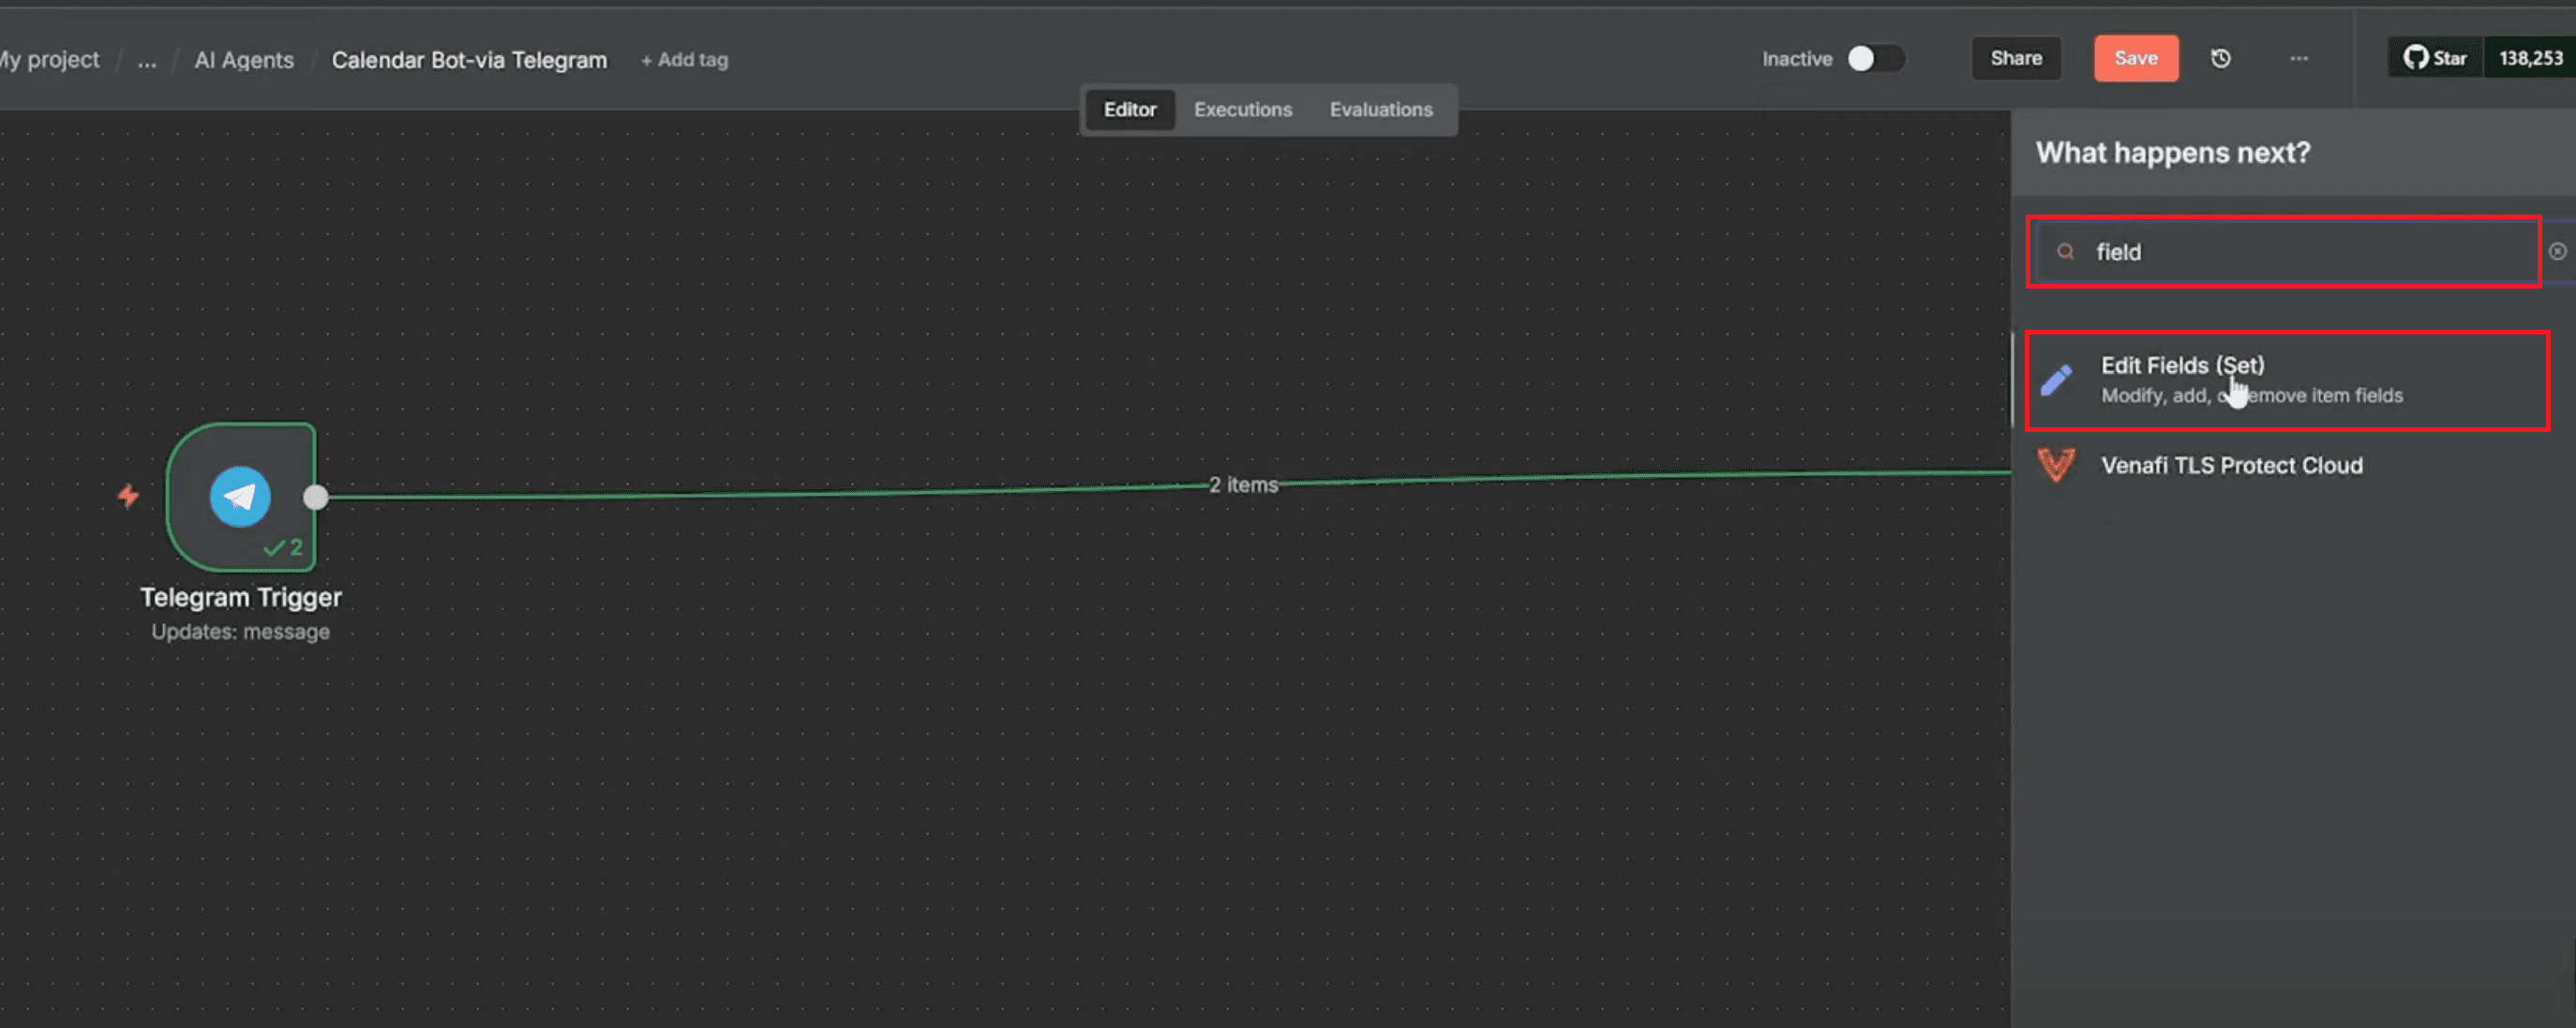
To add a new node in the n8n editor, click the "+" button.
Type "field" into the search bar and choose "Edit Fields (Set)" from the list.
--
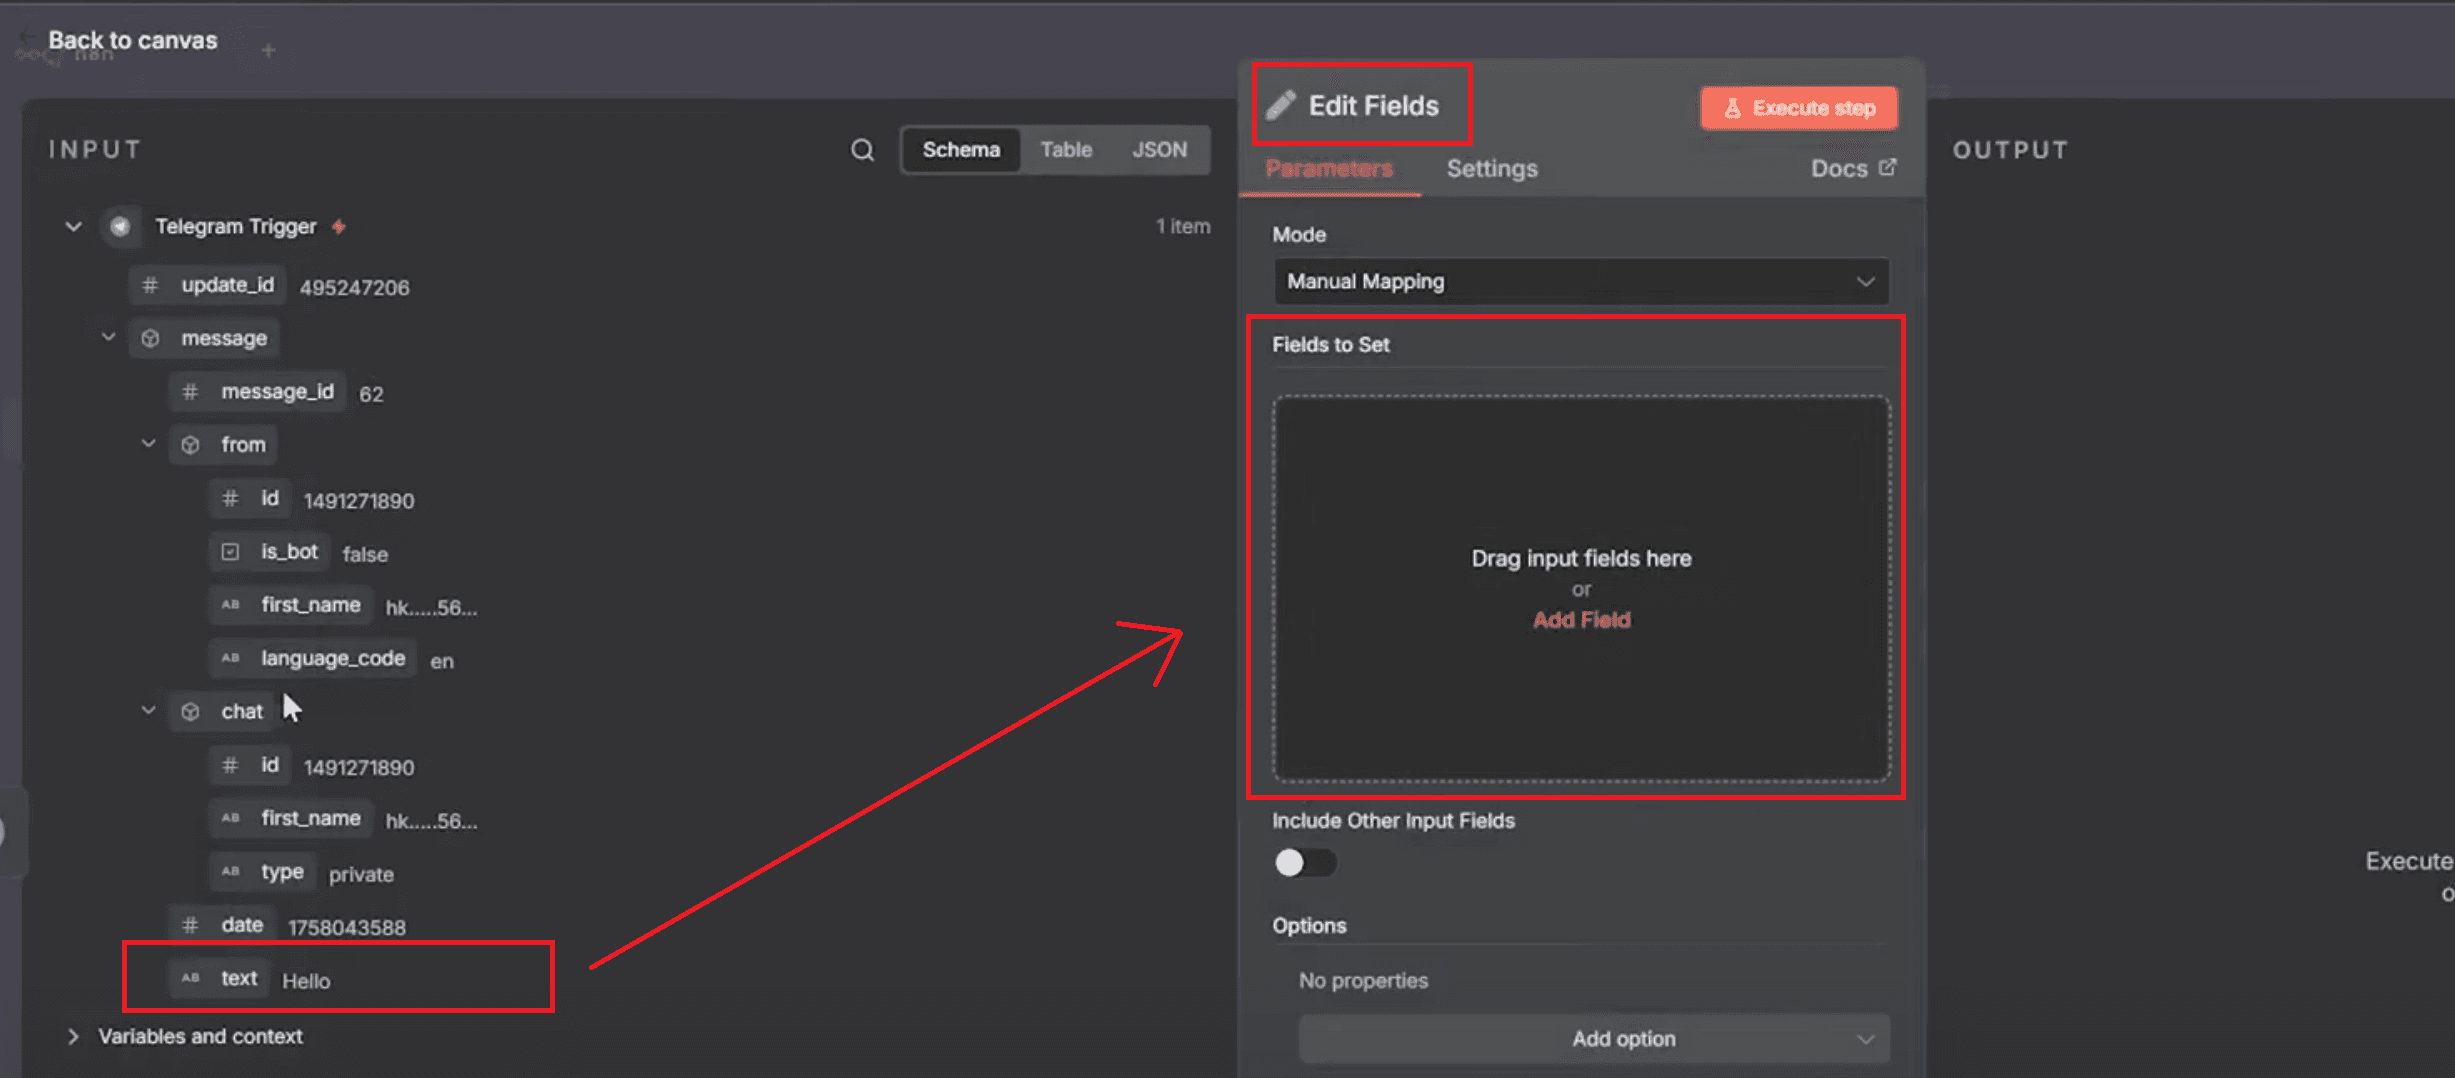
Click "Add Field" or drag an input field into the empty box under "Fields to Set" once the node opens.
Drag the message → text field (the text of the user's message) from the Telegram Trigger input panel.
--
Give this field a name as "message", which makes it clear what it means.
Finally, click the "Execute Step" button to test. Now you should see the captured text on the right as "Hello" or whatever message was sent.
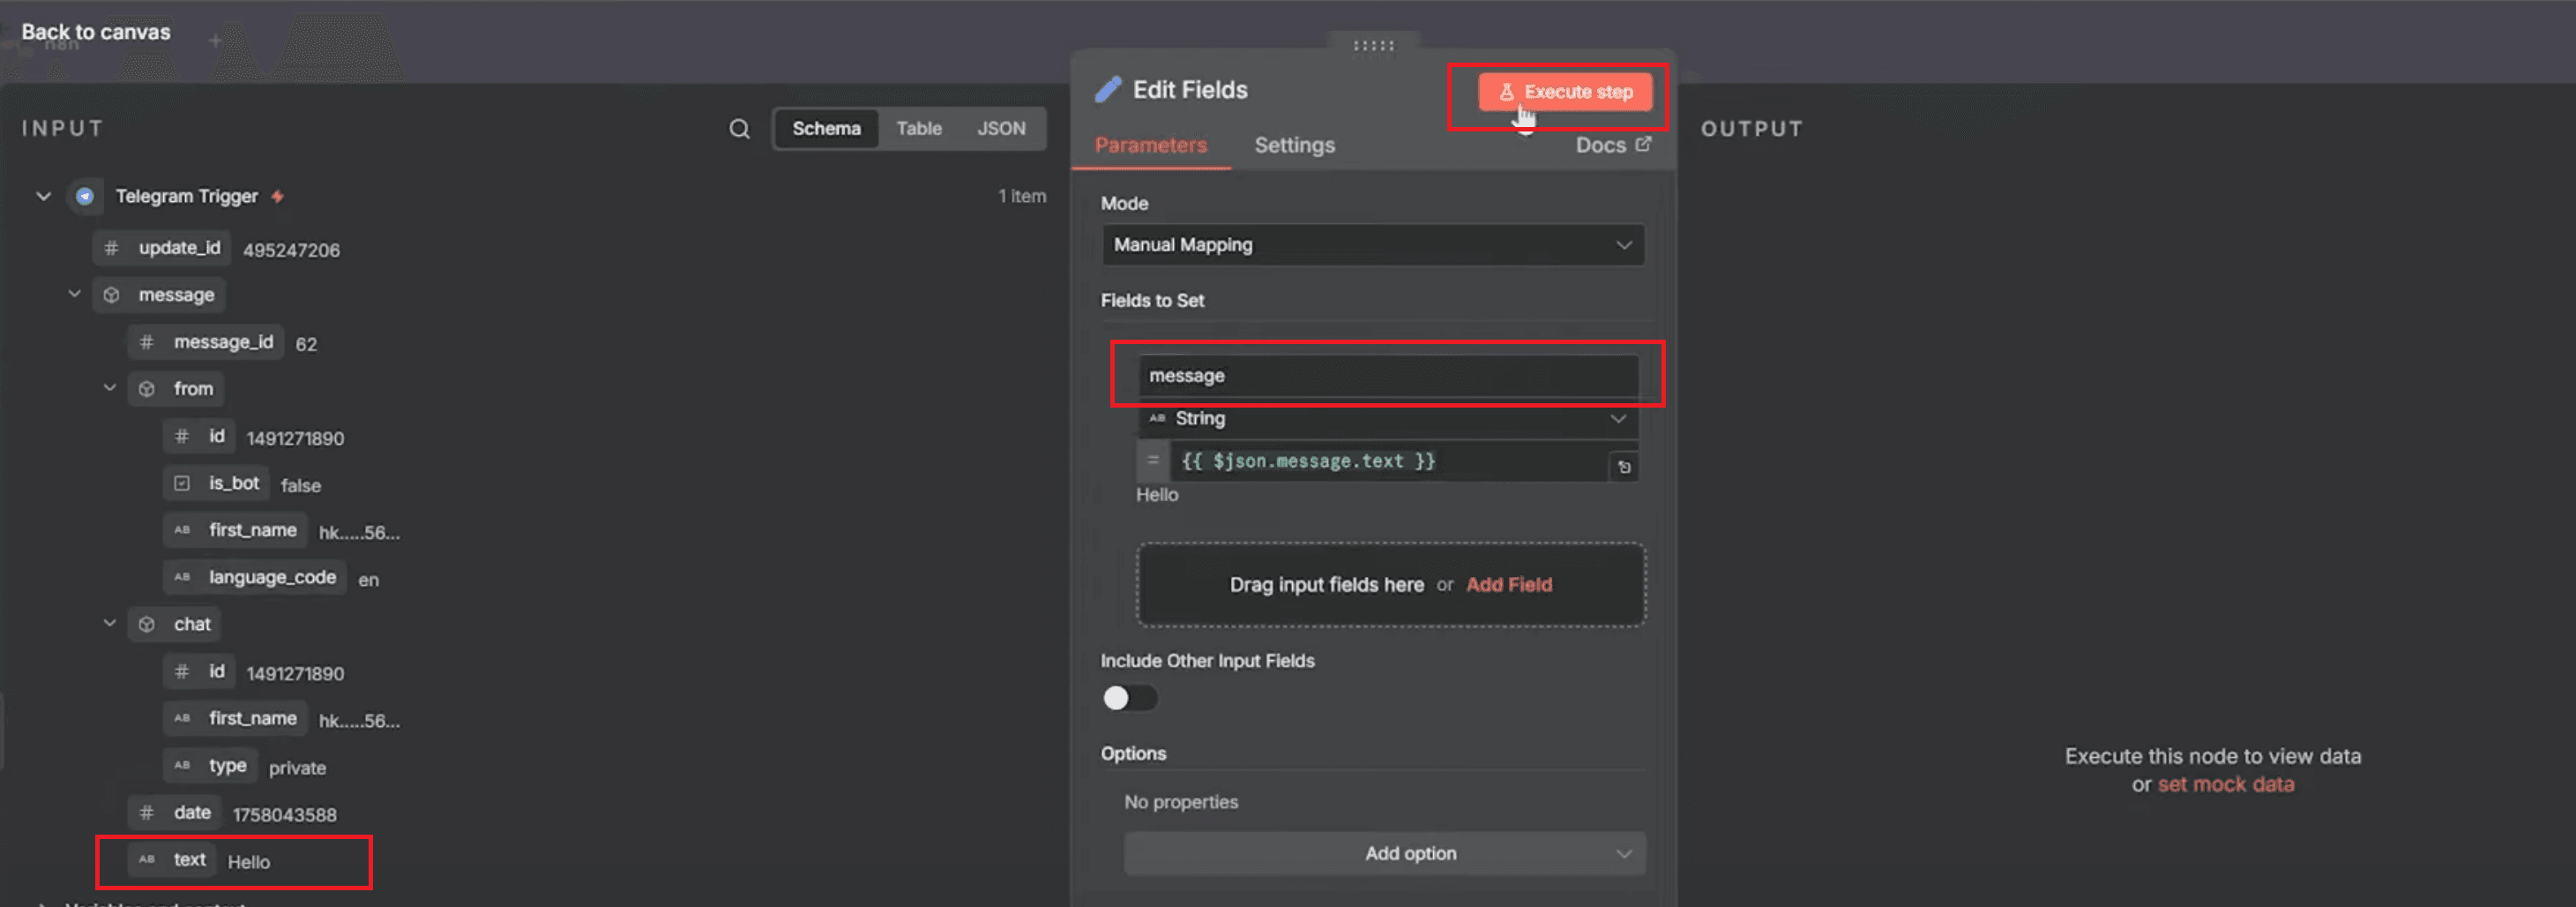
This setup makes sure that every Telegram message is turned into a clean "message" variable that the AI agent and other nodes can use later in the workflow. It's a small but important step that makes sure Telegram can talk to the rest of the automation without any problems.
10 Things Every Small Business Should Automate in 2025
Step 4: Adding an AI Agent
The AI Agent is the most important part of this process since it knows what the user's message means and turns it into organized actions for Google Calendar. It follows guidelines that have already been set up to make sure that every answer is correct and safe. Before taking action, the agent verifies all the specifics of the occurrence. It never makes guesses or does unsafe things. The AI makes sure that event titles and IDs are correct to avoid mistakes and confusion. Every interpreted message turns into organized output for Google Calendar, which keeps scheduling reliably and consistently.


How to Set Up the AI Agent Node:
From the sidebar, add the "AI Agent" node.
Choose "Define Below" from the "Source for Prompt" menu.
In the "Prompt (User Message)" box, type in the full set of rules that tell the AI how to act.

The agent knows how to create, change, delete, and check the validity of emails based on these rules. This is where the system learns how to securely and correctly respond to what users do. The following are the Instructions for the AI agent:
"You are an AI assistant designed to manage calendar events for the user. Your capabilities include:
Creating events
Retrieving events
Updating events
Deleting events
Get mail
Important Guidelines:
Always provide a name for the event when asked to create one.
To update or delete an event, you must first retrieve the event ID using the "get event" tool.
Without the ID, you cannot successfully edit or delete events.
In order to schedule an event, make use of the get mail tool node attached and extract the Gmails from the node. If there are multiple (or even one), ask the user to consider which one. Do not include the body of the mail—just give the user the name and email (do not say anything extra like “we found 2 mails from the same mail id”). Once the user confirms, then schedule the meeting with the selected email."

At the end of the prompt setup, set the user input as “message.”
Open the left panel under "Edit Fields".
Drag "message" from the available fields and drop it into the input box.
This connects the user’s message directly to the AI for processing.

Setting Up the Chat Model
Connect the OpenAI Chat Model node to the AI Agent and add it to your workflow. This model helps the AI read and understand everyday language commands like “Create a meeting tomorrow at 4 PM”. It then turns those words into organised steps for creating, updating, or deleting events in Google Calendar. This setup ensures that the AI interprets each message correctly and responds with clear, accurate actions every time.
Steps to set up:
Click the plus (+) icon under the Chat Model section of the AI Agent node. In the right panel, search for OpenAI Chat Model and select it from the list.
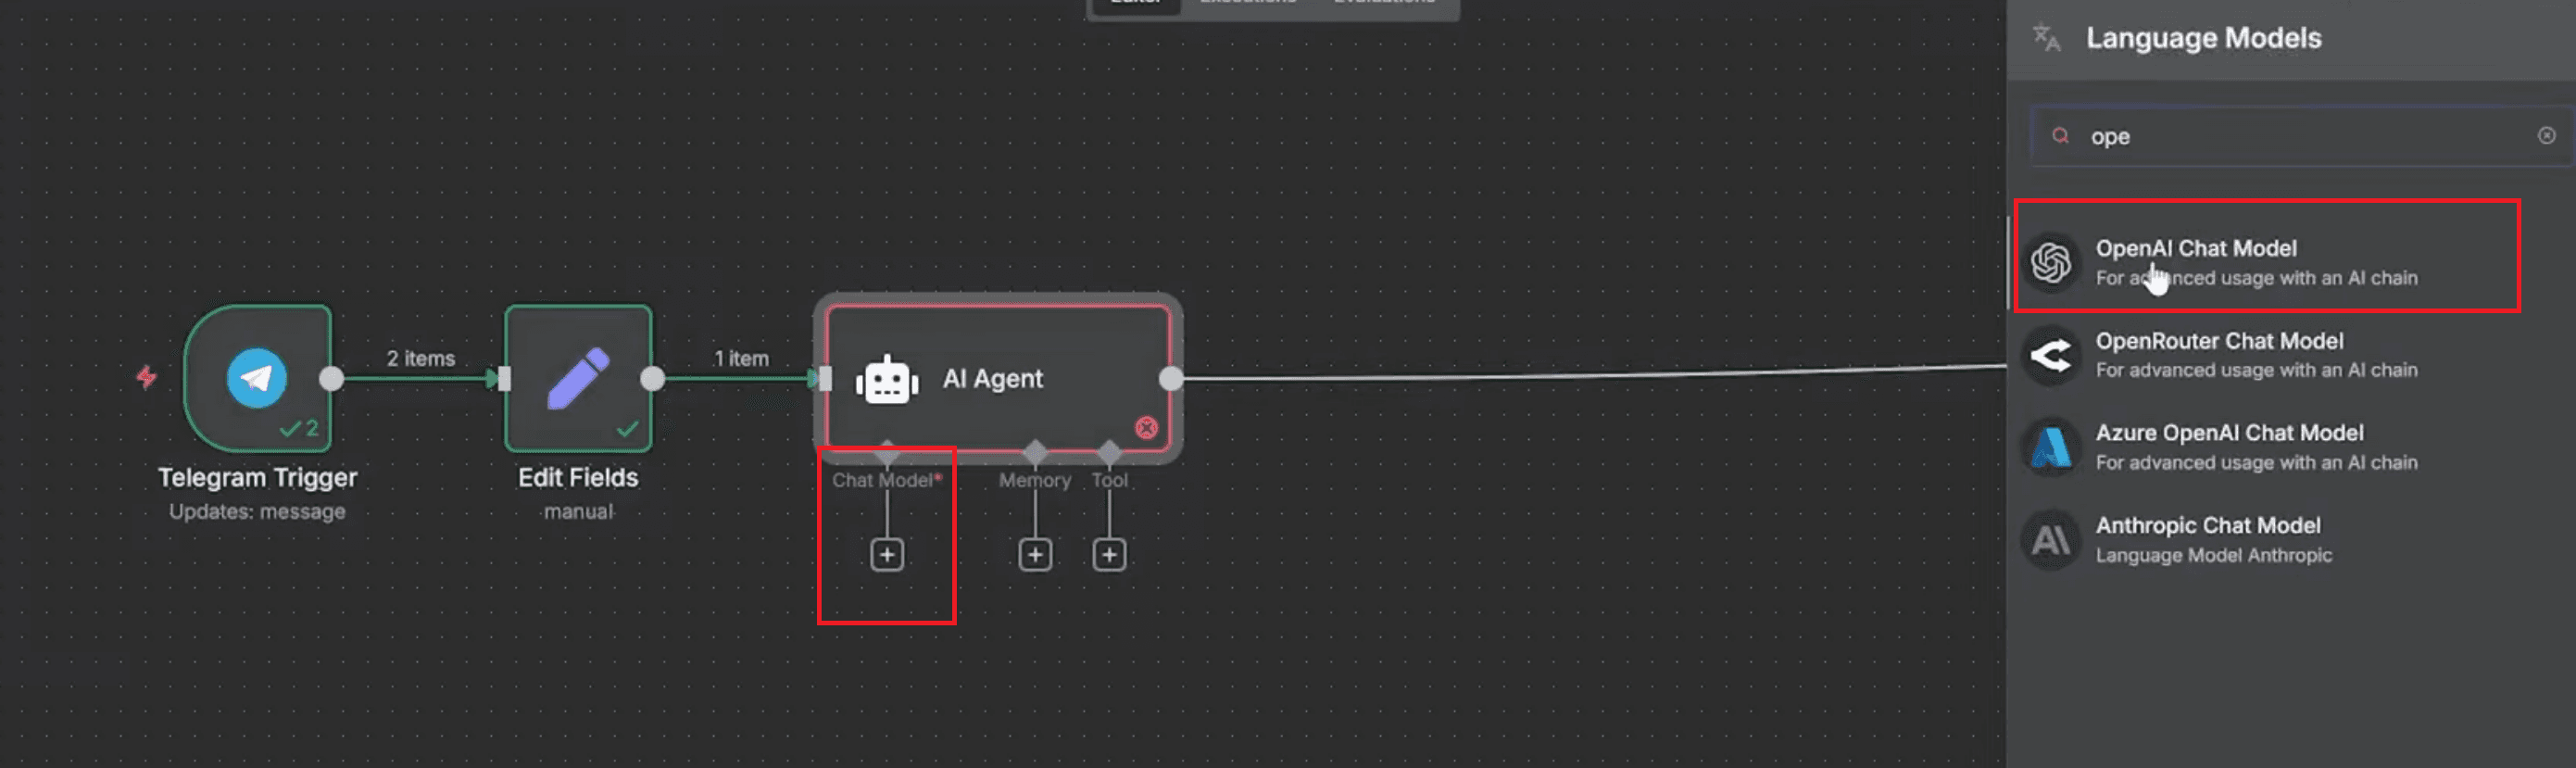
Under Credential to connect with, choose your OpenAI account.
From the Model dropdown, select gpt-4.1-mini.
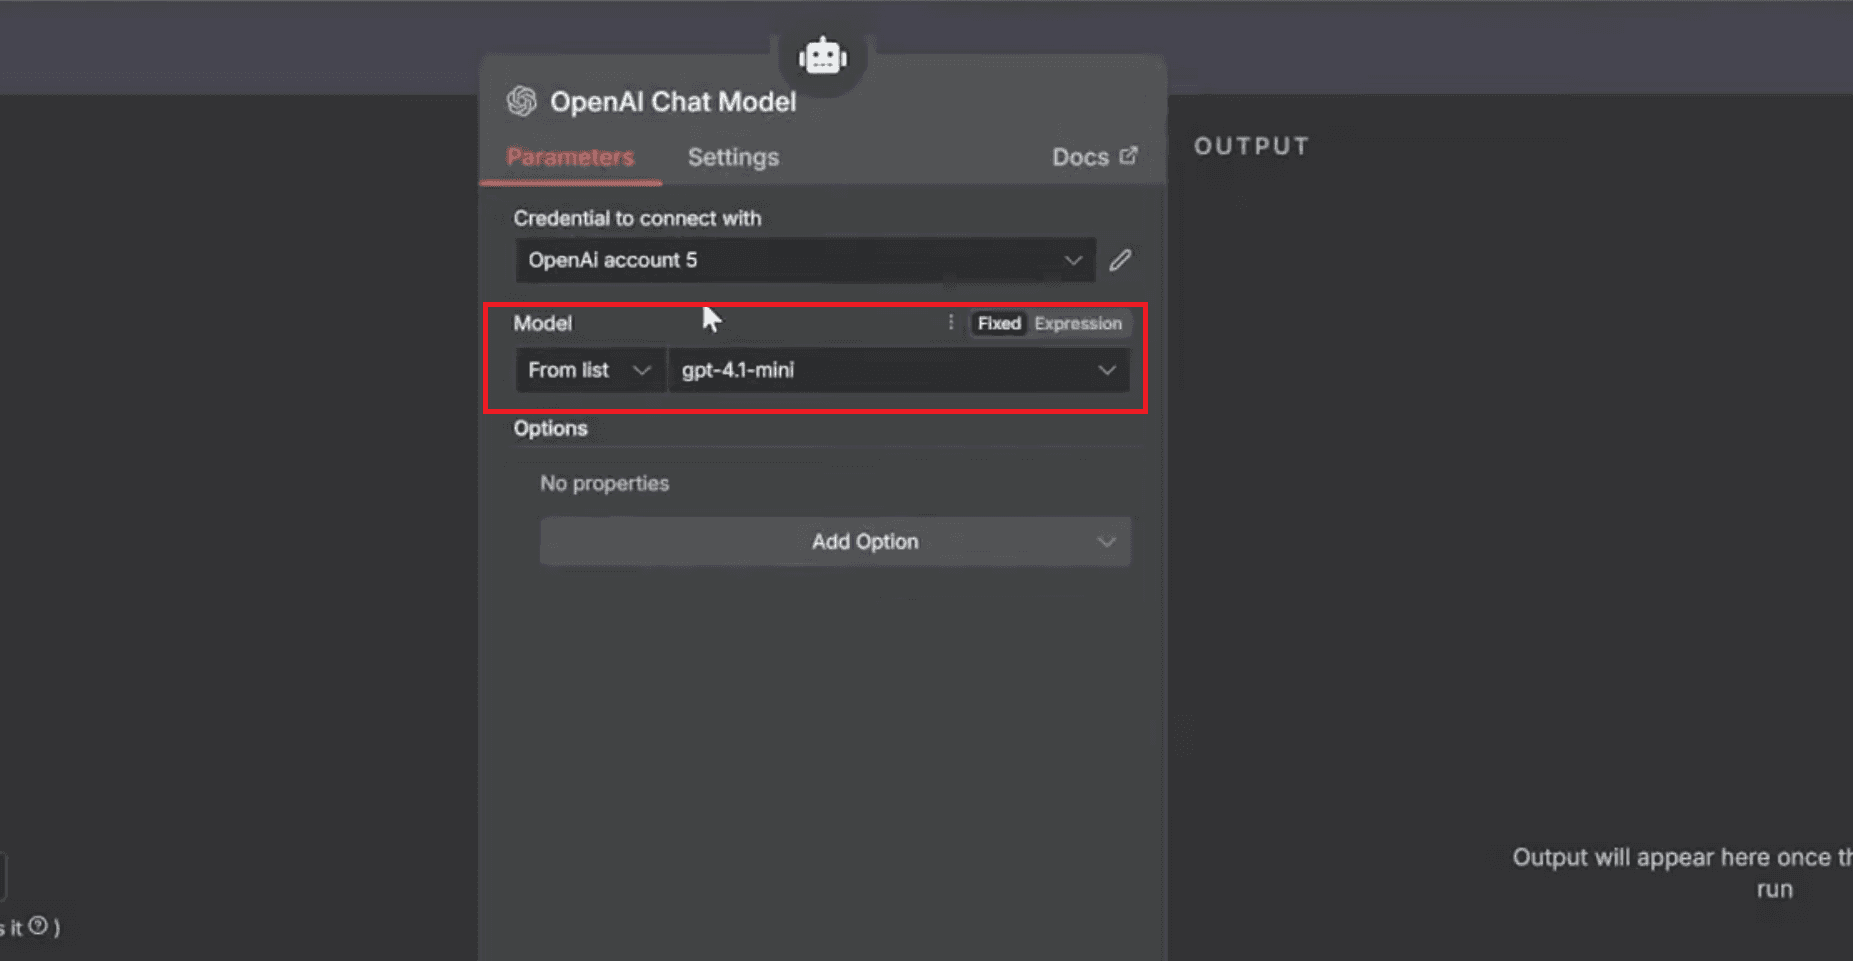
Save the settings to activate the connection between the Chat Model and the AI Agent.
This connection lets the model process natural language smoothly and pass clear outputs to other tools like Google Calendar.
Boost ROI through Automated Consulting Process | Ritz7
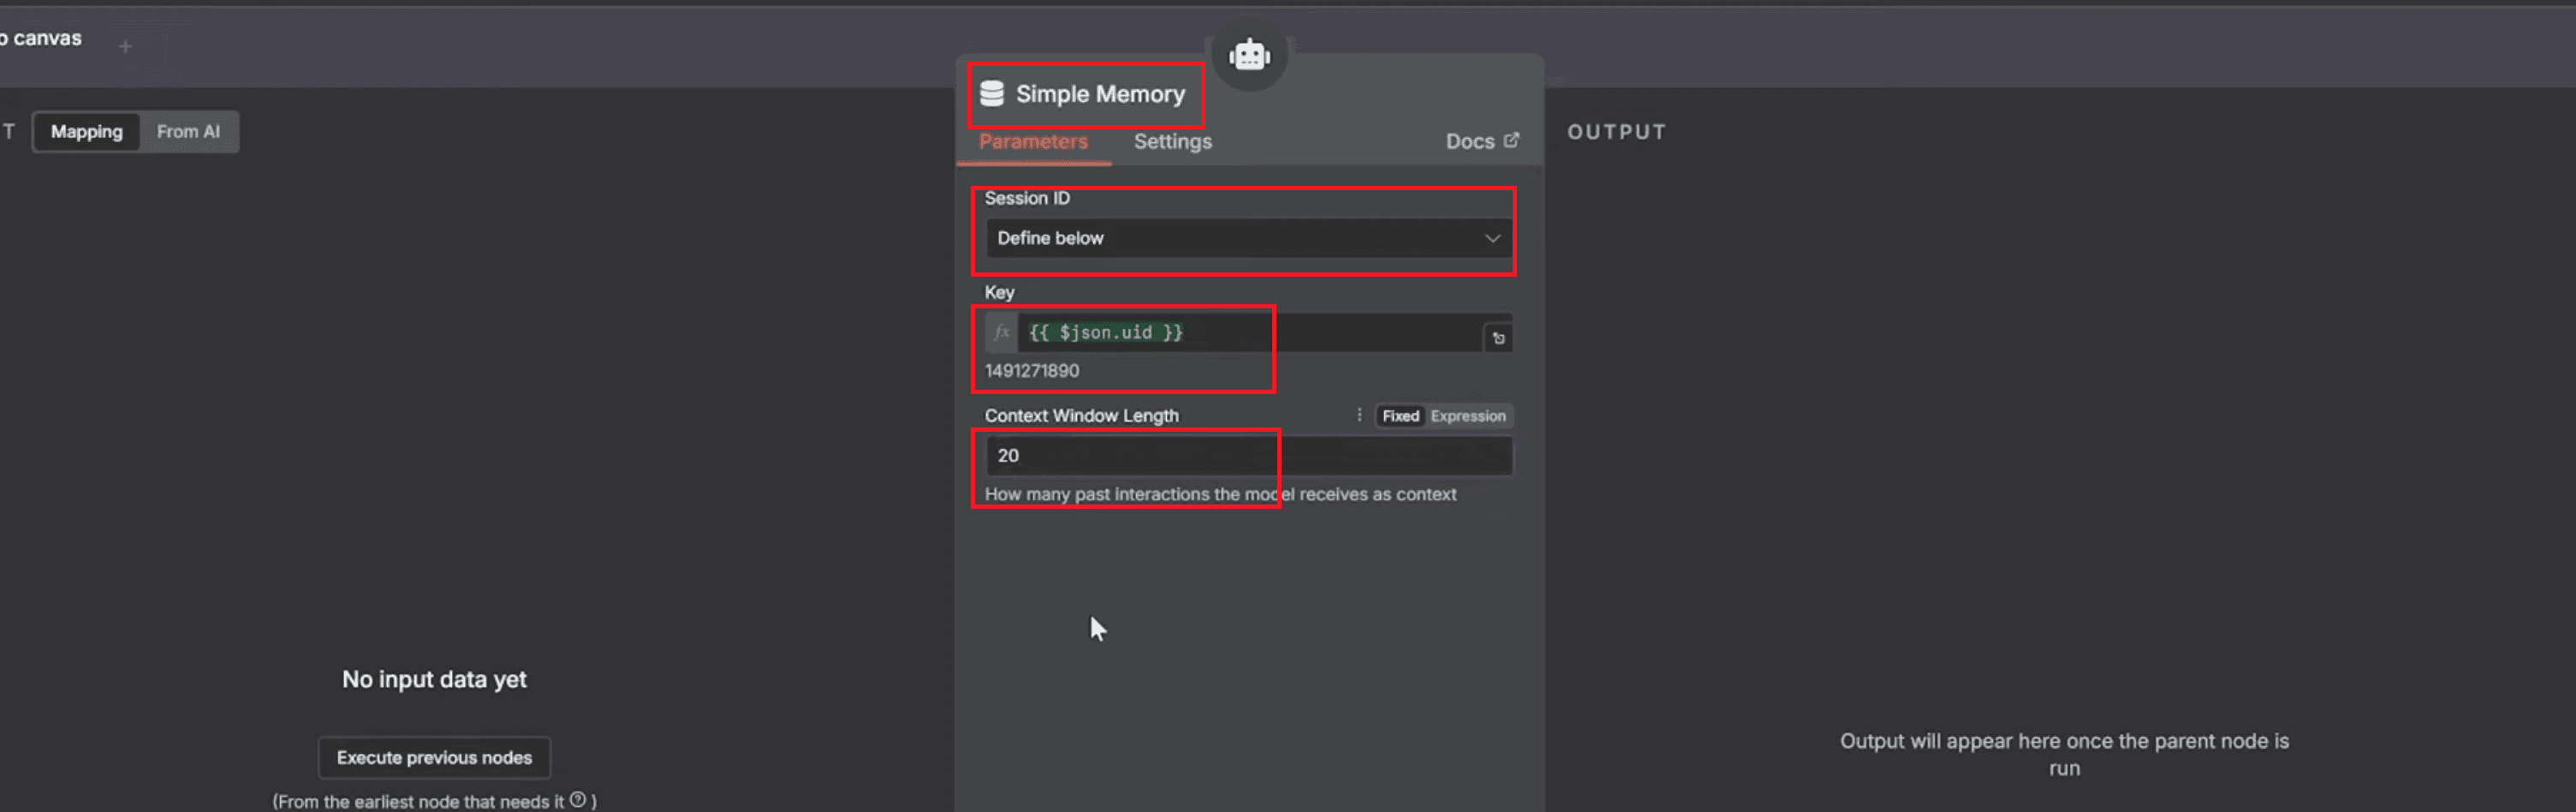
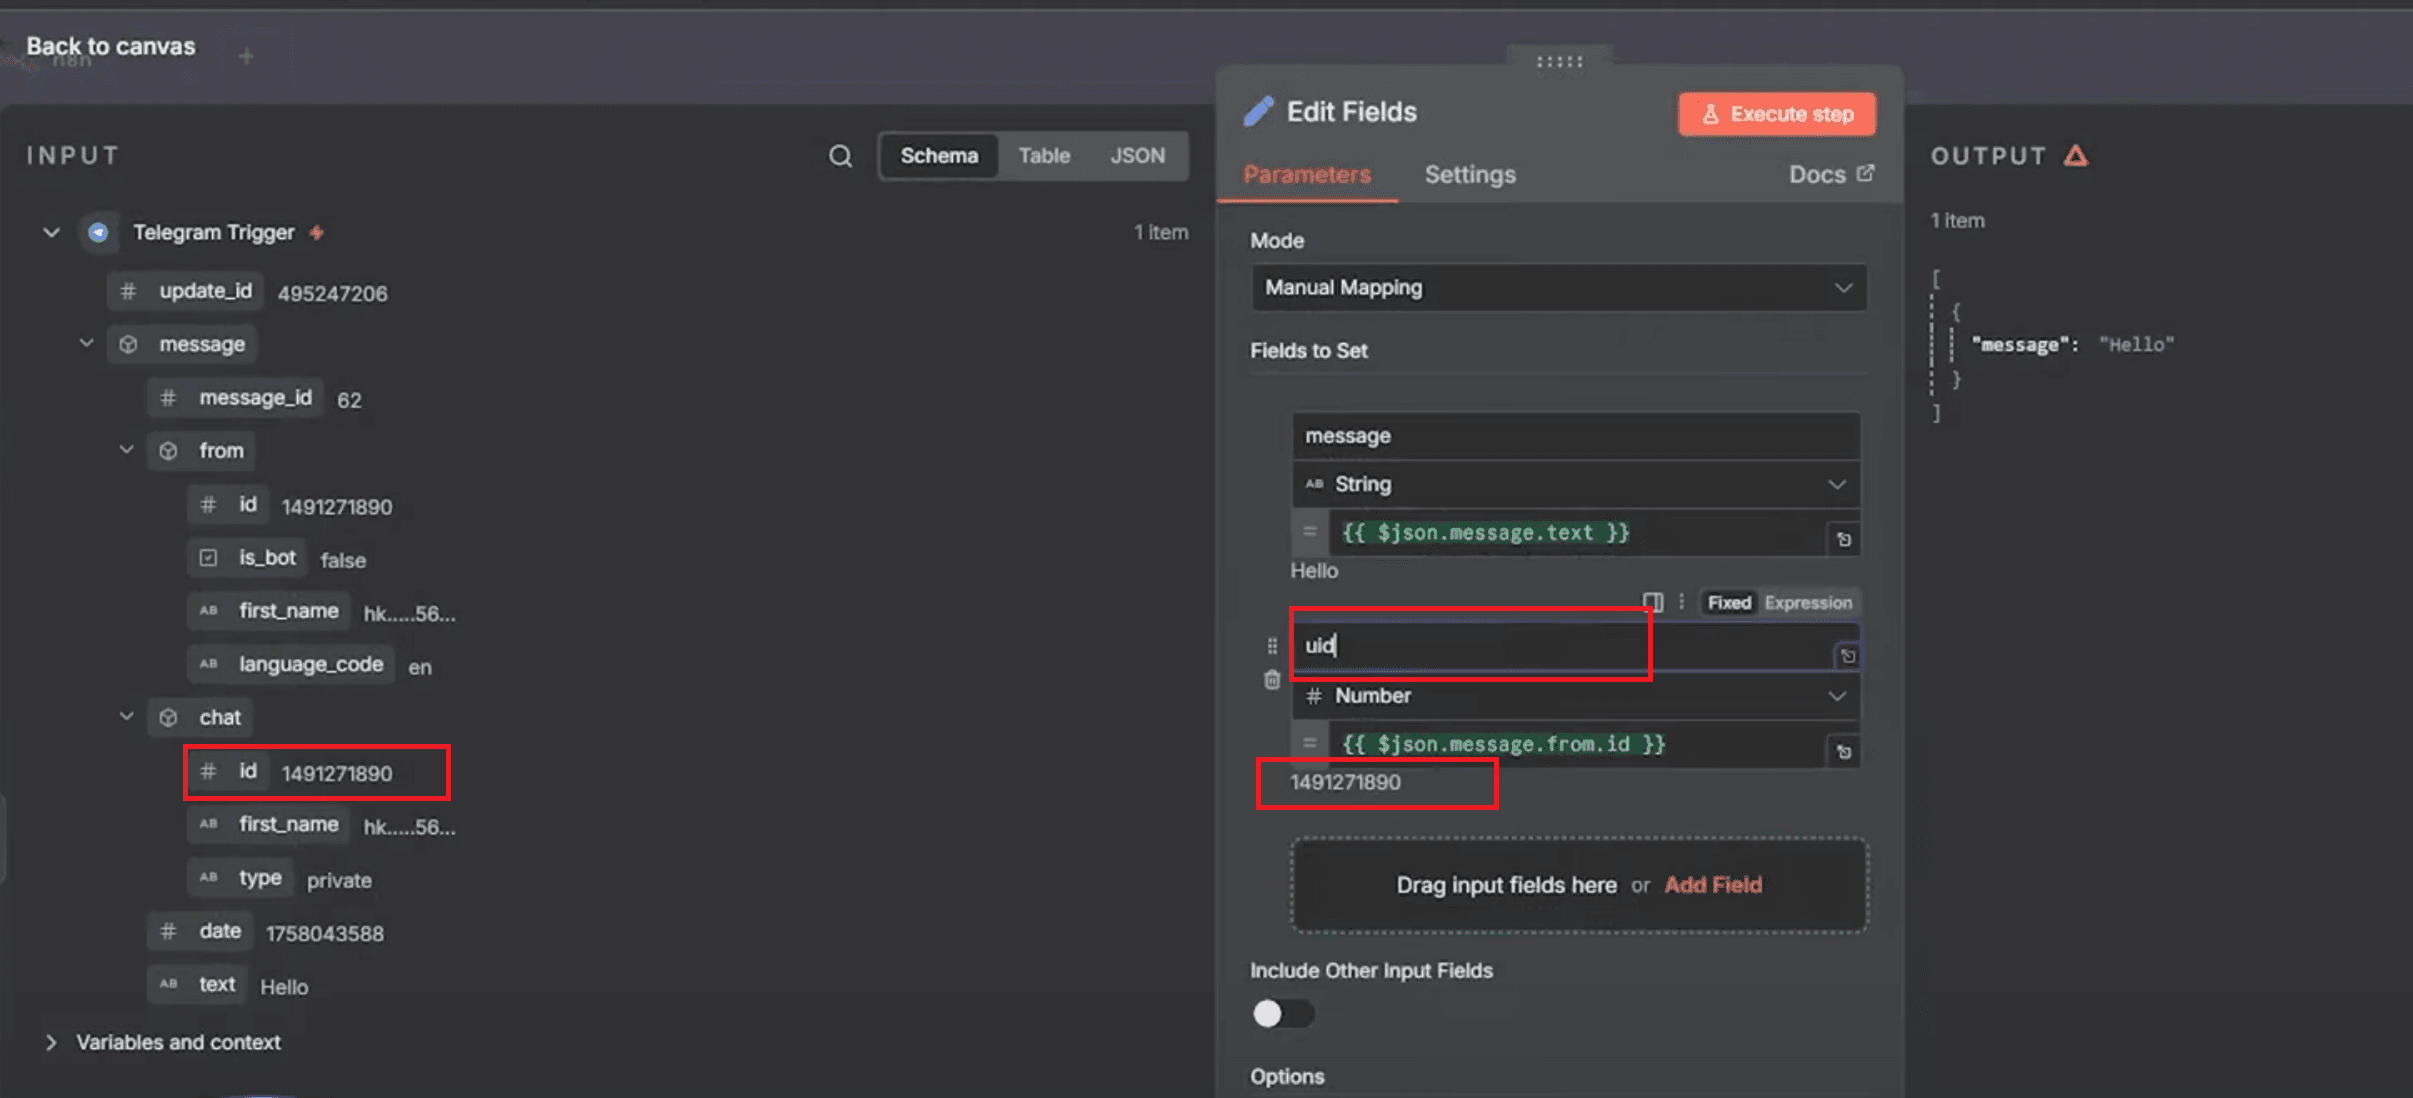
Setting Up Simple Memory
Add a Simple Memory node and connect it to the AI Agent using the Memory connection. This node allows the AI to remember user messages and maintain short-term context during a conversation. It keeps track of each user’s exchanges, so their ongoing requests make sense even when they refer to previous messages. For example, if someone says, “Change that meeting to 3 PM,” the AI will recall the last meeting that was discussed and update it correctly.
Steps to set up:
Click the + under Memory in the AI Agent node, search for Simple Memory, and select it to store short-term chat context.
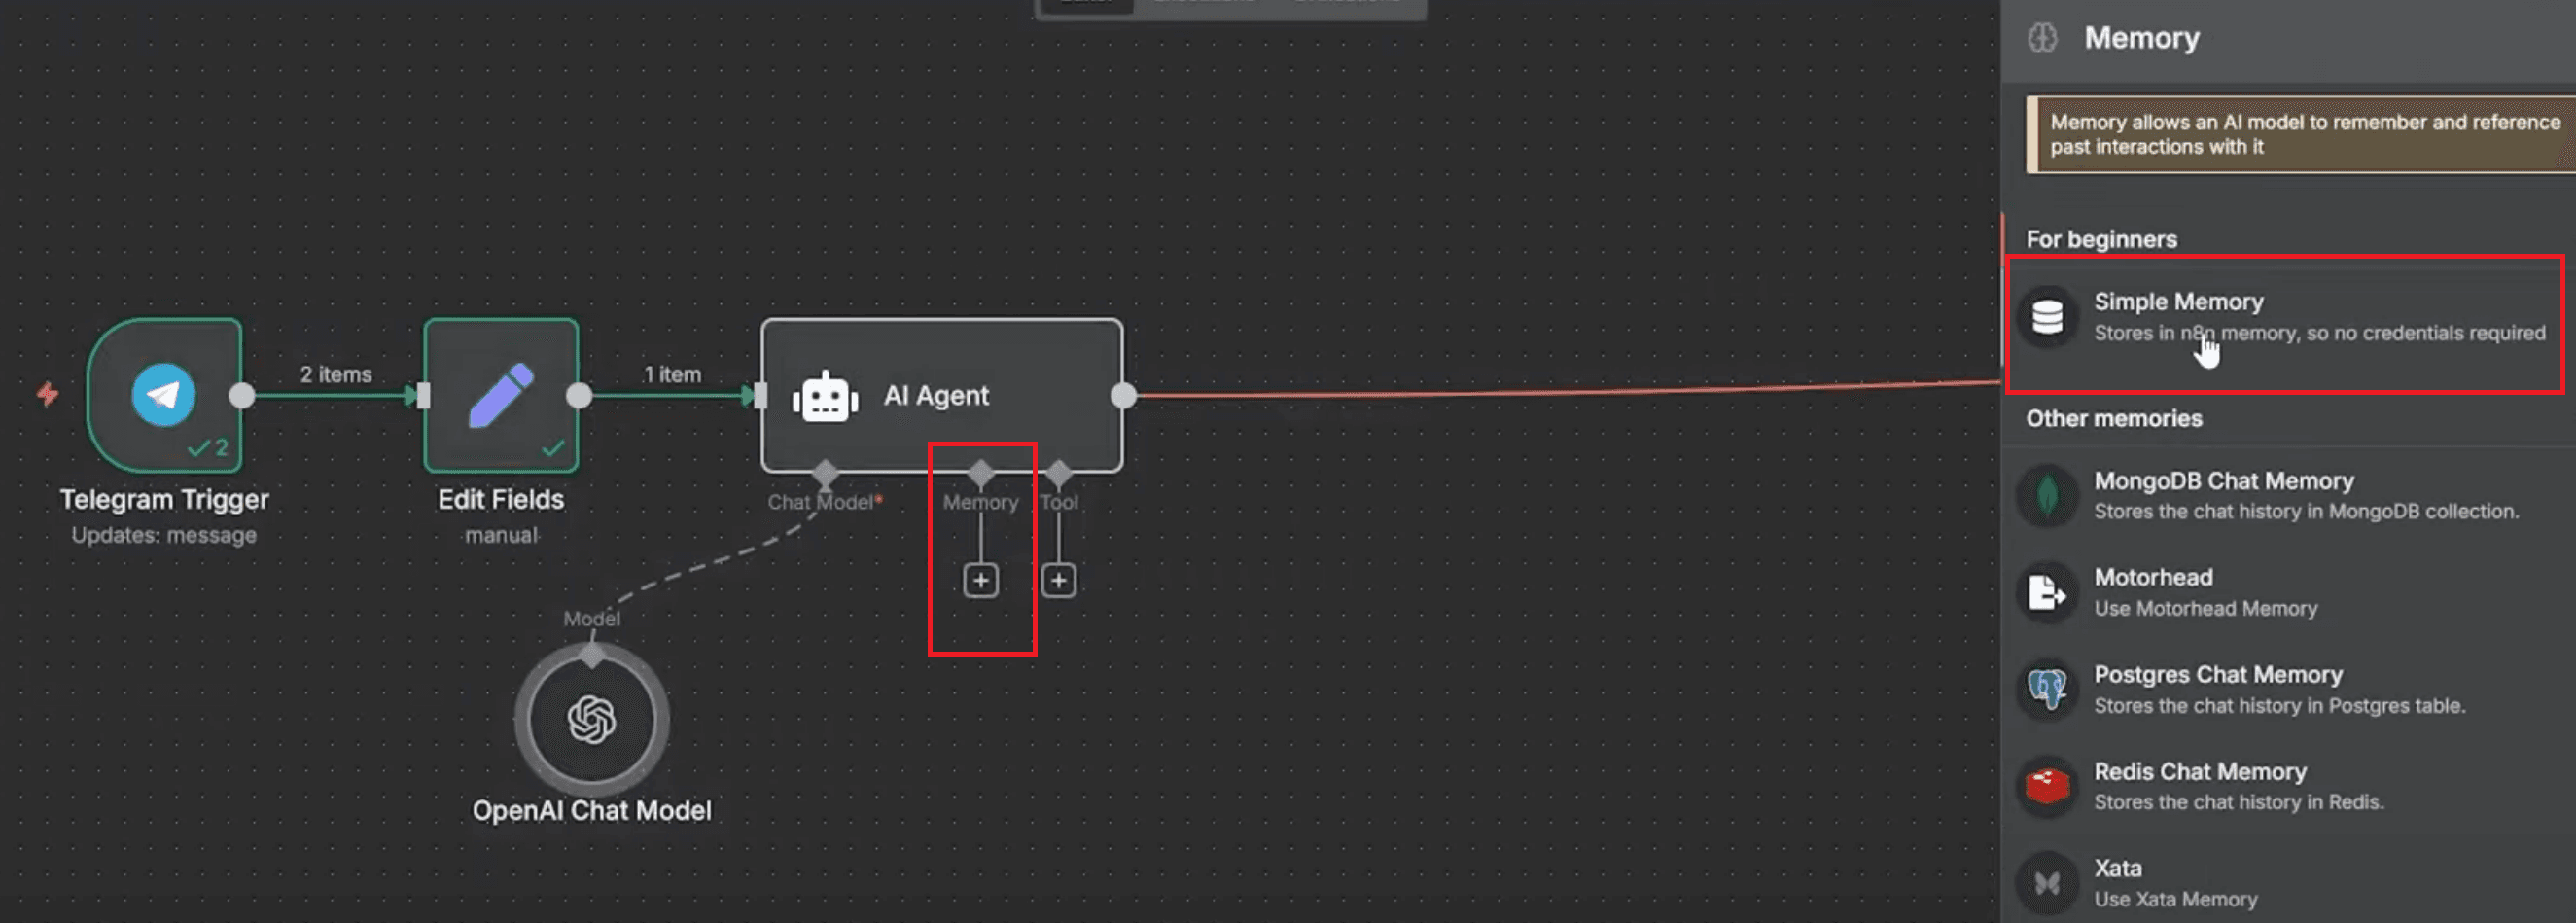
Set the Session ID to "Define below" to make it configurable.

In the Key field, type uid as the reference for each user.
Set the Context Window Length to "20", which allows the AI to remember the last 20 interactions.
Save the configuration so each user conversation stays separate and consistent.
Setting Up Edit Fields
Before connecting everything, create an Edit Fields node to organise and map the data that the AI Agent will use. This step ensures that every message is properly identified and linked to the right user before being passed to the AI. It also standardises the format of the message text so that other connected tools, such as Google Calendar, can read it easily. Setting up these fields helps maintain clear data flow and avoids confusion between different user inputs.
Steps to set up:
Open the Edit Fields node and click Add Field to create two new fields.
For the first field, name it message, then drag and drop the user’s message text (for example, message.text).
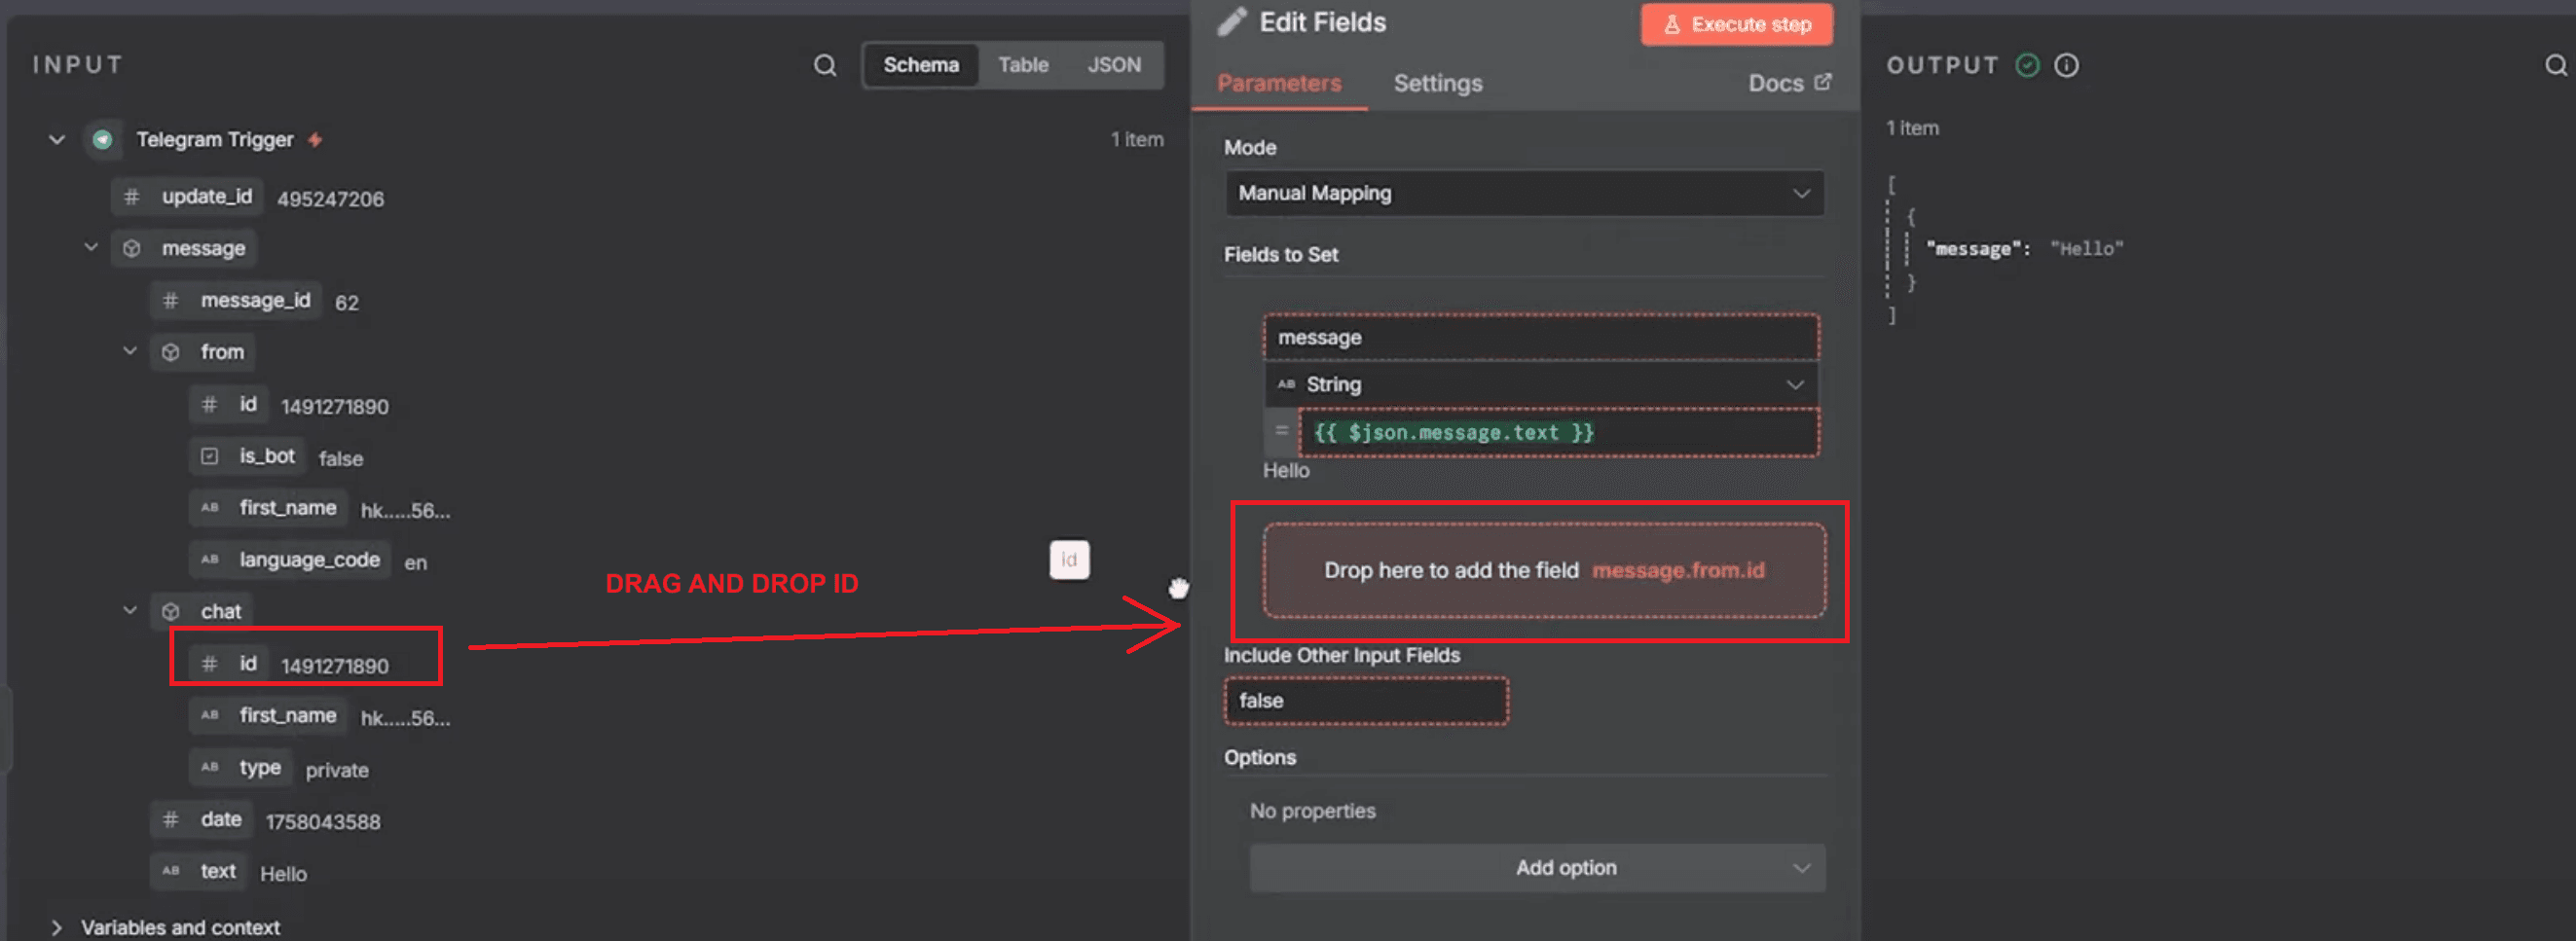
For the second field, name it uid, then drag and drop the user or chat ID (for example, message.from.id).
Save and execute the step to confirm that both fields appear correctly in the output panel.
Must Read - YouTube Automation Guide: Master YT Video Uploads in 2025
Step 5: Connecting Tools - Google Calendar Tool
(Looking at events in Google Calendar)
Now it’s time to link the tools that allow the AI Agent to take real actions in your workflow. These tools are what turn the AI’s understanding into real results, such as creating or updating events in your calendar. The Google Calendar Tool manages event creation, updates, deletions, and retrievals. The Gmail Tool checks and validates emails before scheduling meetings. Together, they make the AI Agent capable of complete, hands-free calendar management.
Steps to set up:
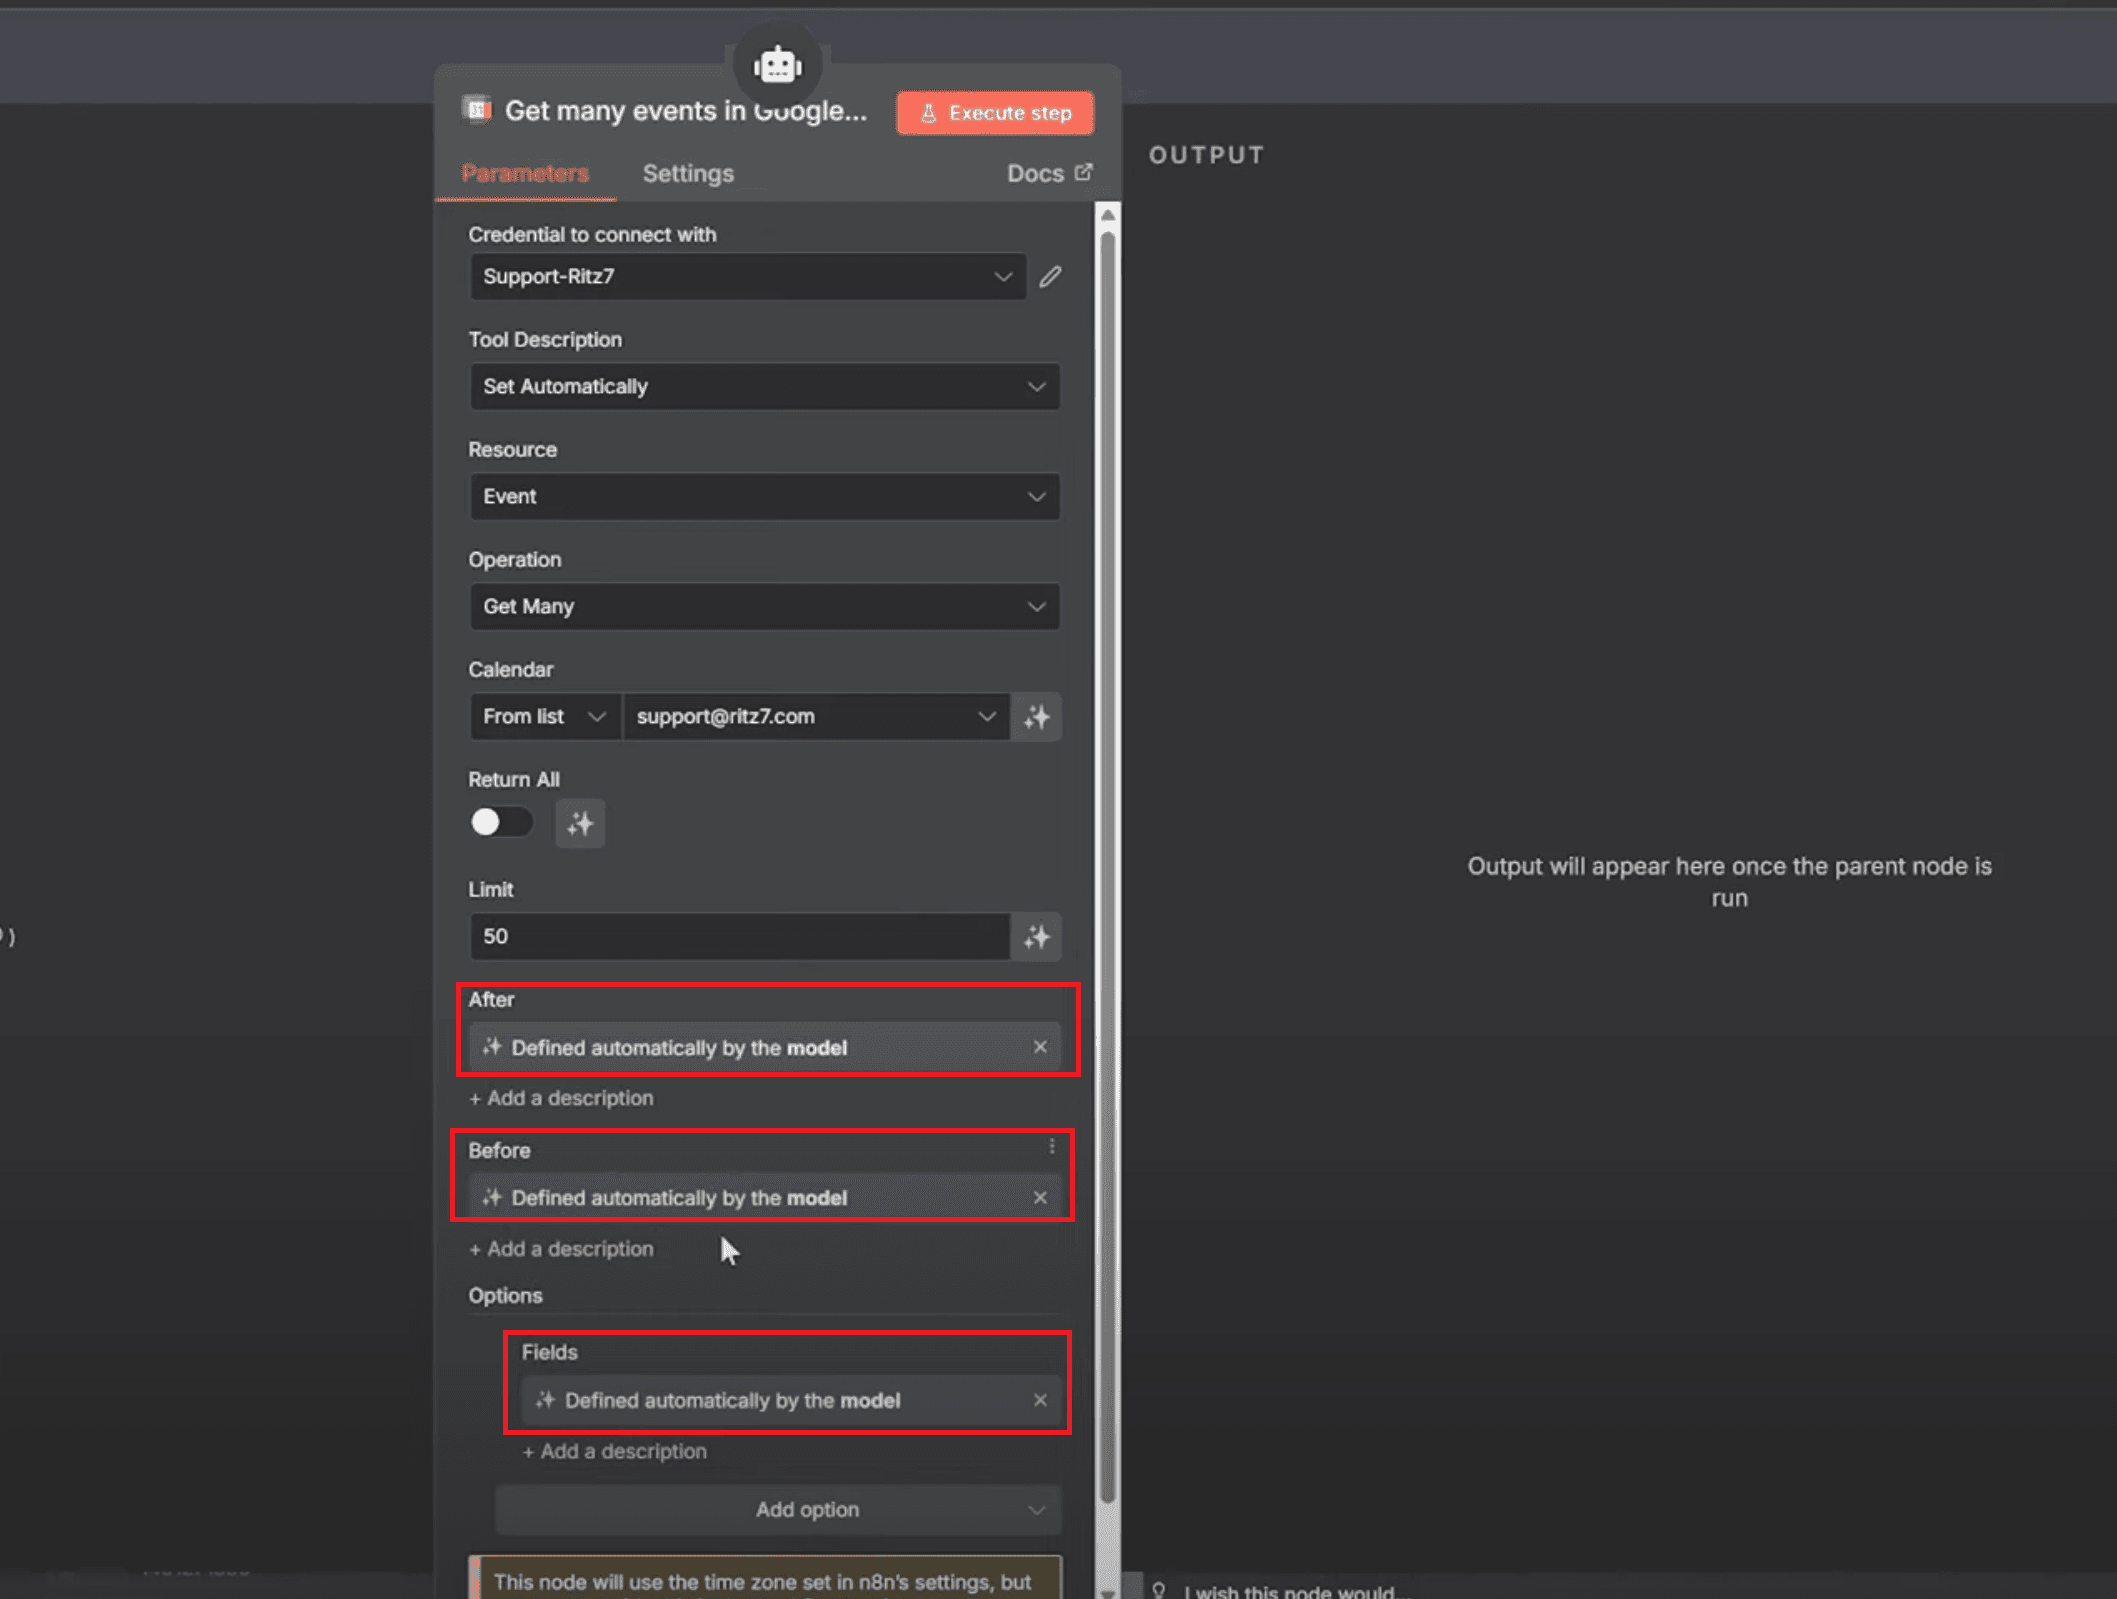
Click the "Tool" connection below the AI Agent and add the Google Calendar Tool.
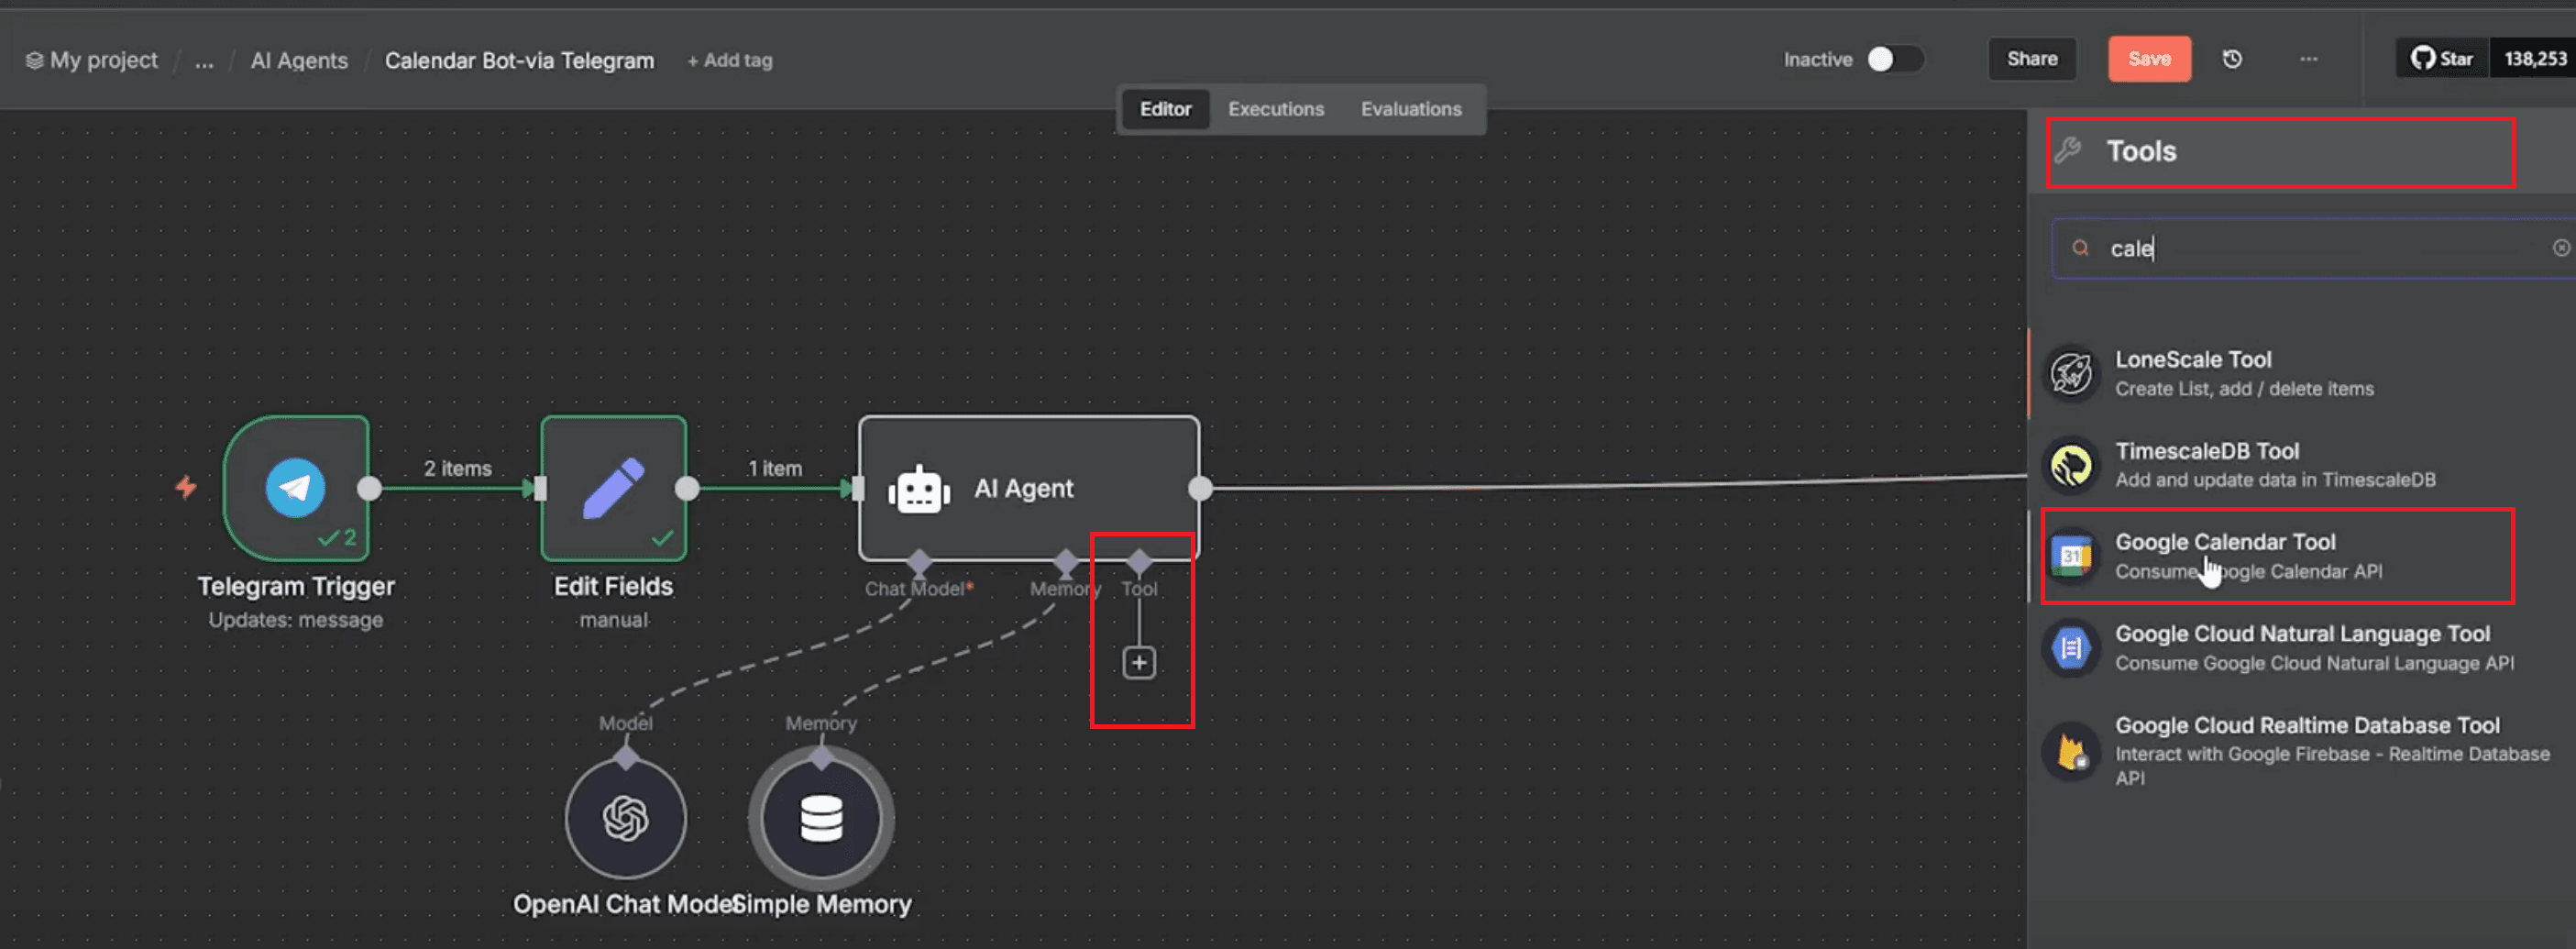
In the Google Calendar Tool, set Resource to "Event" and choose "Get Many" as the operation to retrieve multiple events at once.
Go to the Filters section and set both "After" and "Before" fields to Defined automatically by the model. This lets the AI Agent decide the time range based on the user’s request — for example, “today,” “this week,” or “next month.”
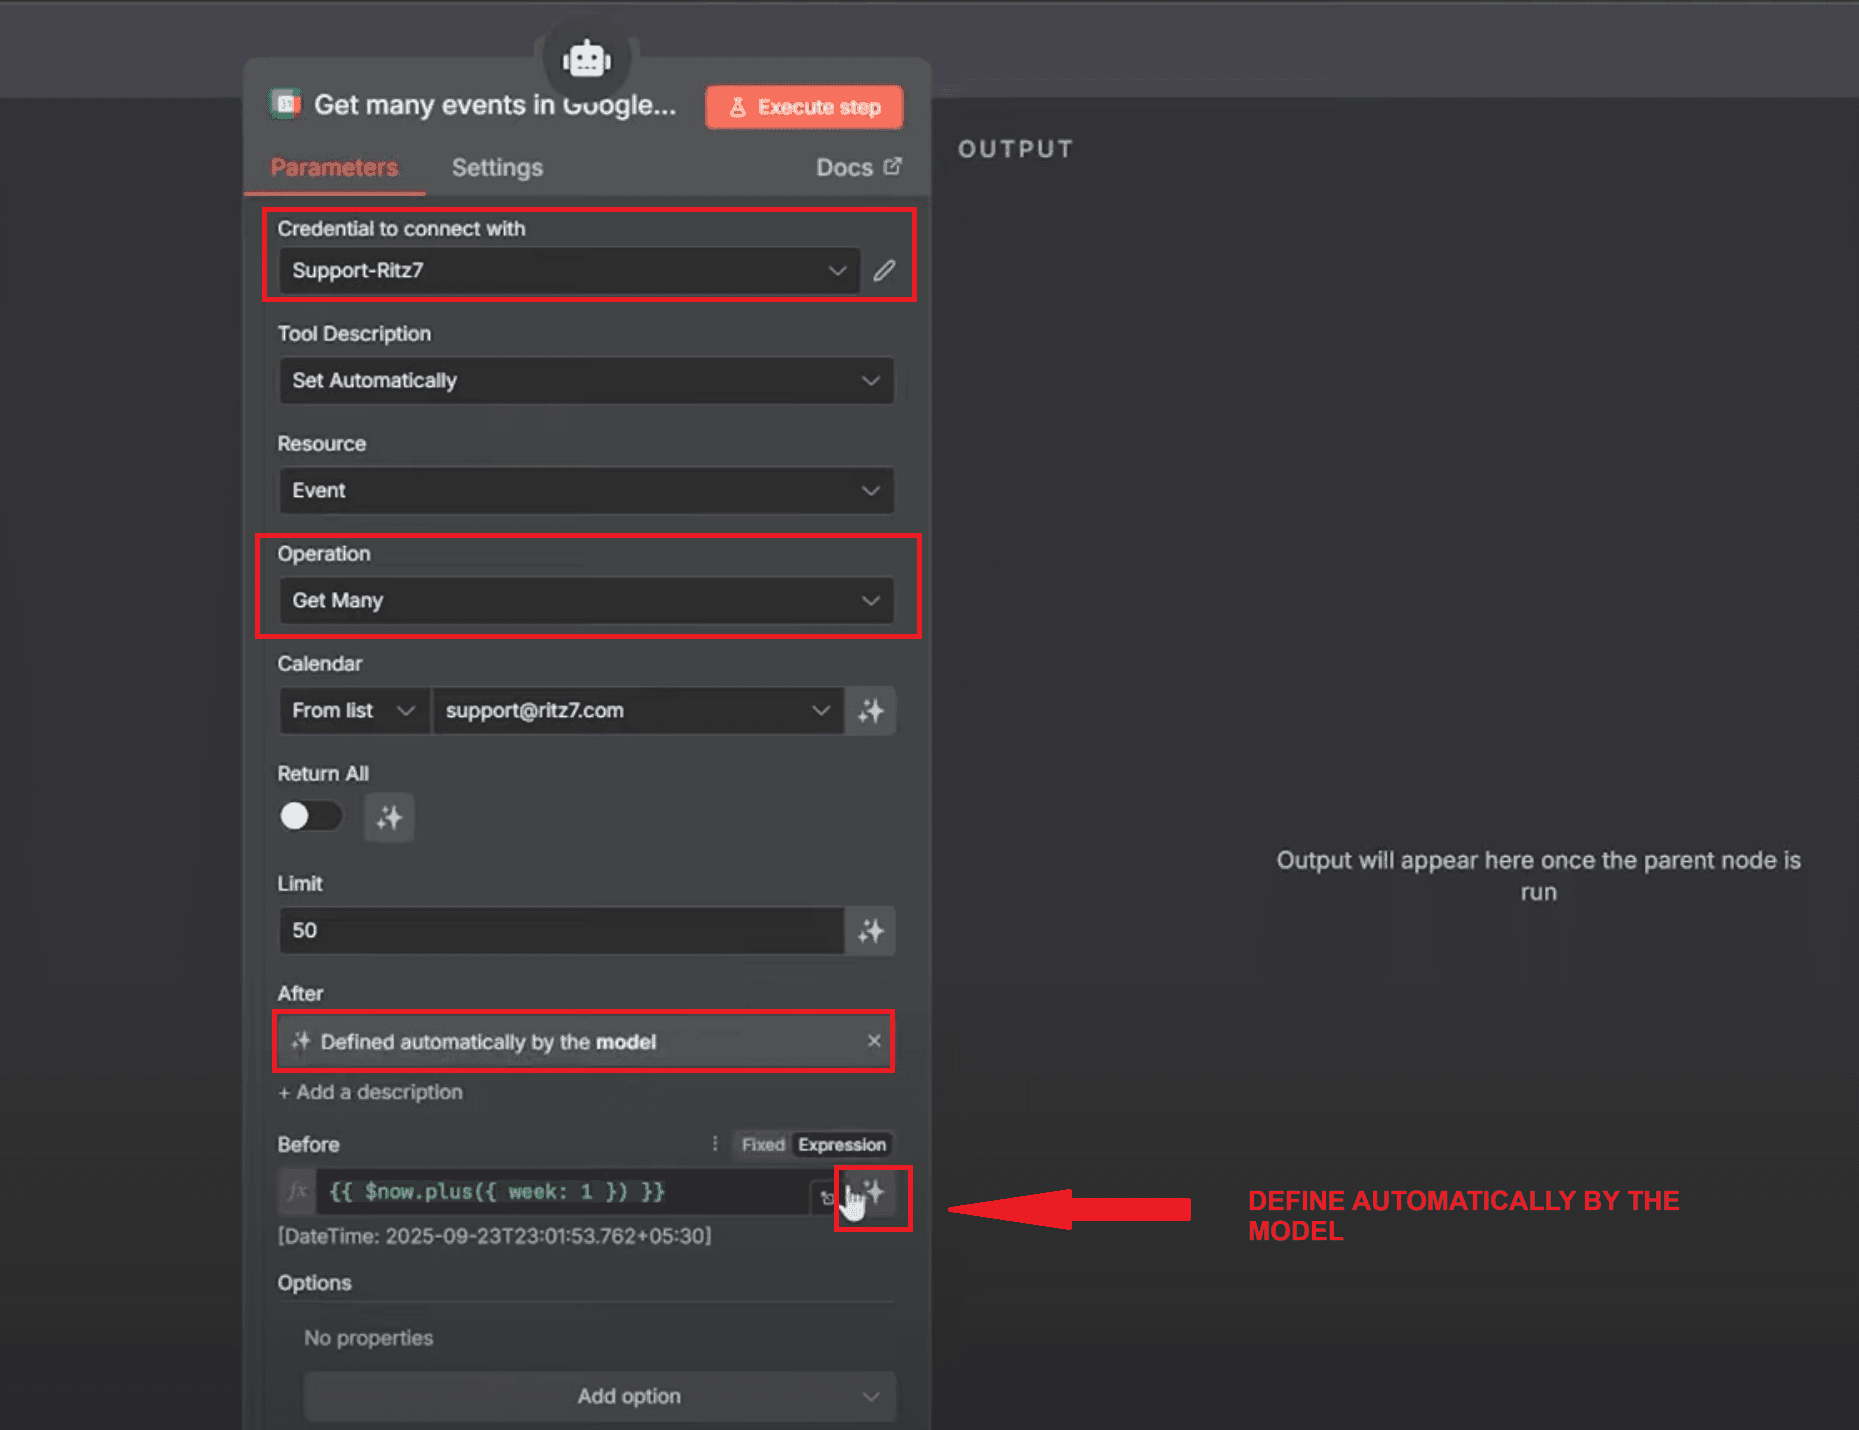
Scroll down to the Options section and set it as Defined automatically by the model as well. This helps the AI decide how much data to include, such as descriptions, attendees, or time details.
Save the node and test it by sending a Telegram message like “Get today’s events”. The bot will either return a list of event names and times or confirm that no events are scheduled.
Step 6: Sending a Text Message in Telegram
Now that the AI Agent is ready, it’s time to make it respond directly in Telegram. Start by running the previous nodes to ensure the AI Agent returns a message like “There are no events scheduled for today.” Once that’s confirmed, move to the Send a Text Message node.

Here’s how to configure it:
Use your connected Telegram bot account under Credentials.
In the Chat ID field, drag and drop message → chat → id from the Telegram Trigger node. This ensures the message is sent to the correct chat.
In the Text field, drag the output from the AI Agent node so that it sends whatever the AI responds with.
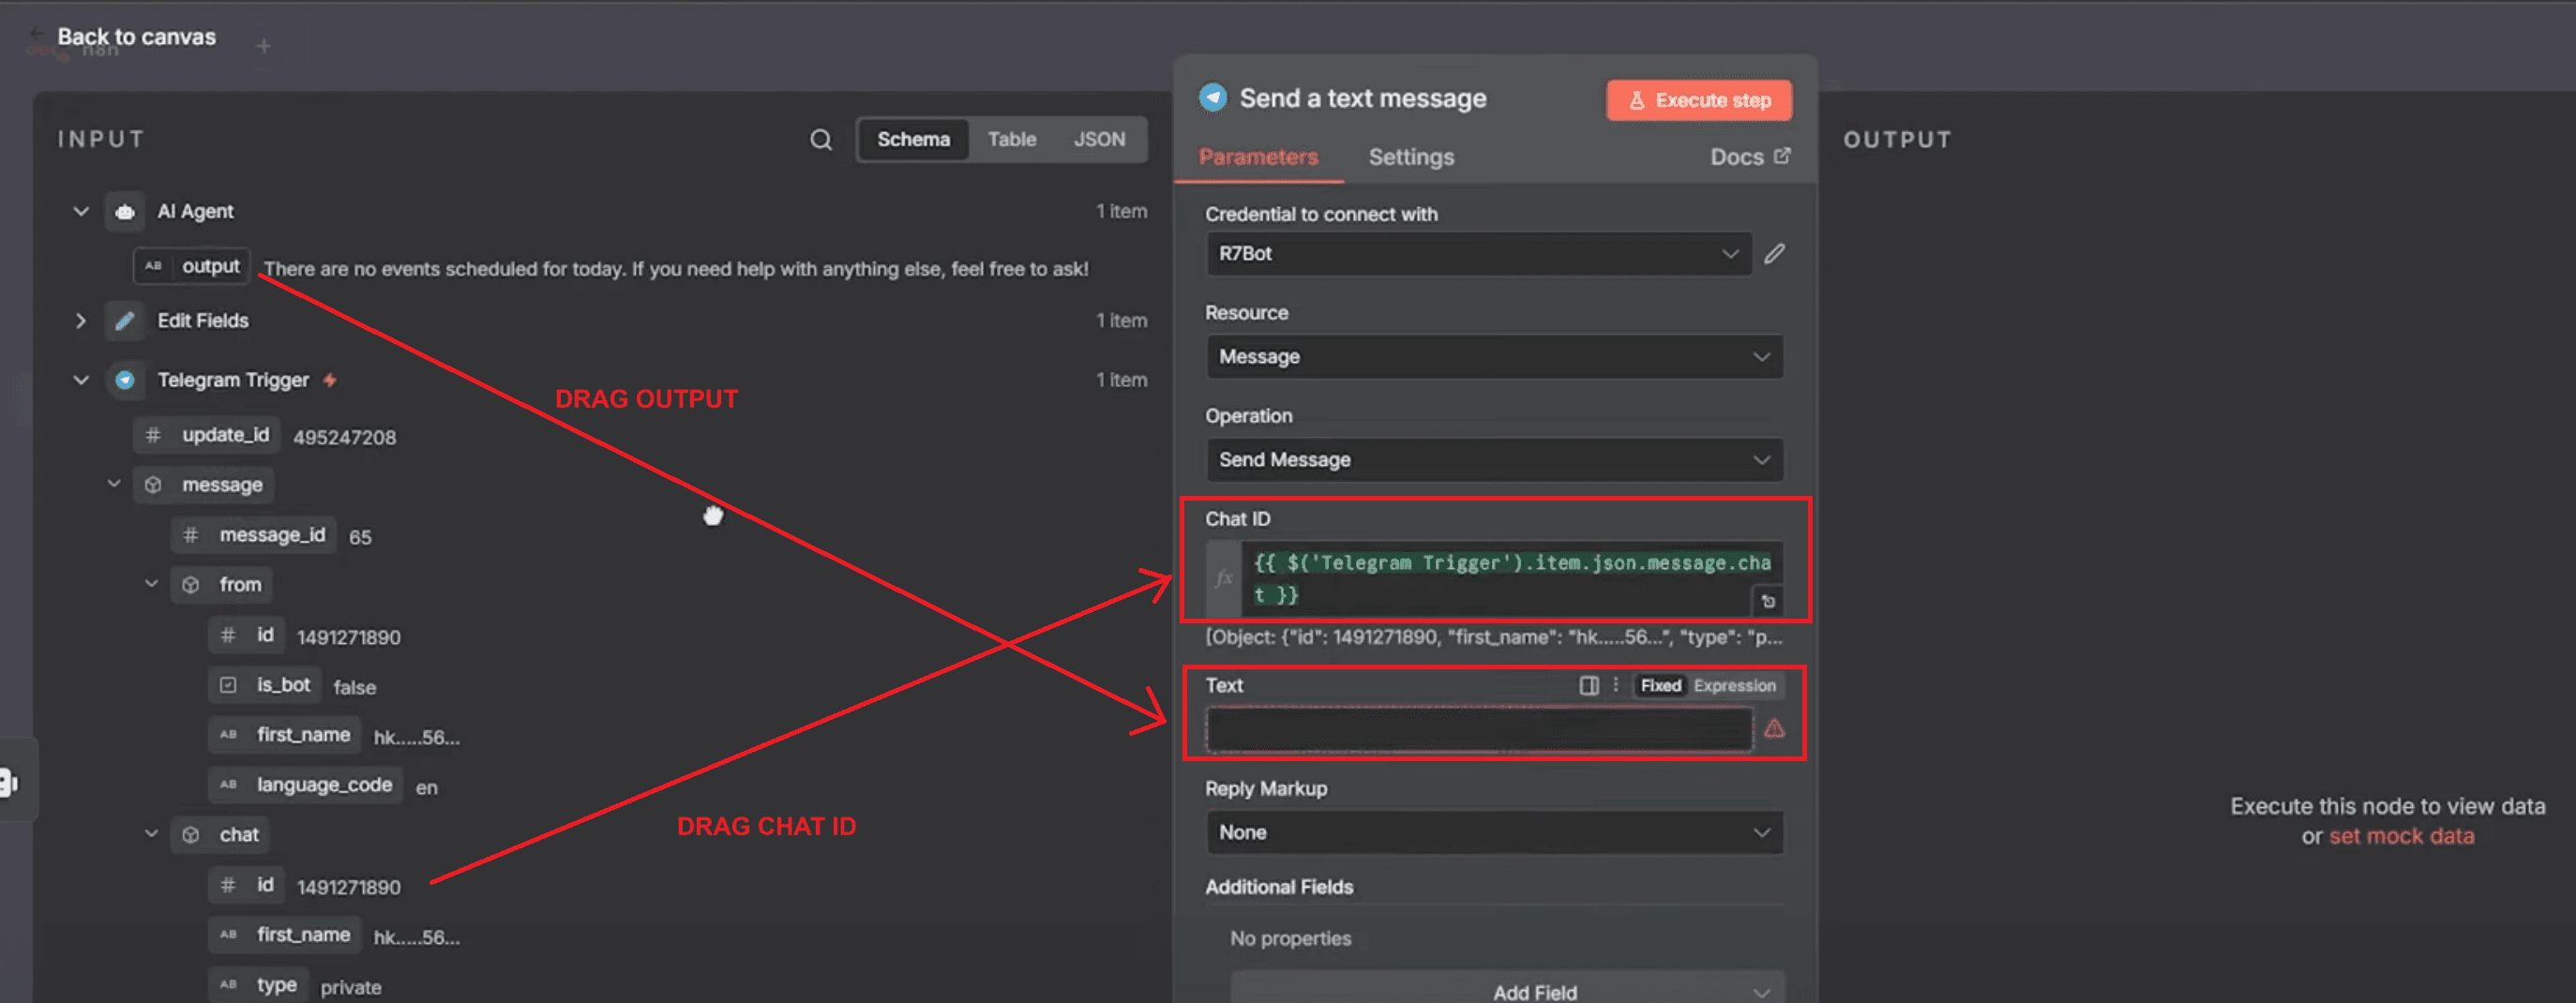
Remove any additional attributions by disabling the “Append n8n Attribution” option.
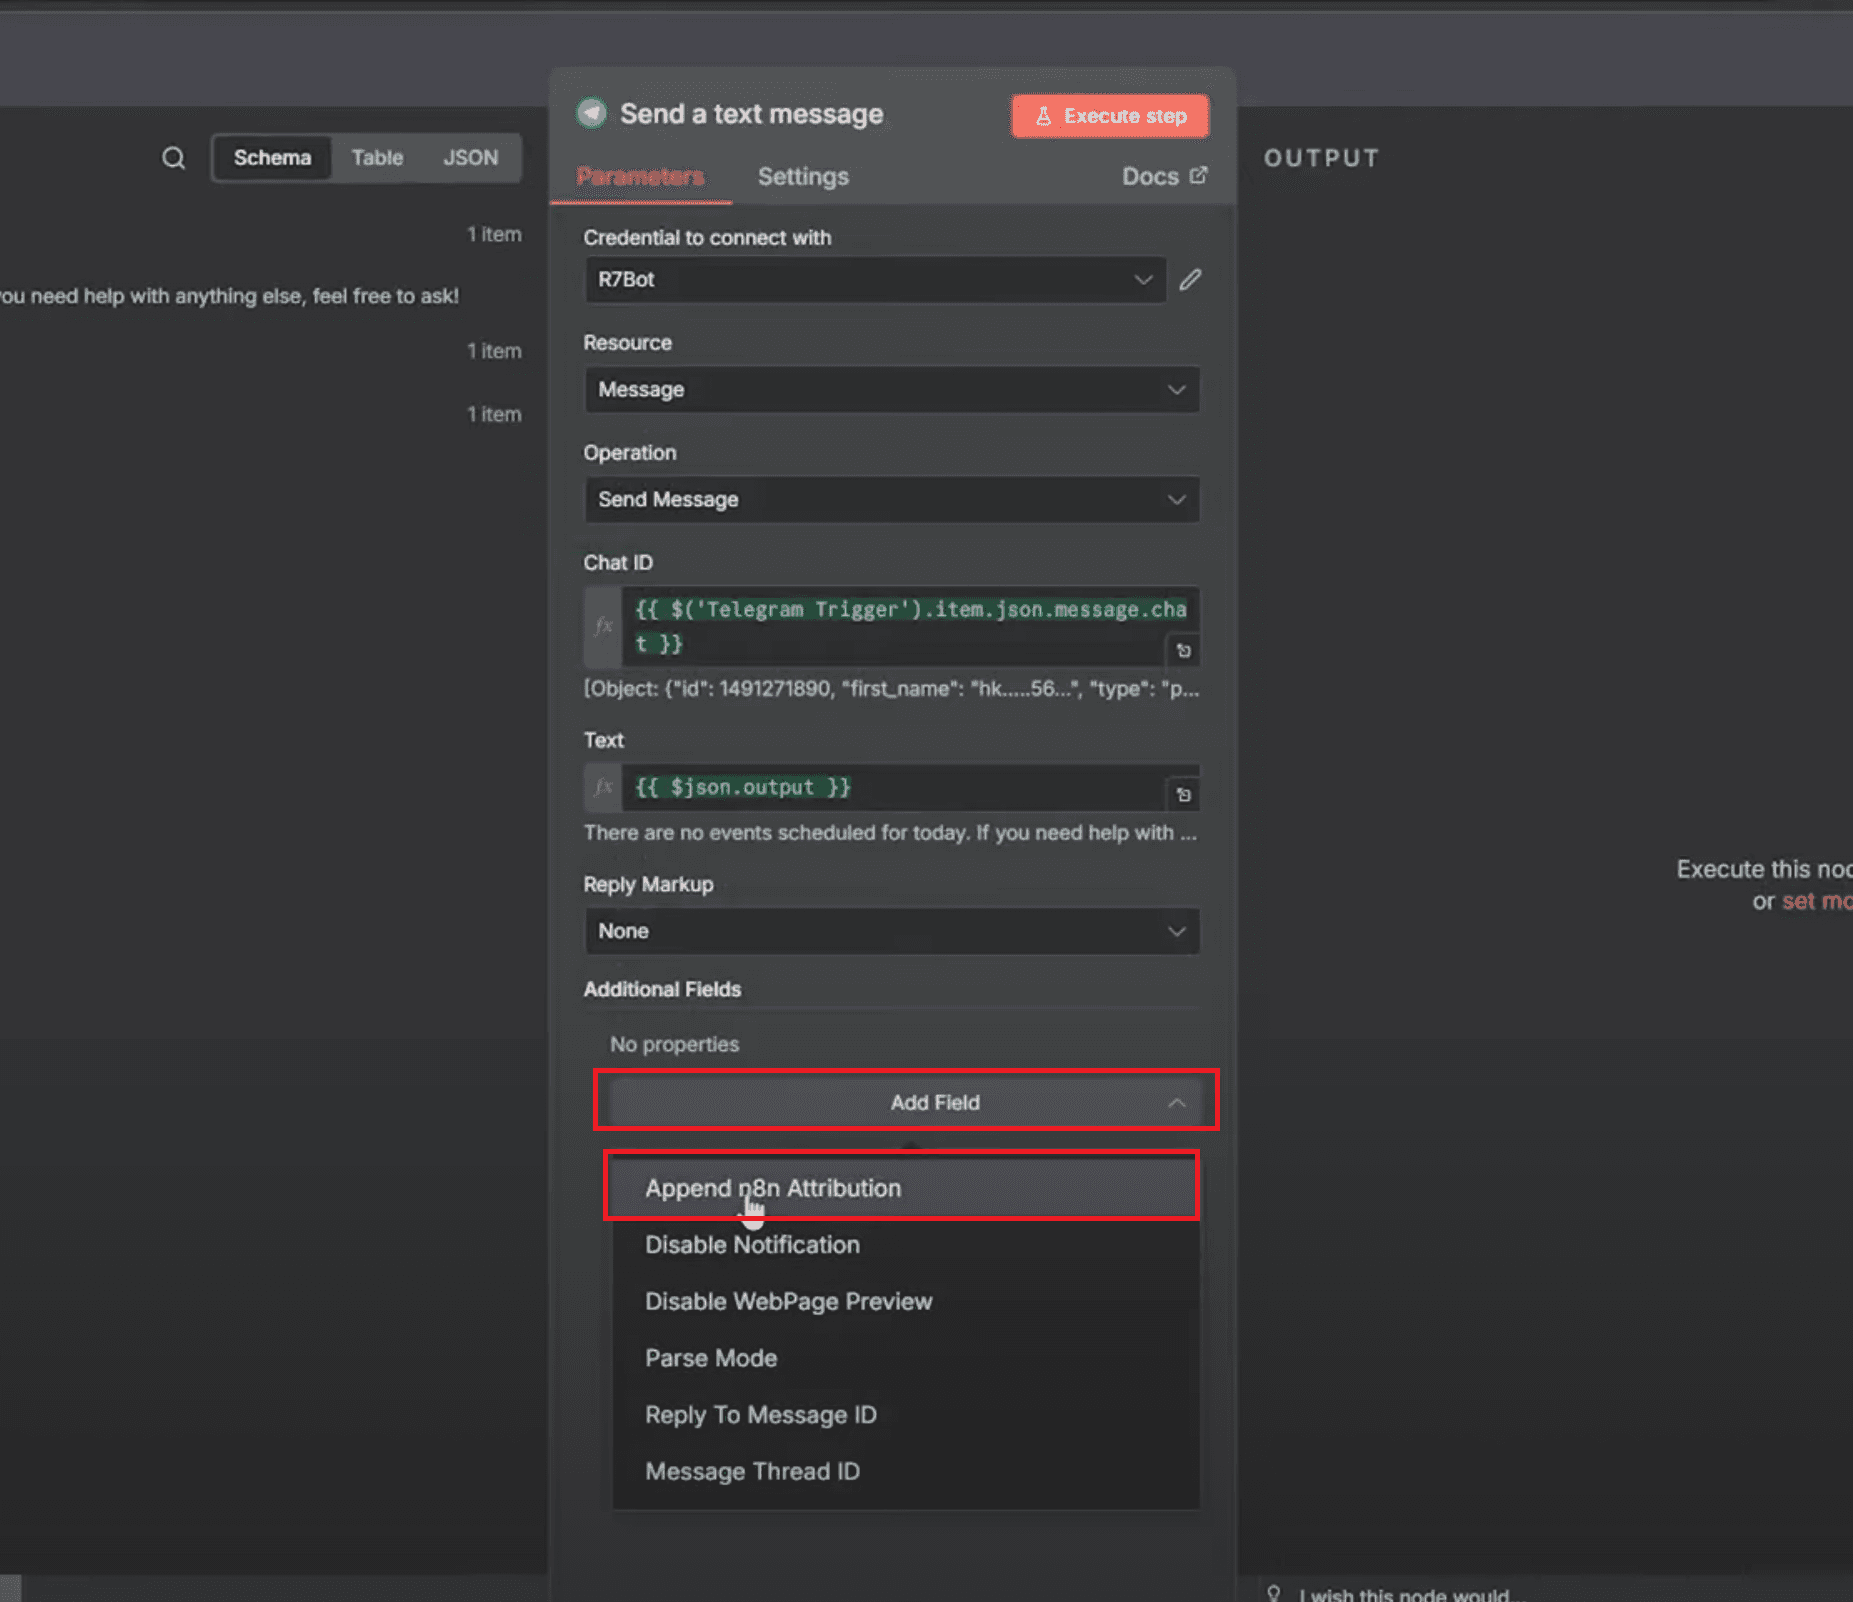
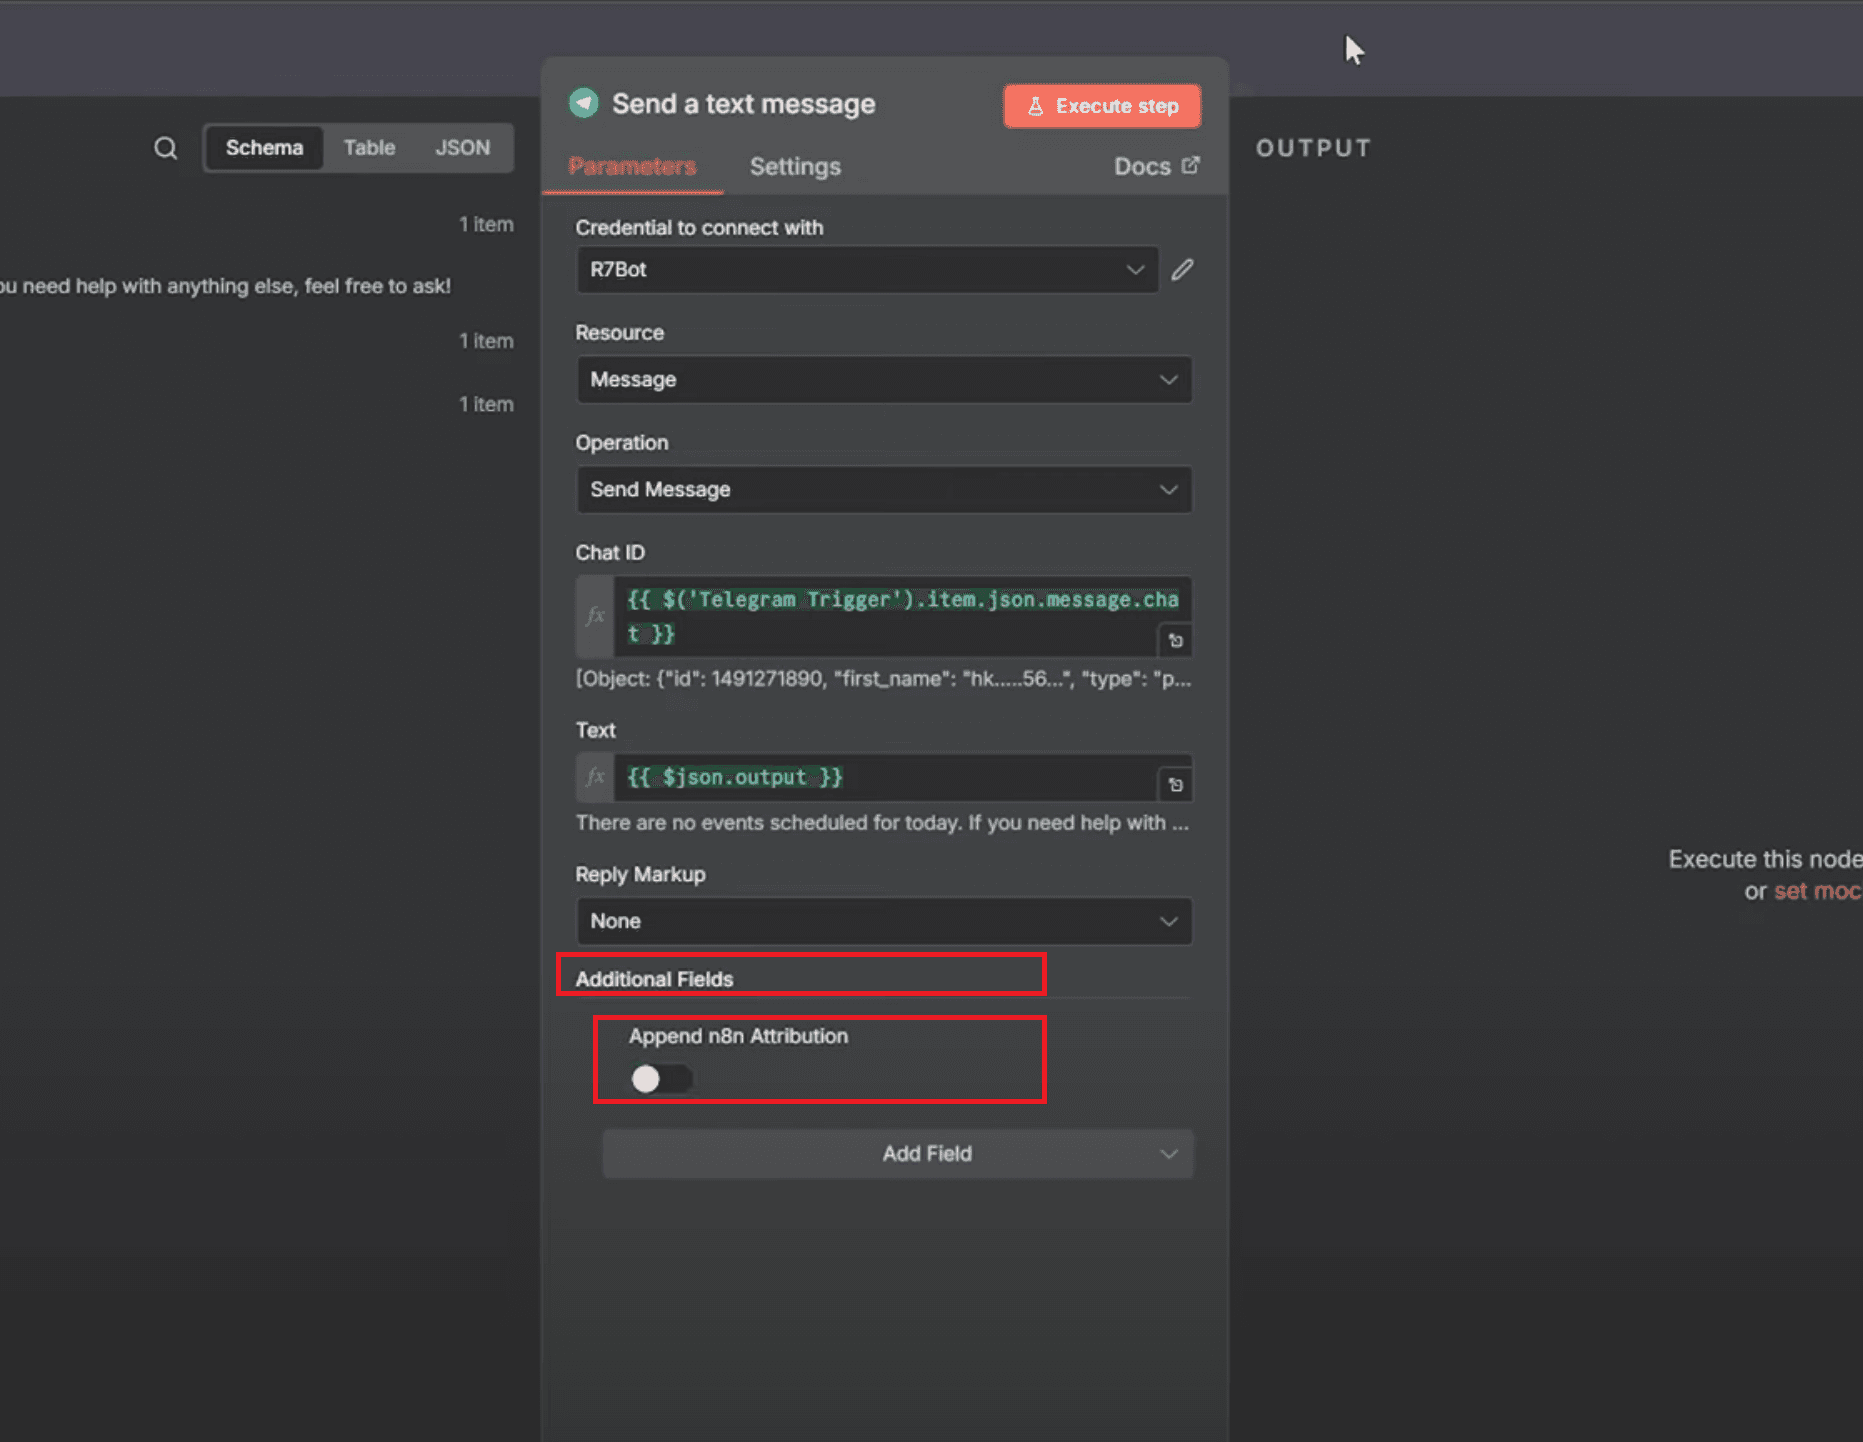
Once done, click Execute Node to test.
If you see a “Check parameters” error, make sure the Chat ID path ends with .id and then rerun it. When set correctly, Telegram will instantly display the AI’s response — confirming that your bot can now understand, process, and reply to user requests seamlessly.
The Rise of Deepfake: How Grok AI Fueled the Scandal
Step 7: Create Events in Google Calendar
Creating events is the most typical thing people need to do when they plan their days. A user might say, "Set up a KPI meeting for 30 minutes at 4:30 pm." The bot should be able to understand the title, the start and end times, and then save the event. This job is meant to be done by the Google Calendar Create node. The AI agent takes out the key fields and sends them straight to the calendar node. When the process is done, a message is sent back to Telegram to confirm that it was made.

How to get around the node:
Add a "Google Calendar Tool" node from the sidebar and change the Resource to Event.
Choose "Create" under Operation to add new events to the calendar.
Choose your Google account that is connected (for example, Support-Ritz7) under Credentials.
To choose which calendar to use, click on the Calendar field and then From list → support@ritz7.com.
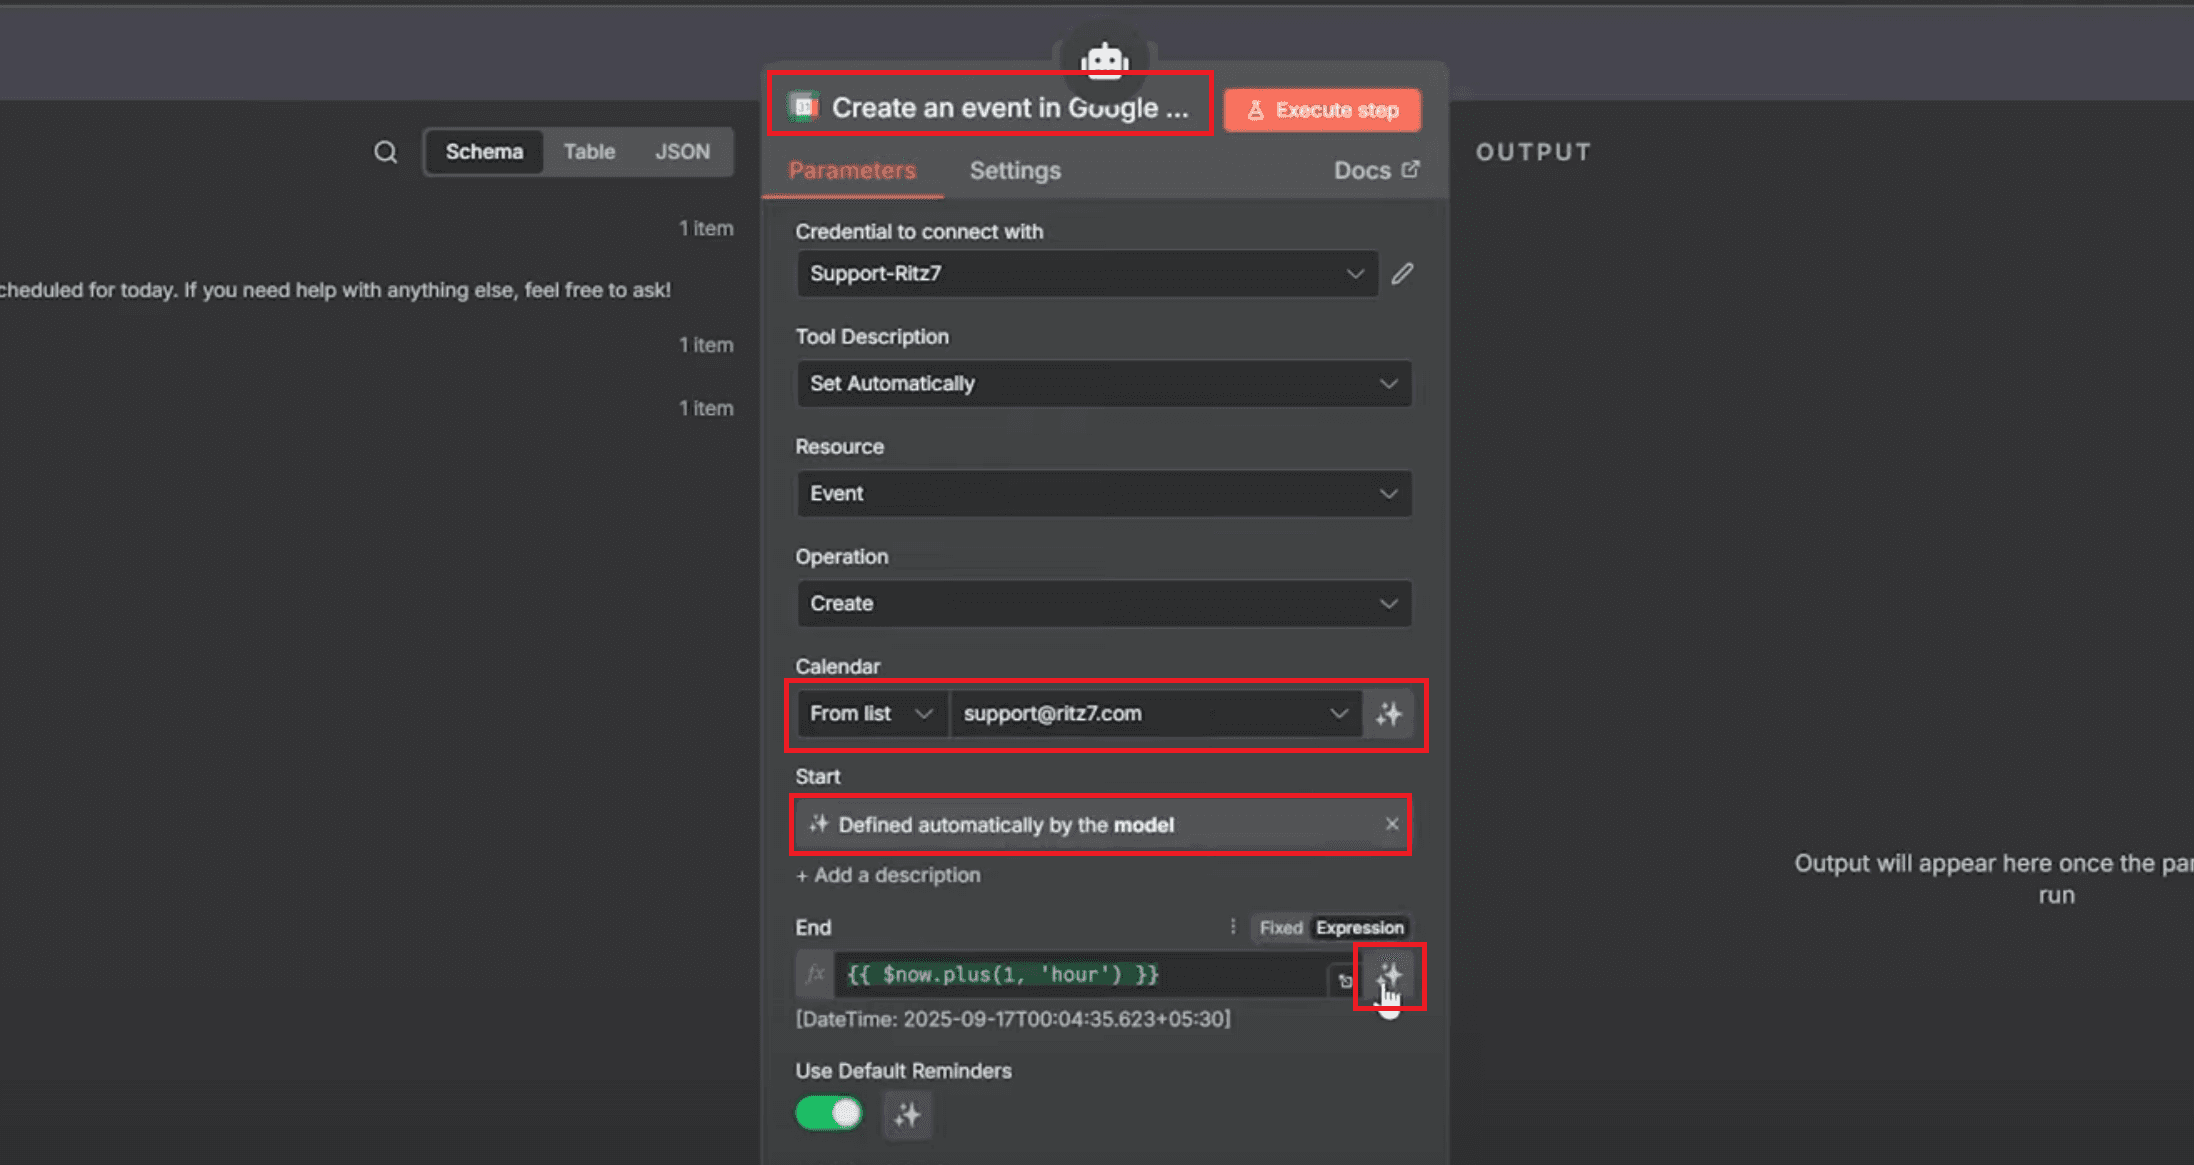
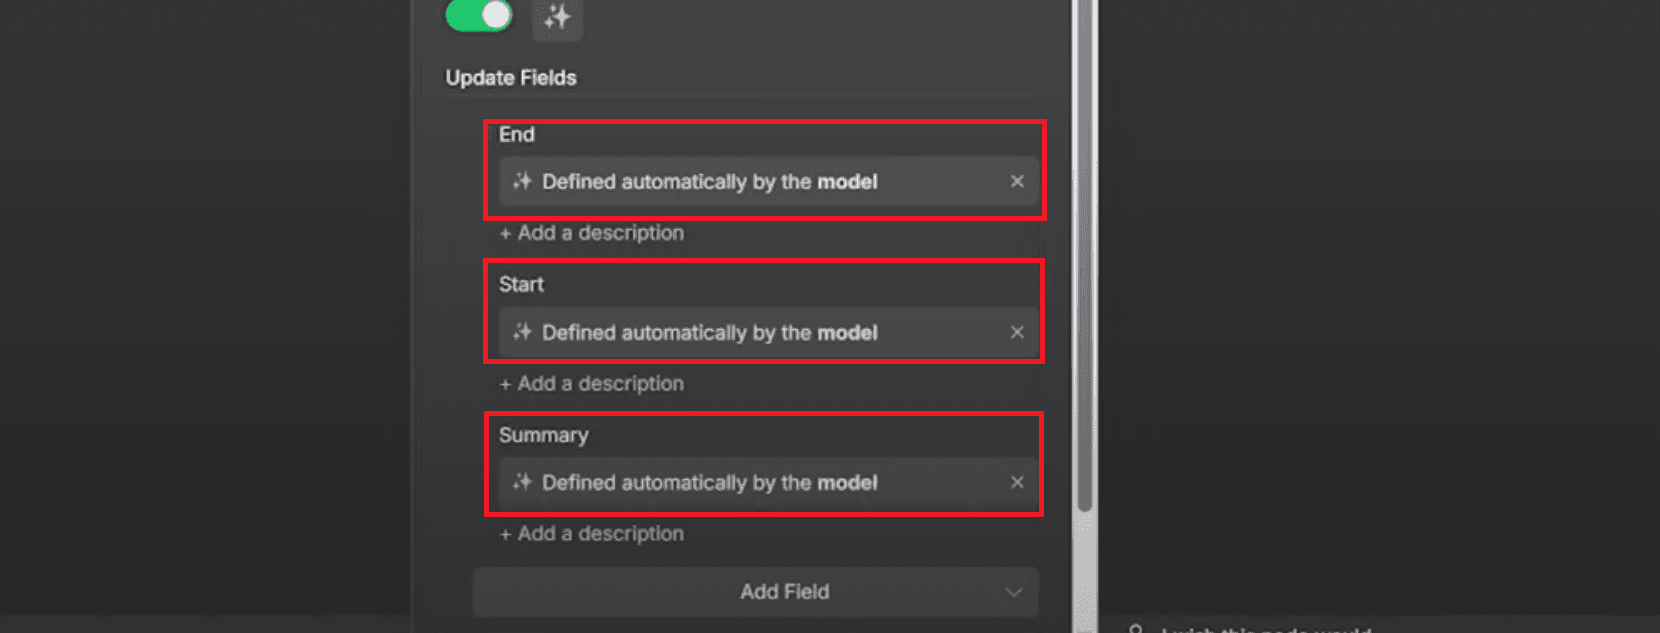
Set Start, End, and Summary to “Defined automatically by the model.”
This means the AI Agent will decide the appropriate event title and time automatically based on the user’s message.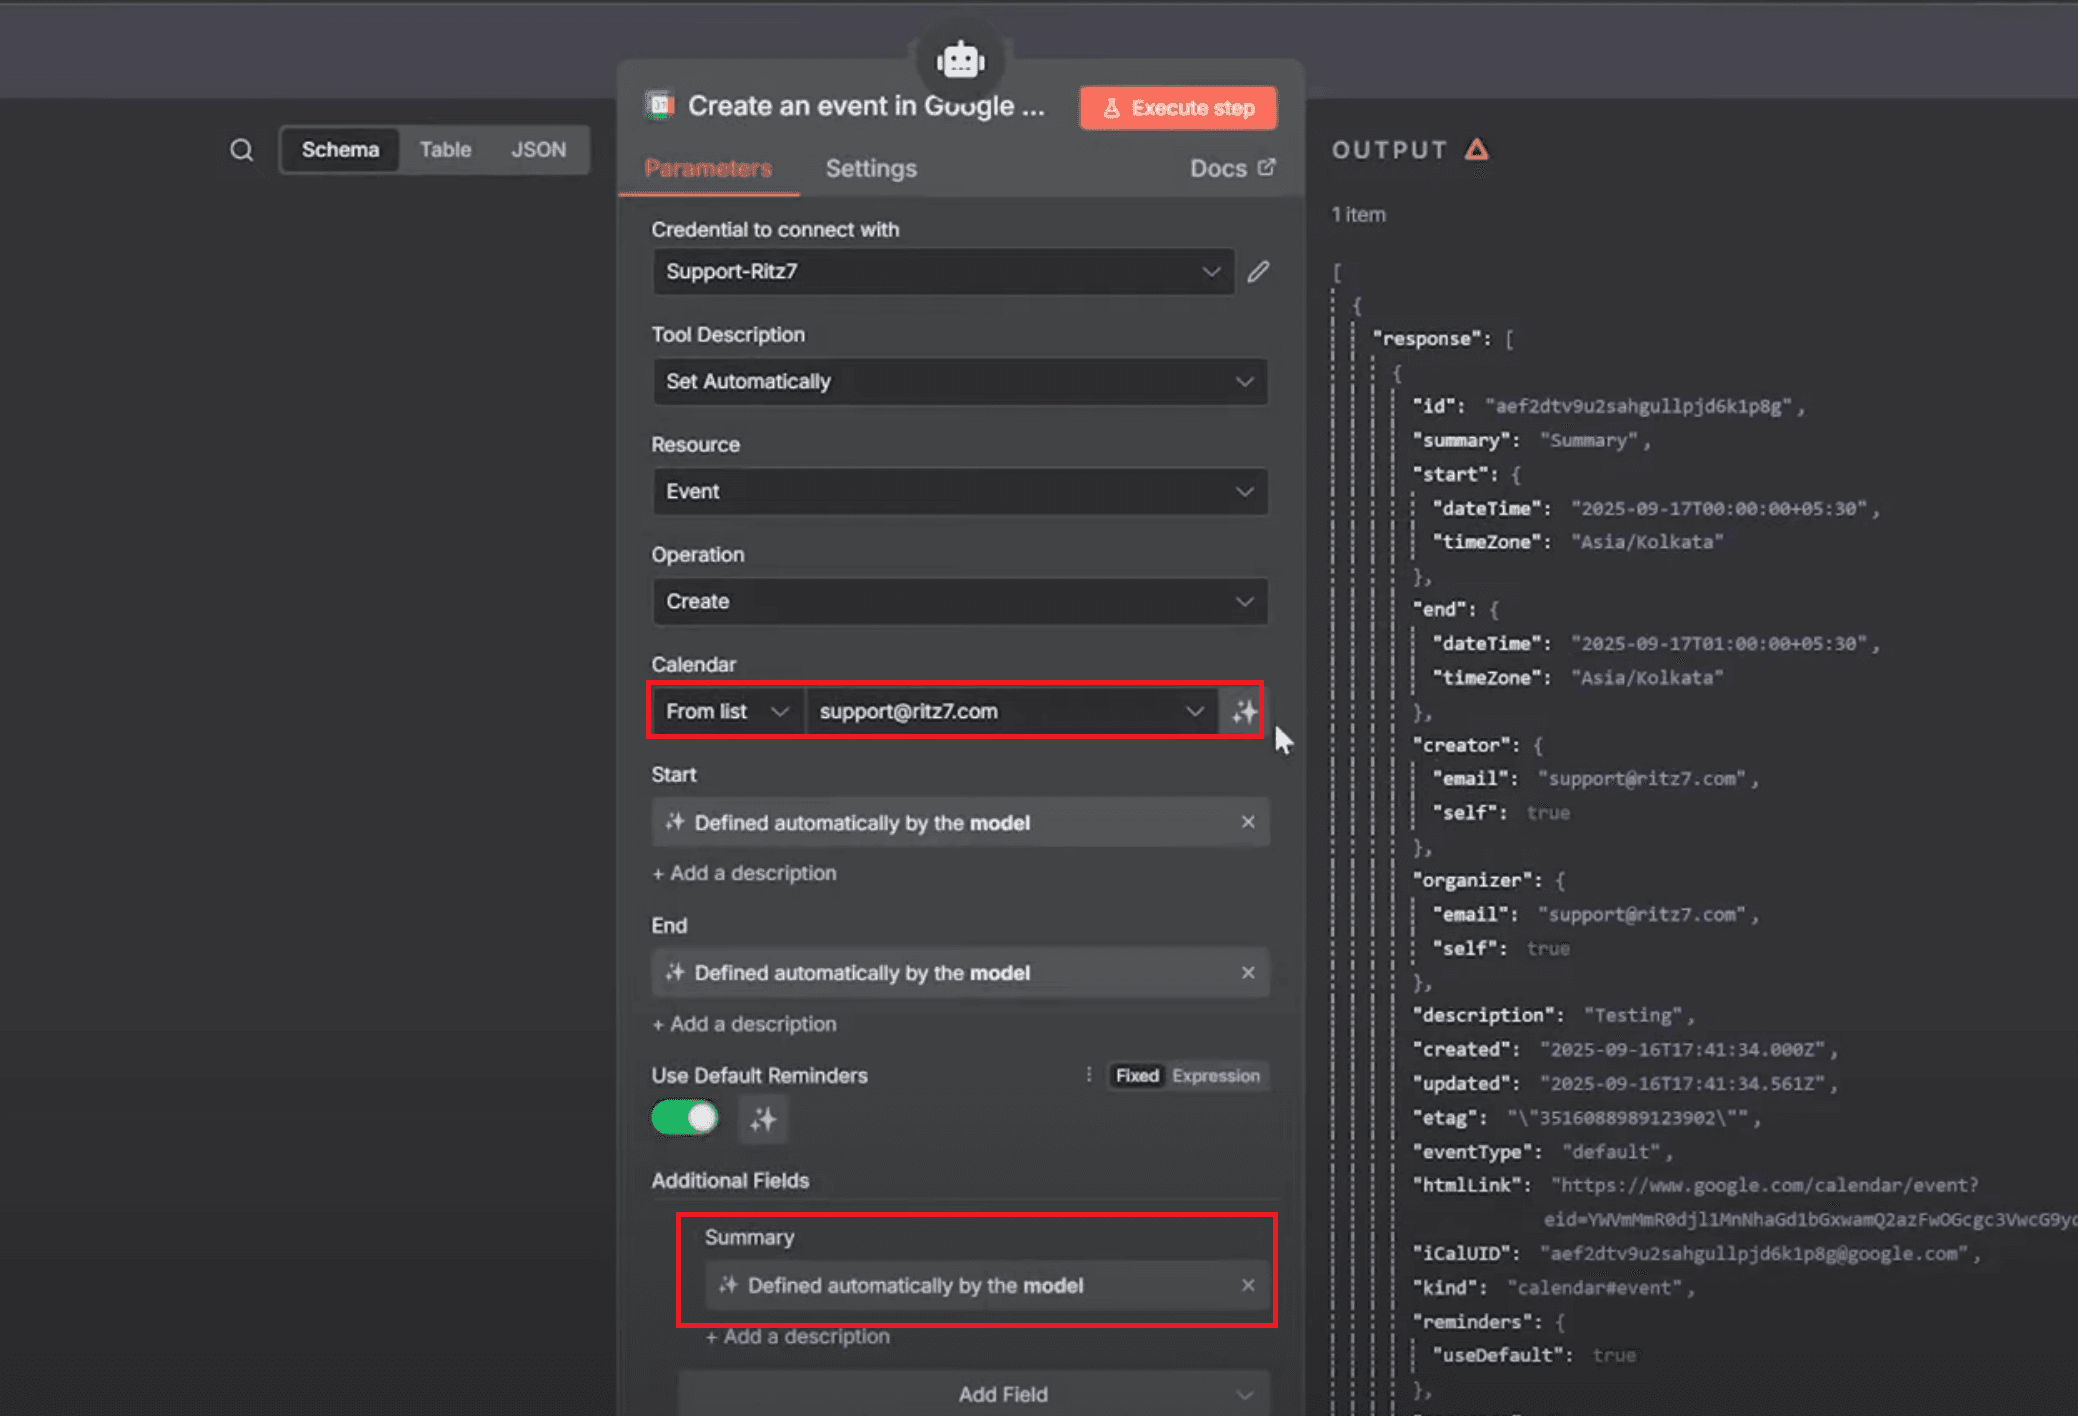
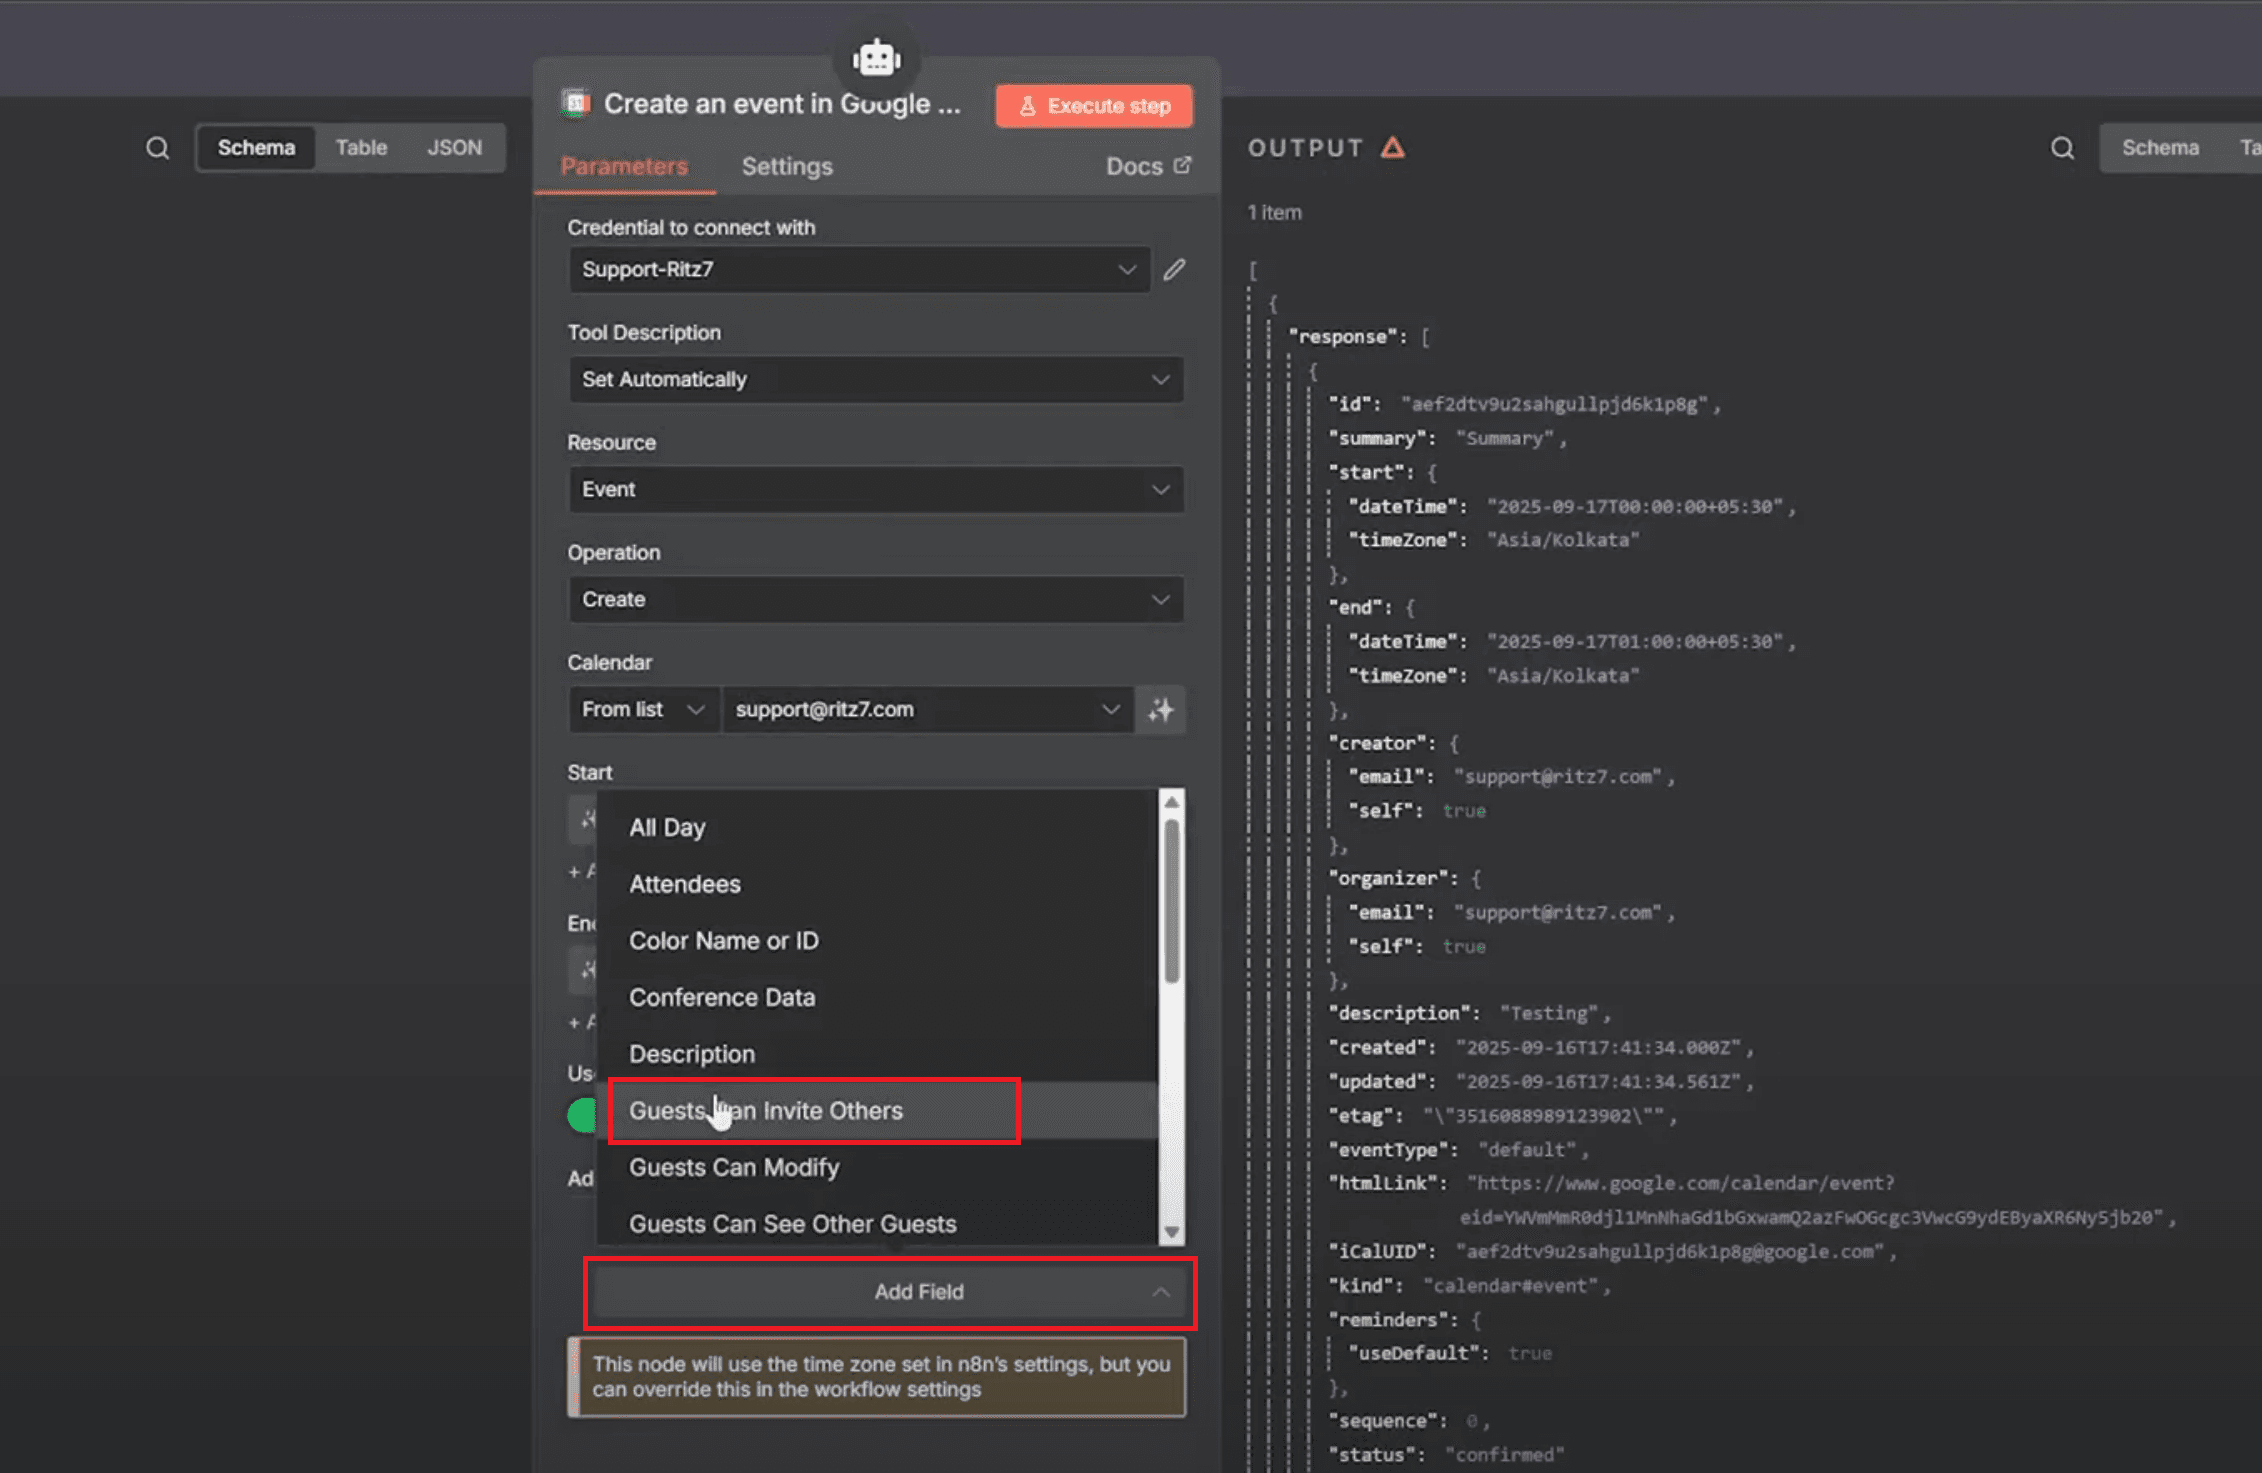
Scroll down to Additional Fields, click Add Field, and enable “Guests can invite others” or any other options your workflow requires.
Keep the Use Default Reminders set "ON" to automatically deliver basic event alerts.
Once everything is set up, save the workflow and perform a test. Send a Telegram message like, “Create a meeting called Review Call for tomorrow at 4 PM.” The bot will create the event in your Google Calendar and reply in Telegram, confirming something like “Review Call has been scheduled from 4:00 PM to 5:00 PM.” This arrangement makes event production fast and accurate. Instead of manually entering data in Google Calendar, users may simply send one message – and the bot does the rest.
Step 8: Update events in Google Calendar
It's crucial to be able to swiftly adjust an event when schedules change. A message like "Prepone my KPI Call by one hour" should change the meeting time safely without making a copy of it. The Google Calendar Update node does this by focusing on the event ID. The AI agent makes sure to find the proper event ID first, and only then does the update. This maintains the schedule correct and stops the wrong event from being overwritten.

How to get around the node:
In Credentials, pick your connected Google account (for example, Support-Ritz7).
Add another Google Calendar node and change the Resource to "Event".
Select the "Update" option under Operation to change an entry that is already there.
In Calendar, choose From list → support@ritz7.com to target the correct calendar.
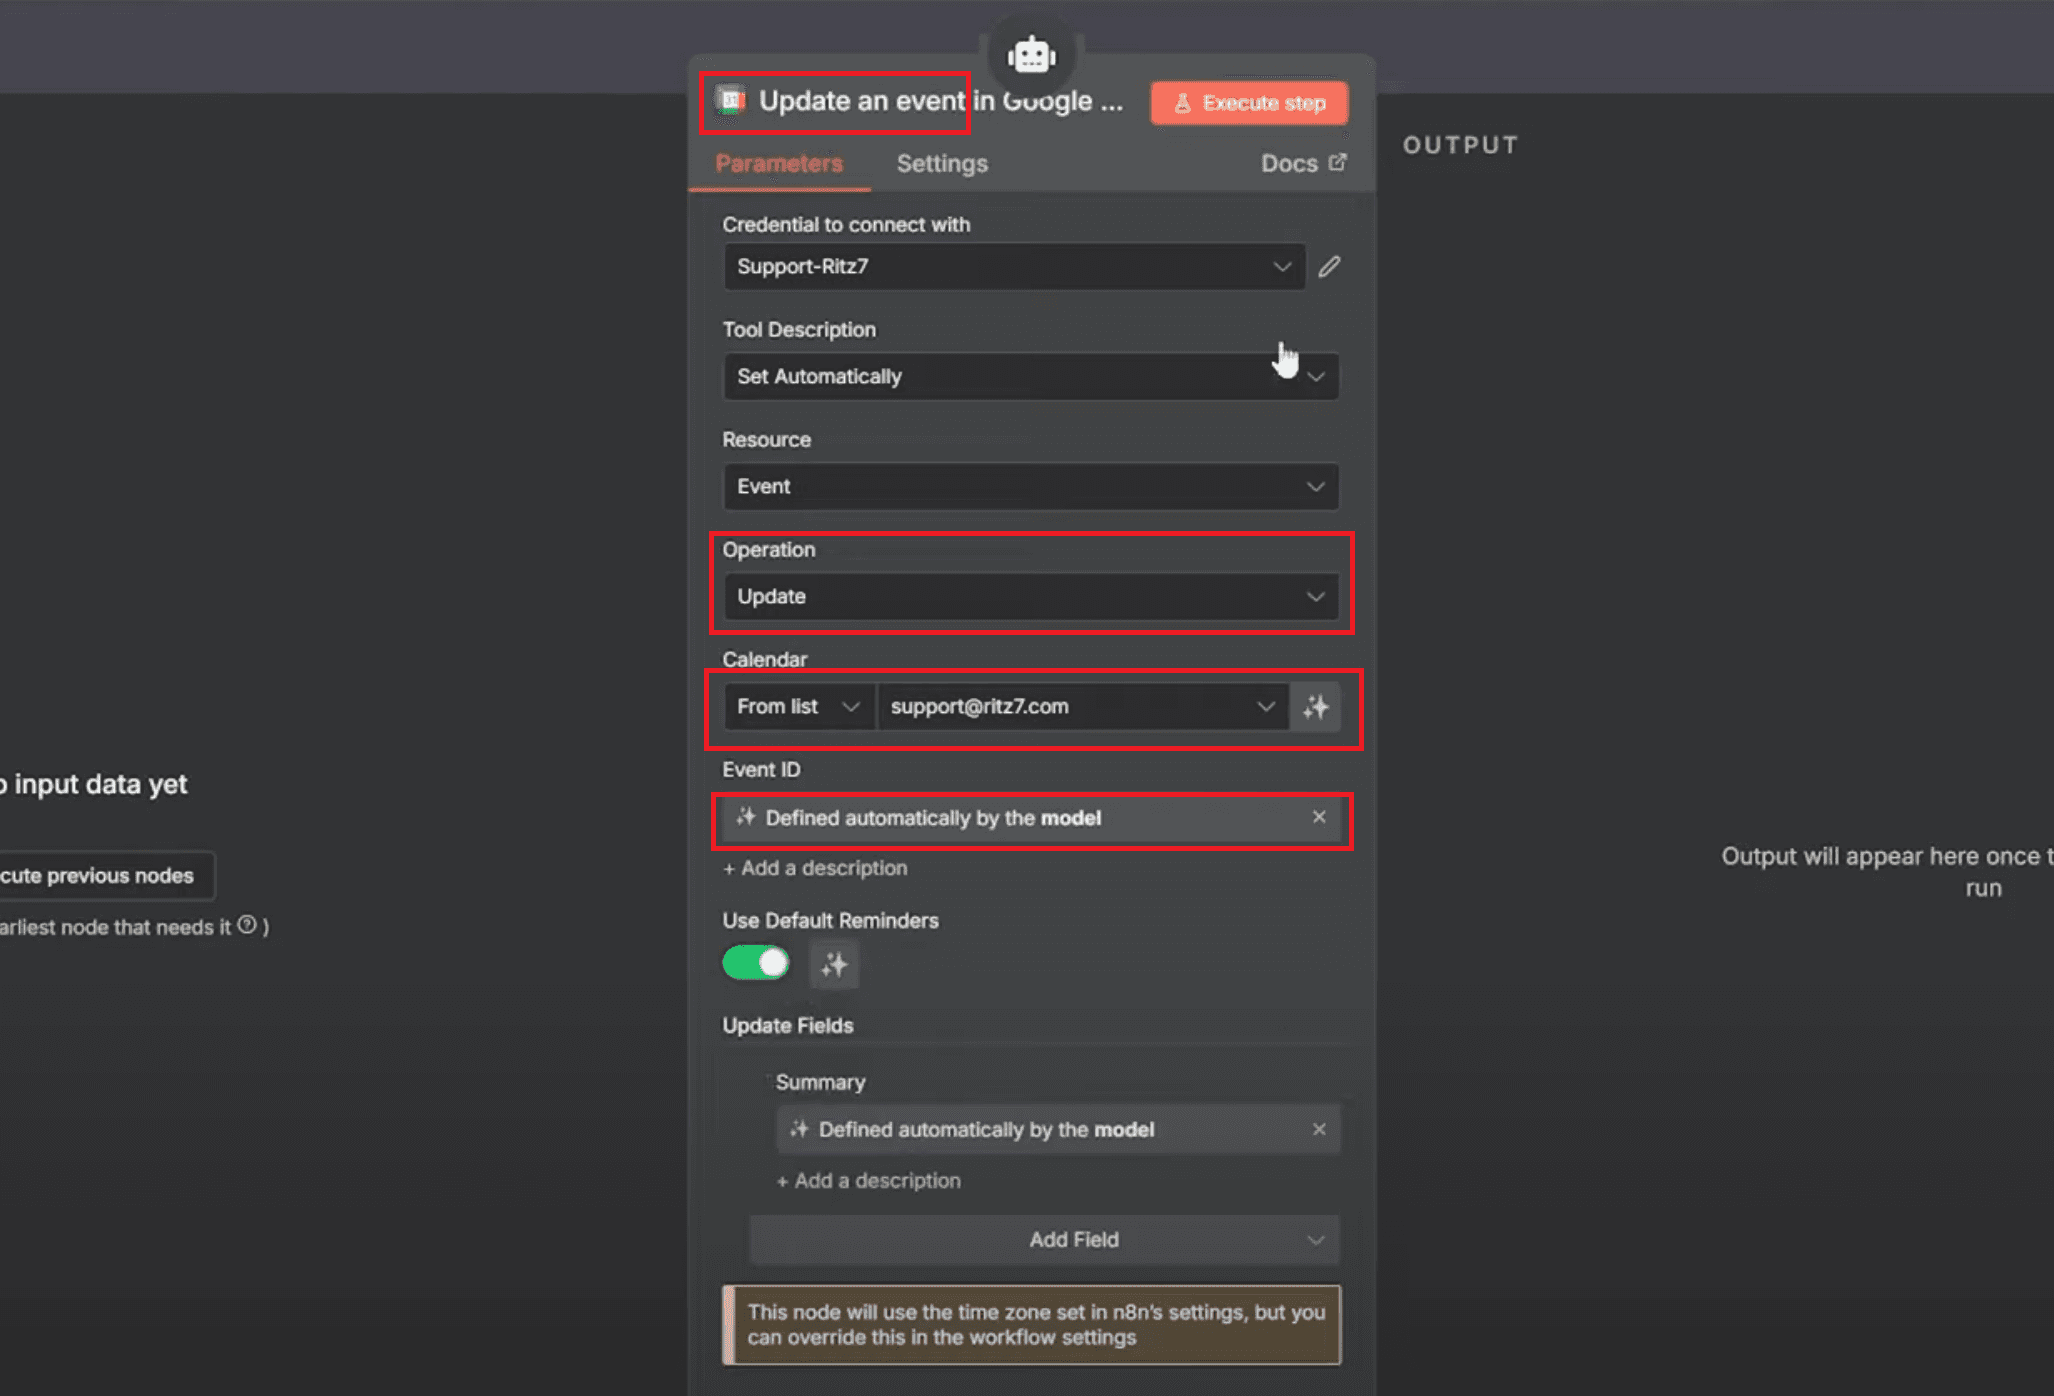
Set Event ID, Start, End, and Summary to "Defined automatically by the model". This lets the AI decide which event to change and what new details to apply from the user’s message.
Keep Use Default Reminders switched on so standard alerts still fire after the update.
Save the workflow and send a message like "Move KPI Call to 3:30 pm." The bot should respond in Telegram with "KPI Call has been changed to 3:30–4:00 pm." The message of confirmation is very important. It makes sure the user knows exactly what has changed and eliminates any confusion. The procedure minimizes hazardous modifications and ensures reliability by making sure that an Event ID is always required.
Step 9: How to Delete Events in Google Calendar
It should be just as easy to delete events as it is to make them. The user can just input "Delete the KPI Call" to get rid of the meeting if it is canceled. The Google Calendar Delete node deletes the event for good. The AI agent needs the event ID before it can delete the event, just like it does for updates. This safety feature stops people from accidentally deleting events and makes sure that the user is in charge of which event is removed.
How to get around the node:
From the sidebar, add a Google Calendar node and change the Resource to Event.
Select the "Delete" option, which permanently deletes events.
Set the Event ID as "Defined automatically by the model".
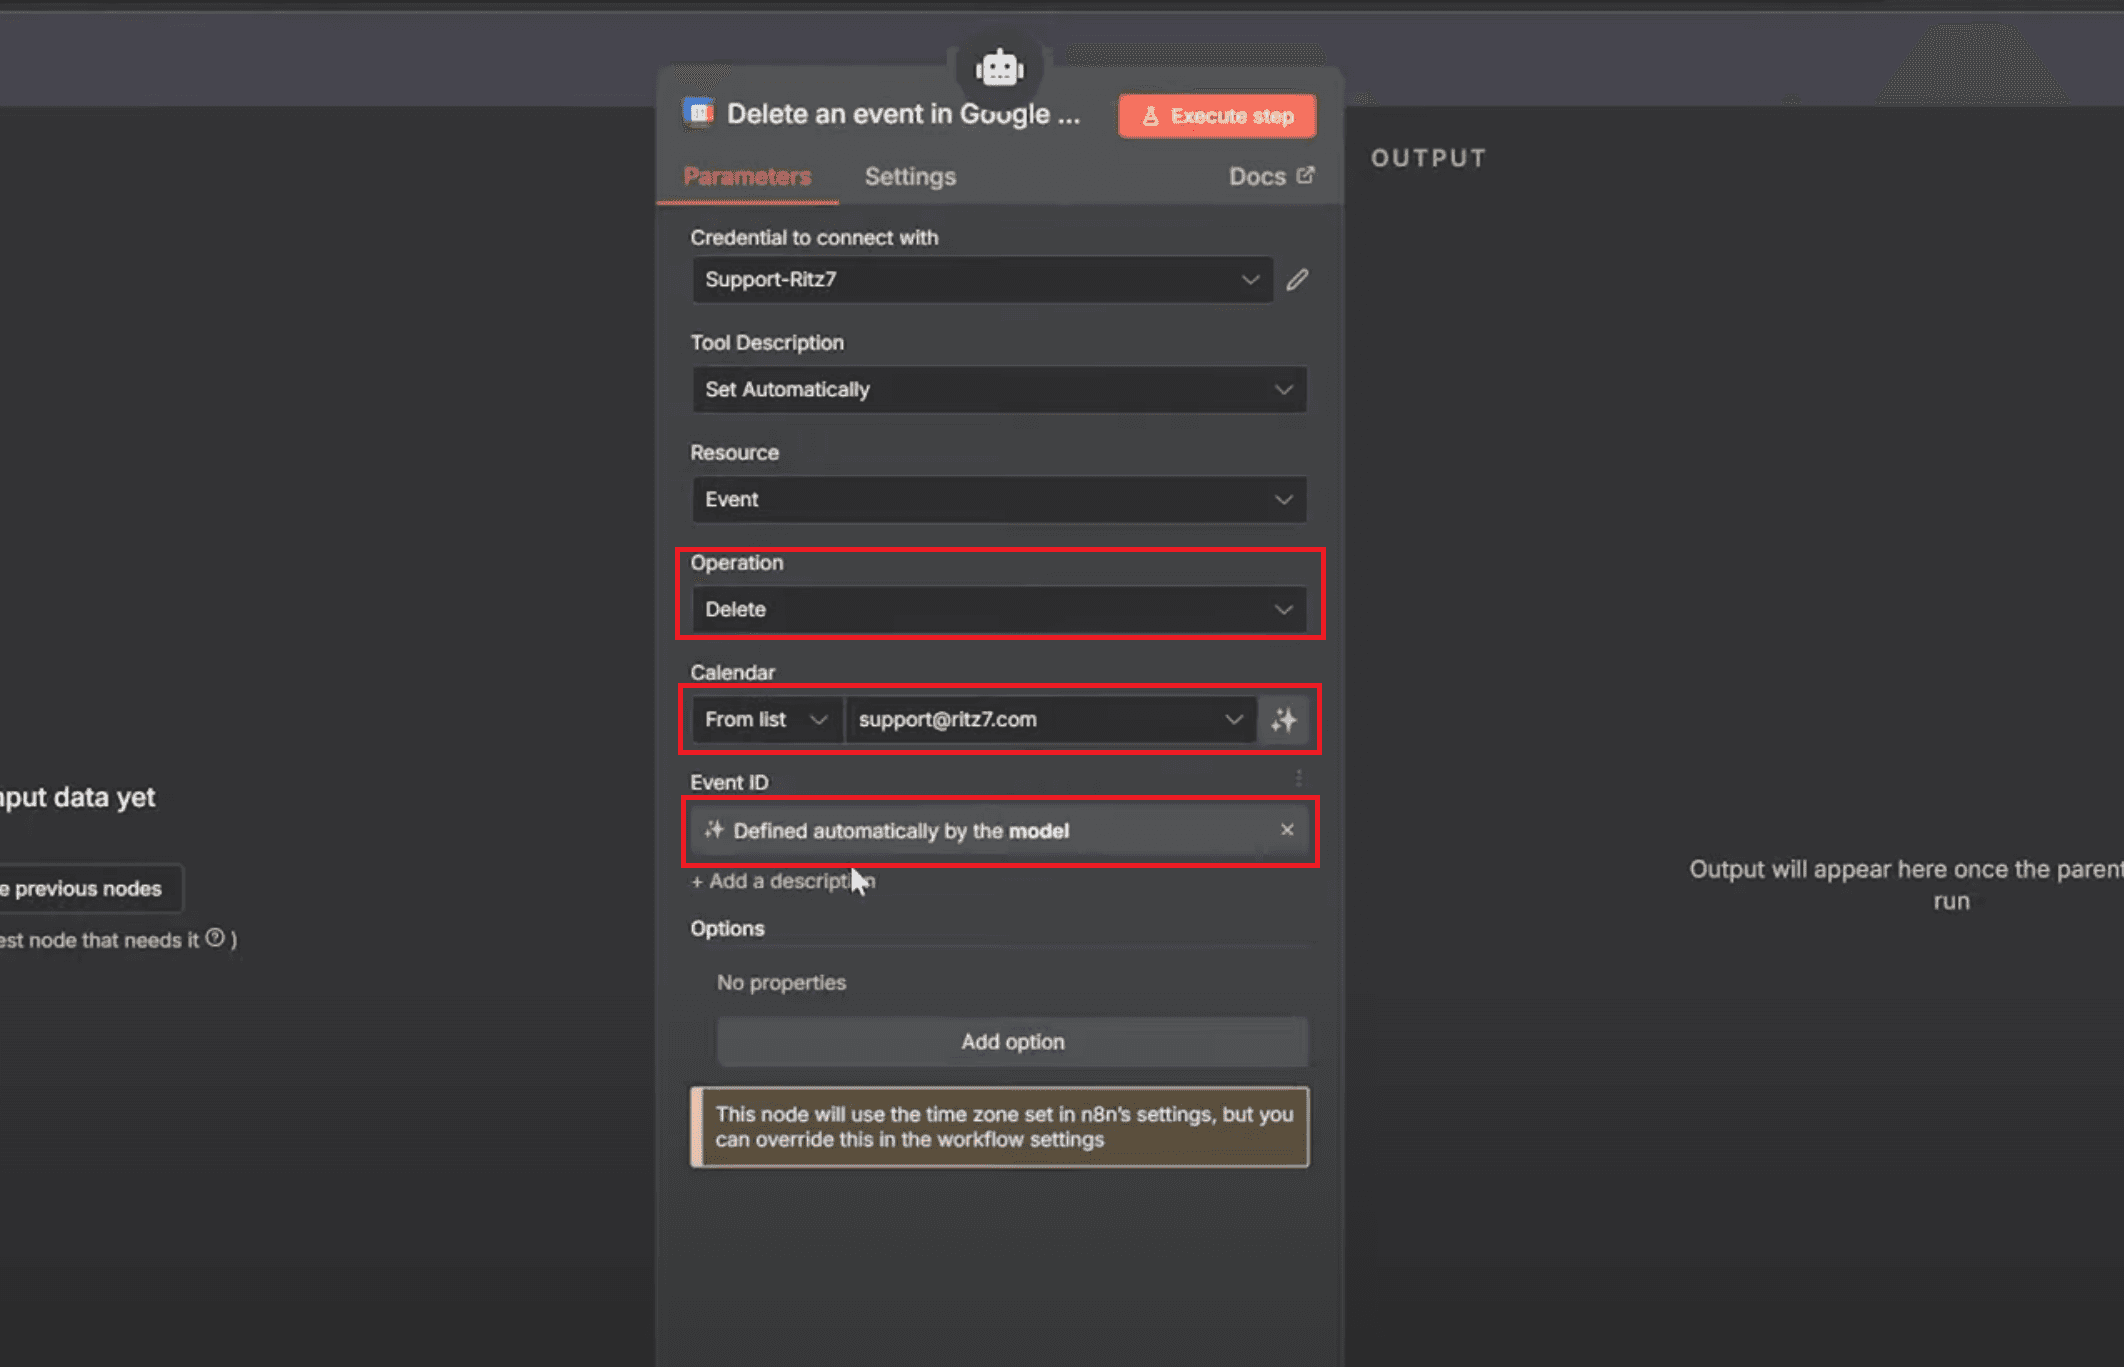
Save the workflow and try it out by sending a request like "Delete KPI Call." The bot should say in Telegram, "KPI Call has been deleted."
Check Google Calendar to be sure the event is no longer there.
The deletion process makes sure that nothing is left behind and keeps the calendar neat. The quick confirmation message makes you feel sure that the job was done well. The AI agent asks for clarification instead of asking for the ID. This keeps the calendar safe and avoids blunders.
Step 10: Integrate Gmail in n8n
(Connect Gmail Tool for Email Validation)
Before sending out calendar invites, it’s important to ensure that all participants' email addresses are correct. The Gmail Tool makes this easier by connecting directly with Gmail to retrieve and verify email data using the Gmail API. This allows the AI Agent to confirm valid addresses or identify errors before an event is scheduled. It helps prevent missed invites and ensures smooth communication for every meeting.
How to Get the Node Ready:
Click the “+” icon under the AI Agent’s Tool section and add a Gmail Tool node.
In the right sidebar, search for Gmail Tool and select it from the list.
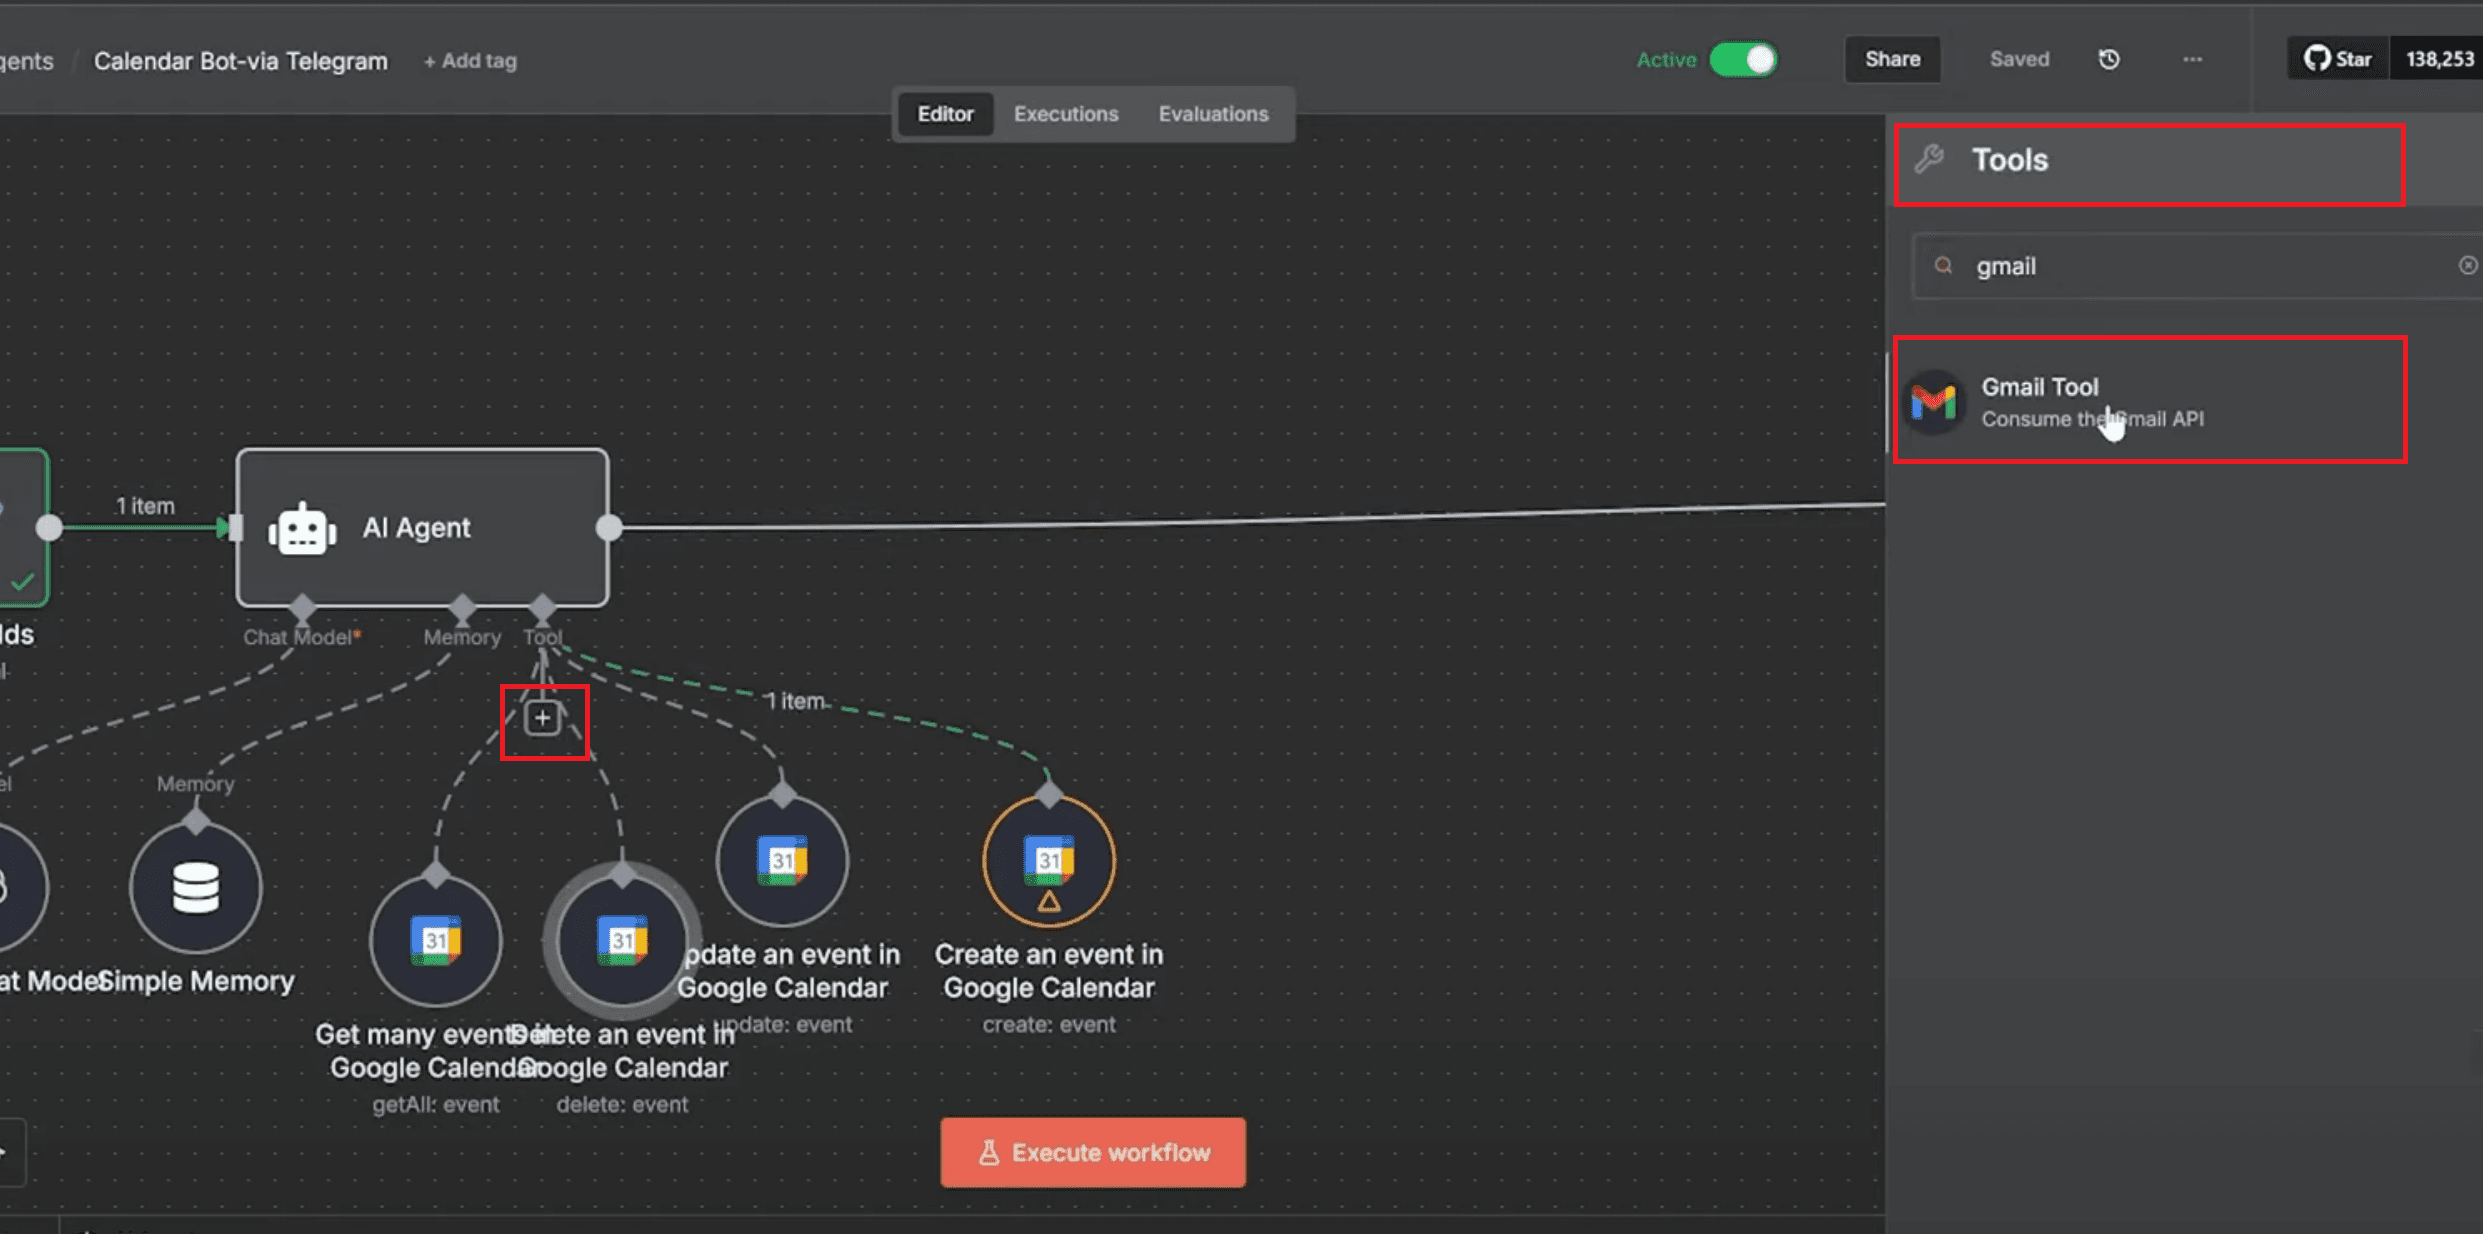
Set Resource to Message so the tool can access both incoming and outgoing email data.
Under Operation, choose Get Many — this allows the AI to fetch multiple emails at once for validation or tracking.
Enable Return All and Simplify so the AI retrieves a clean, easy-to-read list of emails without extra formatting.
In the Filters section, set Sender to Defined automatically by the model. This lets the AI dynamically check participant emails mentioned in the user’s request.
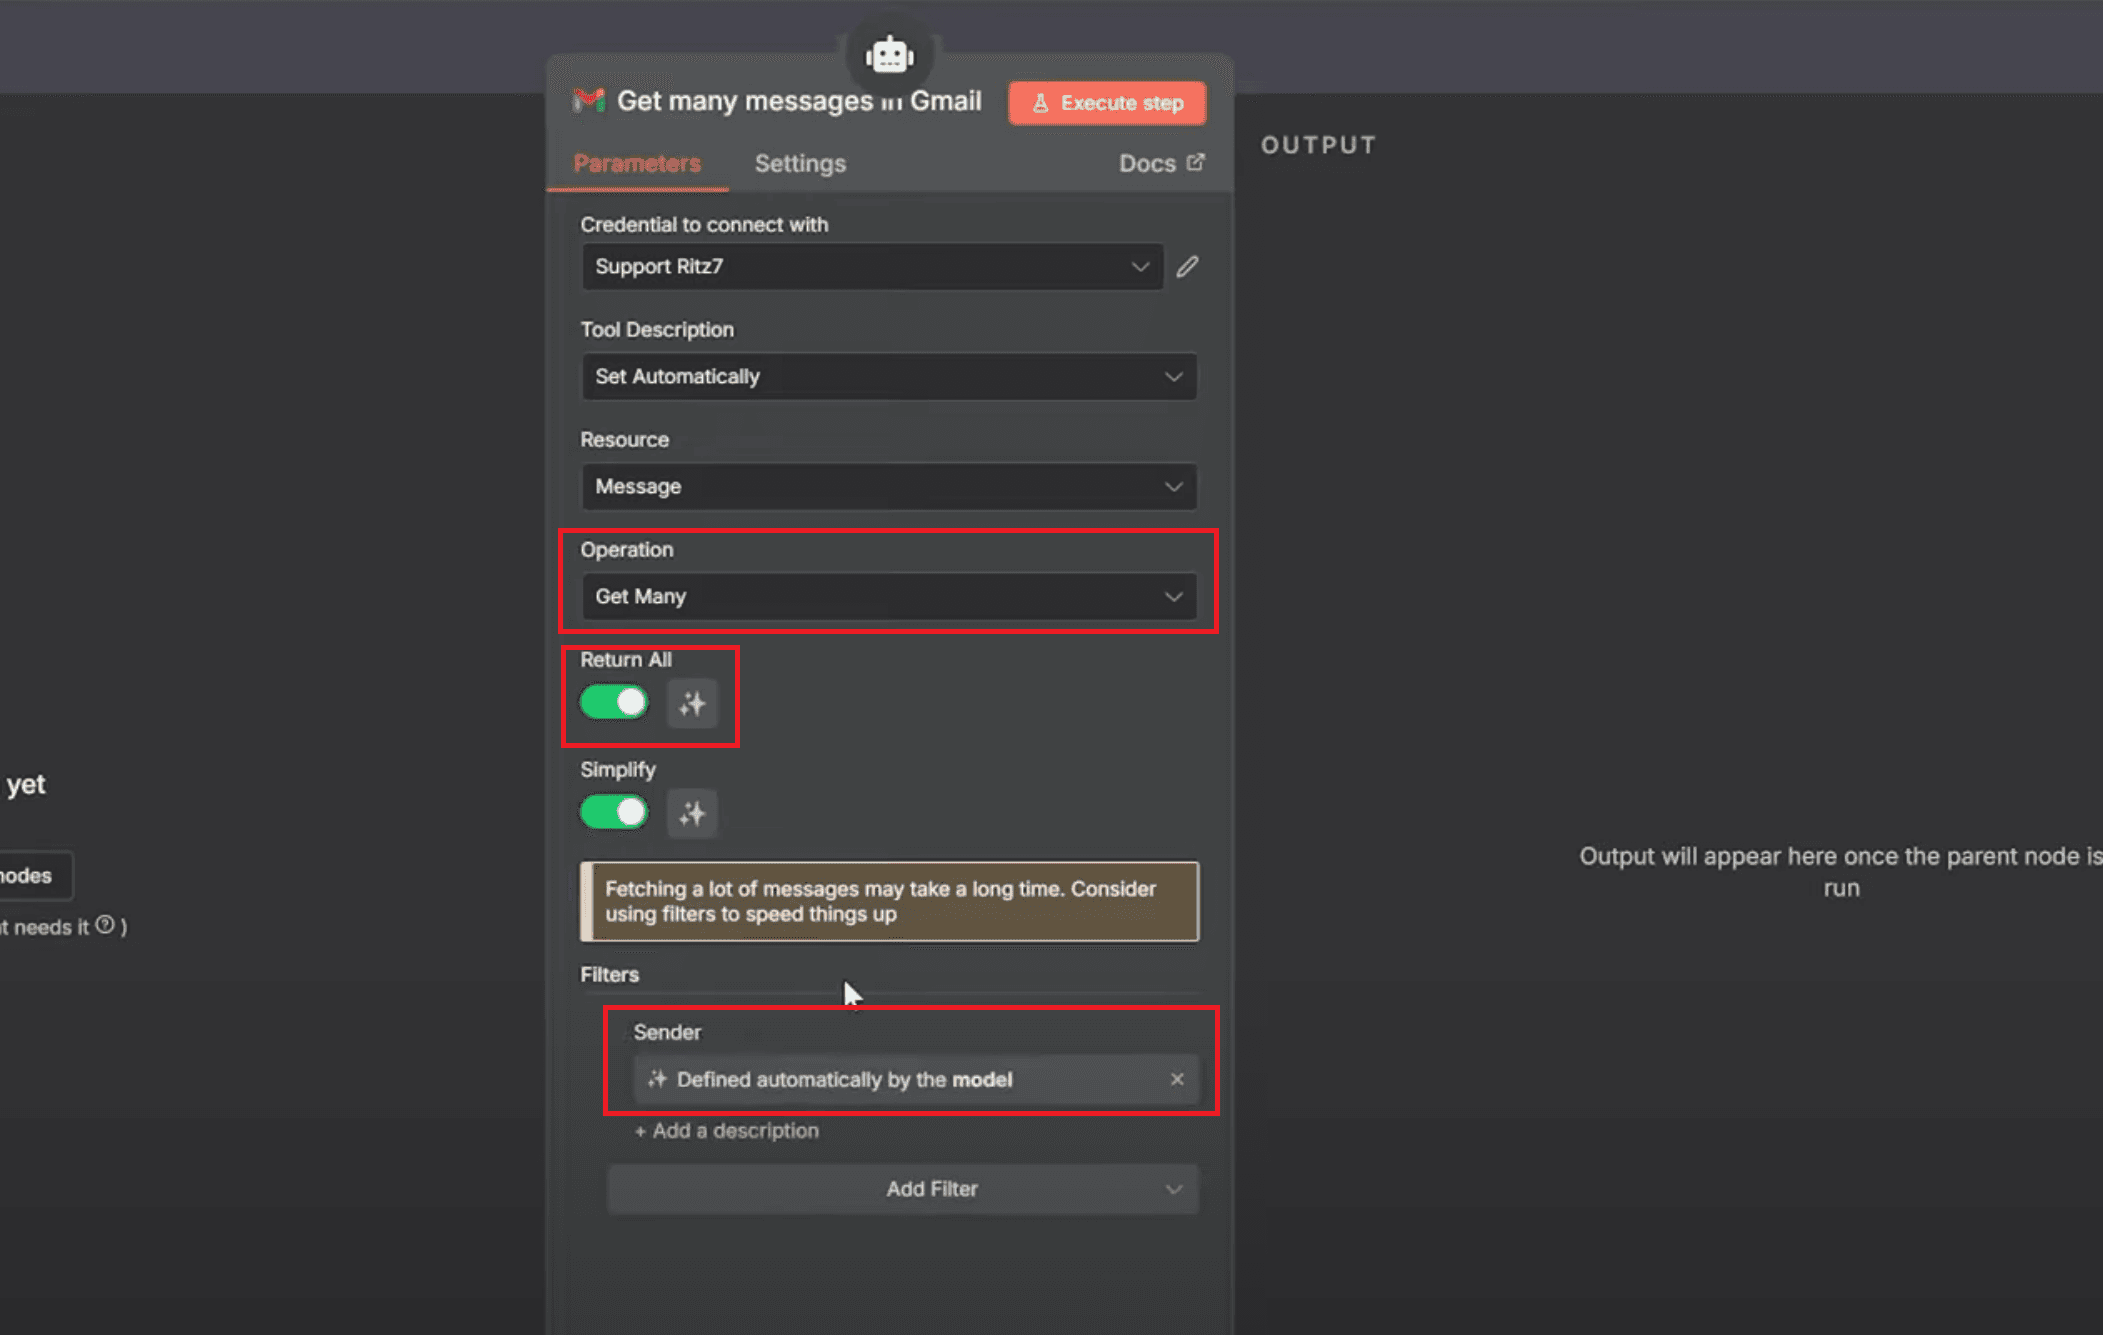
After everything is set up, the AI Agent verifies the emails of all the participants using Gmail before making or changing calendar events. If you say, "Set up a meeting with Raj at raj@example.com tomorrow at 4 pm," the bot checks to see if that email address exists in Gmail. The bot will create the event if the information is correct; otherwise, it will ask for confirmation. This procedure makes sure that all invitations go to the right and active addresses, stops emails from bouncing, and keeps event planning running smoothly and professionally. The whole process of checking attendees, setting up events, and mailing confirmations happens without any problems and on its own.
Step 11: Add a Switch Node to Detect Voice or Text Messages
At this stage, you’ll make your Telegram bot smart enough to know whether the user has sent a voice note or a text message. This helps the workflow automatically decide what to do next — whether to transcribe an audio note or process the text directly. Setting up a Switch Node creates two different paths inside the workflow, so your bot can handle both inputs naturally. It’s what makes the entire automation feel conversational, quick, and flexible.
For example, imagine a user sends a voice note saying, “Schedule a call with Sam tomorrow at 4 pm called Project Update.” The bot detects that the message is an audio file, routes it through the voice branch, and passes it to Gemini to be transcribed. If the user had simply typed the same sentence, the workflow would follow the text branch instead — both end up triggering the same calendar actions but through different routes.
Steps to Set Up the Node:
Click the “+” icon next to your Telegram Trigger node and search for Switch.
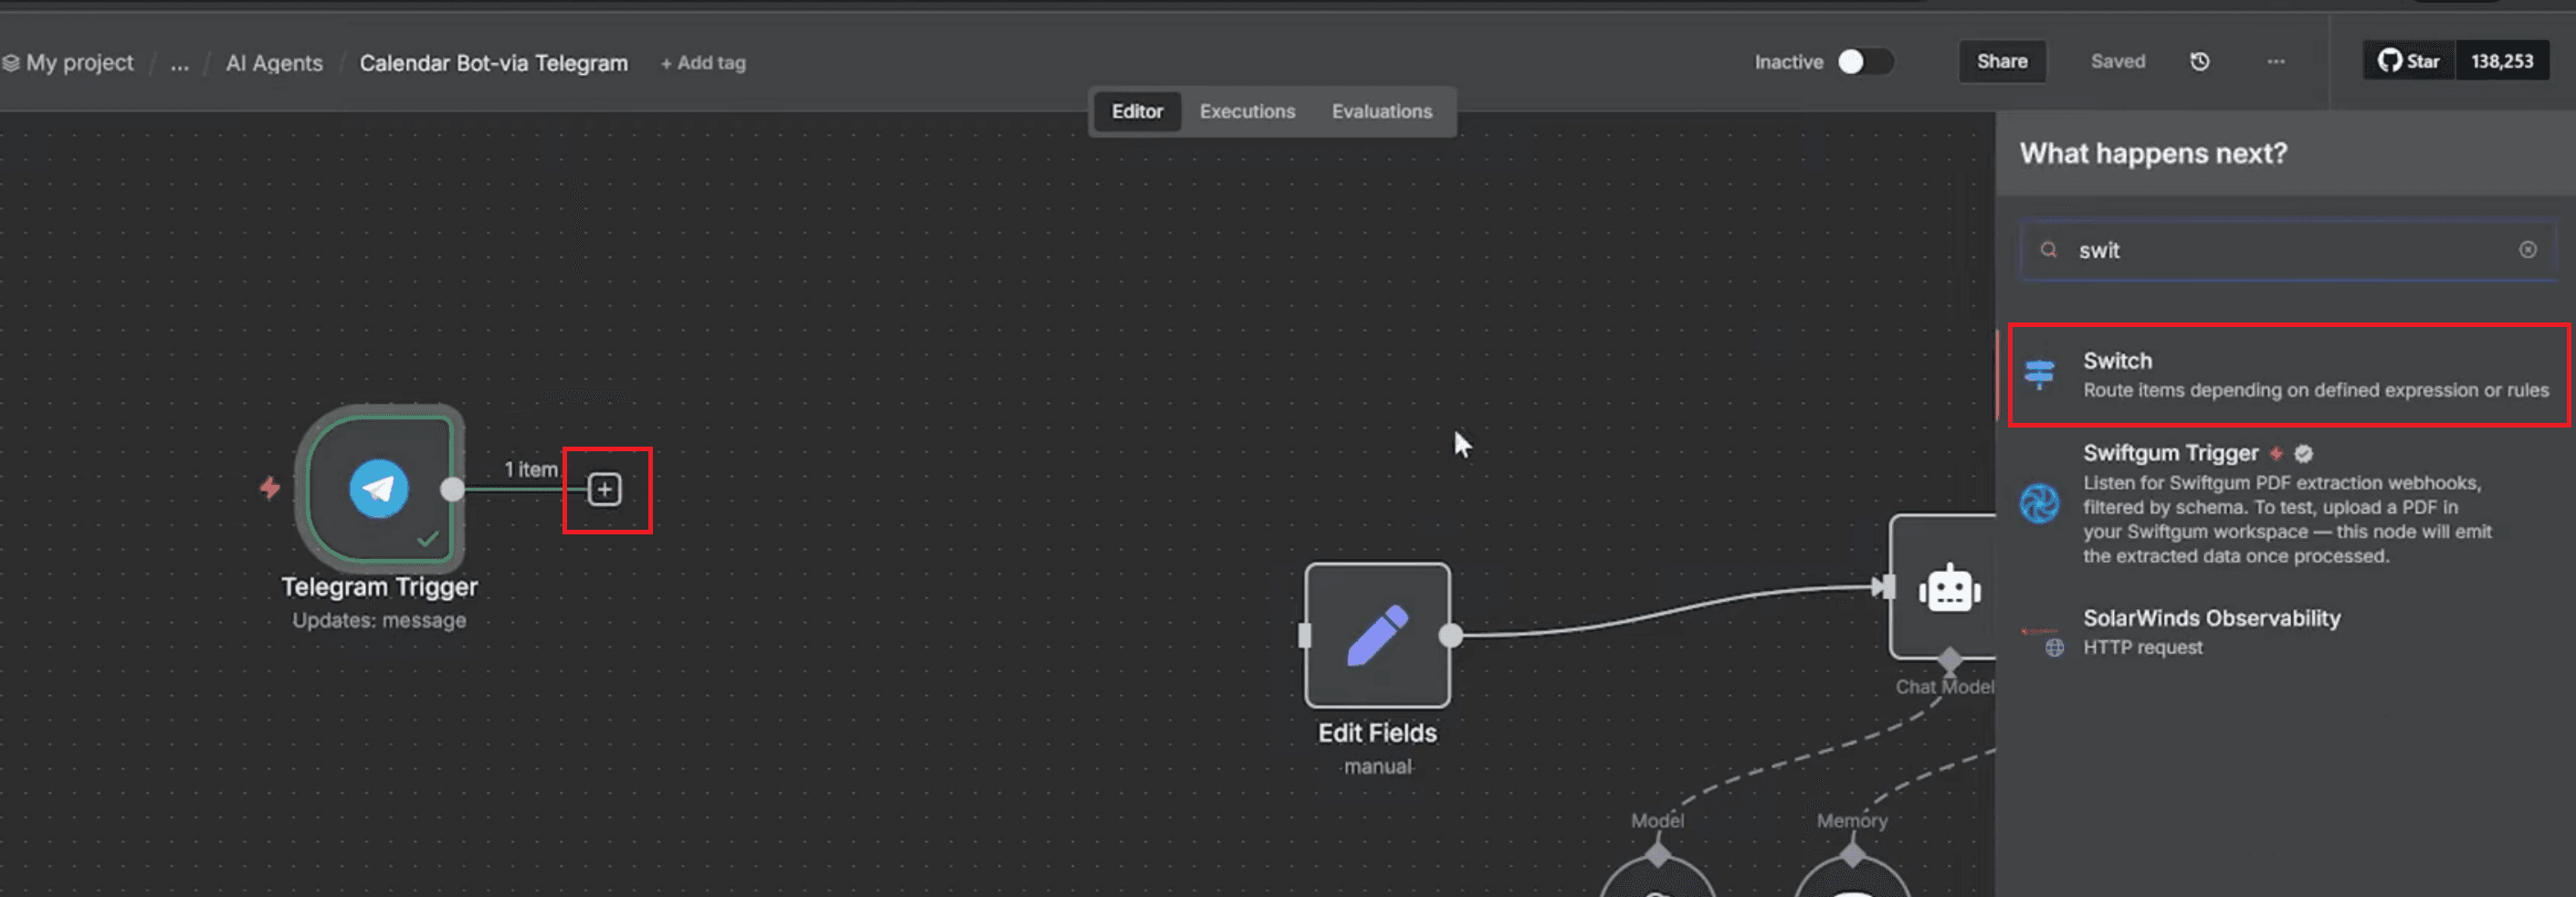
Select Switch (Route items depending on defined expression or rules) from the list.
In the Parameters tab, change the Mode to "Rules".
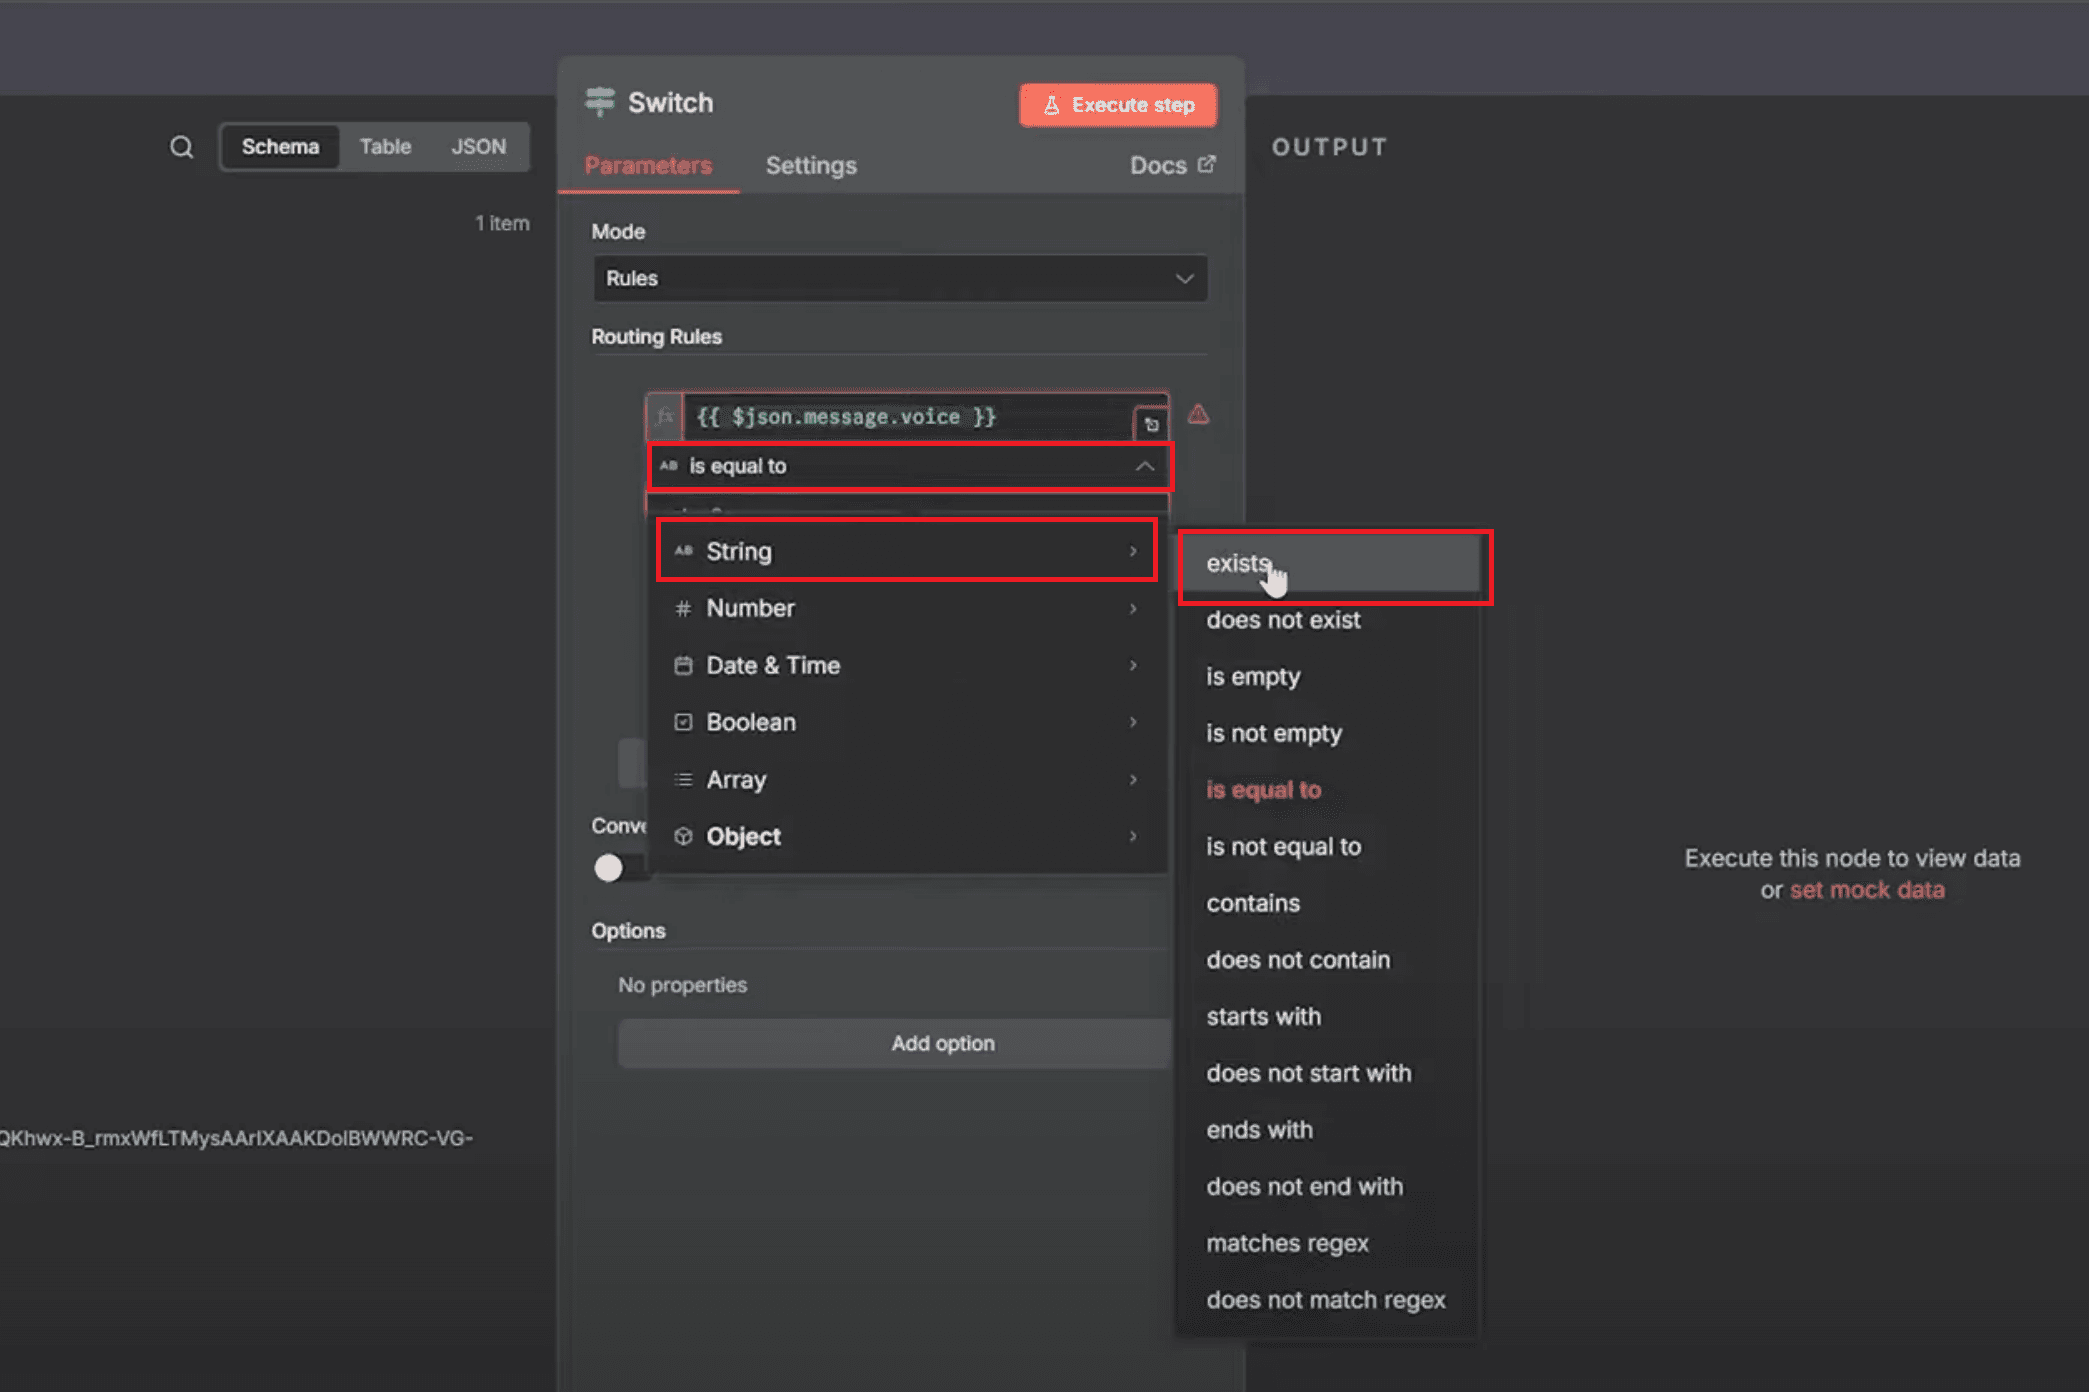
Under Routing Rules, drag the voice field from the Telegram Trigger input to Value 1 (as shown in the image).
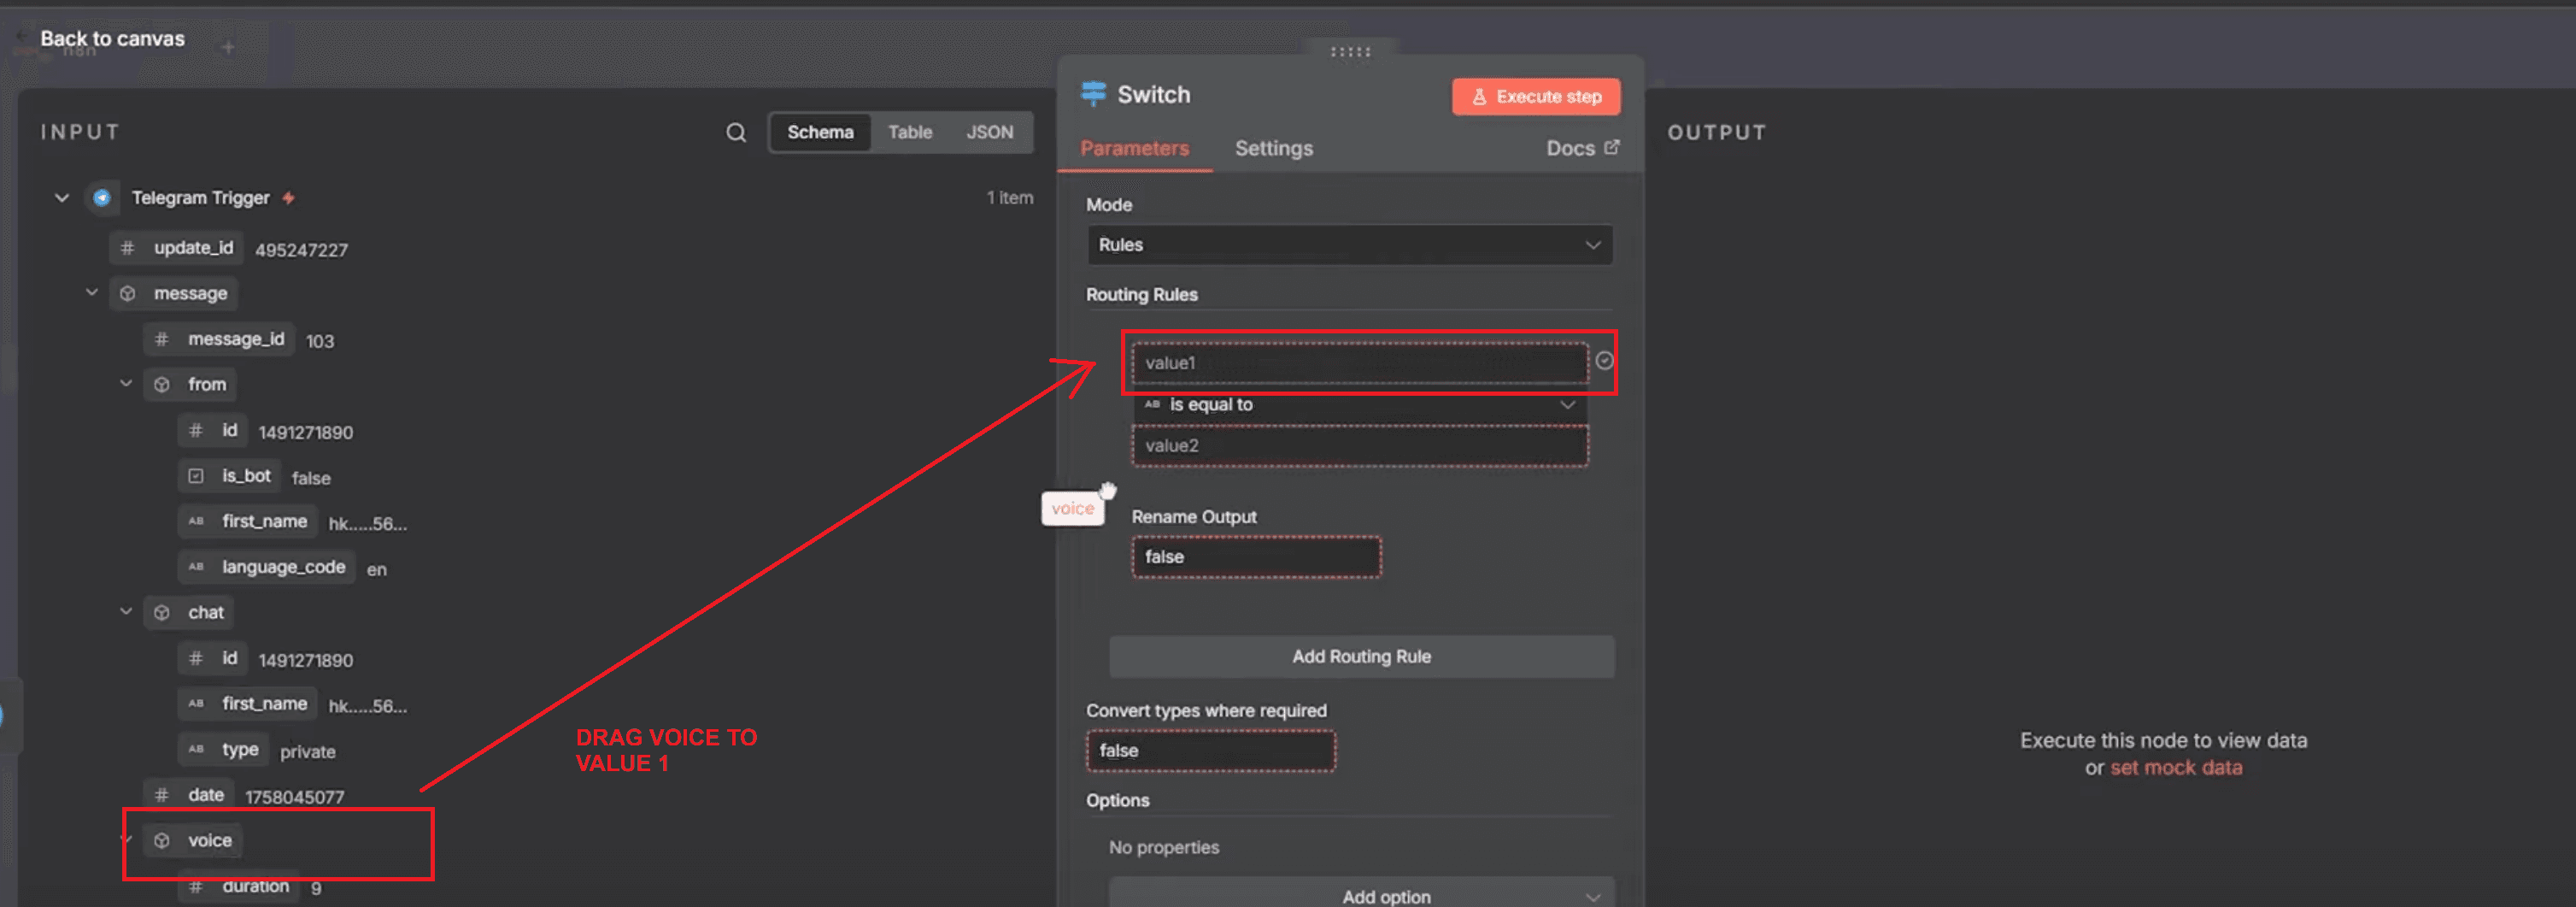
Set the condition type to String → exists to check if a voice message is present.
Turn on Rename Output and name it voice.
Click Add Routing Rule and add another rule for text messages.
This time, drag the chat field into Value 1, select String → exists, and rename the output as "text".
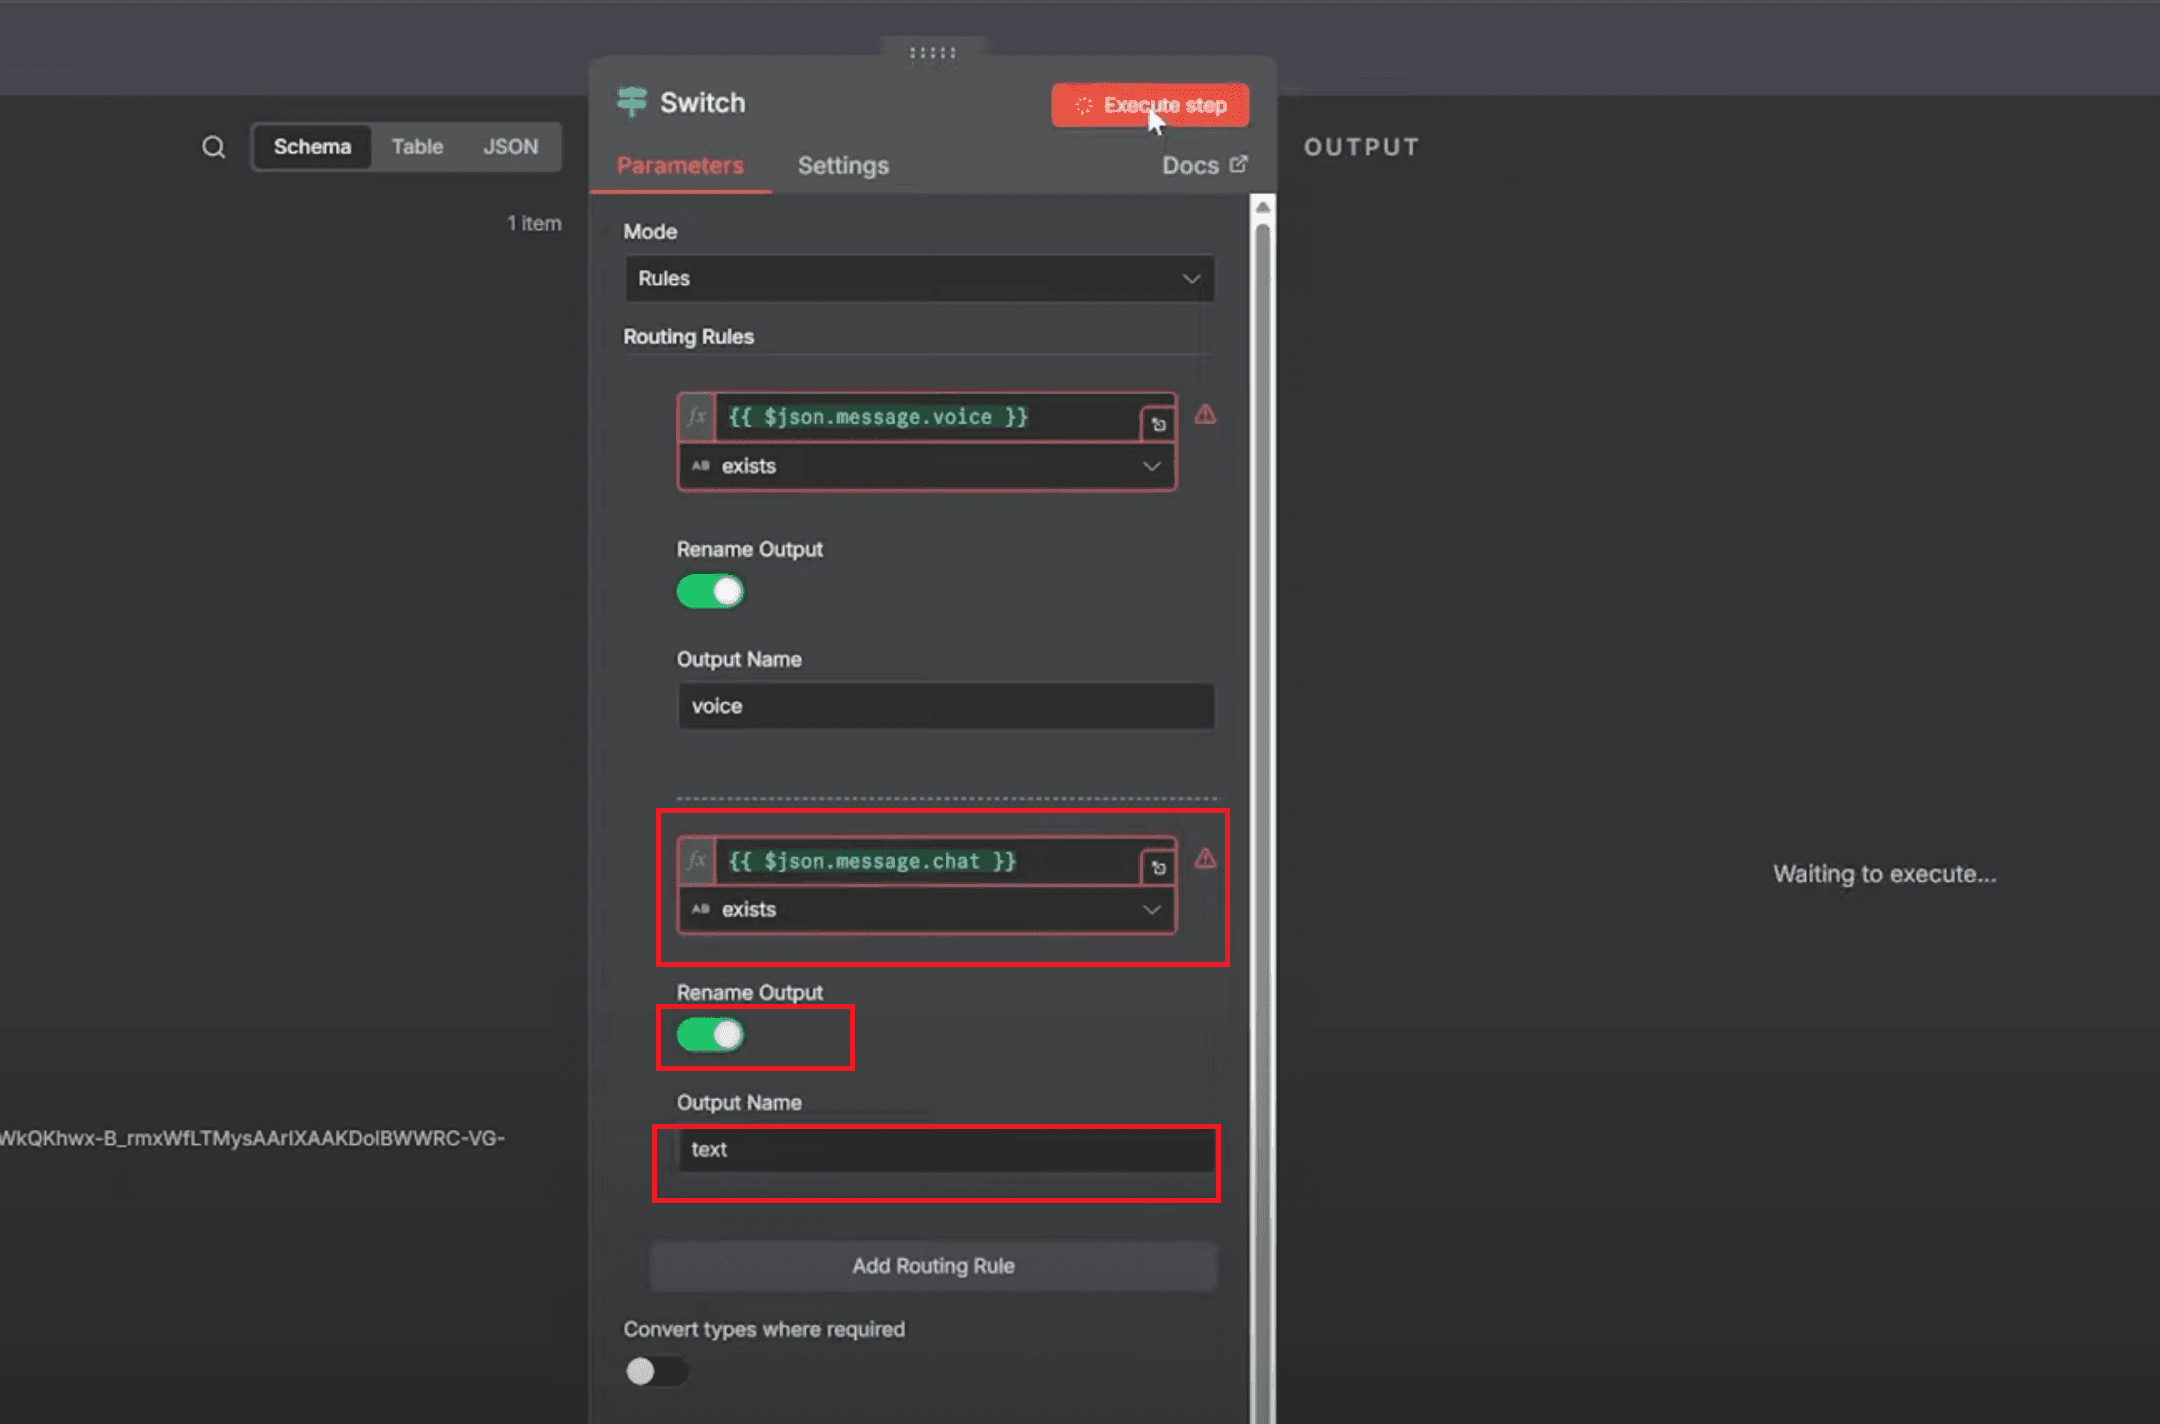
Turn on Convert types where required and click Execute Step to test the setup.
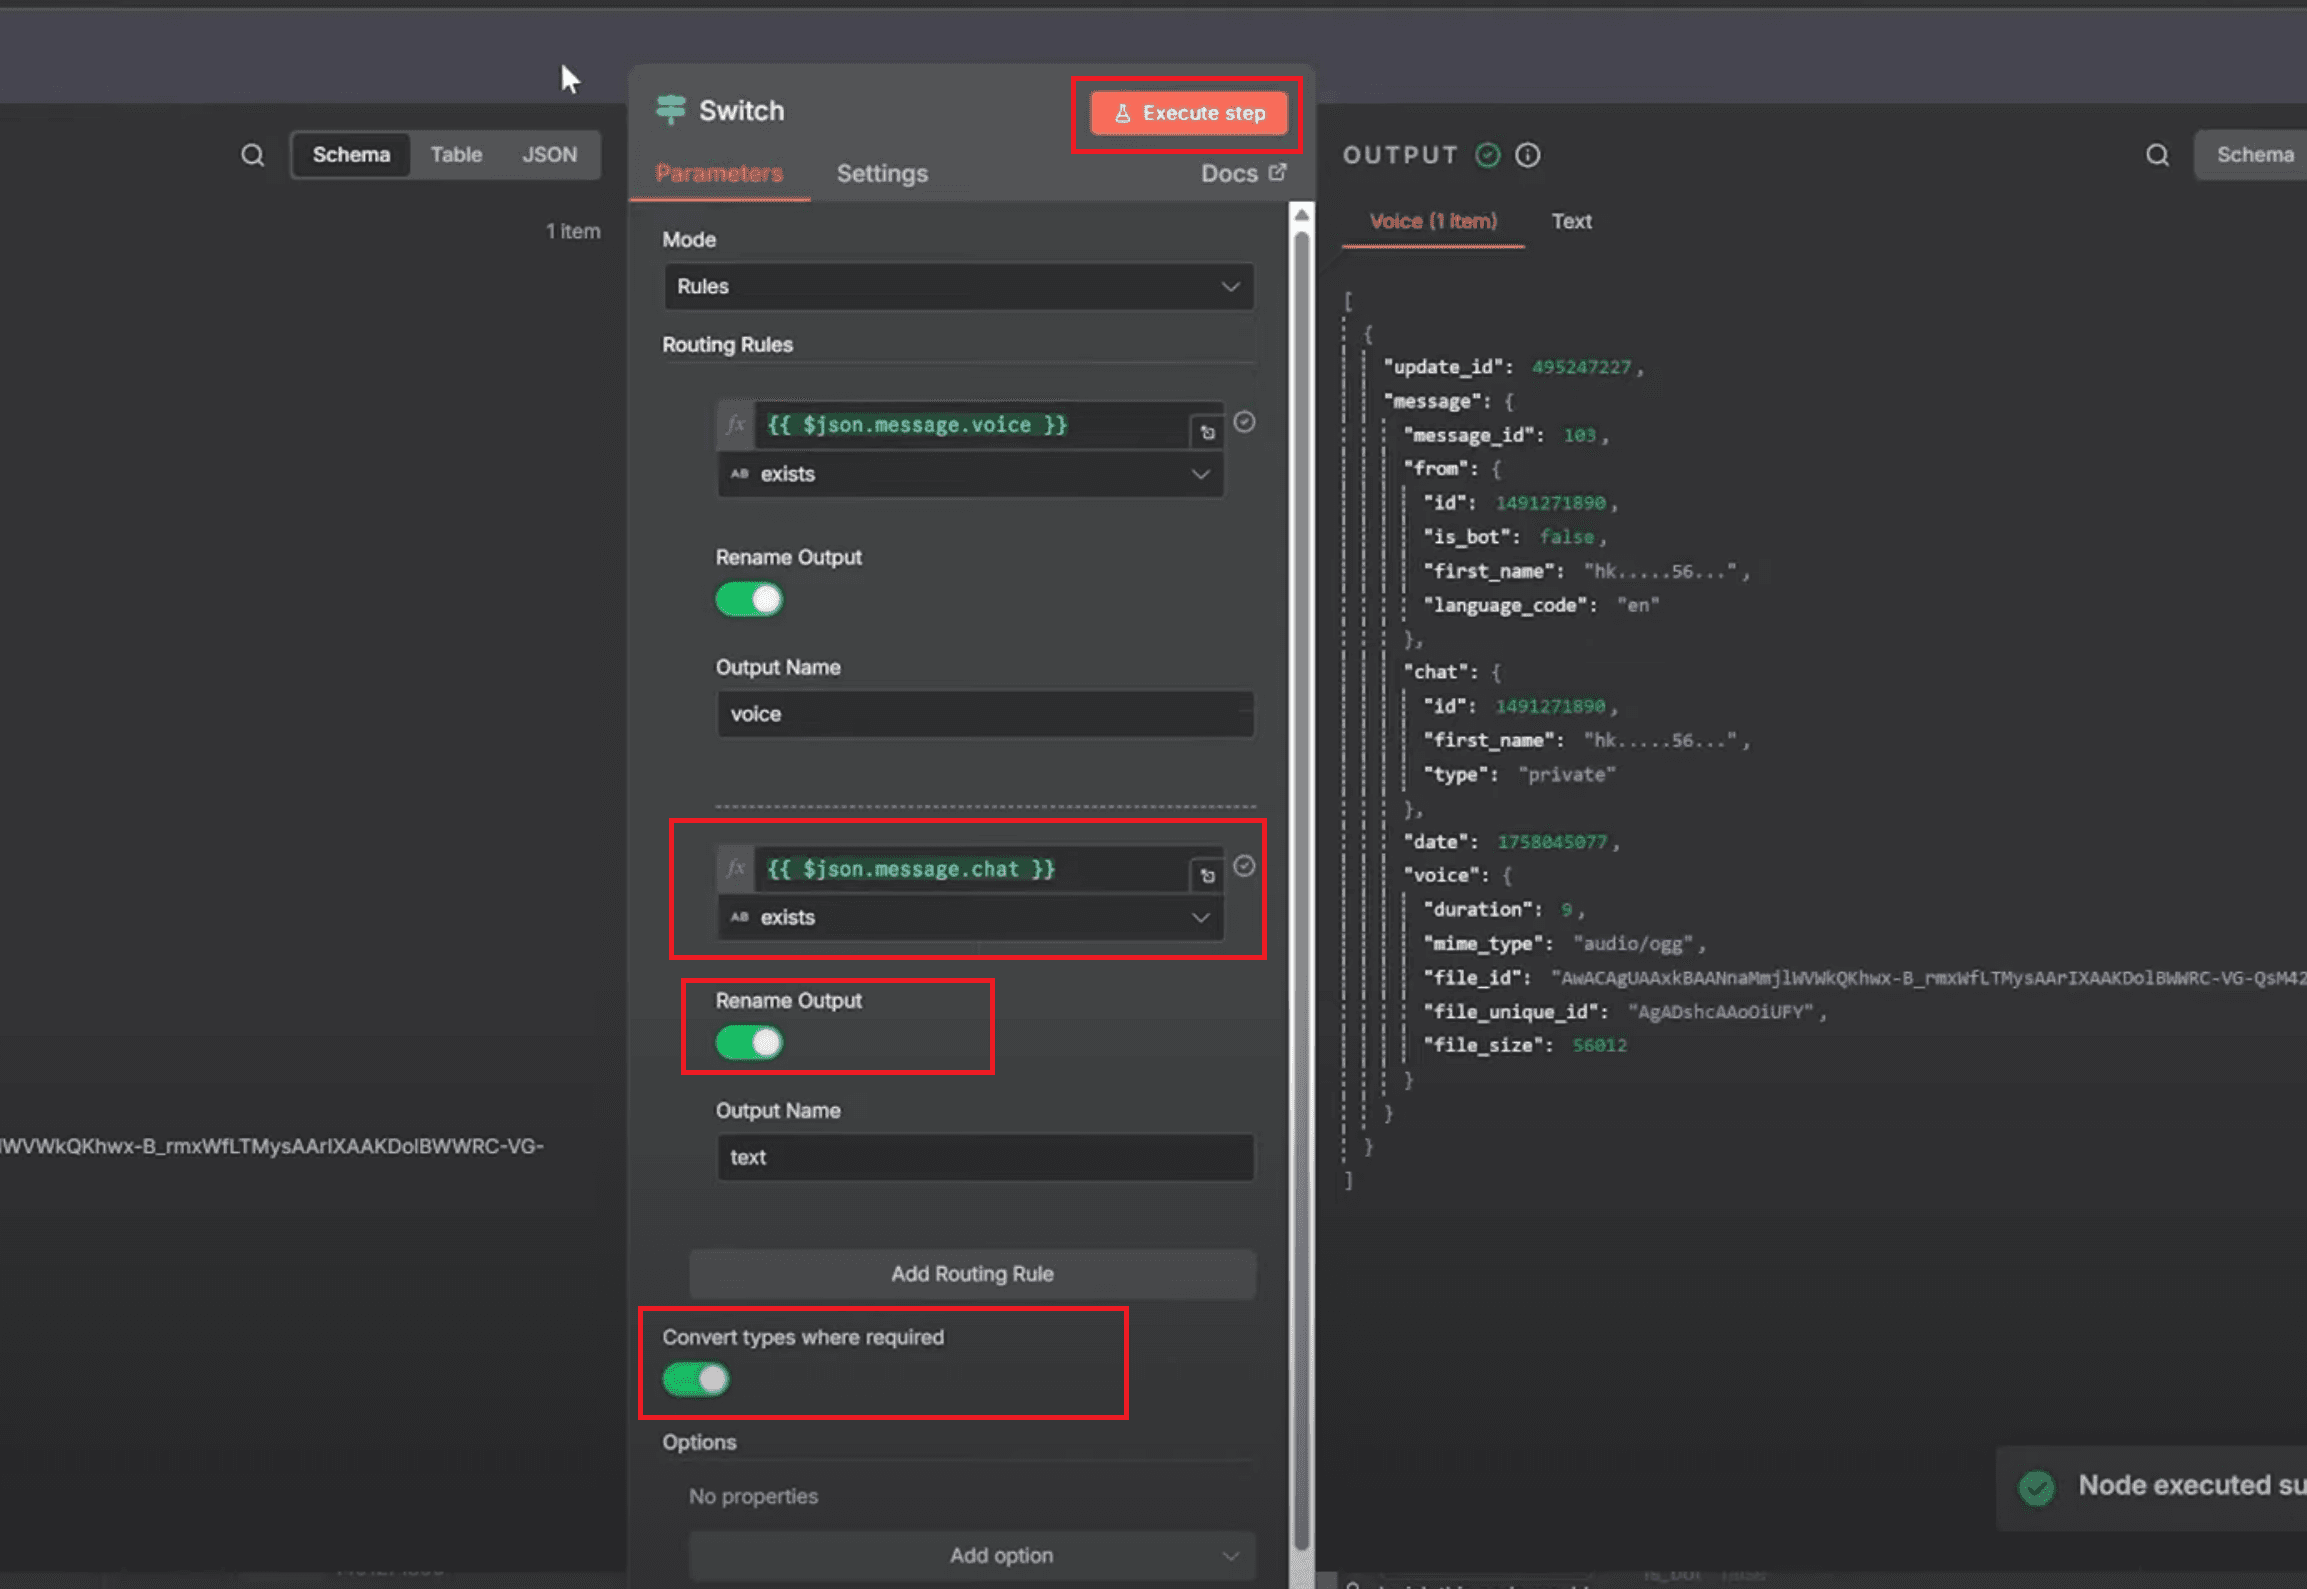
Once done, you’ll see two separate outputs — one for Voice and one for Text. This means your bot can now automatically route messages to the right path. The voice branch will handle audio input for transcription, while the text branch will directly send messages to the AI Agent or Calendar nodes.
Step 12: Get and Transcribe Voice Recordings
Now that the Switch Node can recognize voice messages, the next step is to fetch the actual audio file and turn it into text so your AI Agent can process it like any normal message. This step connects Telegram’s Get File action (to capture the recording) with Google Gemini’s Transcribe Recording action (to convert it into text).
For example, when a user sends a voice note saying, “Schedule a call with Sam tomorrow at 4 pm called Project Update,” the Telegram node captures the file. Gemini then transcribes it into readable text, which is passed to the AI Agent for the same workflow that handles text inputs. The experience feels completely seamless — users can either type or speak, and the bot understands both perfectly.
Steps to Get the Voice File:
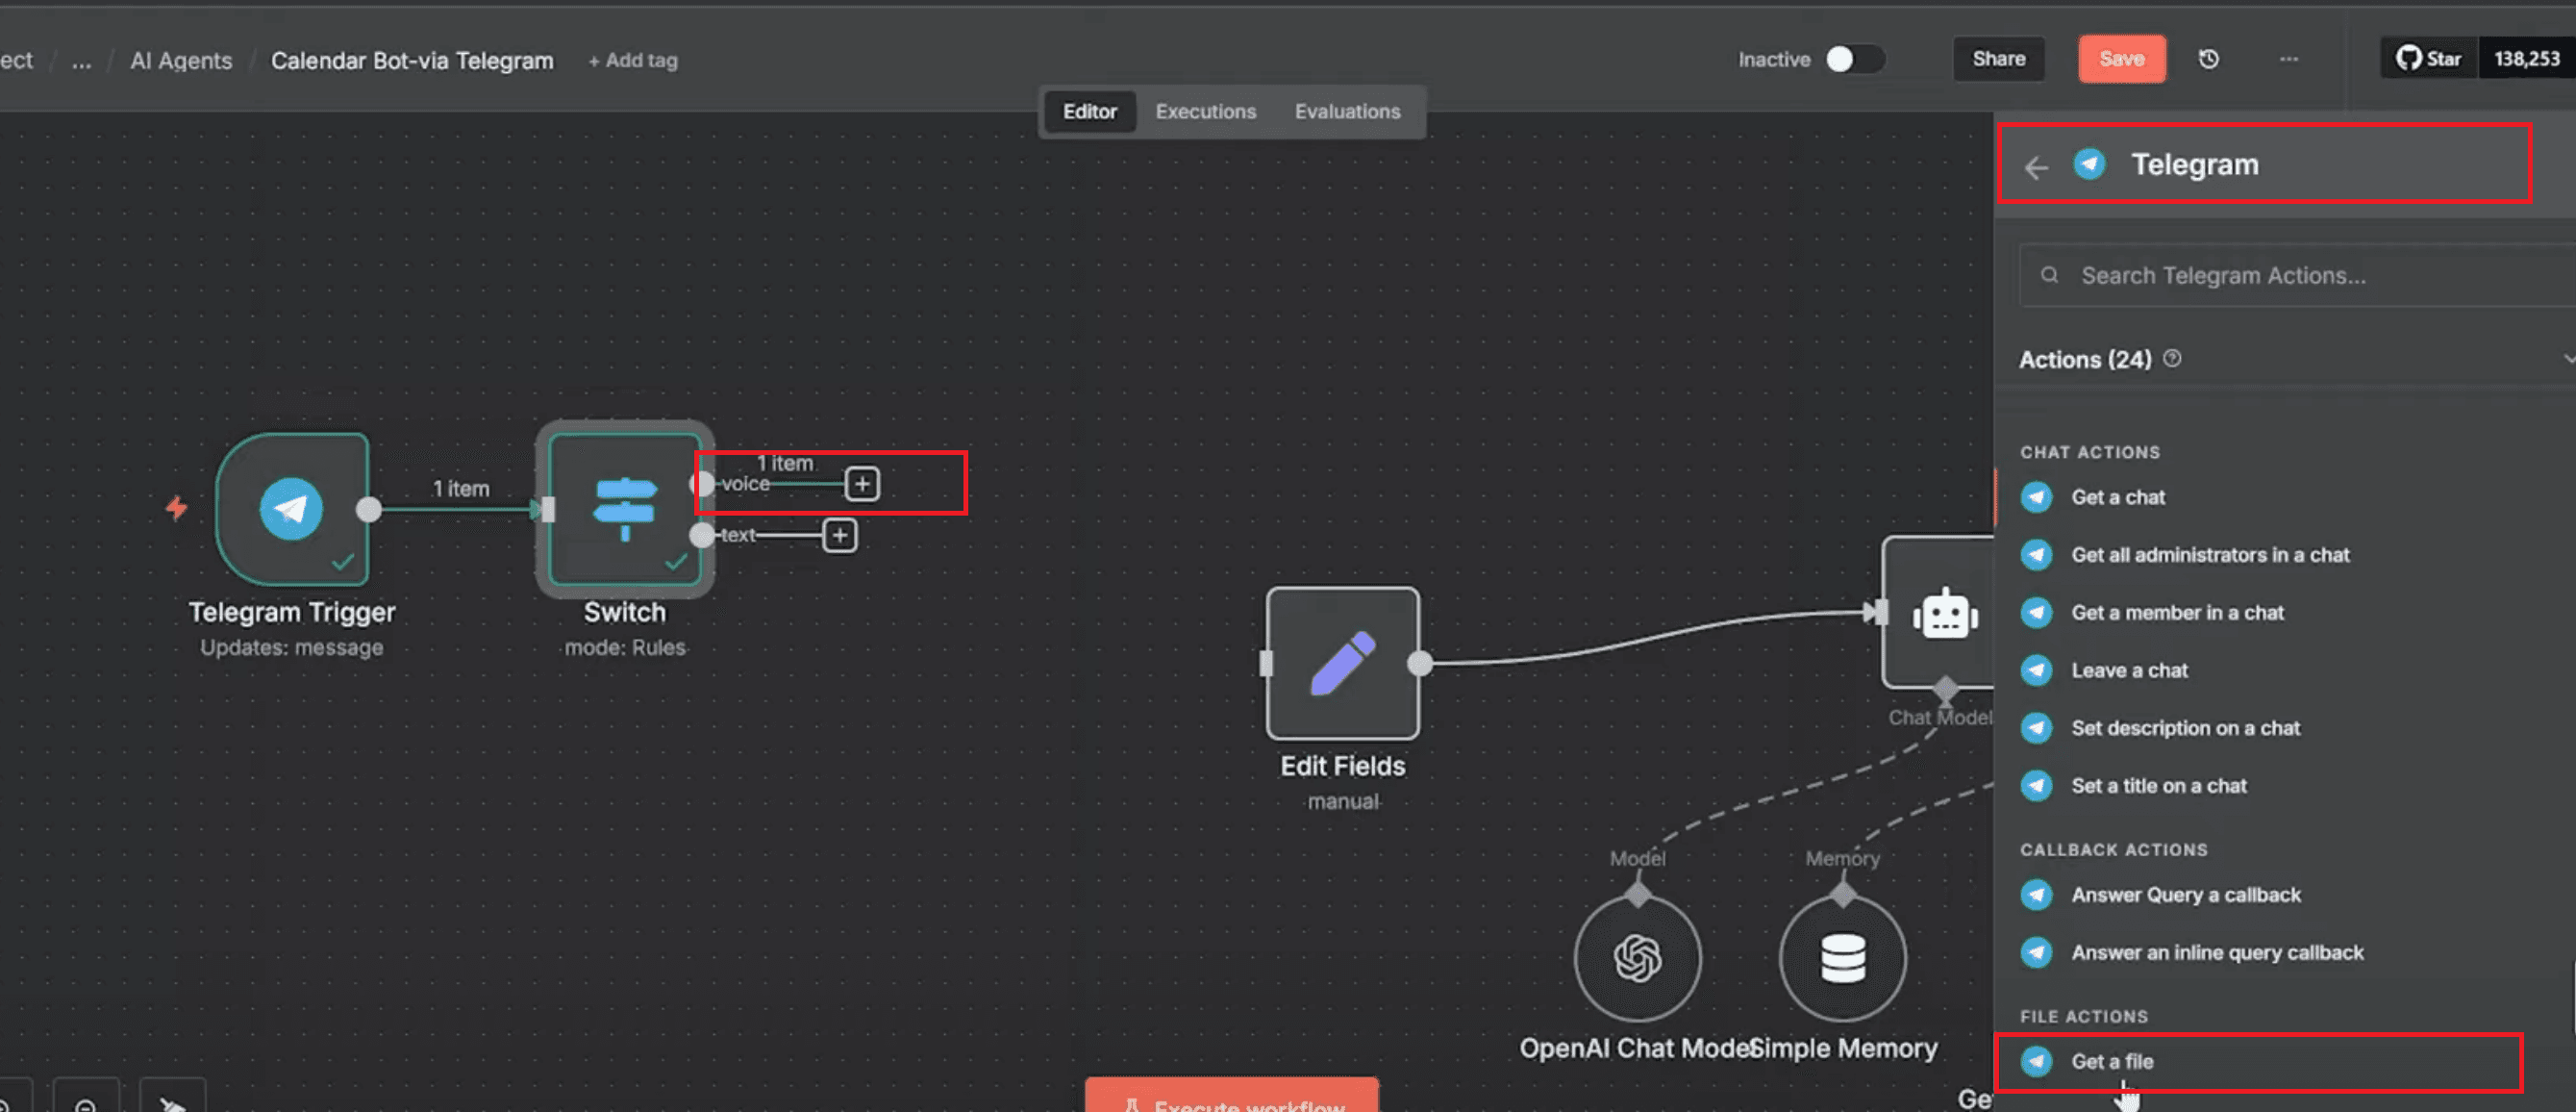
From the voice output of the Switch Node, click the “+” icon and search for Telegram.
From the list, select Get a file under File Actions.
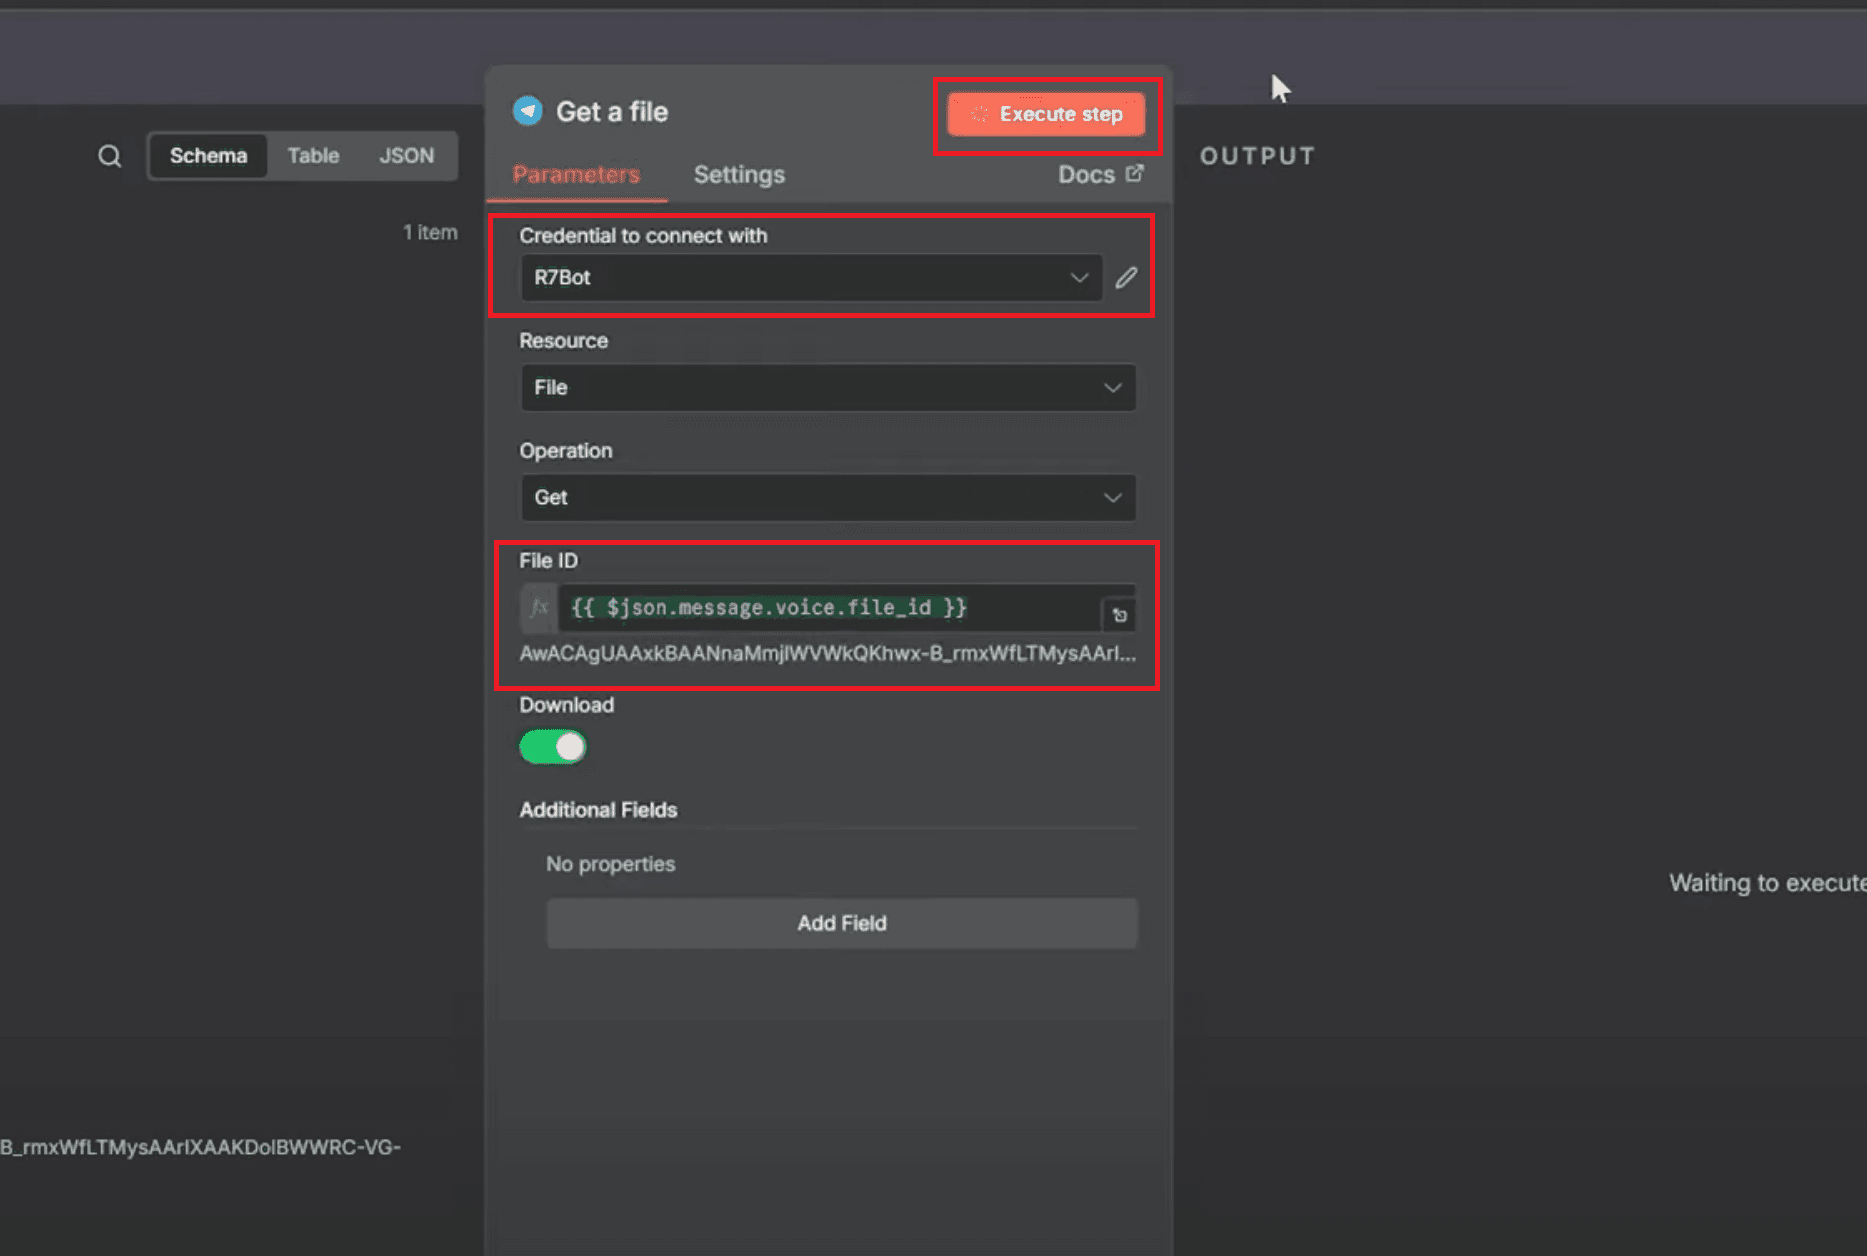
In the right panel, choose the Telegram bot credentials (for example, R7Bot).
Set Resource to File and Operation to Get.
In the File ID field, drag the field “message.voice.file_id” (as shown in the image).
Turn on Download and click Execute Step. You’ll now see the file data appear on the output side, confirming that the bot successfully fetched the audio message.
Steps to Transcribe the Voice Recording:
From the Get a file node, click the “+” icon and search for Google Gemini.
From the Audio Actions list, select Transcribe a Recording.
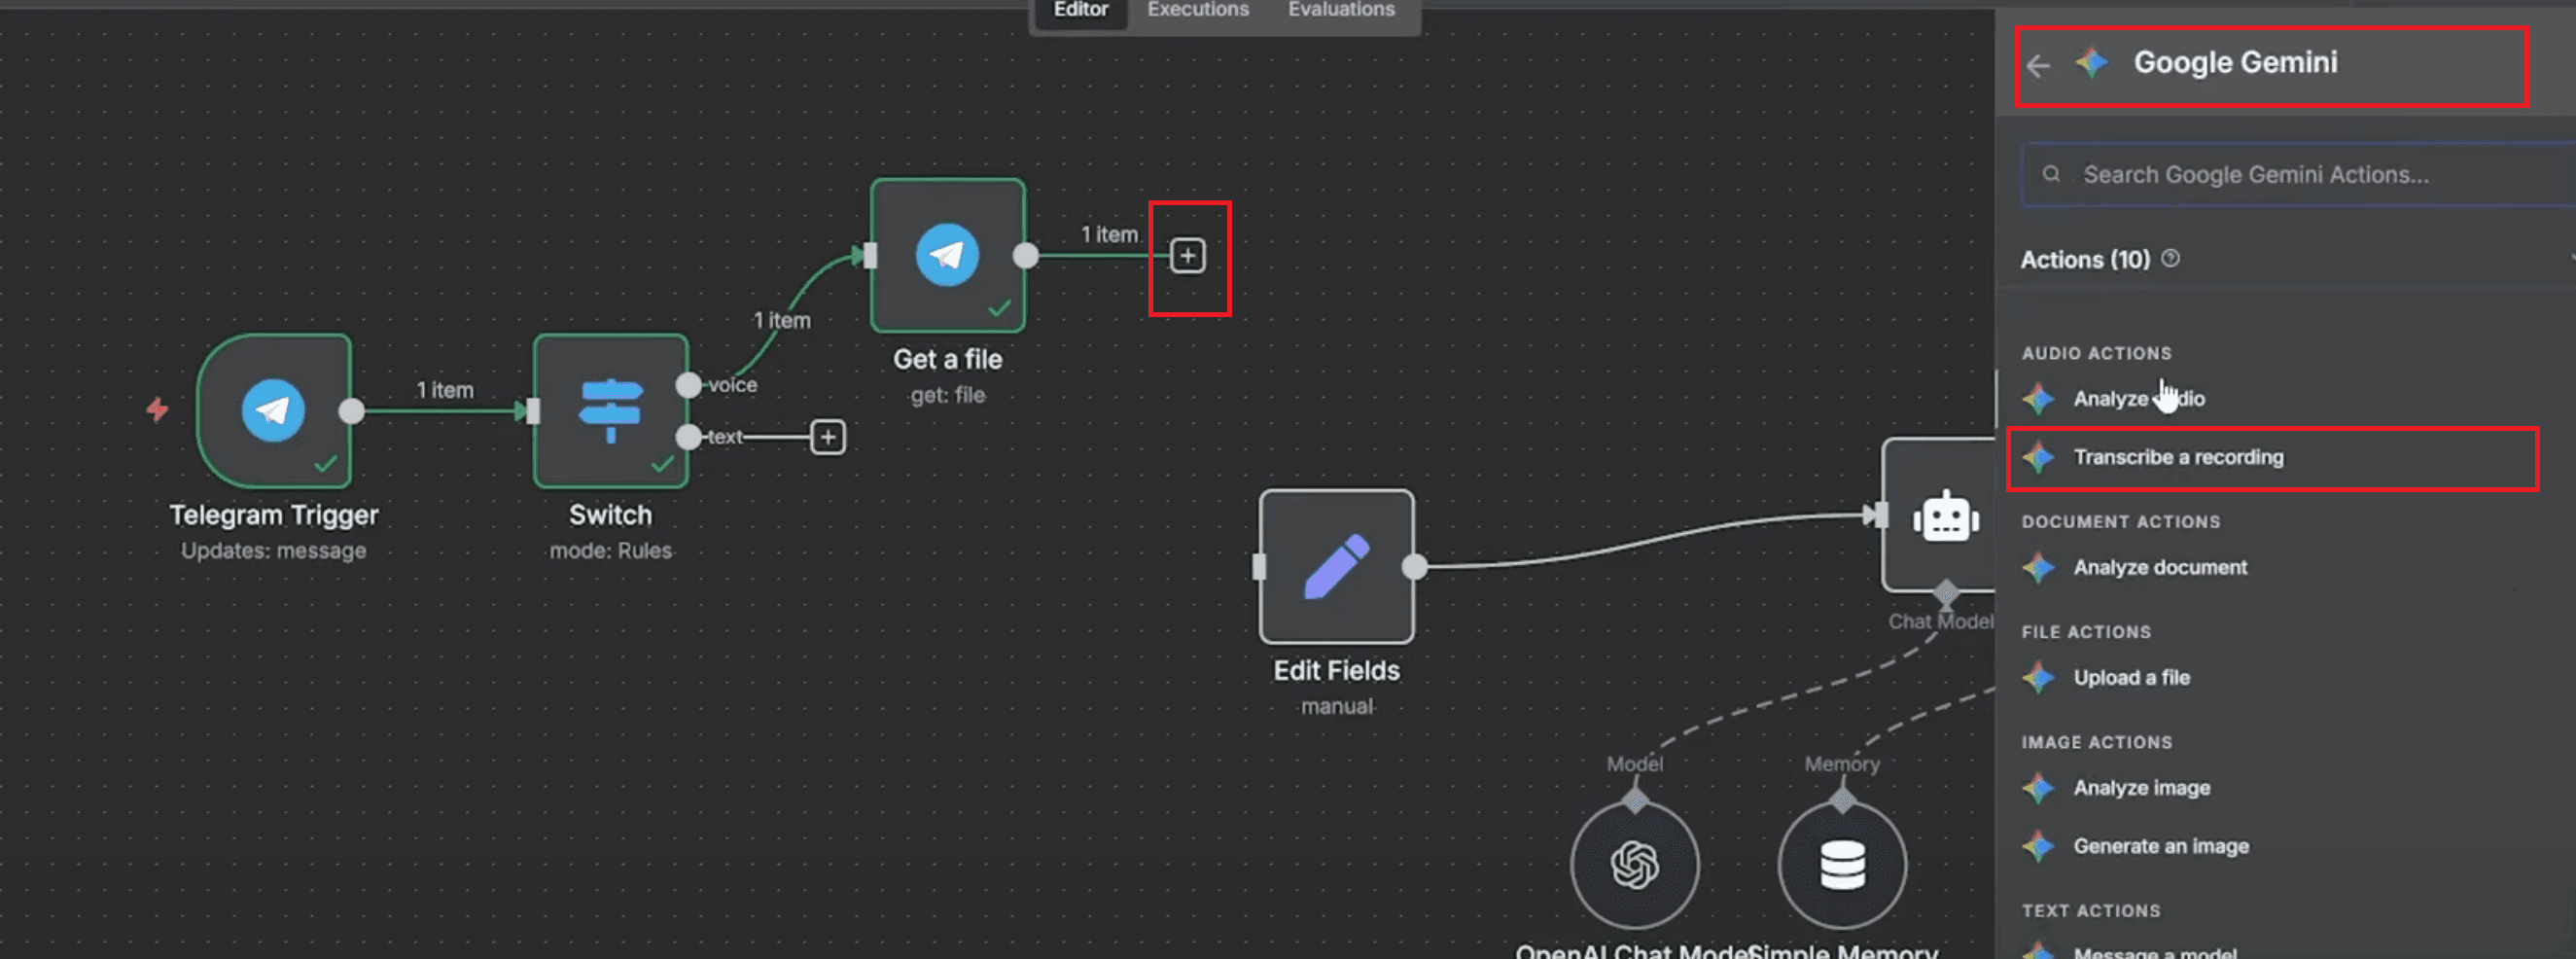
Choose Model → models/gemini-2.5-flash for fast and accurate transcription.
Set Input Type to "Binary File(s)" and type "data" in the Input Data Field Name(s).
Turn on Simplify Output and click Execute Step. You’ll now see the transcribed text of the voice message appear in the output window.

Steps to Add the Transcribed Text as a Field:
Add an Edit Fields node after the Gemini transcription node.
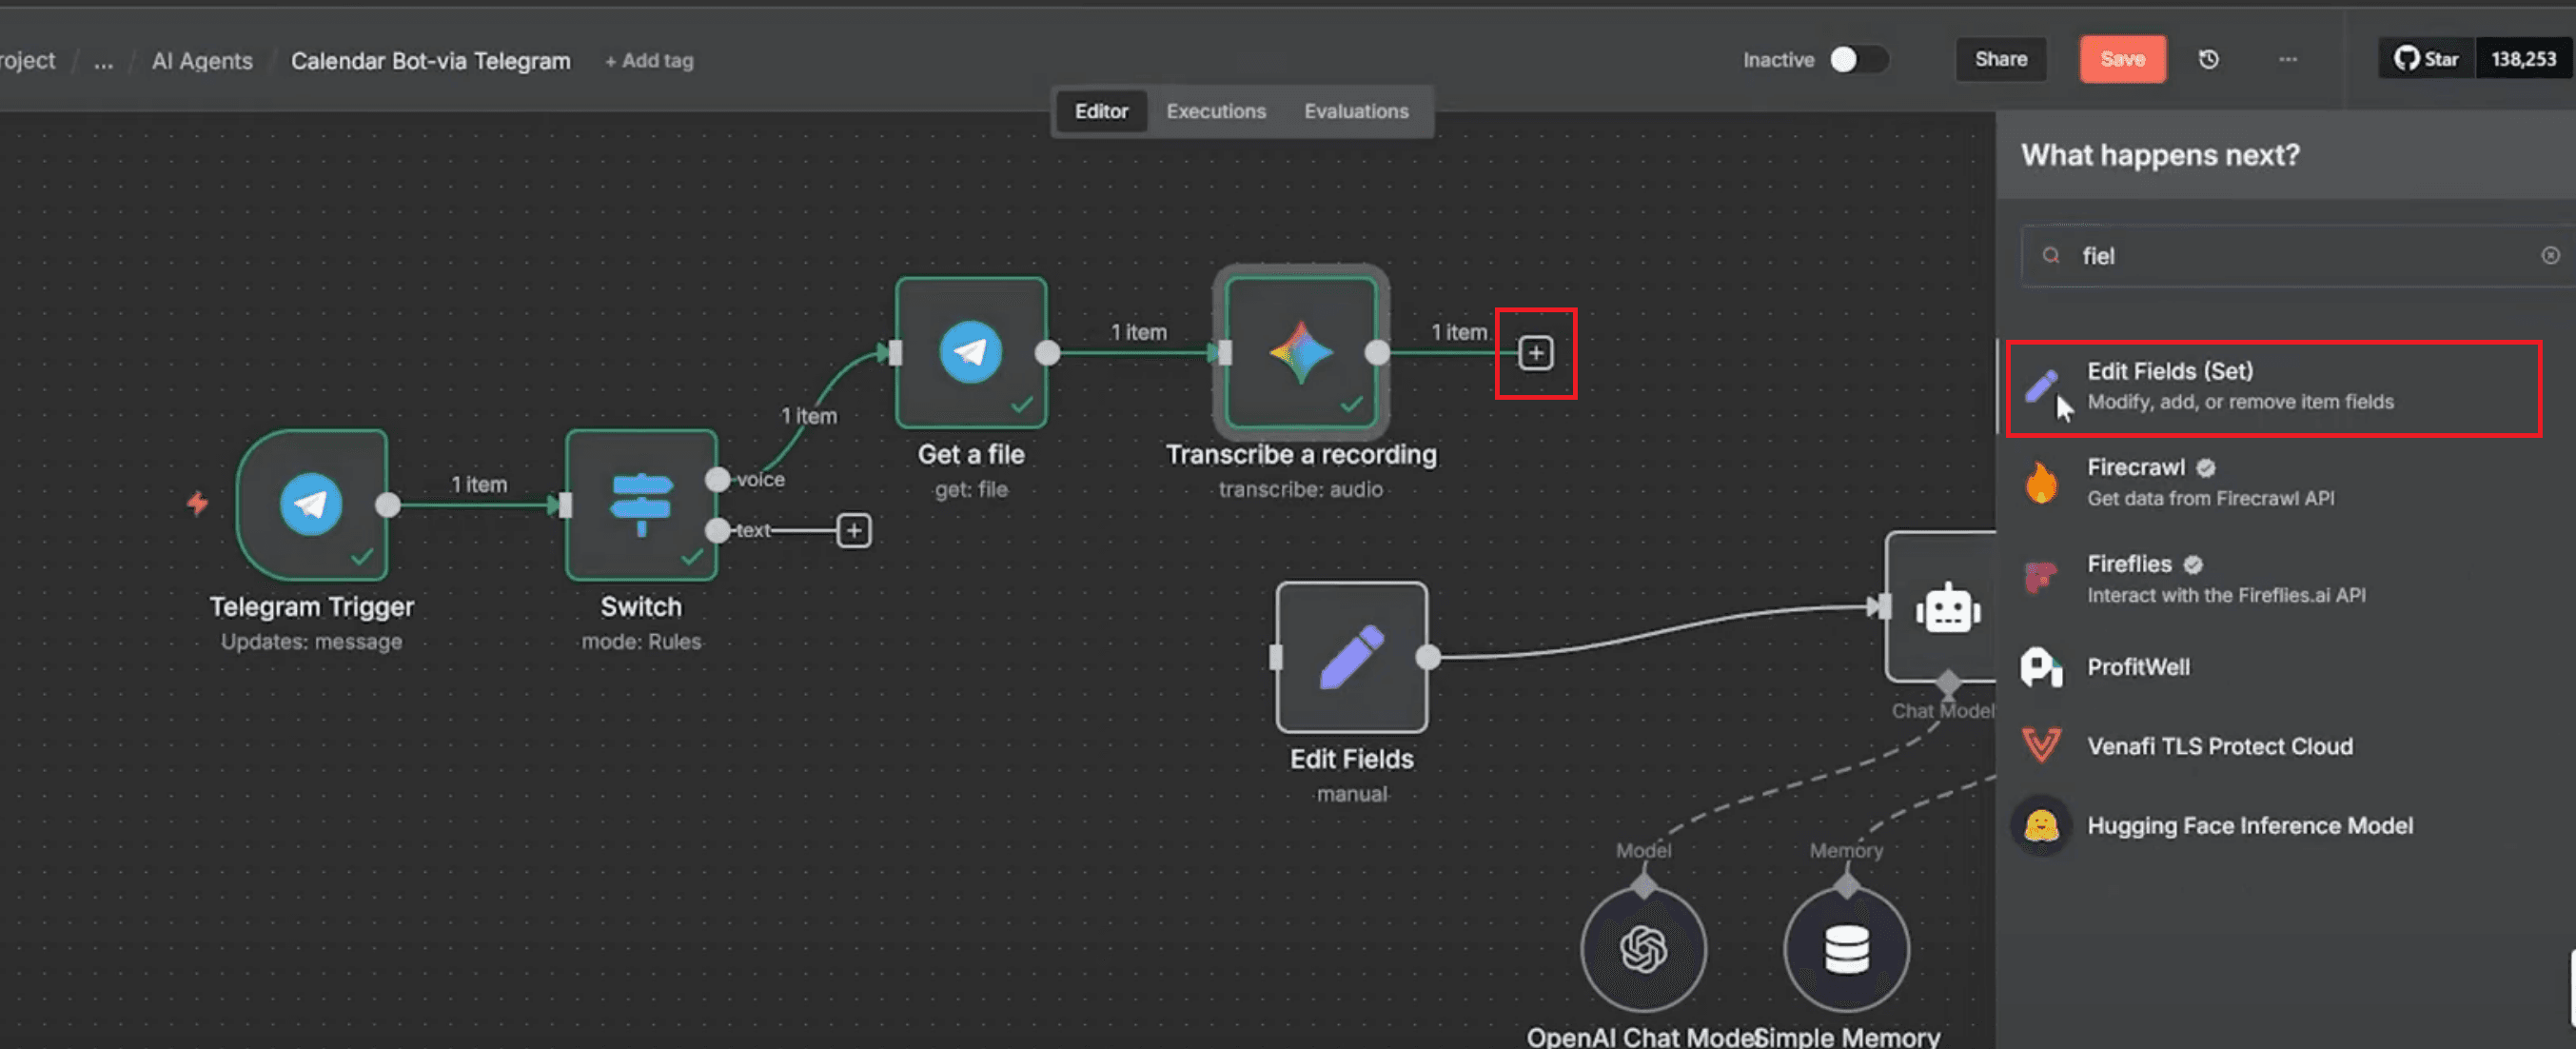
Set the Mode to "Manual Mapping".
Under Fields to Set, create a new field named "message".
Drag the text field from the Gemini output (as shown in the image) into the message field.
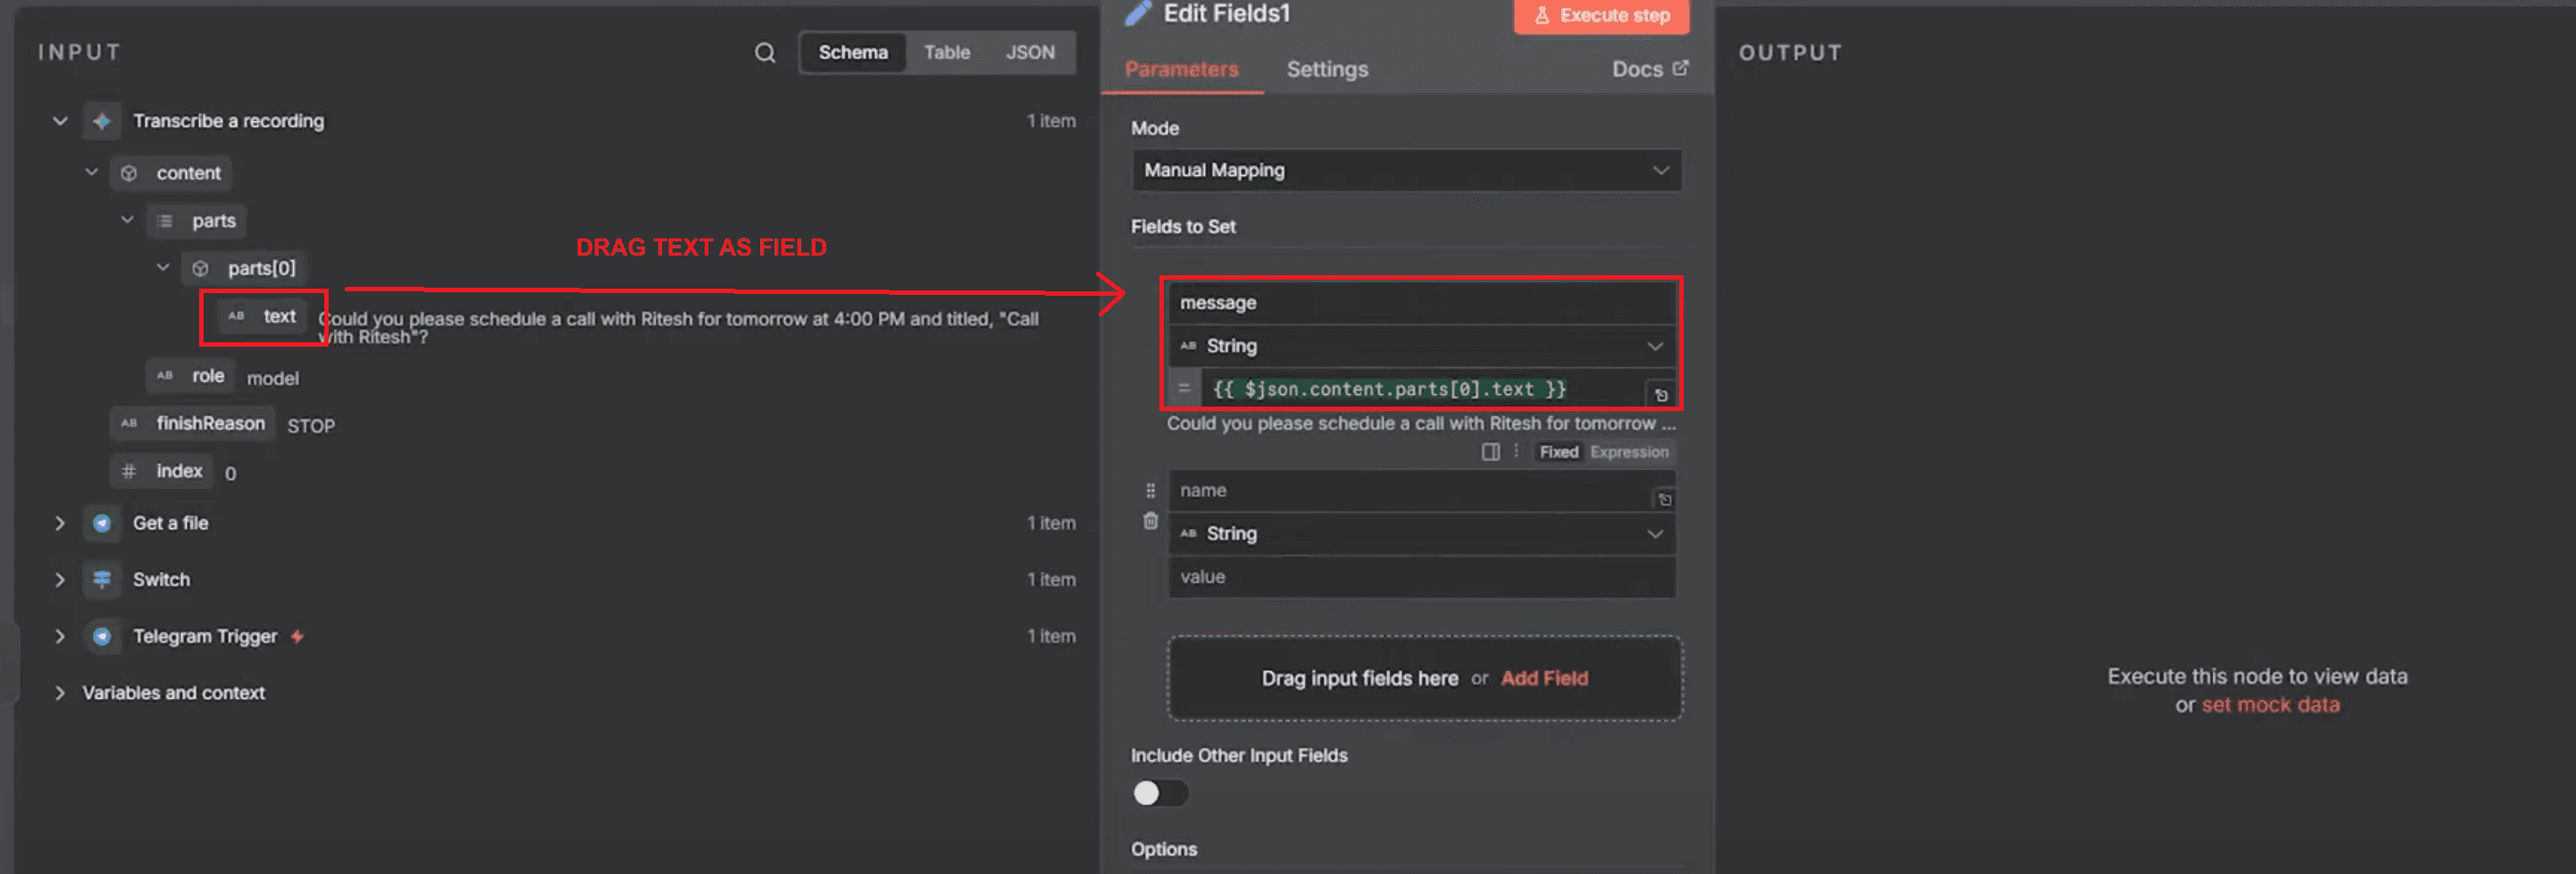
Click Execute Step to confirm the mapping.
Once this setup is done, the bot can instantly convert any audio communication into text and handle it just like a regular typed command. Users may now just say what they want the bot to do, and it will understand, process, and schedule tasks—all in the same workflow. This makes your automation both natural and easy to use, which is great for setting up meetings and talking to people quickly.
Step 13: Link the Voice and Text Paths to the AI Agent
It's time to connect the text and voice branches now that they are both ready. It will let the AI Agent handle both inputs in one smooth flow. It makes sure that everything gets to the same AI processing point, no matter how users communicate, whether they type or send a voice note. The bot can then read messages, check information, and do things on the calendar by itself.
Steps to Connect the Nodes:
From the Switch node, connect the text output to your Edit Fields node so text messages are formatted properly before reaching the AI.
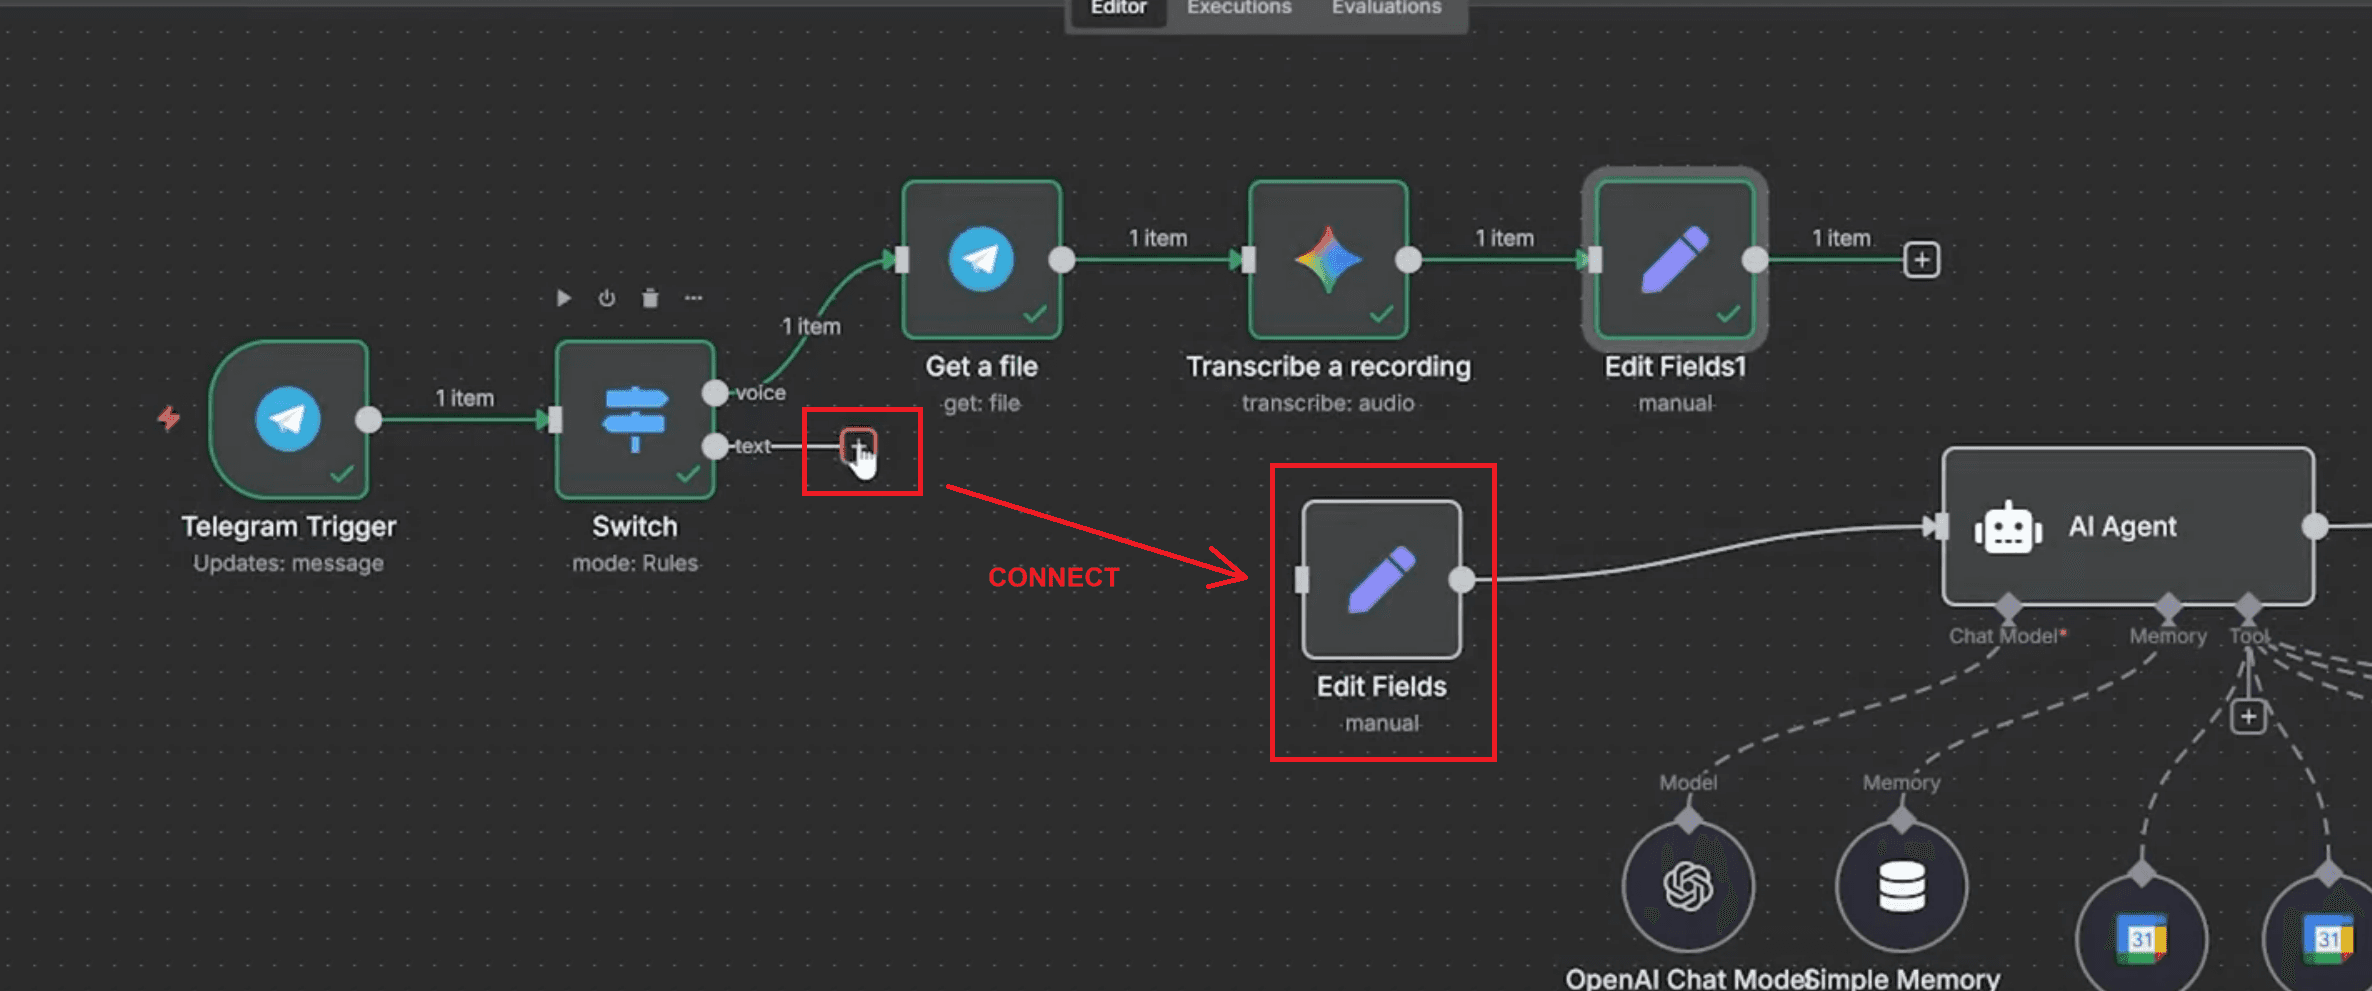
From the voice branch, connect the last Edit Fields1 node (after Gemini transcription) to the AI Agent node.
Check that both branches — Edit Fields (text) and Edit Fields1 (voice) — are linked to the same AI Agent.
Test the setup by sending a text command and a voice note to make sure both routes trigger correctly.
Once these connections are done, the automation becomes unified. The AI Agent can now process both typed and spoken messages, verify details, create events, and send confirmations in one smooth workflow. Your bot is now complete — it can read, listen, and act naturally, making scheduling effortless and conversational.
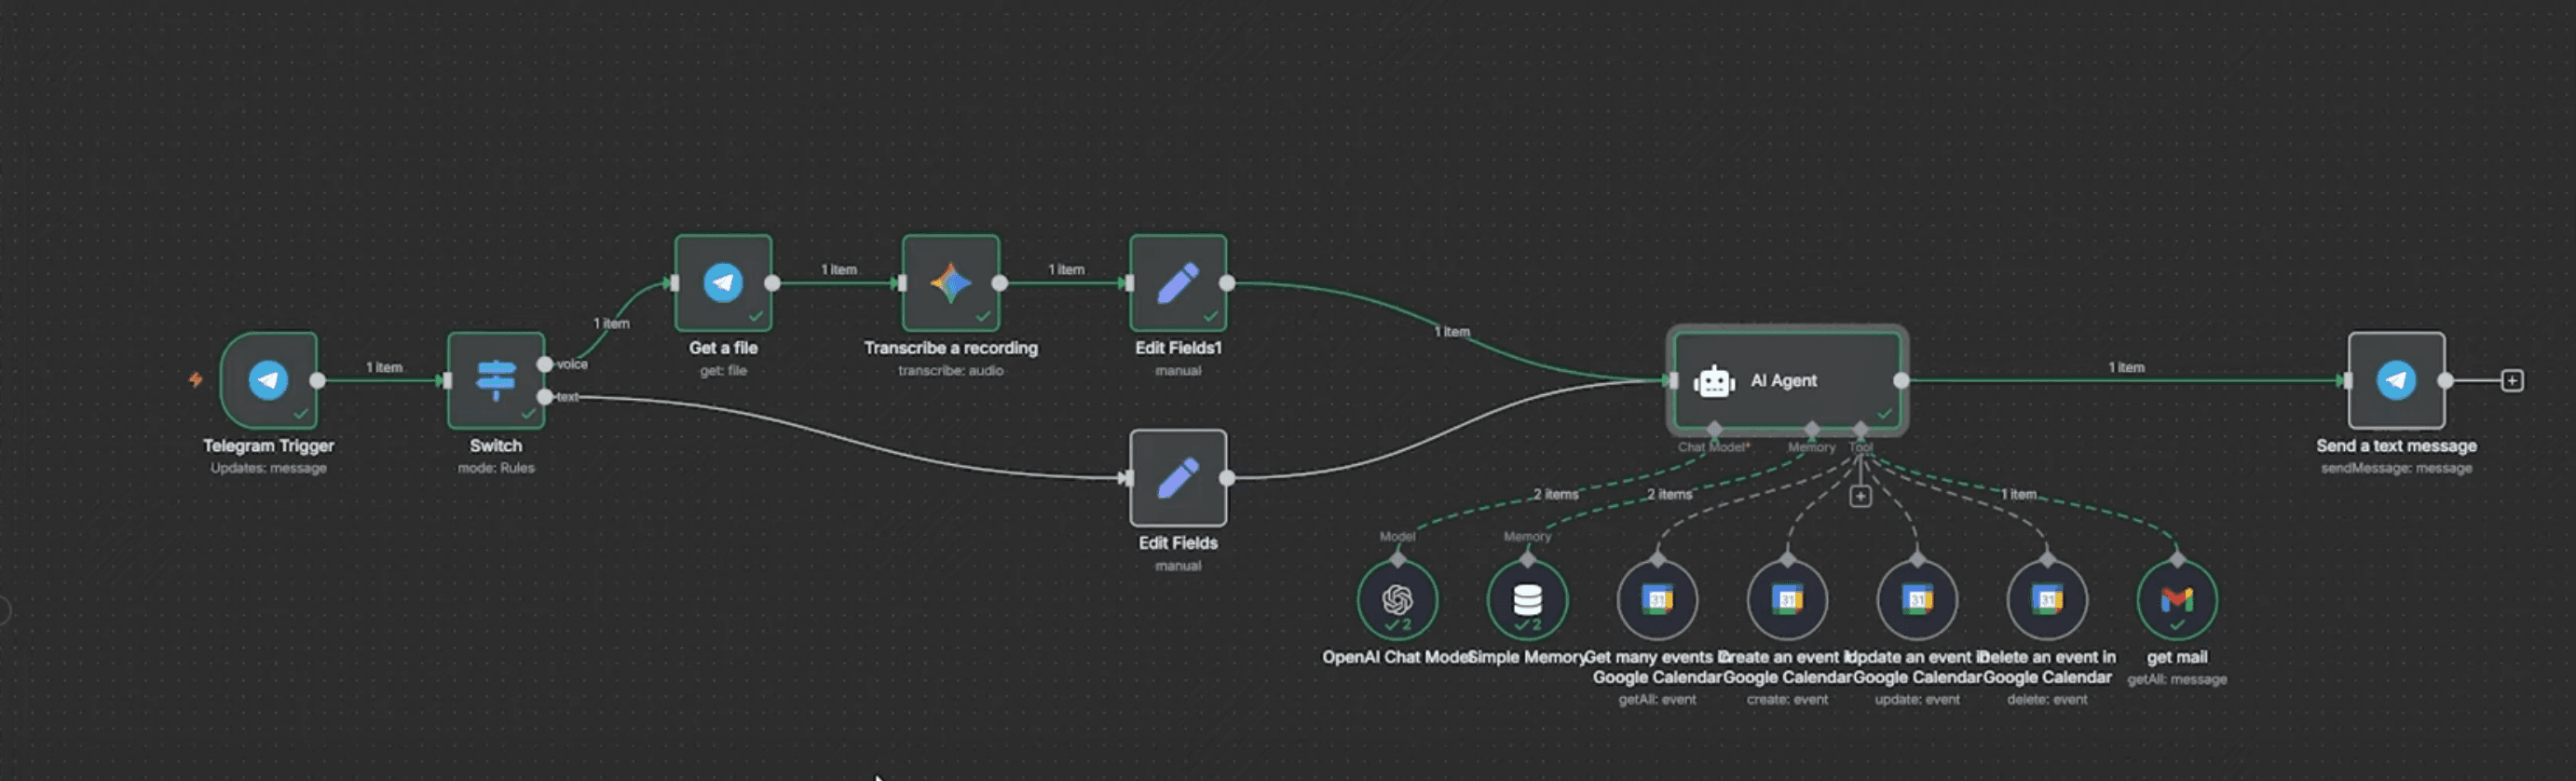
Final n8n Workflow Structure
It begins with a Telegram Trigger to capture the message, followed by a Switch node to separate text from speech. The text branch utilizes a Set node to structure inputs, whereas the voice branch gets and transcribes the audio before creating the same fields. Both branches feed into the AI Agent, which is supported by a Chat Model and a Simple Memory. The AI Agent connects to Google Calendar for event actions and optionally to Gmail for email validation. Finally, Telegram Send Message sends confirmations back to the user.
This structure ensures that every request is processed consistently and that the calendar remains correct. Each action is affirmed in straightforward terms, which provides confidence that the request was carried out successfully. The workflow architecture is flexible, so new technologies such as Slack or WhatsApp can be added later by following the same pattern of nodes and data connections.
Questions that are often asked:
How can I link Google Calendar to Telegram in n8n?
To link Google Calendar to Telegram, you need to make a workflow that starts with a Telegram Trigger and finishes with a Telegram Send Message. Between these, the AI Agent understands the message, and Google Calendar nodes carry out the activities. Credentials for both services must be added in n8n so each node may communicate securely with its platform. You can find more about Telegram bots on Telegram’s official bot website. Google's Calendar API documentation has information on how to integrate with the calendar.
Can the telegram bot take voice commands?
Yes, the bot can take both voice and text inputs. For voice, the workflow uses Telegram Get File to get the audio and a transcription node like Google Gemini to turn speech into text. After that, the process is the same as it is with text requests. This makes it just as easy for people who like to talk to set up events.
What rules does the AI agent follow?
There are specific regulations that the AI agent must observe. There must be a distinct title for every new event. You need a valid Event ID to make any changes or deletions. After each action, there is a quick confirmation message. The agent doesn't assume; instead, they ask for more information. These rules make the system work the same way every time.
(source: Google Developers - Designing AI Prompts).
How does n8n link data between nodes?
You can add nodes to n8n by clicking the addition button on the sidebar and choosing the service. You can't drag whole nodes. Instead, you drag individual data values like chat ID, message content, or event ID from the output panel of one node to the input field of another node. This method makes sure that the right data moves through the workflow without having to write code by hand.


