Build An AI Resume Analysis Bot In n8n

Table of Contents
Why Automate Resume Screening with AI?
What tools are required to build an AI resume bot?
Step-by-Step Workflow Guide
Step 1: Gmail Trigger – Capture Resumes
Step 2: Get Message – Fetch Email & Attachments
Step 3: Text Classifier – Filter Job Applications
Step 4: Extract from File – Read Resume PDF
Step 5: Variables – Add Job Description Link
Step 6: Edit Fields – Include Job Details
Step 7: AI Agent – Analyze & Score Resume
Step 8: Chat Model – Connect OpenAI GPT
Step 9: Gmail Tool – Send Acknowledgment
Step 10: Output Parser – Structure AI Results
Step 11: Variables (Pro Plan) – HR Report Email
Step 12: Gmail Send – Deliver Final ReportWorkflow Structure Overview
Final Output and Functionality
Watch The Tutorial Video
Benefits and Takeaways
FAQ
Finding the right candidate among hundreds of applicants can be a real challenge. HR teams, recruiters, and business owners often spend hours manually going through emails and resumes, trying to shortlist the best fit. In today’s competitive job market, efficiency, accuracy, and speed are essential. That’s where automation comes in.
Meet the AI Resume Analysis Bot — a no-code solution built with Artificial Intelligence (AI) and automation tools like n8n. This bot can automatically read resumes, understand job descriptions, calculate a resume score, and even send follow-up emails to applicants — all without human intervention. It functions like a simplified Applicant Tracking System (ATS), but it’s easy to set up and completely customizable. In this tutorial, you’ll learn step-by-step how to build your own AI Resume Analyzer Bot in just 15 minutes.
Why Automate Resume Screening with AI?
Resume screening is one of the most time-consuming steps in the hiring process. Recruiters often deal with hundreds of job applications, and it’s easy for qualified job seekers to get overlooked. Traditional manual review methods are slow, inconsistent, and prone to bias.
An AI-powered platform changes this. It can quickly evaluate resumes, extract key information, and provide structured data that helps HR professionals make faster, more informed decisions. Automation allows recruiters to focus on high-value tasks like interviews, while the system handles the repetitive work.
This approach, similar to how modern Applicant Tracking Systems function, offers benefits such as:
Increased efficiency: Rapid processing of a large number of applications.
Improved accuracy: Consistent evaluation criteria that reduce human error.
Enhanced candidate matching: AI compares resumes with job descriptions for better fit analysis.
Time savings: Frees up HR time for strategic and interpersonal work.
Better user experience: Provides instant acknowledgment to candidates.
The bot ensures fairness, objectivity, and data-driven decision-making while improving the overall job search experience for candidates.
What tools are required to build an AI resume bot?
You’ll only need a few simple tools to get started:
n8n – to automate the entire workflow, including email triggers, AI processing, and notifications.
Gmail – to receive resumes and send automated replies or HR reports.
OpenAI (GPT models) – to analyze resume content, compare it with the job description, and generate a resume score.
Google Docs – to store and update the job description dynamically using a shareable link.
Step-by-Step Workflow Guide
Step 1: Gmail Trigger – Capture Resumes
The first step is to automate resume intake directly from your inbox. This ensures every incoming job application is captured without manual effort.
Connect Gmail: Add a Gmail Trigger node in n8n and set it to trigger “on message received.”
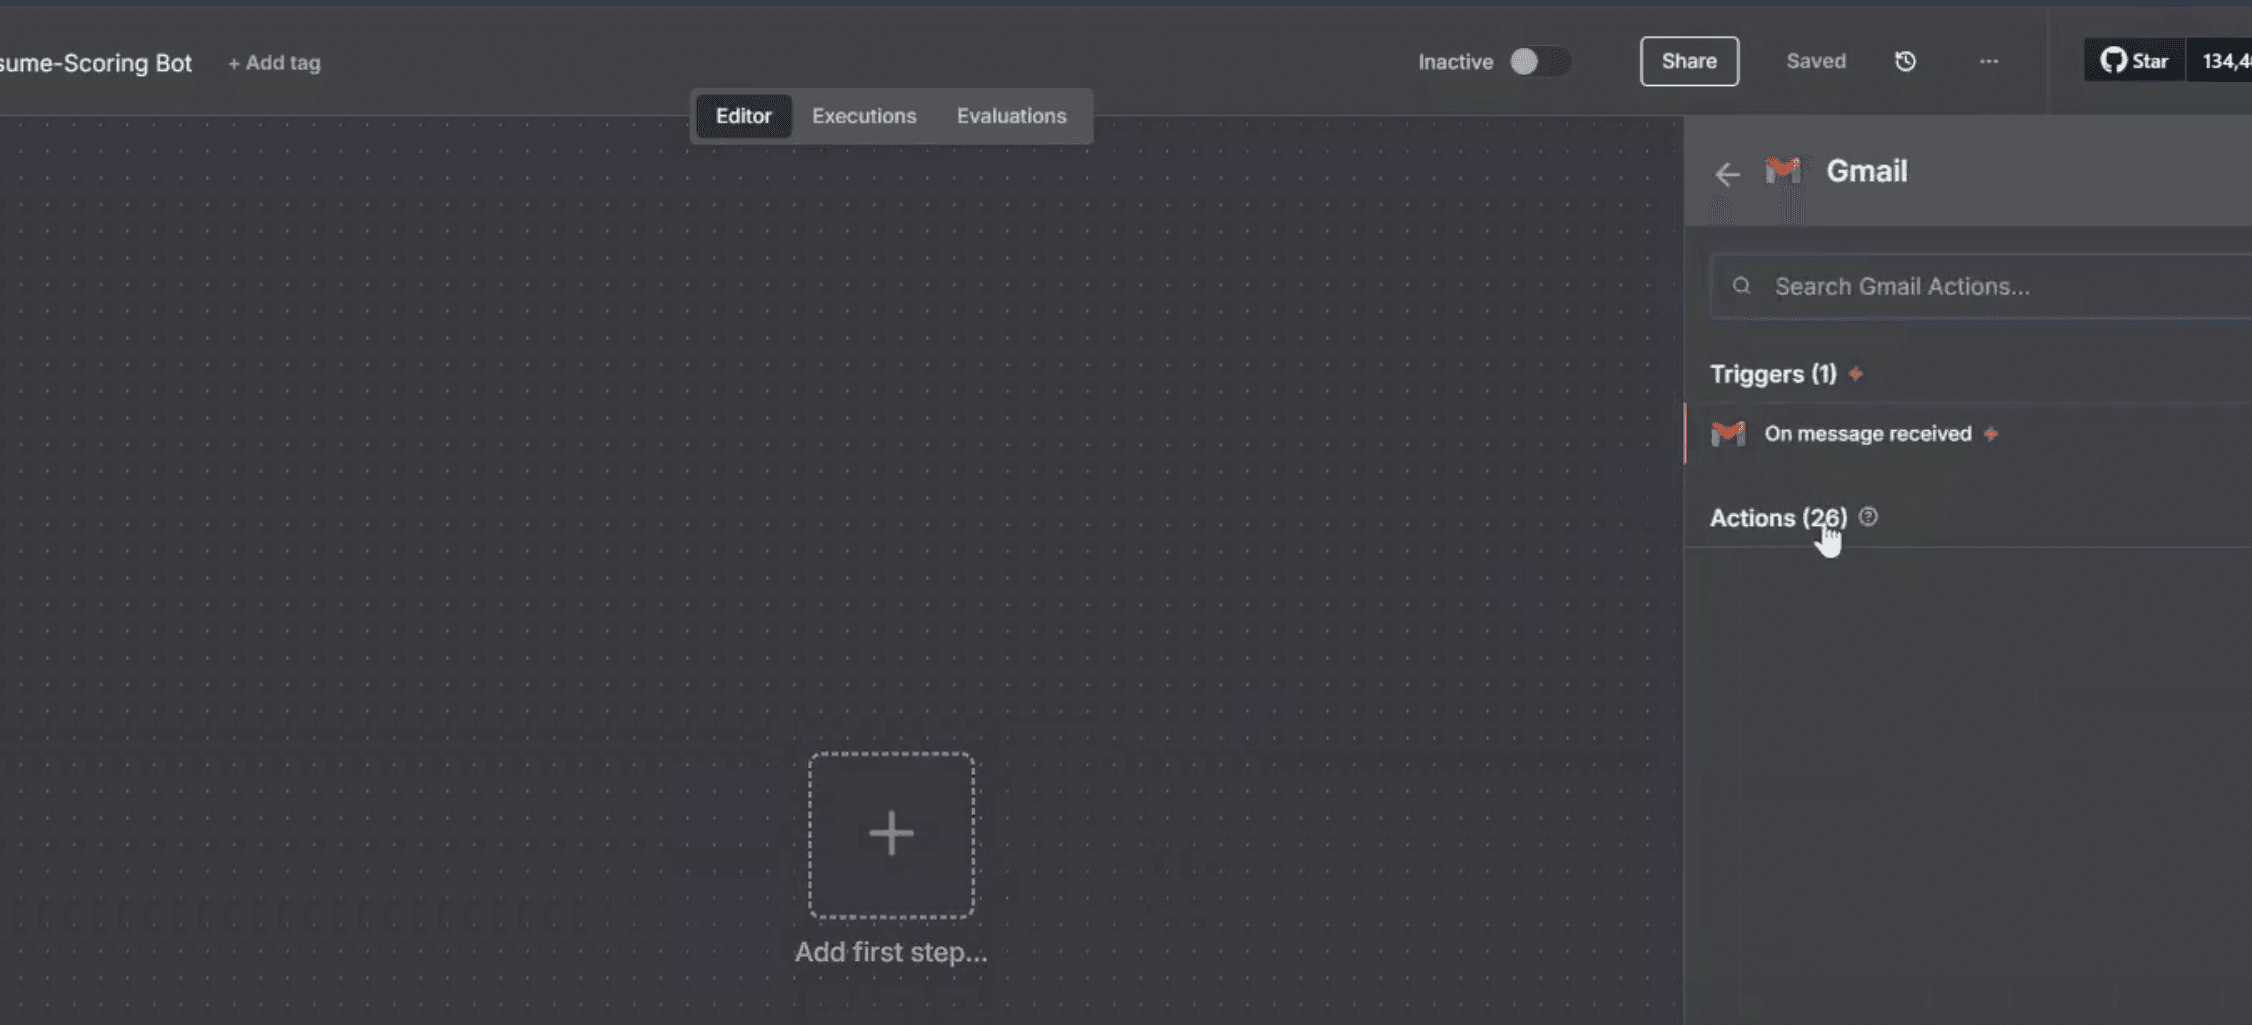
Set Poll Time: Choose how frequently the bot checks for new emails — every minute, hour, or day.
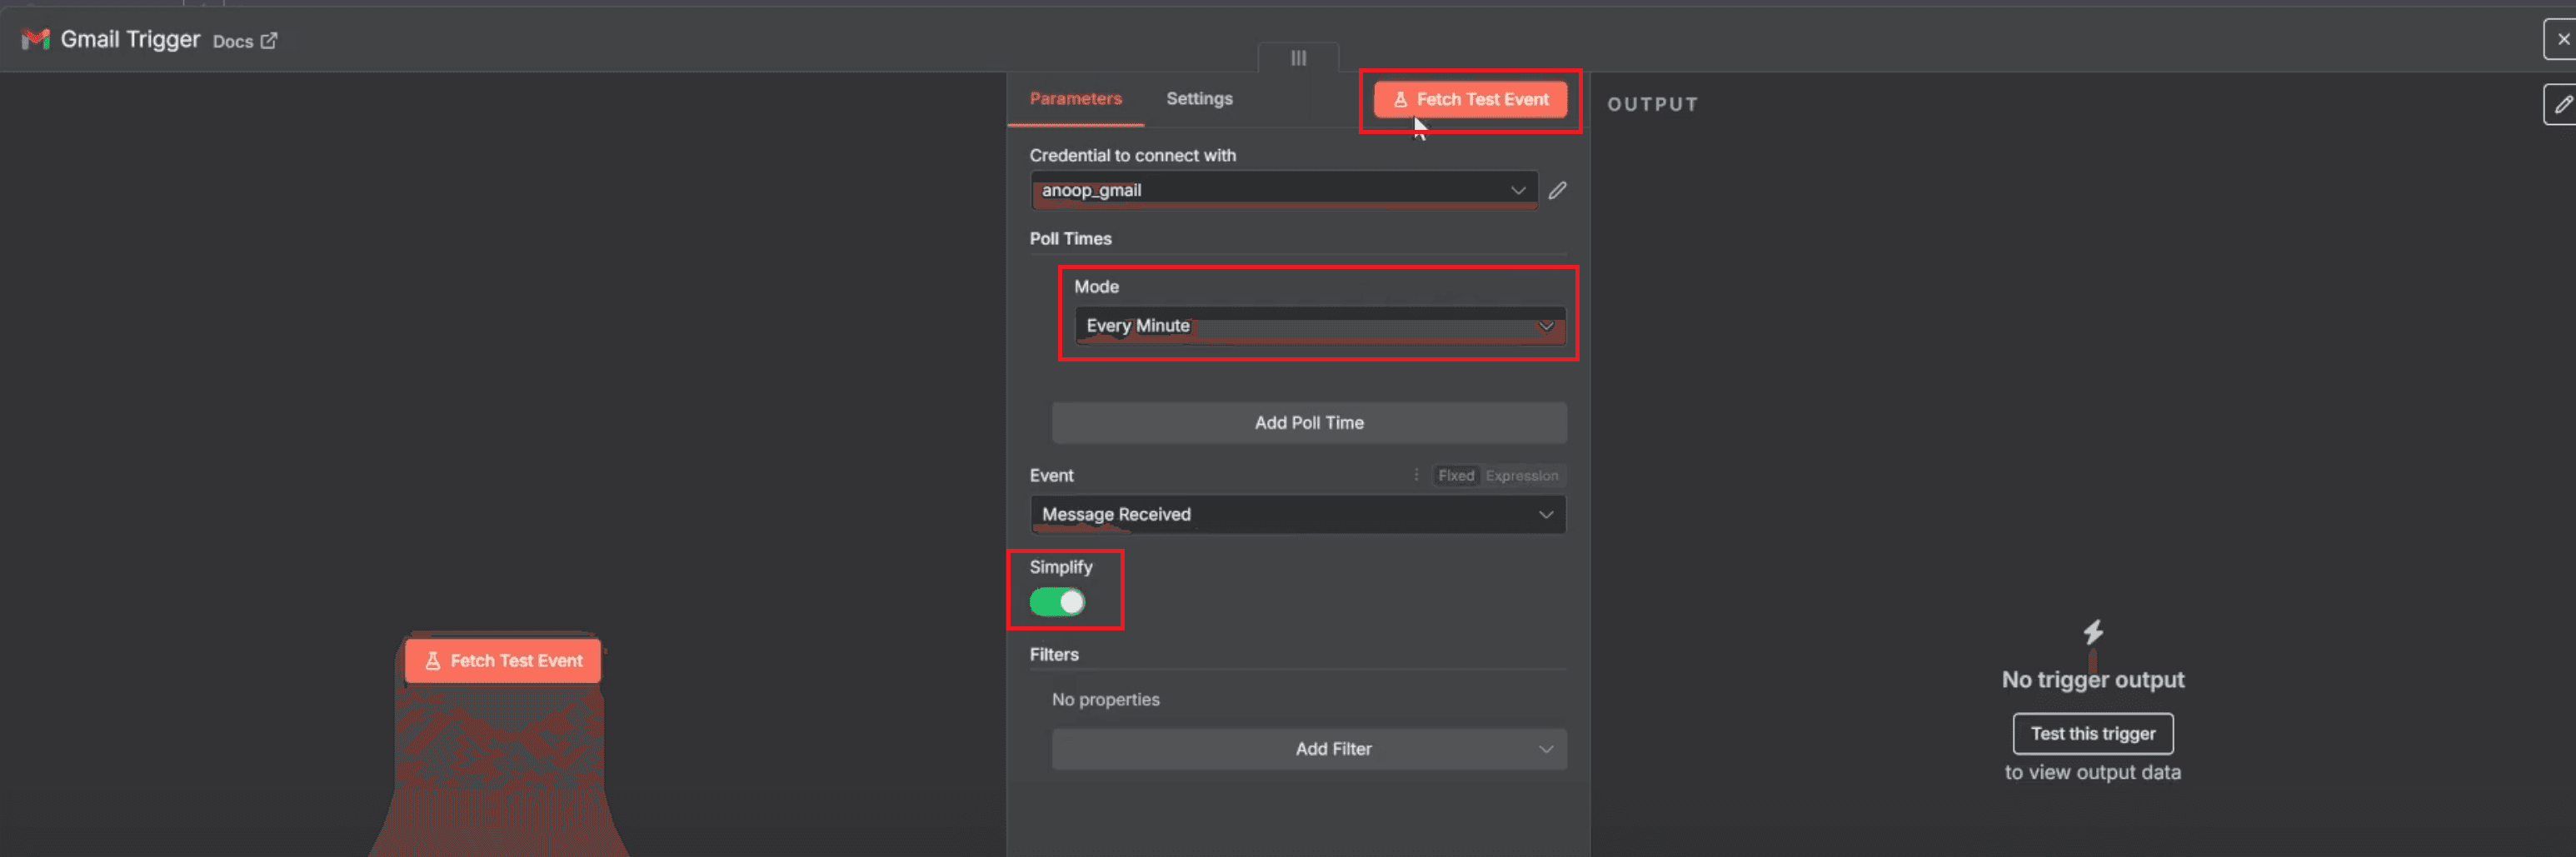
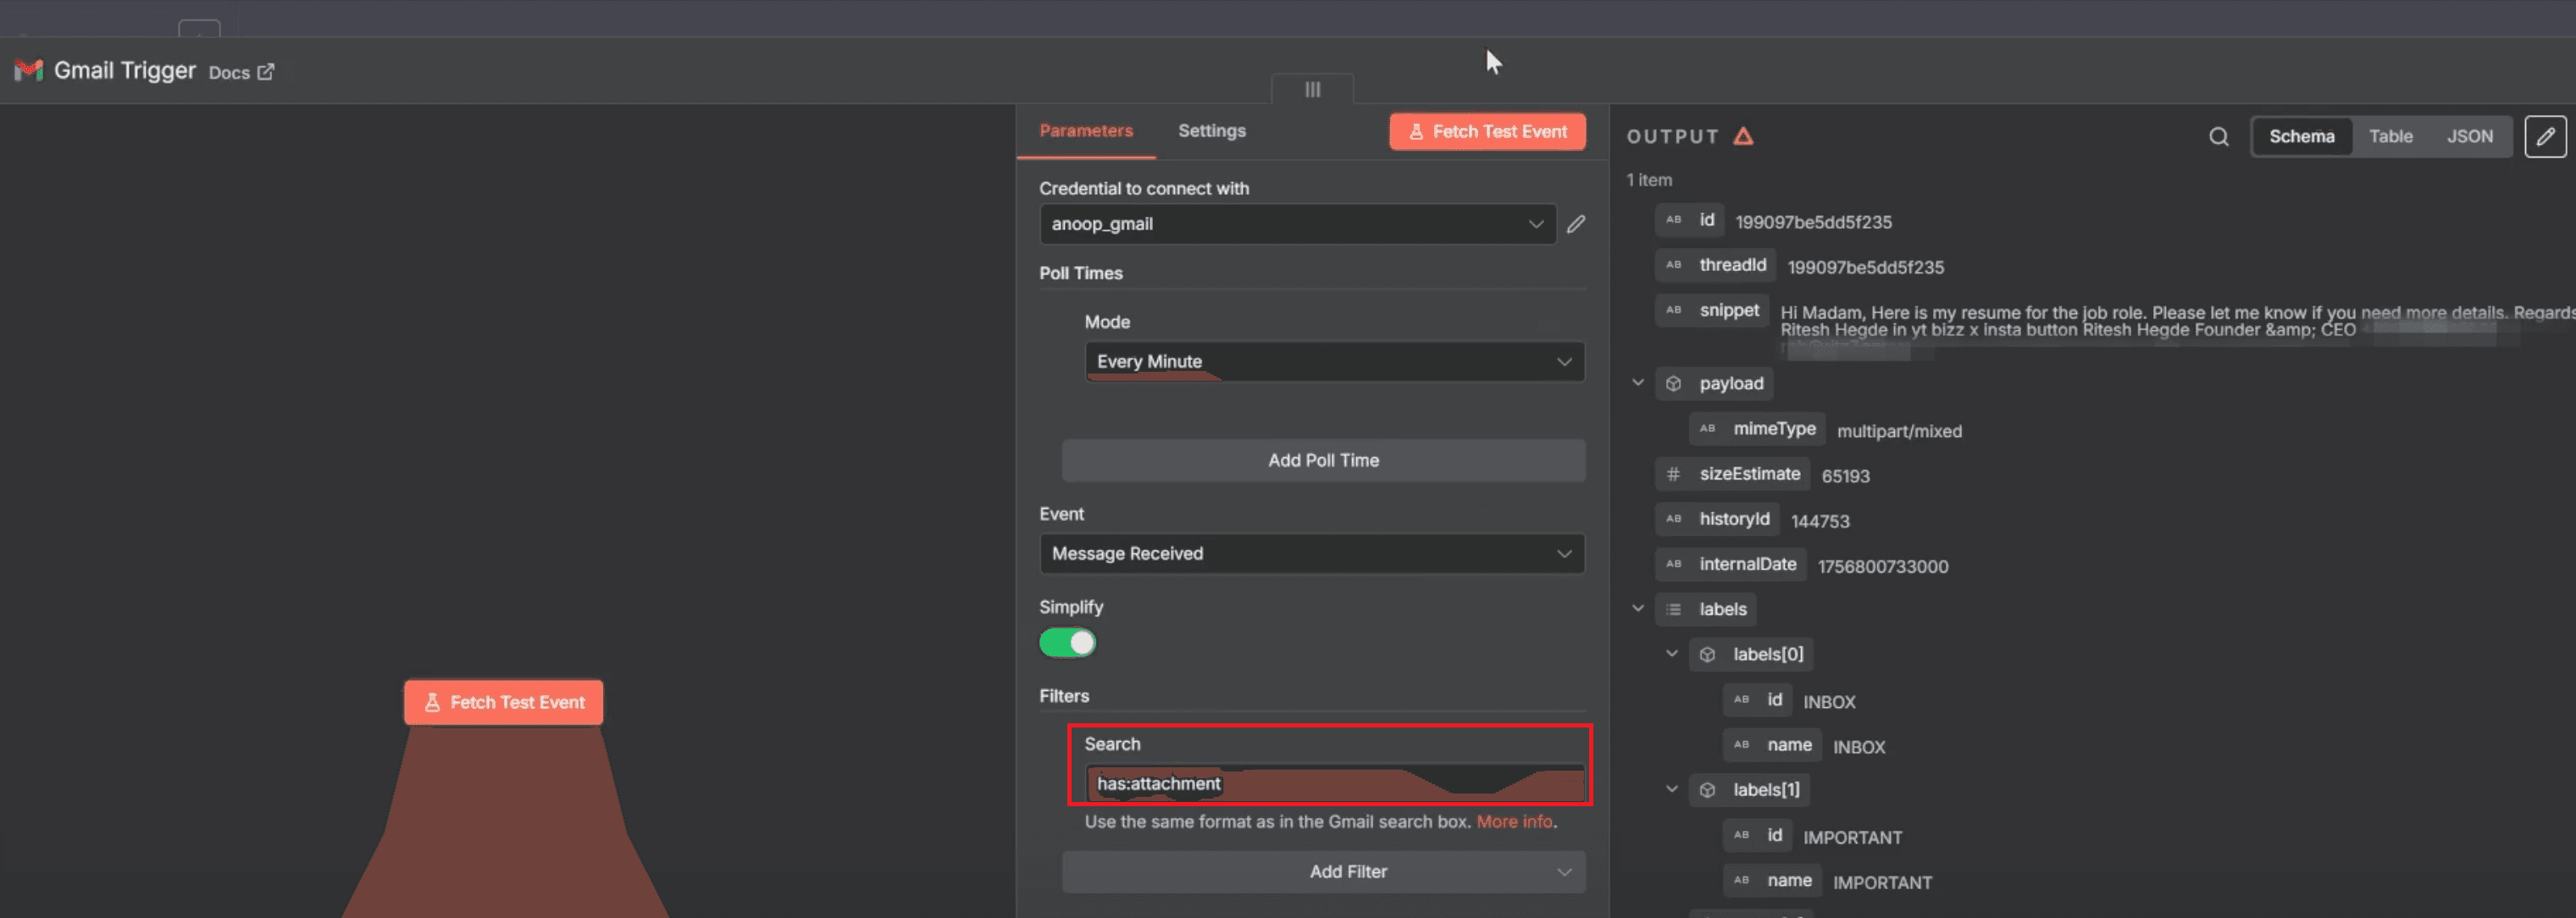
Filter for Attachments: Type has:attachment in the search field. This ensures only emails with attached Resume PDFs are processed.
This step ensures that only relevant emails from job seekers are processed automatically, creating a foundation for a seamless AI Resume Optimizer workflow.
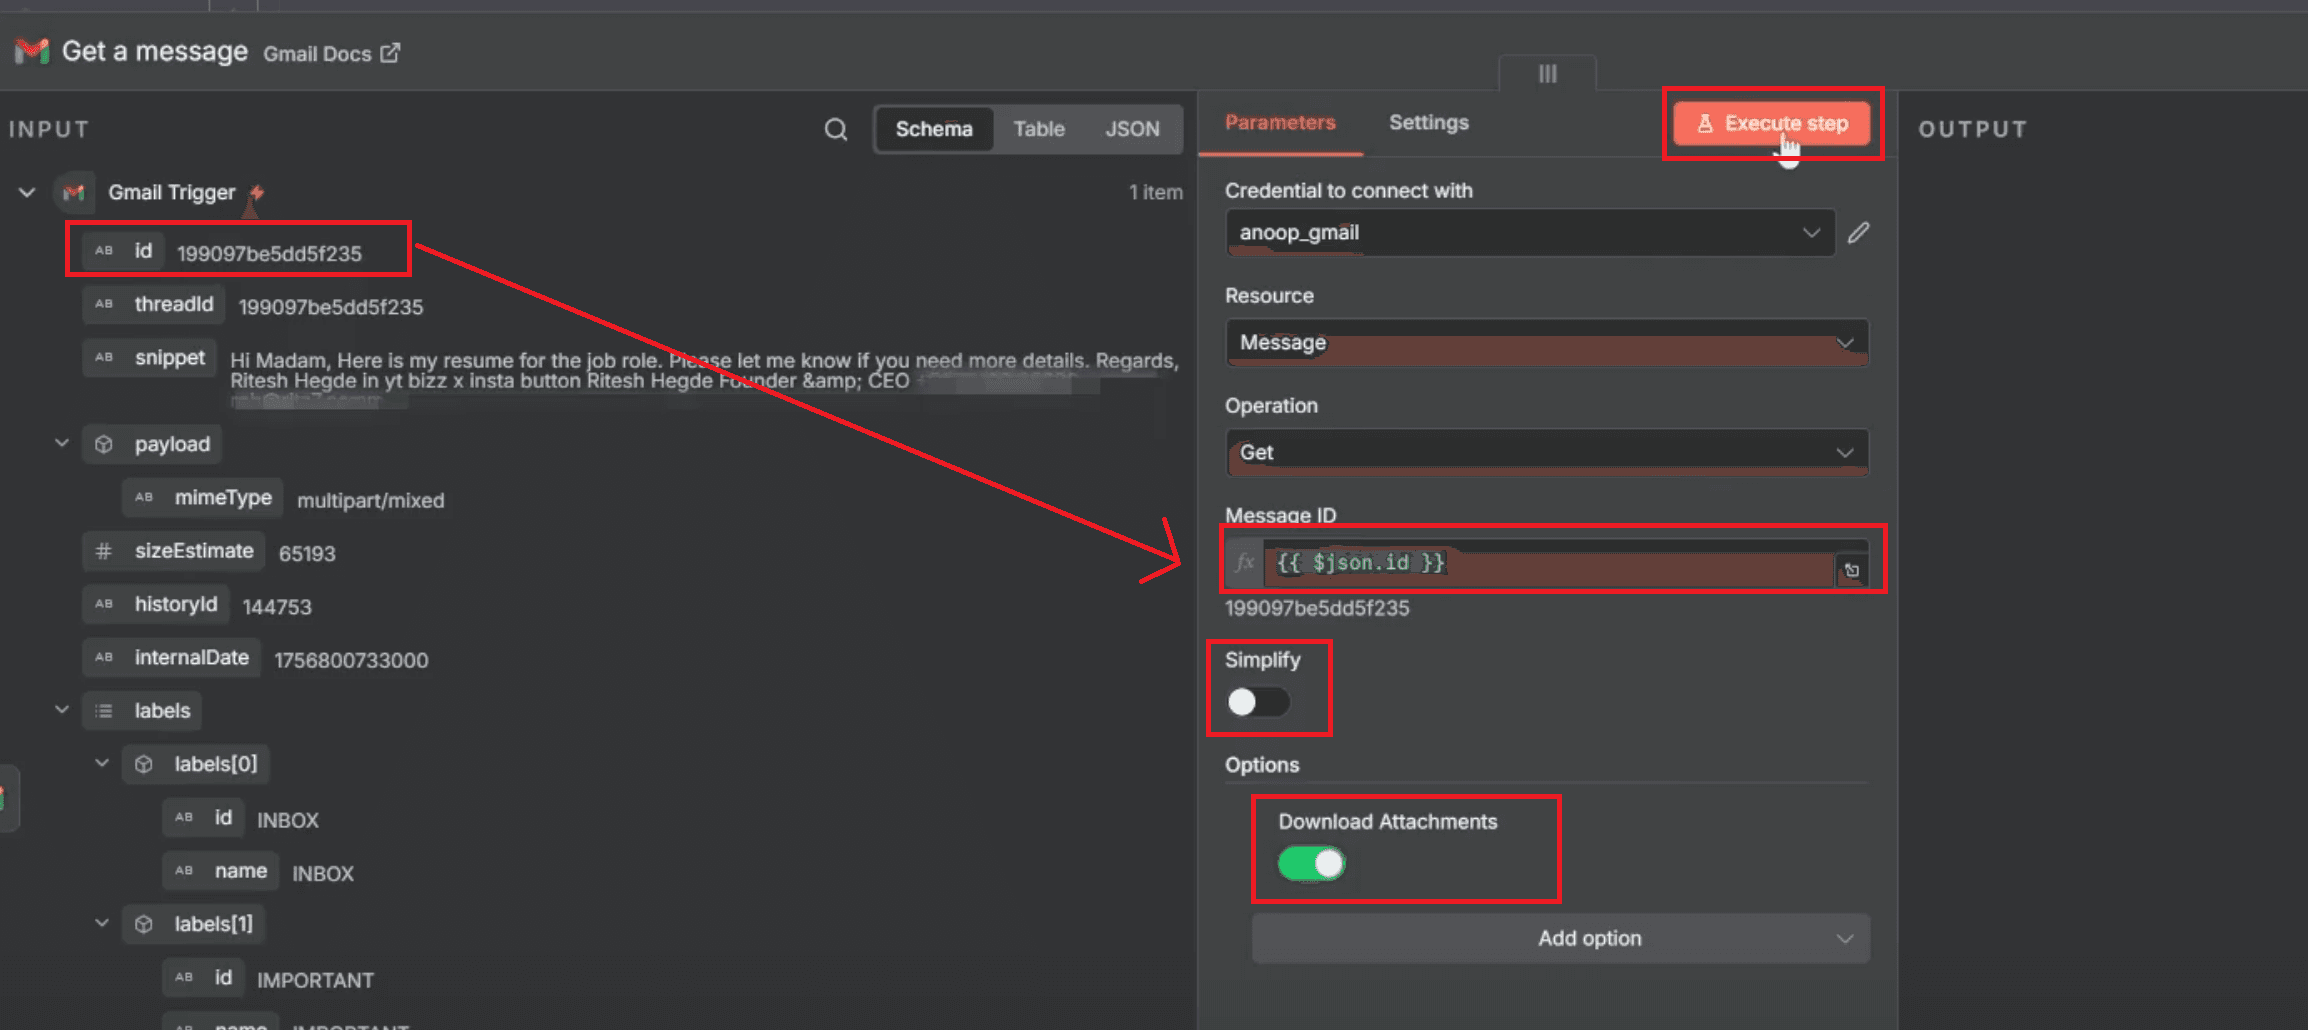
Step 2: Get Message – Fetch Email & Attachments
Once the email arrives, the next step is to retrieve its full content and the attached Resume PDF.
Add Gmail – Get a Message Node: Connect it to your trigger node. This node retrieves the sender’s name, email, subject, and attachments.
Map Message ID Automatically: Drag the ID field dynamically from the Gmail trigger output to ensure accurate linkage.
Turn Off Simplify and Enable Attachments: Disable “Simplify” and enable “Download Attachments.”
Add a Search Filter (if not already set):
If you did not apply the filter in the previous step, go back to the Gmail Trigger and add a search query. Enterhas:attachmentto ensure that only emails containing resumes (PDF/Doc attachments) are processed in the workflow.
By this point, the system functions like a smart AI resume review tool, ready to download and analyze every attached resume automatically.
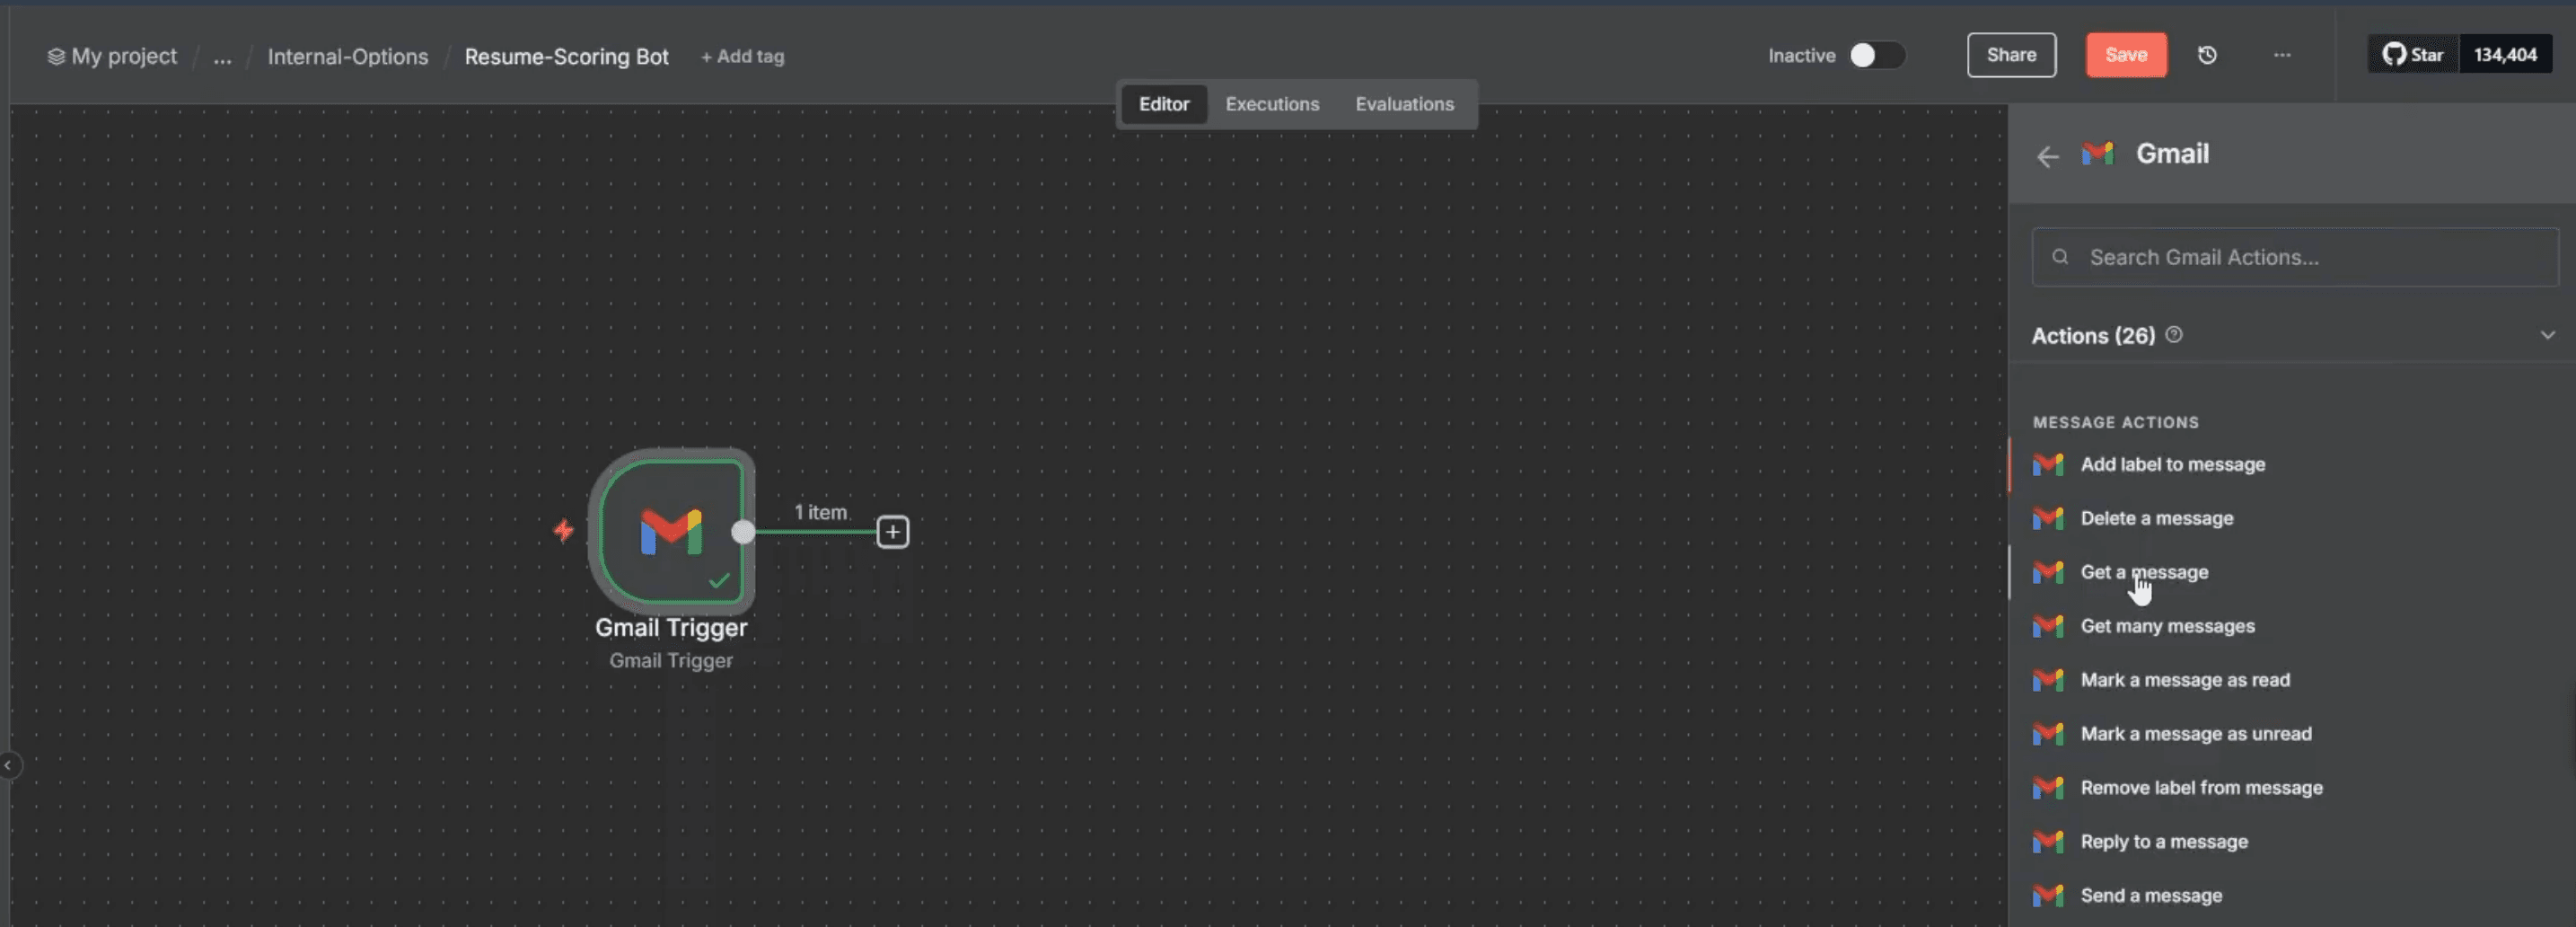
Step 3: Text Classifier – Filter Job Applications
This step ensures the workflow only continues if the email is related to a job application.
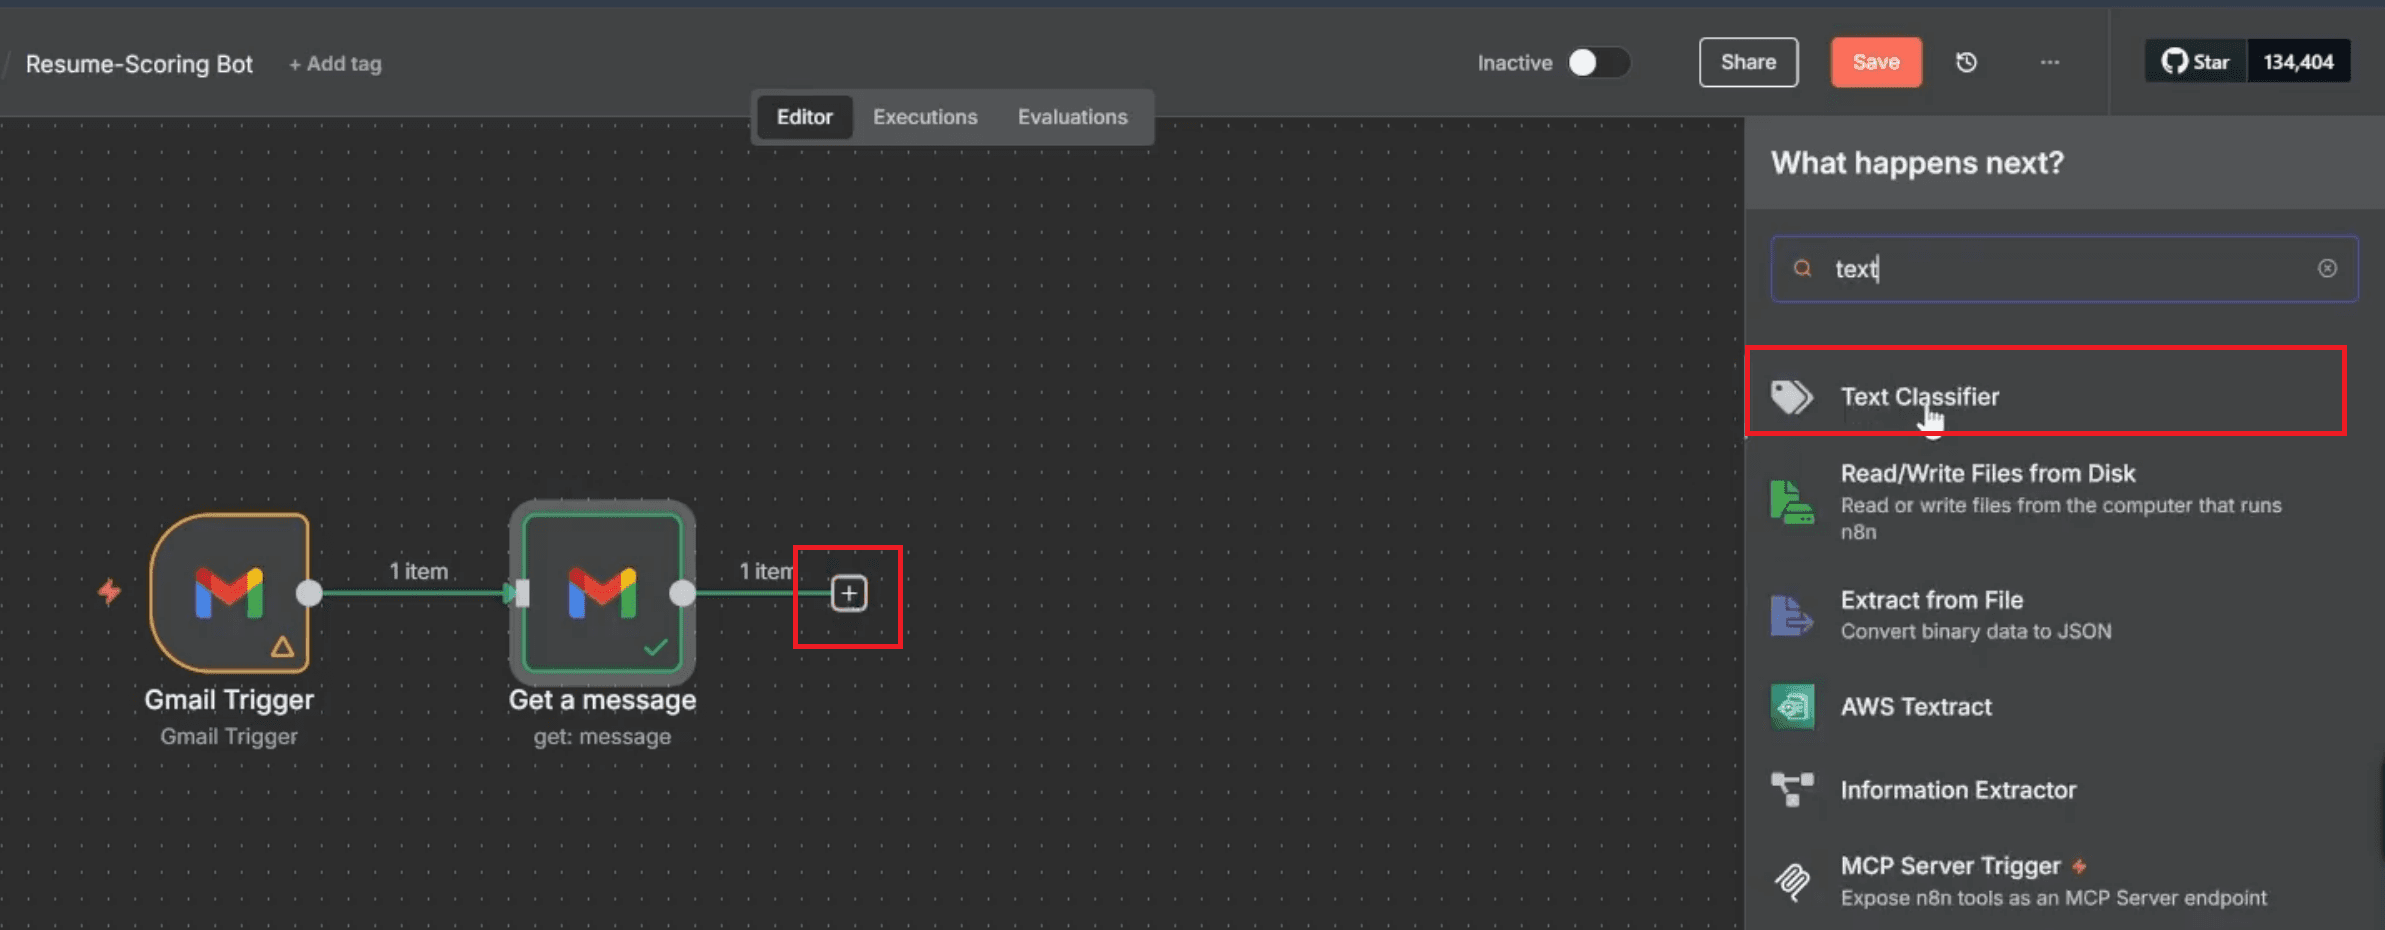
1. Add the Text Classifier Node
Click on the “+” icon next to the Get a message node.
Search for “Text Classifier” and add it.
2. Drag the Email Subject into the Classifier
On the left under Input, expand Gmail → headers → subject.
Drag the subject field into the Text to Classify box.

3. Add Classification Categories
In the Categories section, add two options:
Related to Job – for job applications or resumes.
Something Else – for non-job-related emails.
This helps filter only relevant emails for processing.
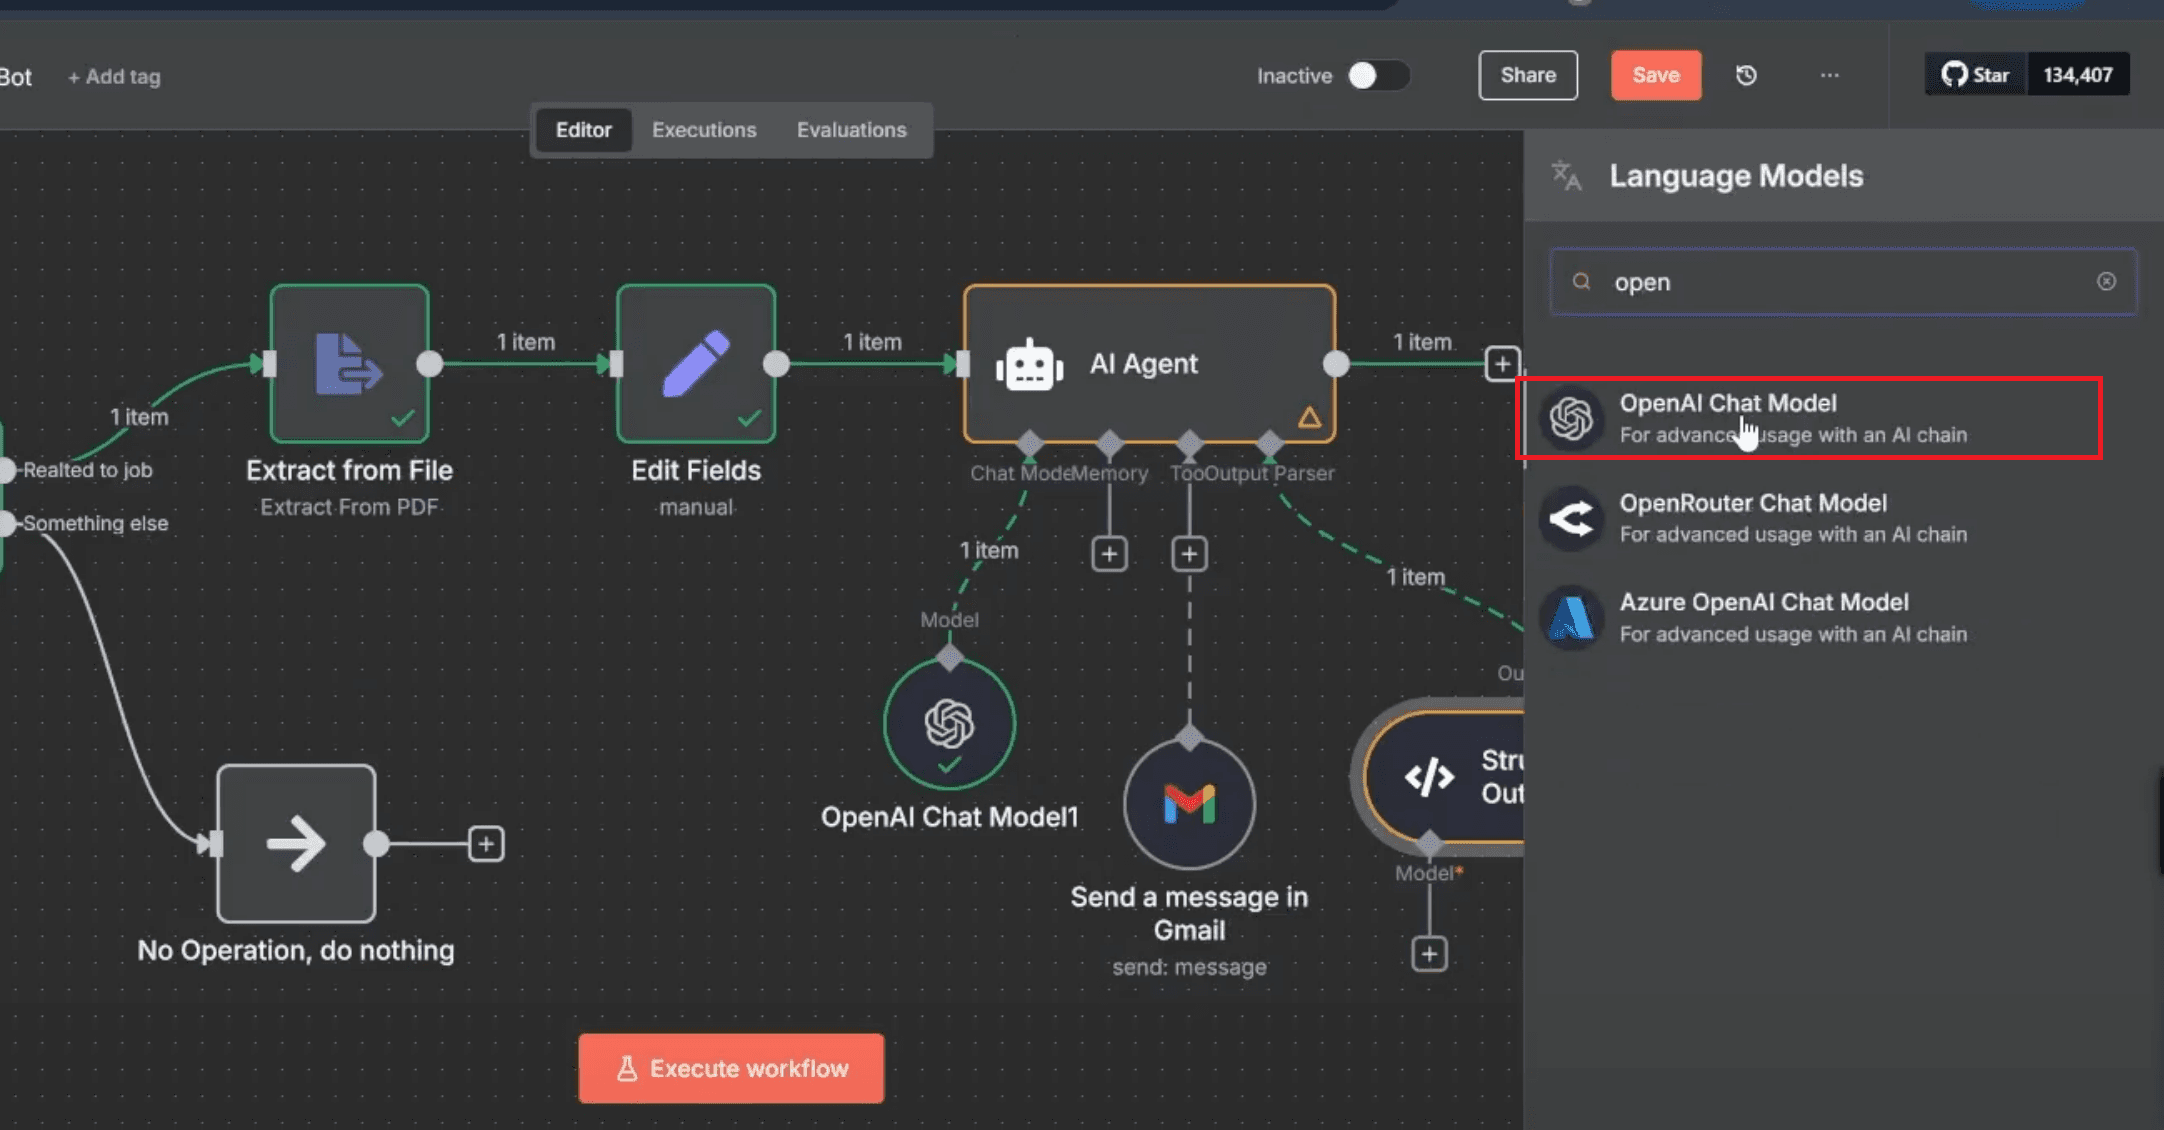
4. Connect OpenAI Chat Model to Classifier
Under the Text Classifier node, click the small + icon below “Model”.
Search and select OpenAI Chat Model.
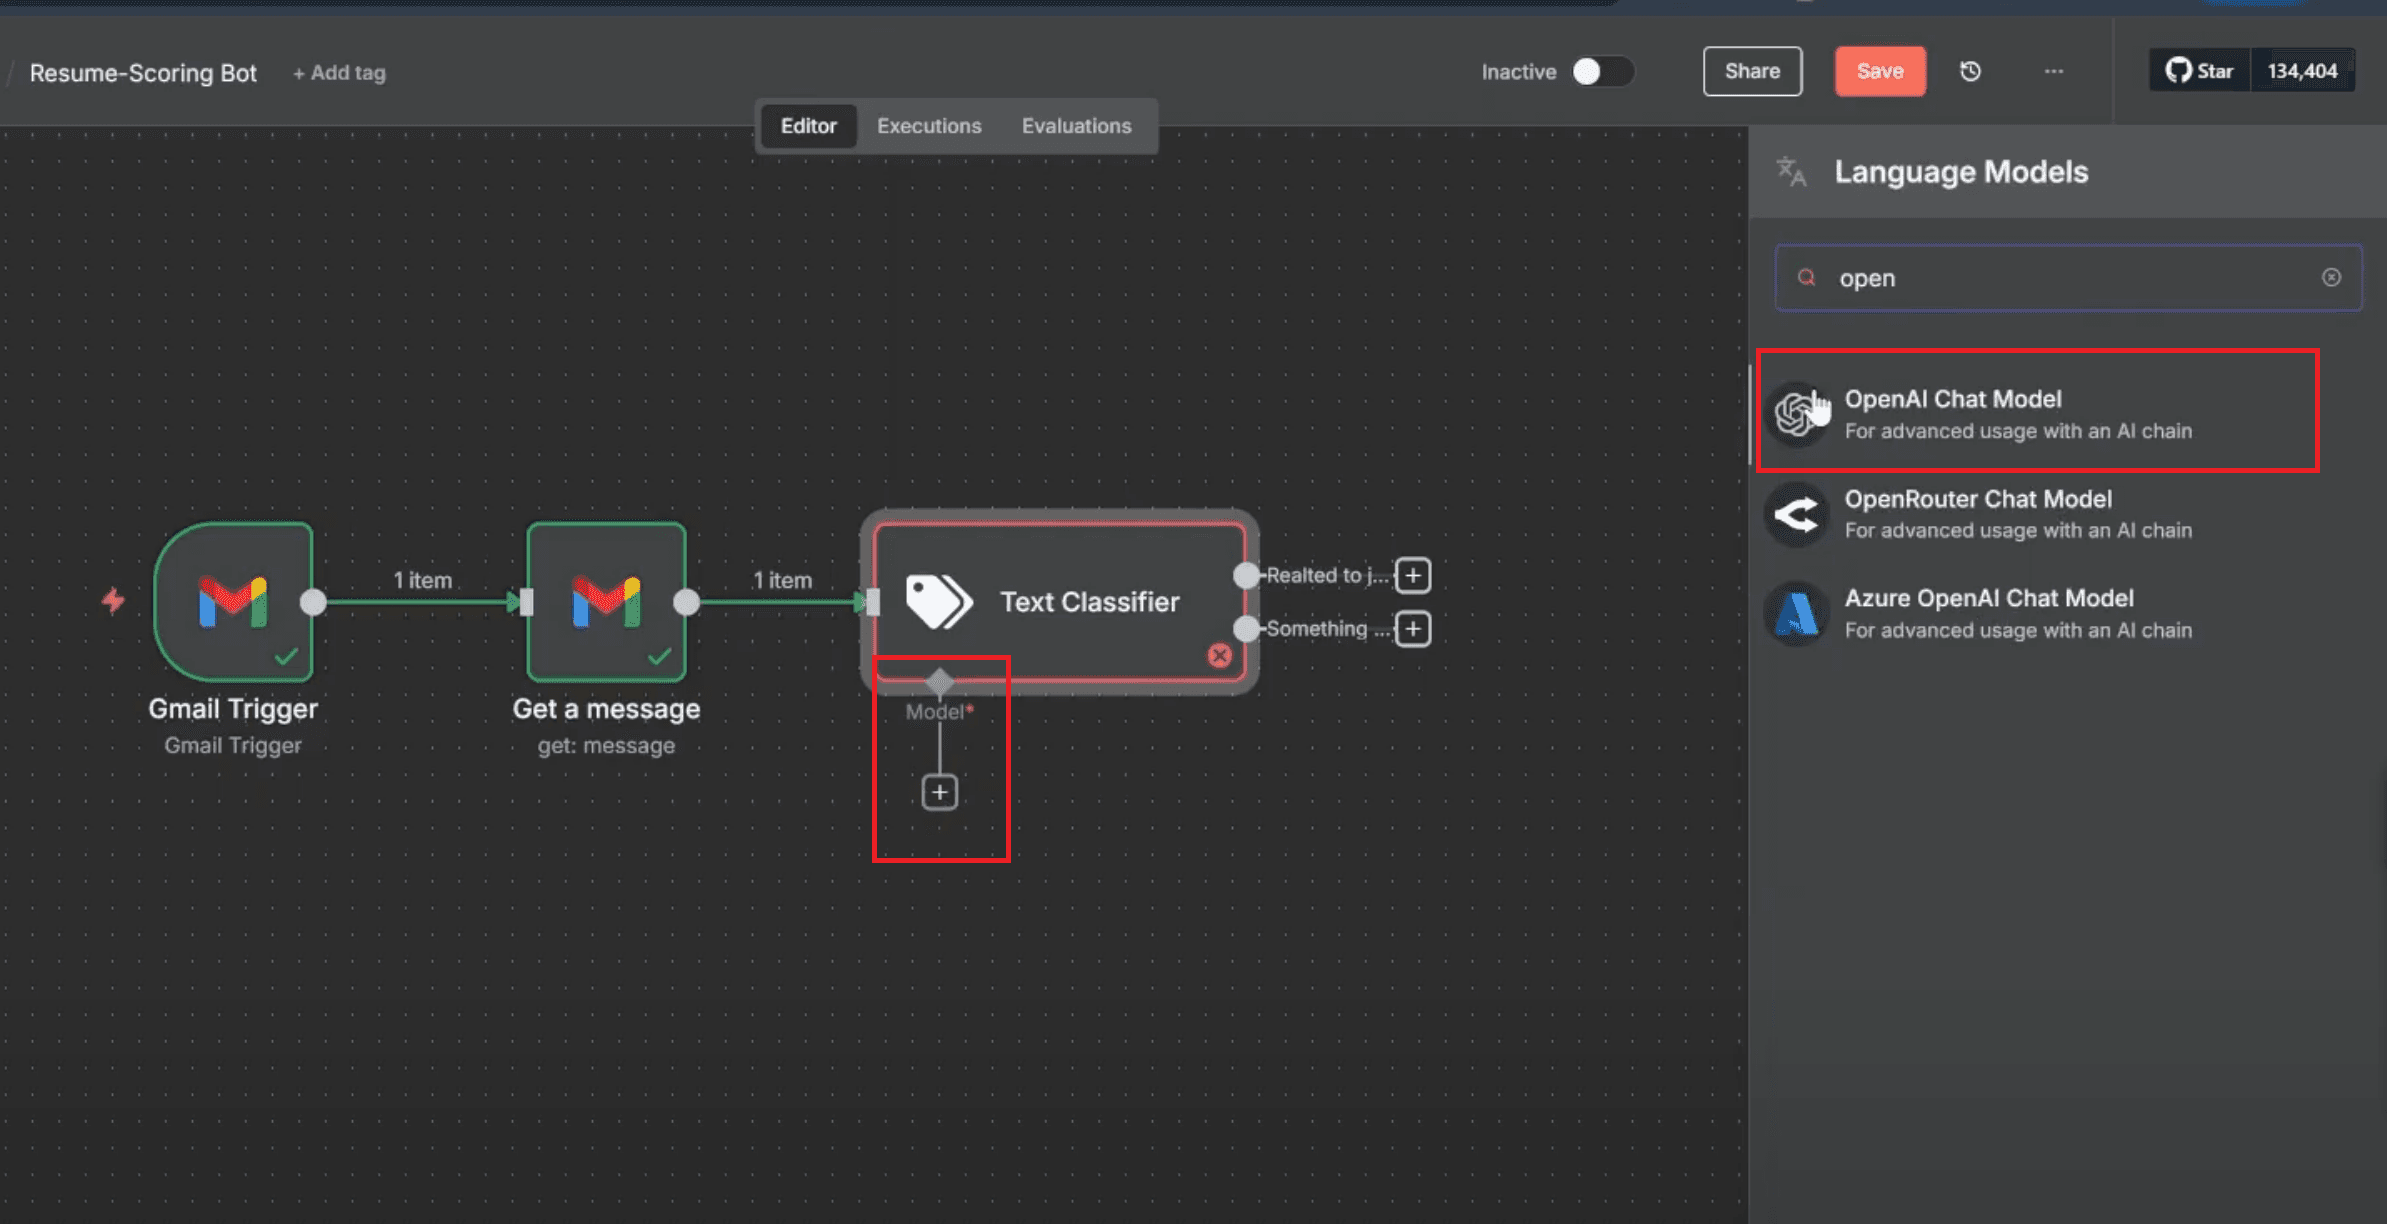
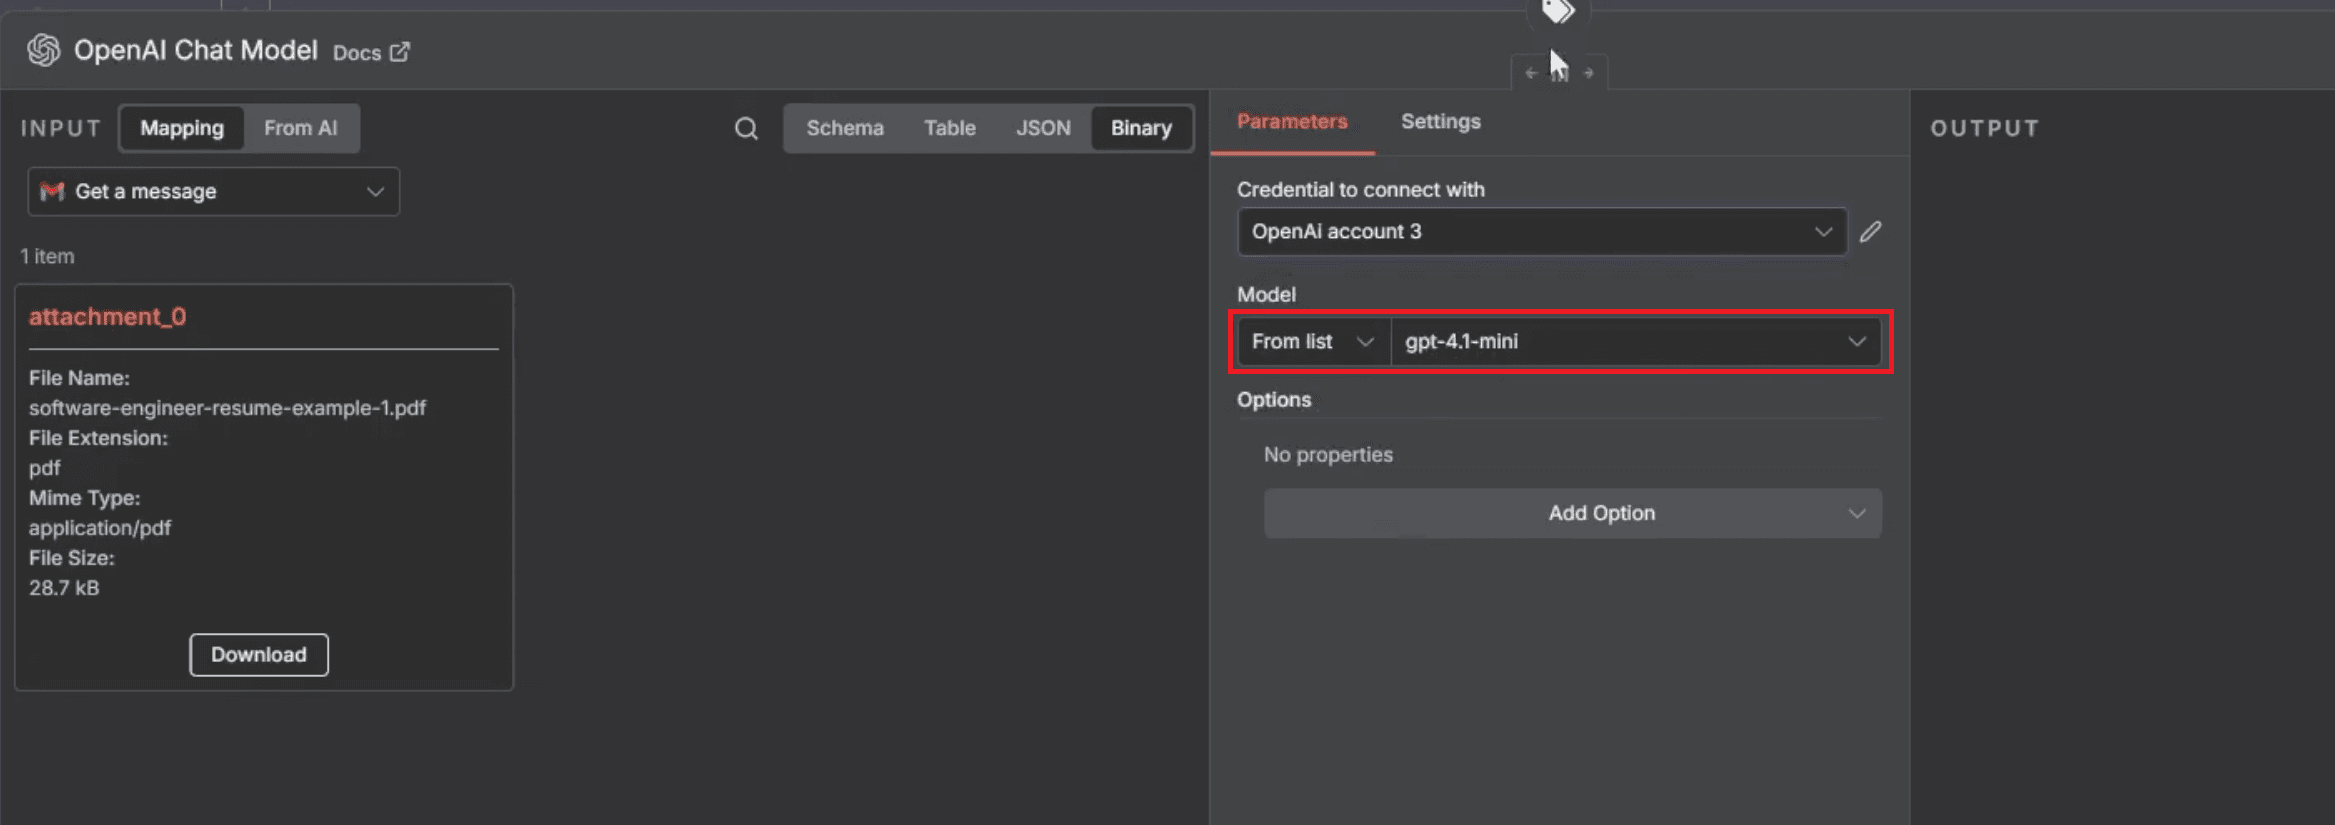
5. Configure the OpenAI Chat Model Settings
Select your OpenAI credentials.
Under Model, choose “From list → gpt-4.1-mini” (or the model shown in the image).
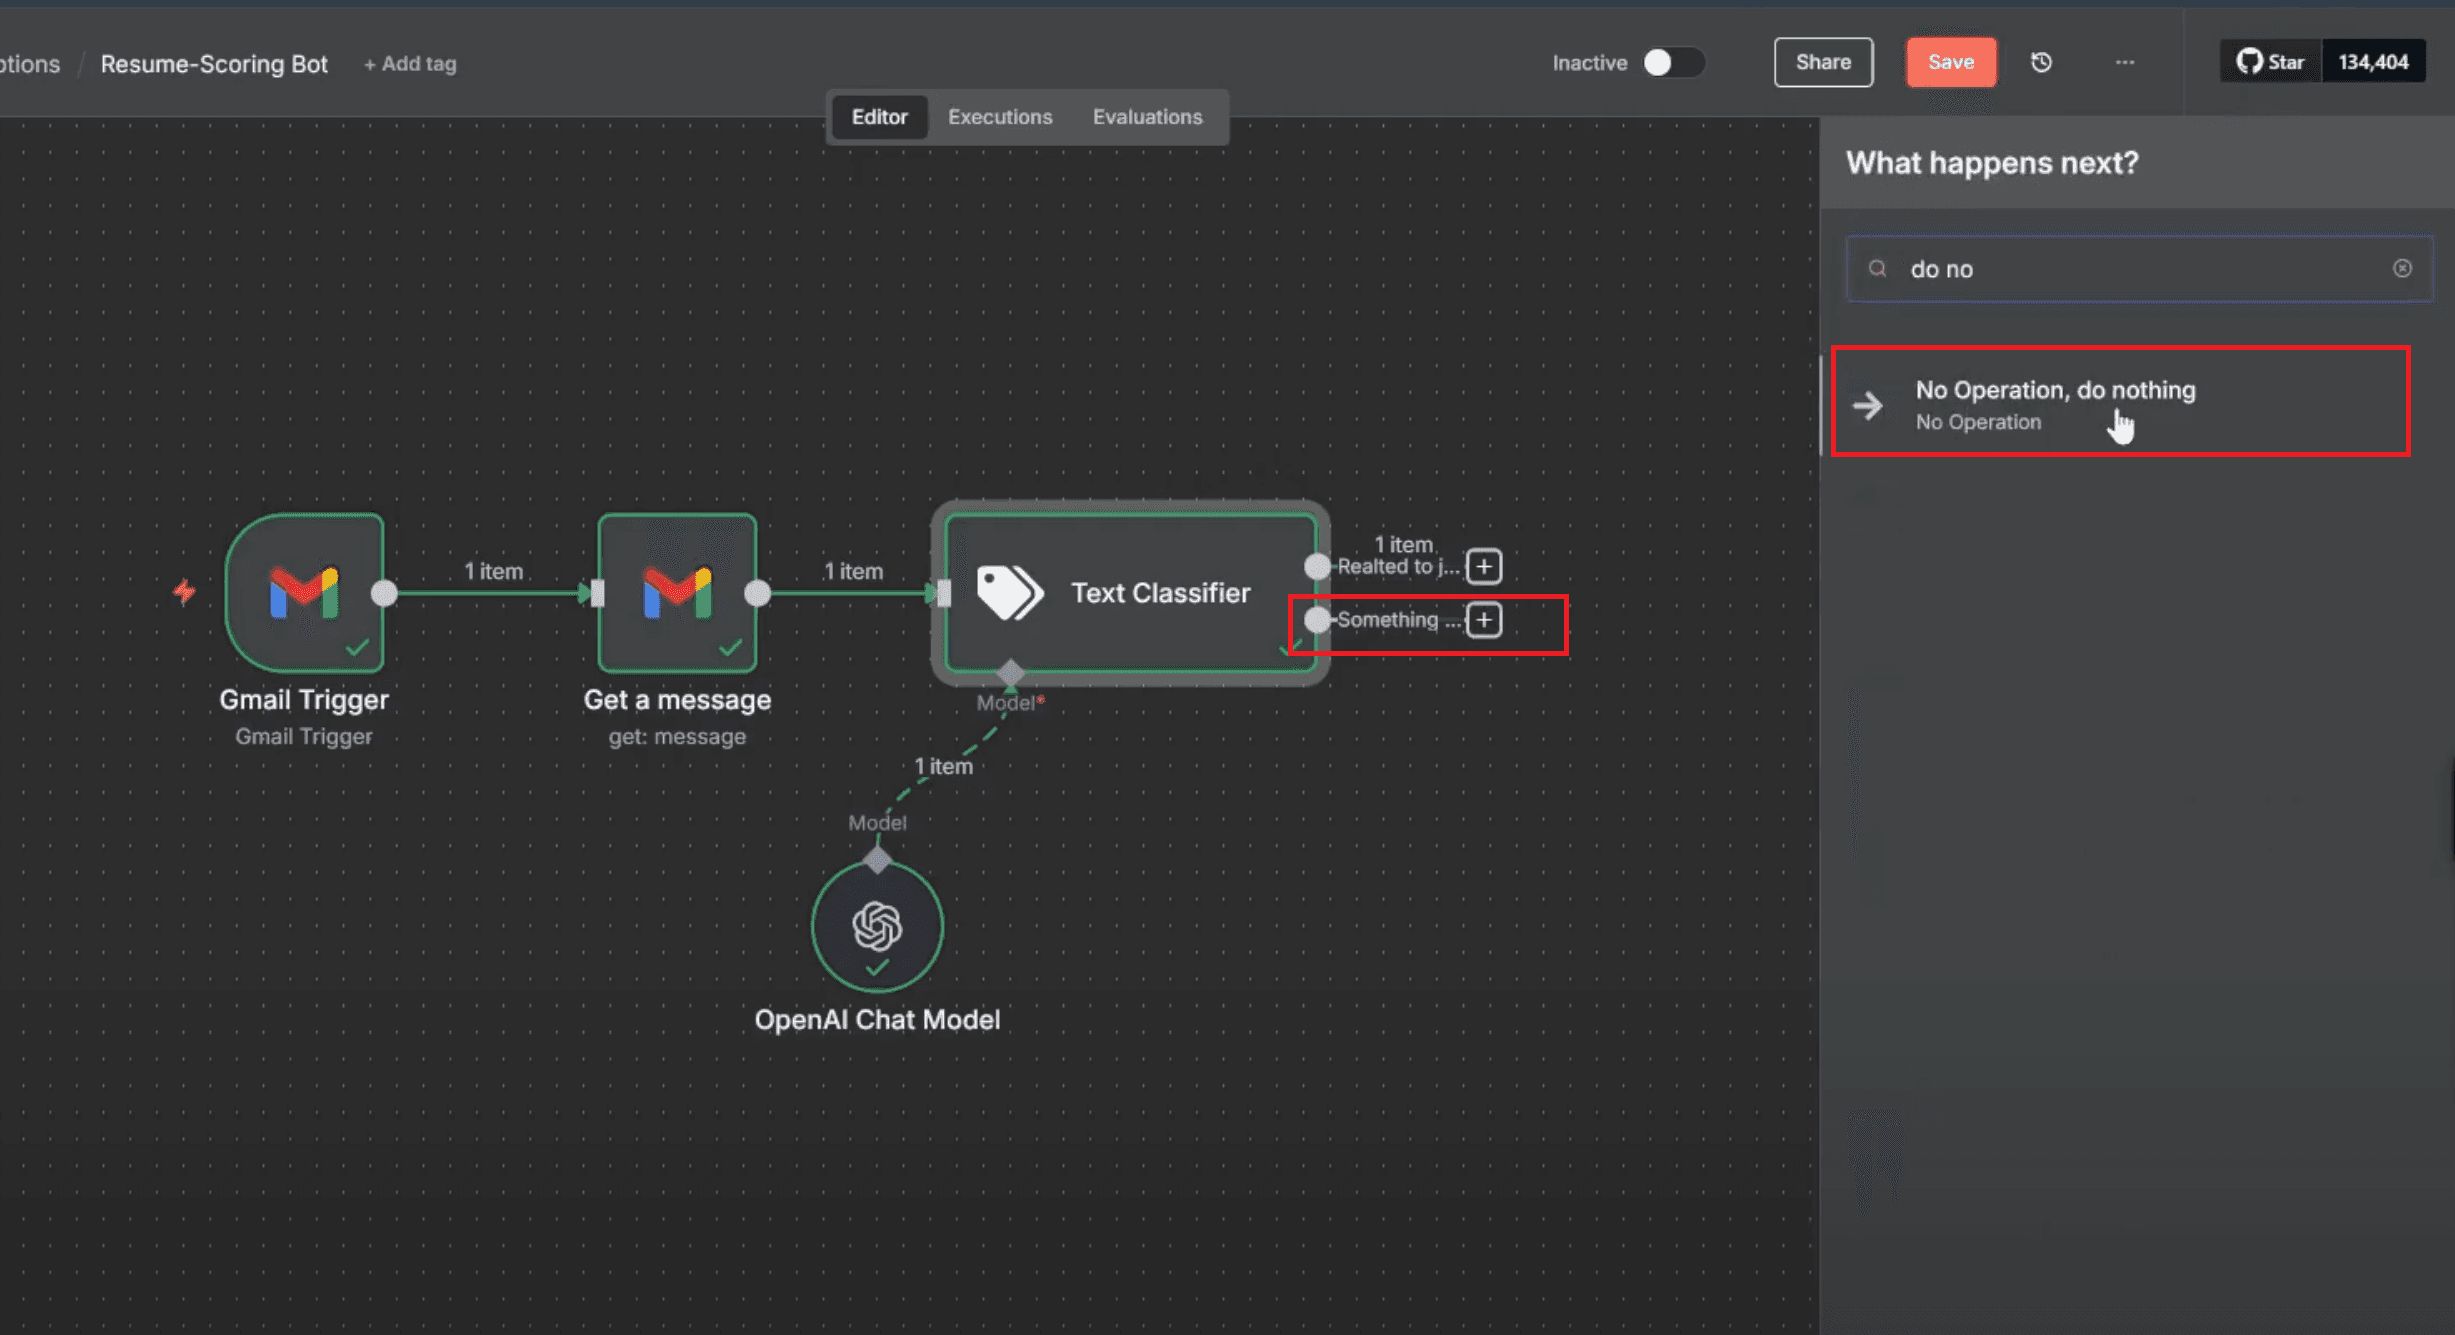
6. Handle Unrelated Emails (Optional but Recommended)
Click on the “+” icon next to the “Something Else” output.
Search “No Operation, do nothing” and select it. This stops non-job emails from moving forward in the workflow.
Step 4: Extract from File – Read Resume PDF
Once an email passes the classification step, the workflow needs to extract readable content from the attached Resume PDF. This allows the AI to later analyze details like work experience, hard skills, and educational qualifications.
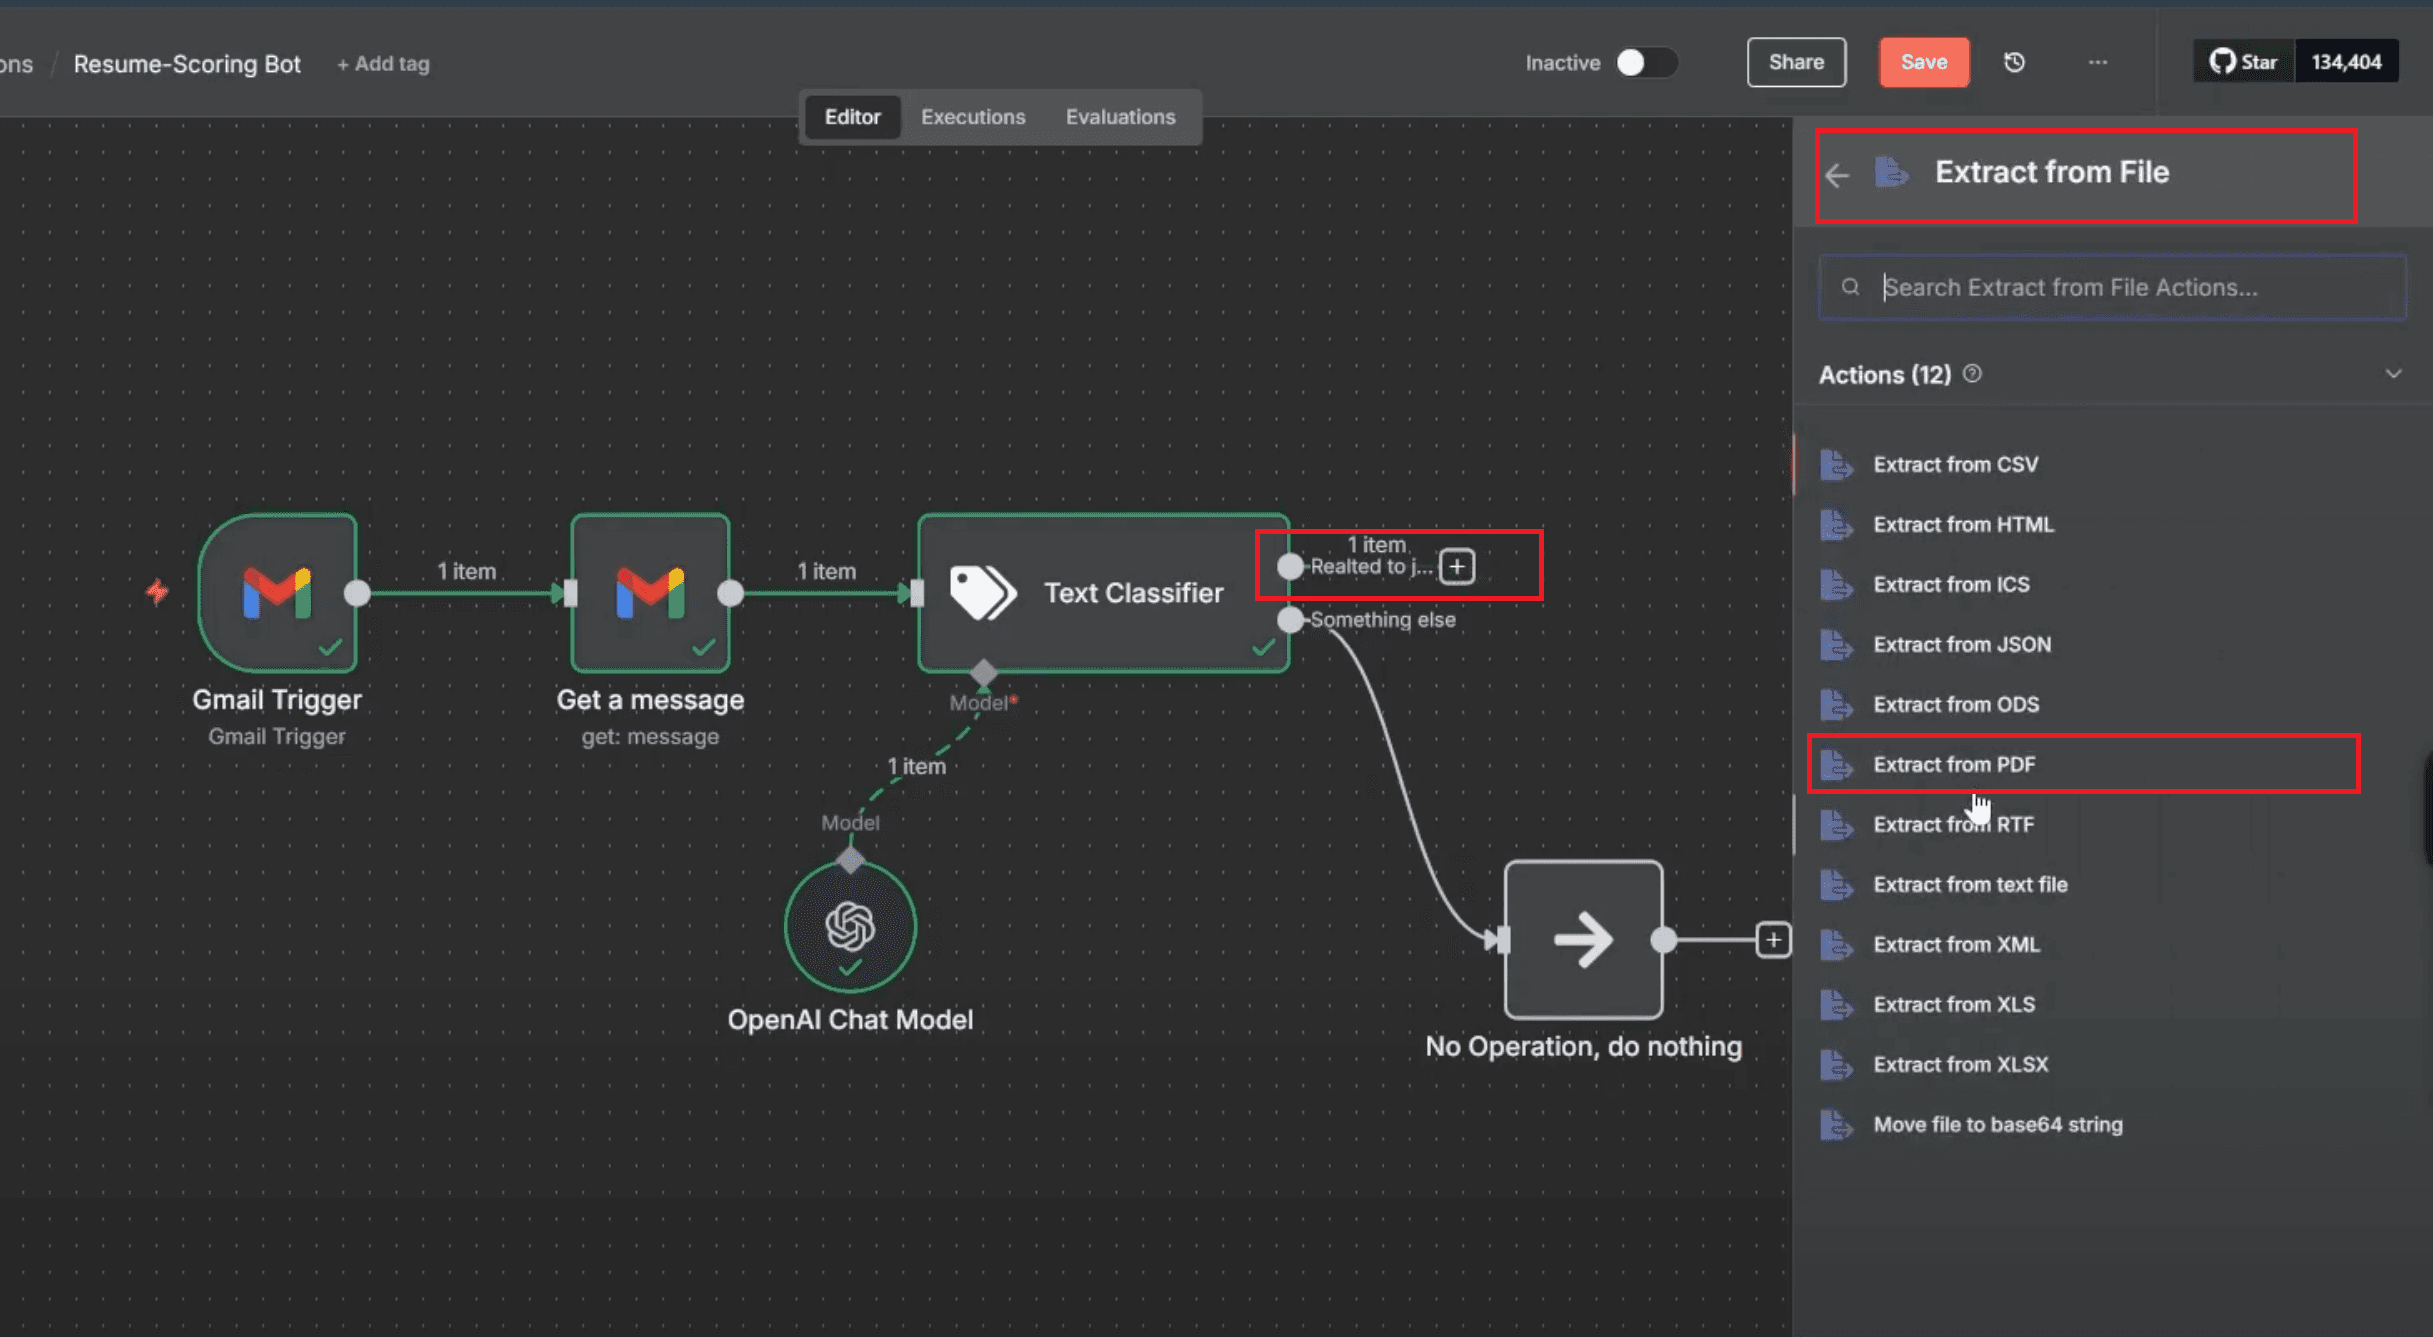
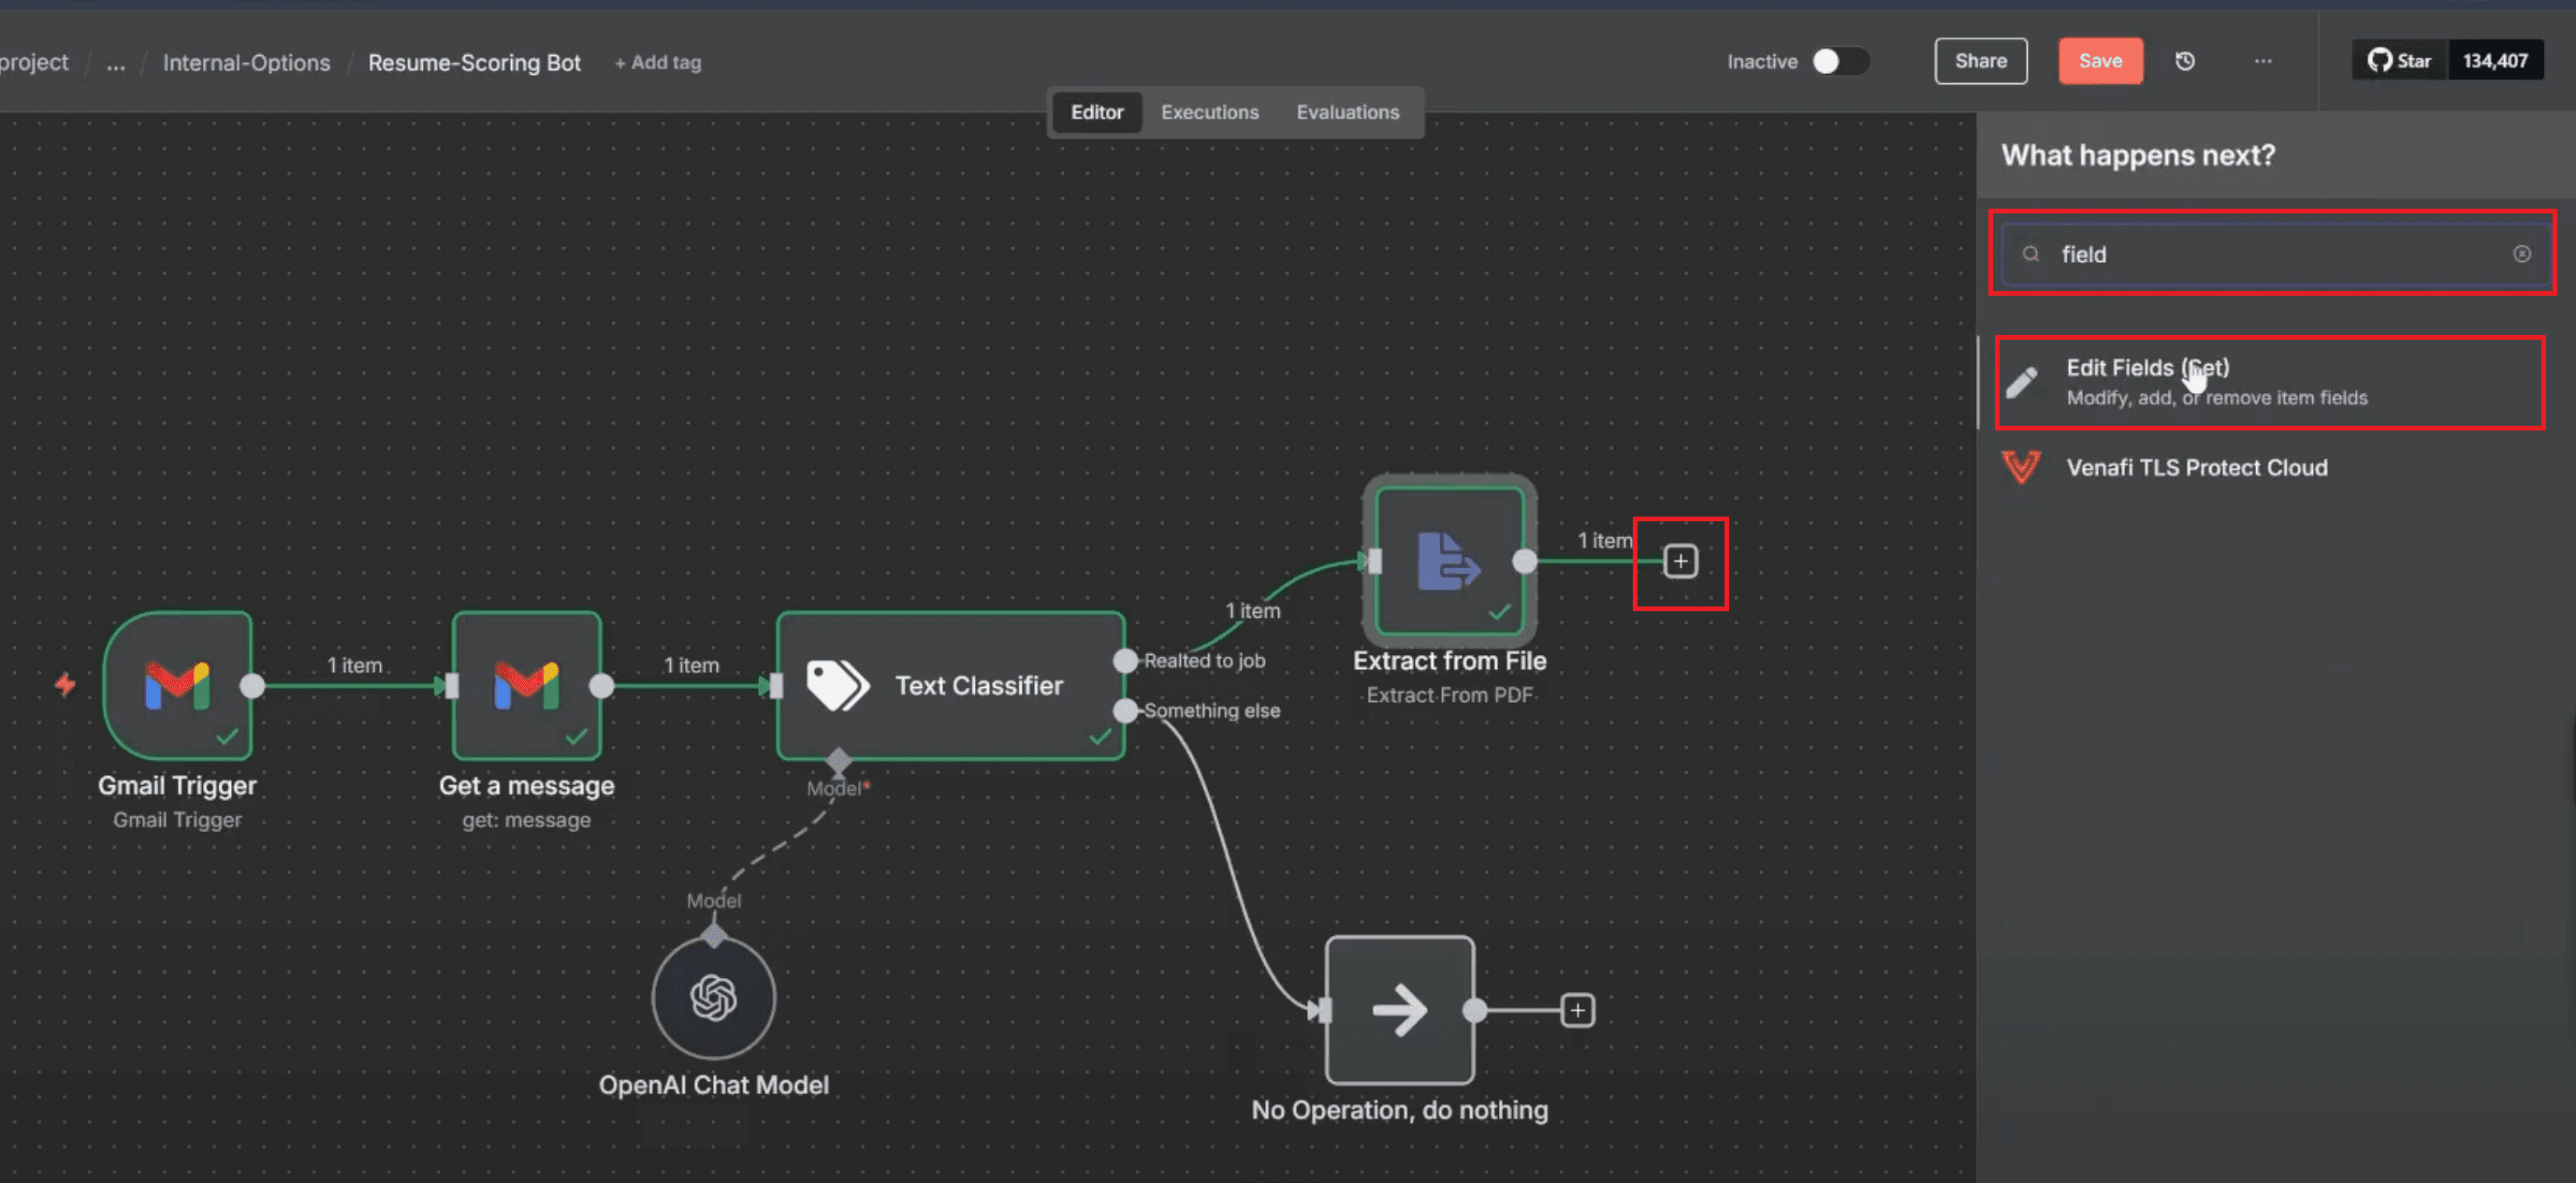
1. Add the Extract from File Node
Click the “+” icon next to the “Related to Job” output from the Text Classifier node.
Search for Extract from File in the right-hand panel.
From the list of available actions, select Extract from PDF.
2. Set the Input Binary Field
In the “Input Binary Field” section, type or select attachment_0.
This refers to the resume file automatically downloaded from the applicant’s email.
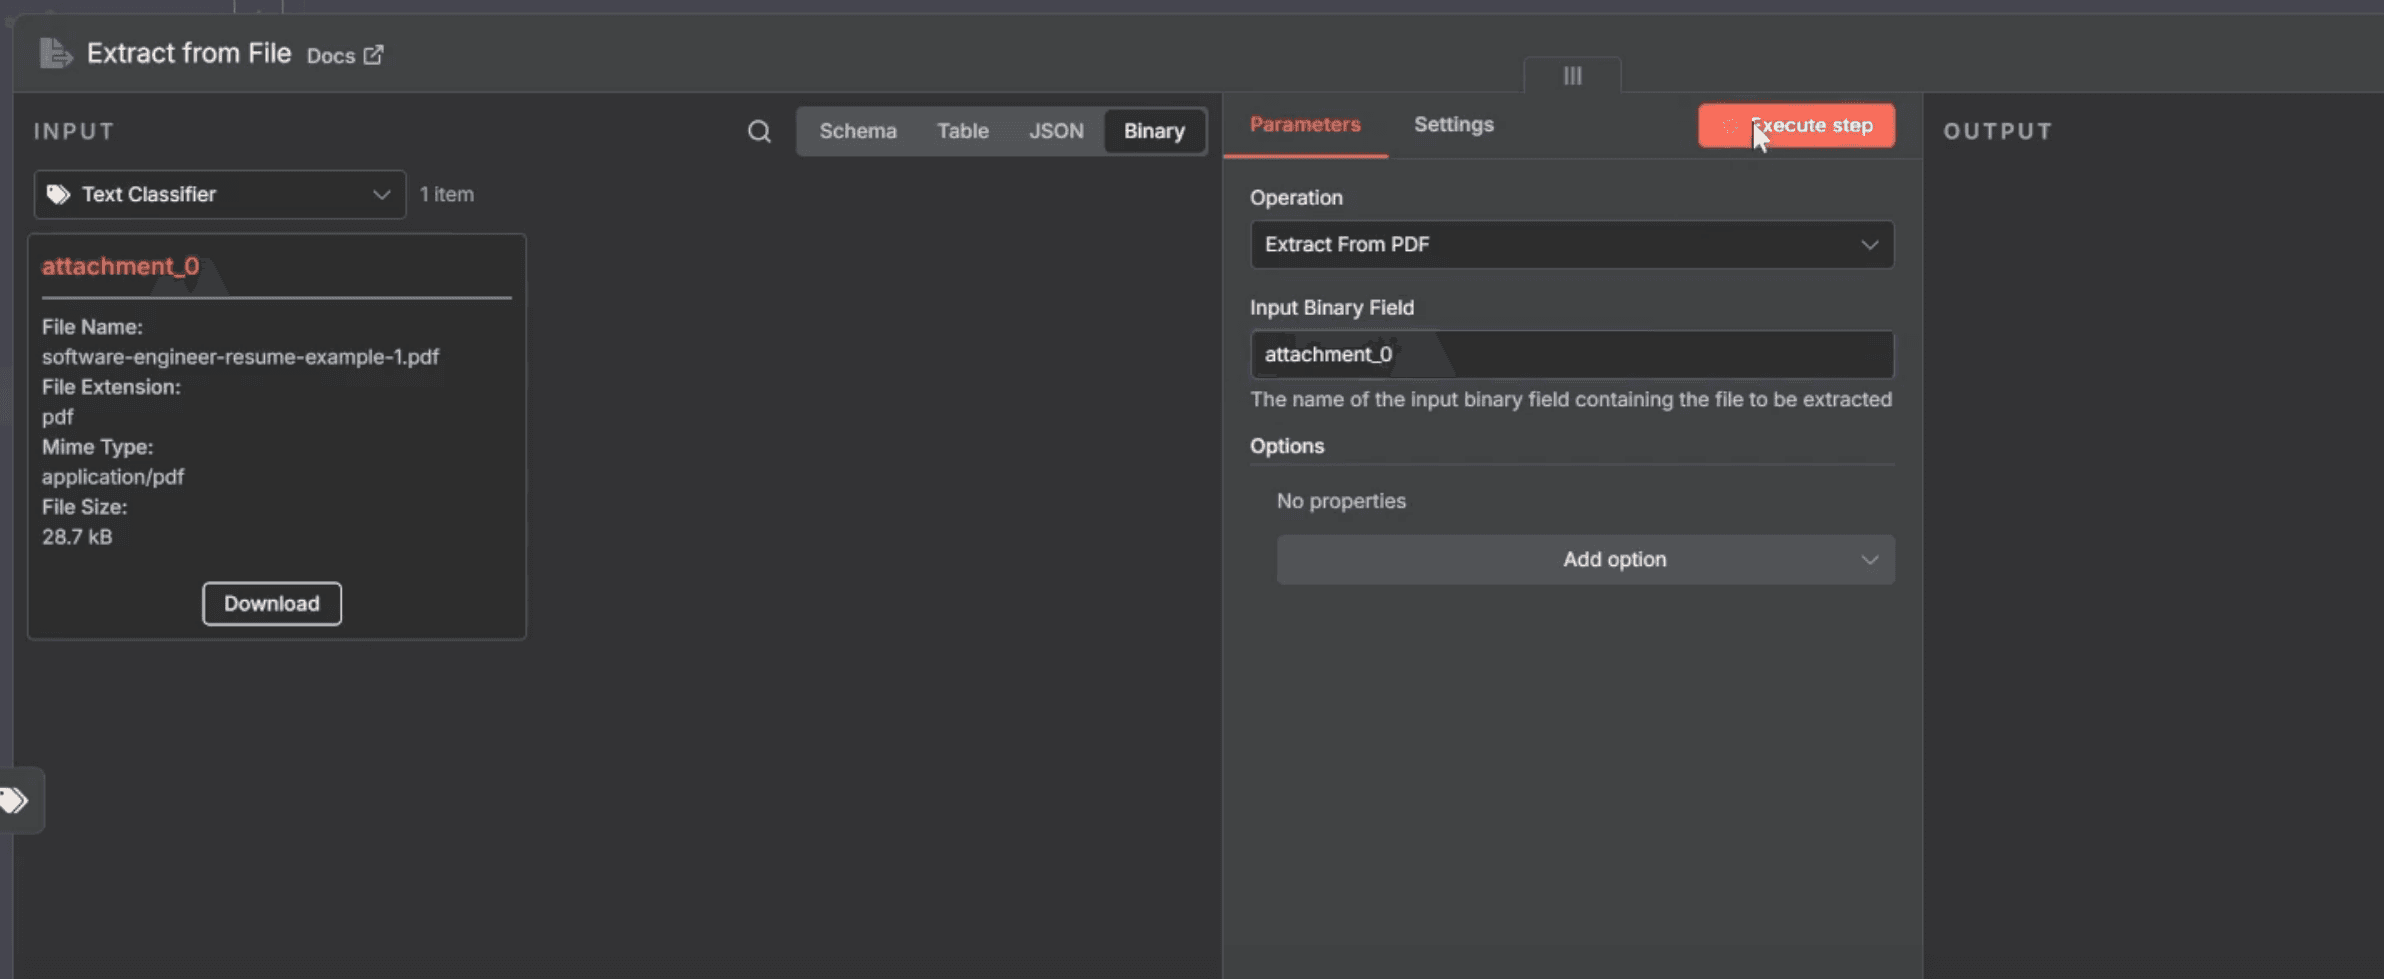
3. Execute the Step
Click Execute Step at the top-right corner to process the Resume PDF.
The node will extract all text data, including job titles, skills, and education, converting the file into an AI-readable format.
This step transforms each Resume PDF into structured, machine-readable data — similar to how professional Resume Optimization tools and AI Resume Analyzers process documents for recruiters. It forms the foundation for intelligent comparison and keyword matching in later steps.
Step 5: Variables – Add Job Description Link
To make resume analysis dynamic, the bot needs to reference the latest job description every time it runs. You can store it as a global variable inside n8n.
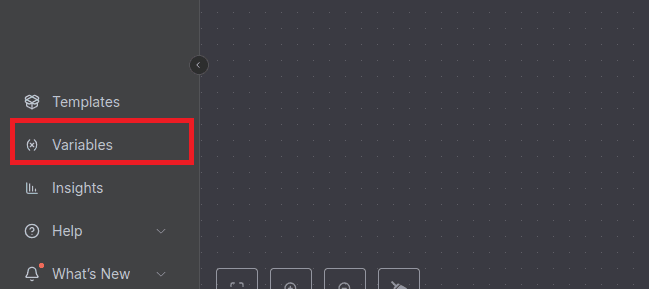
1. Open the Variables Panel
On the left sidebar of your n8n workspace, you’ll see options like Templates, Variables, and Insights.
Click on Variables to open the global variable manager.
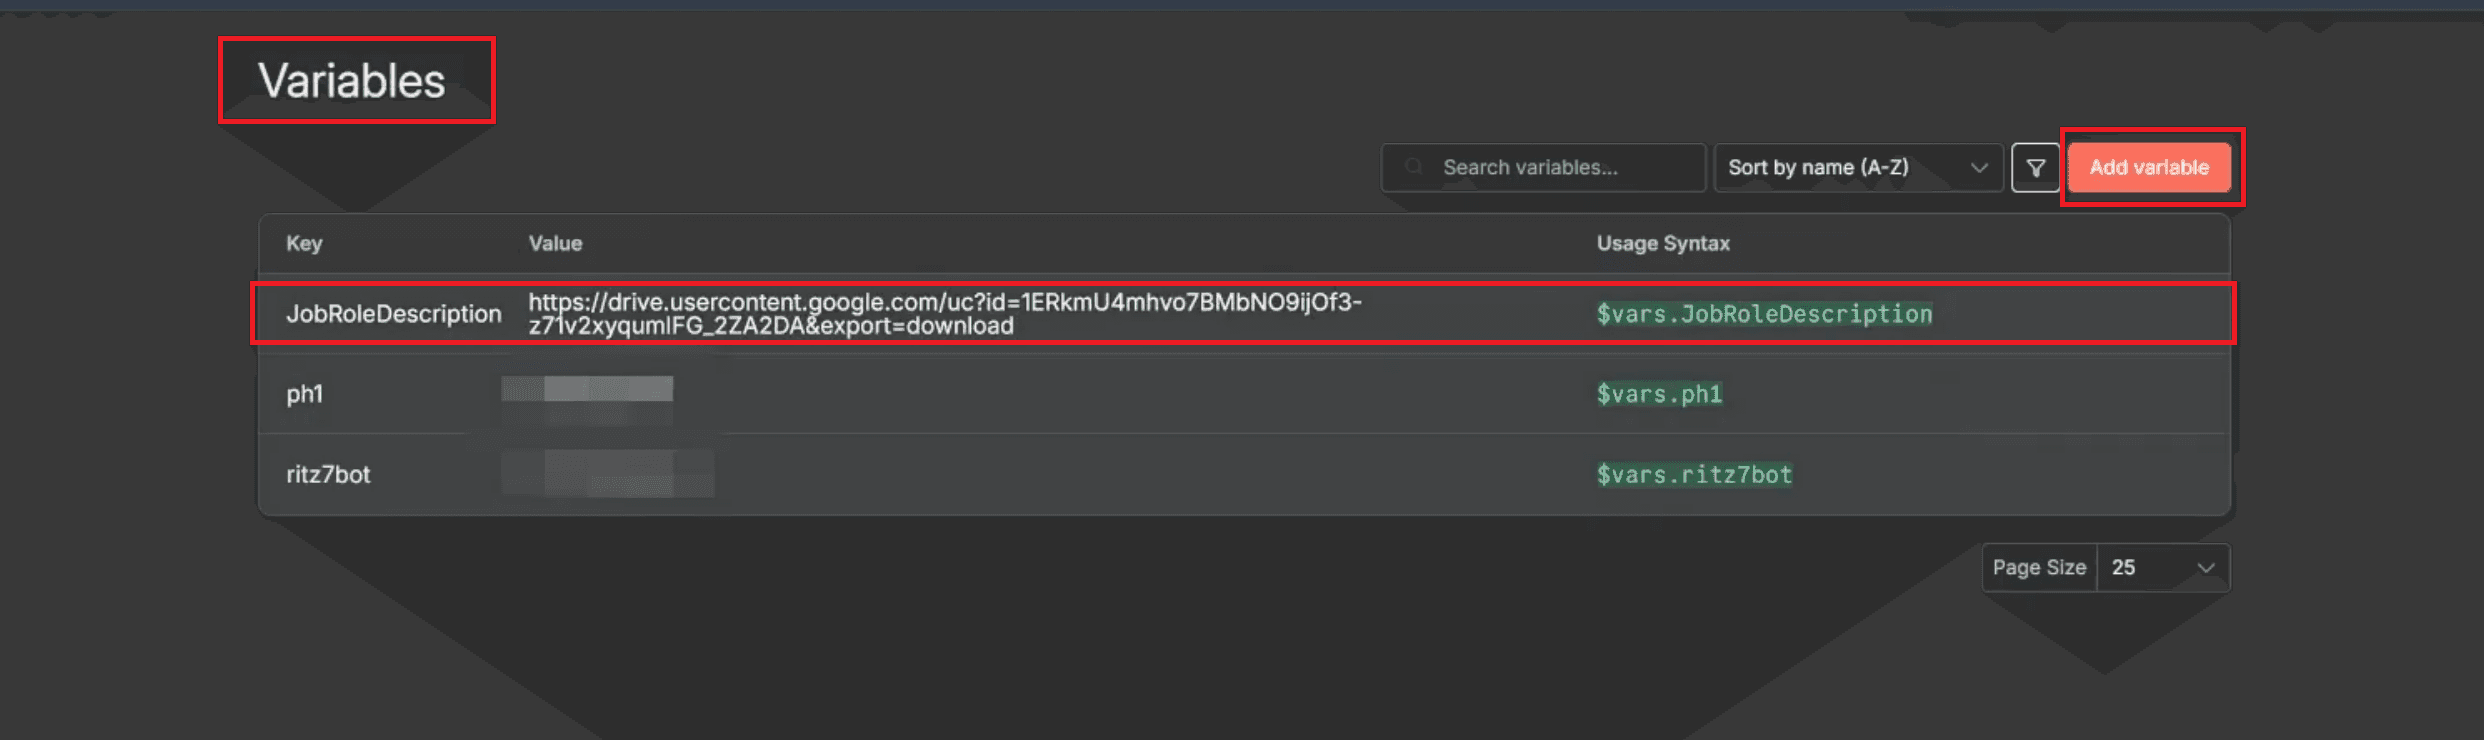
2. Add a New Variable
Click the “Add Variable” button on the top right of the Variables screen.
Under Key, enter
JobRoleDescription.Under Value, paste your Google Docs shareable link containing the job role, required skills, and responsibilities.
Make sure the Google Doc’s share settings allow public viewing or download access — otherwise, the bot won’t be able to fetch it.
3. Save and Confirm
After saving, you’ll see a new variable appear in your list, with a green usage syntax like:
$vars.JobRoleDescription.This variable acts as a dynamic data source. It means whenever you update your job description in Google Docs, the AI Resume Optimizer automatically uses the updated version for scoring.
This approach mirrors how AI-powered recruitment platforms and job boards sync live job data for resume keyword matching, ensuring that candidate evaluations stay accurate and consistent with current hiring criteria.
You Might Also Like:
Step 6: Edit Fields – Include Job Details
Once the resume text is extracted, the next step is to feed the job description into the workflow. This allows the AI to compare both sources — the candidate’s skills, experience, and education against the requirements listed in the job post. By doing this, the system performs more accurate keyword matching and contextual evaluation. It’s the same logic used by AI-powered resume optimizers and ATS platforms to shortlist the most relevant profiles.
Add the Edit Fields Node
After the Extract from File node, click the plus icon and select Edit Fields (Set) from the node list. This node allows you to add or modify fields that can later be used by the AI for evaluation.
Configure the Field
Under Fields to Set, create a new field and enter:Field Name:
Job DetailsType: String
Value:
{{$vars.JobRoleDescription}}
This links the Google Docs variable (created in the previous step) to the workflow, making the job description accessible for each resume being analyzed.
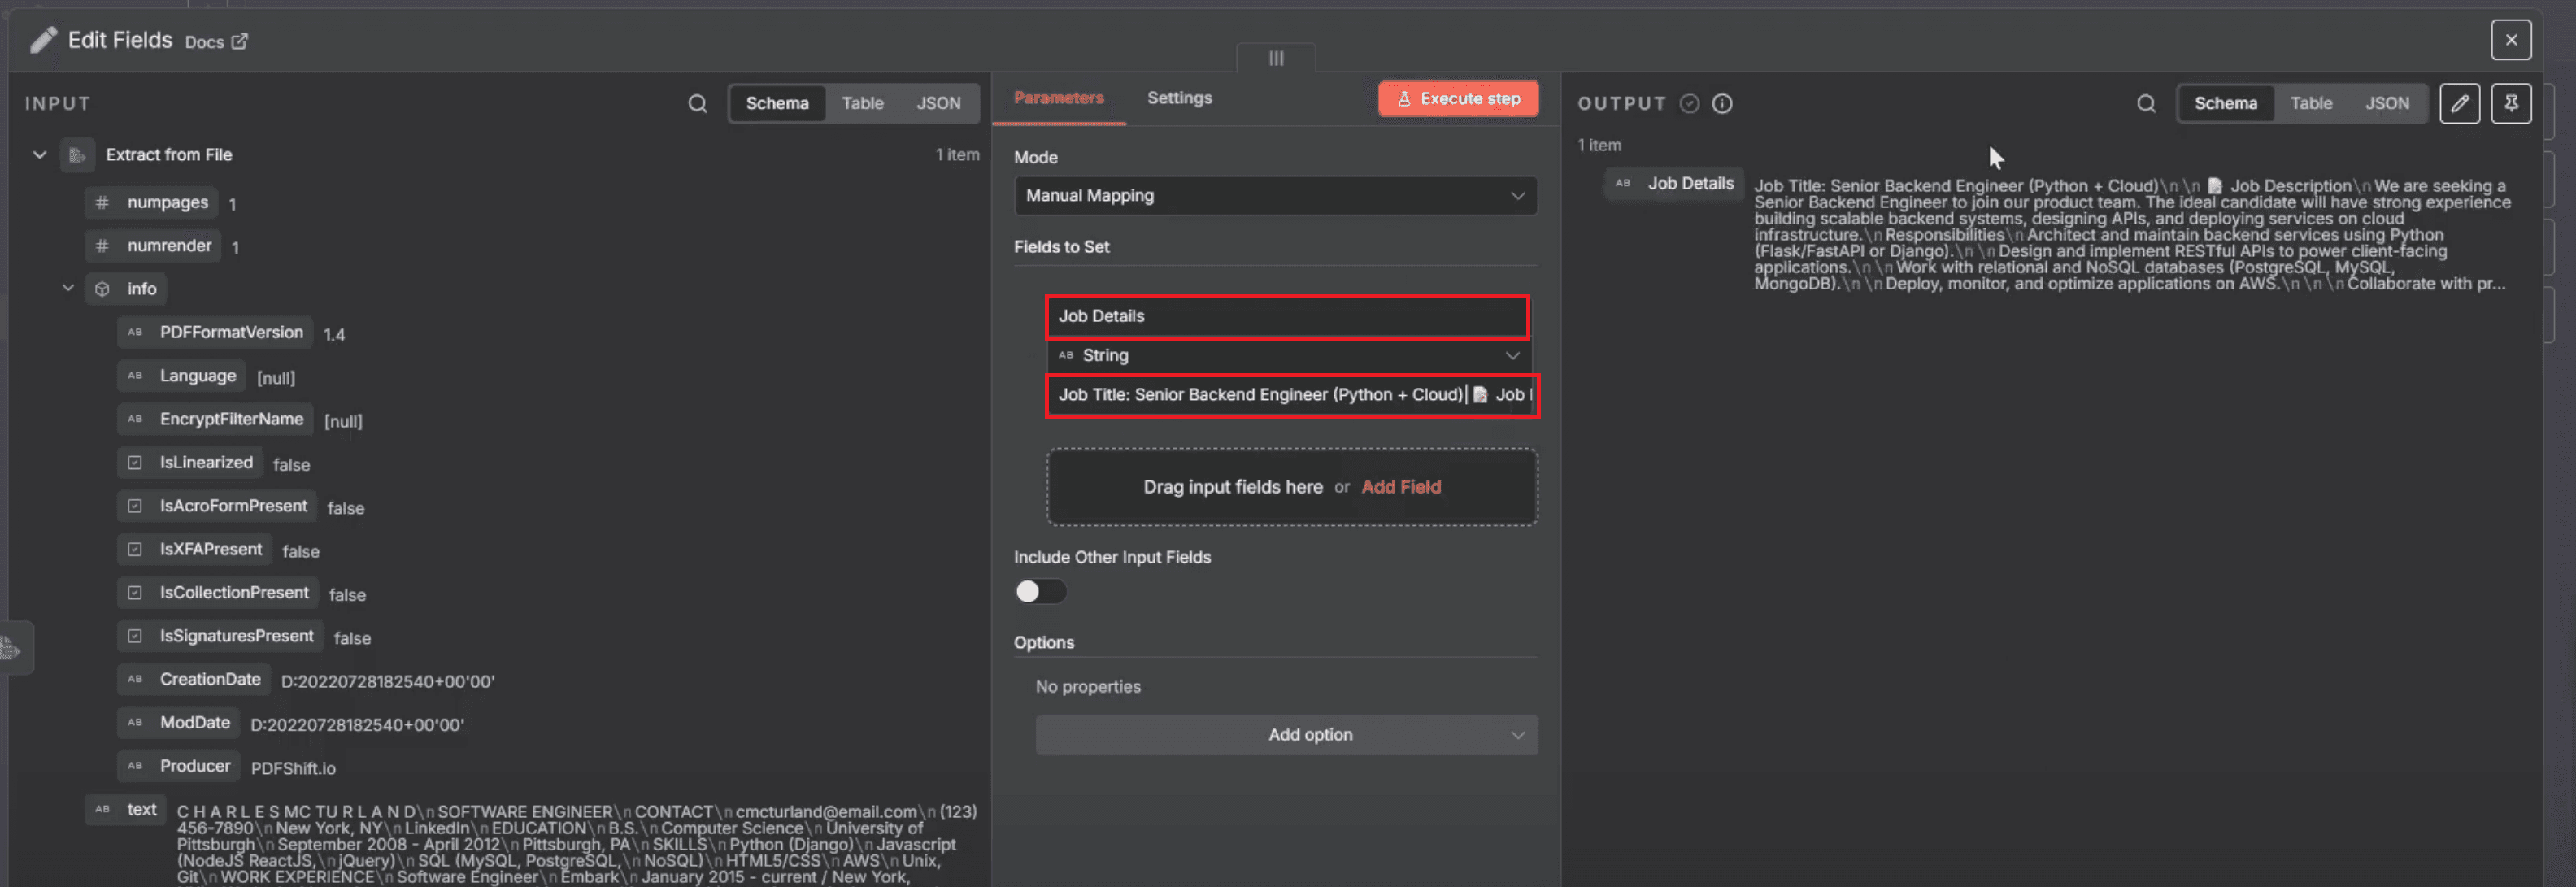
Execute the Node
Click Execute Step to test the configuration.
The output should now display a new field named Job Details containing the full job description text pulled dynamically from your Google Docs link.
Purpose of This Step
Adding the job description at this stage allows the AI to make a structured comparison between each Resume PDF and the associated job role. This ensures every evaluation considers the correct responsibilities, skills, and qualifications, improving scoring accuracy and consistency in automated hiring workflows.
Step 7: AI Agent – Analyze & Score Resume
After the resume text and job description have been extracted, the next step is to use an AI Agent to evaluate the candidate’s suitability for the job. This step turns your workflow into a complete AI-powered resume analyzer.
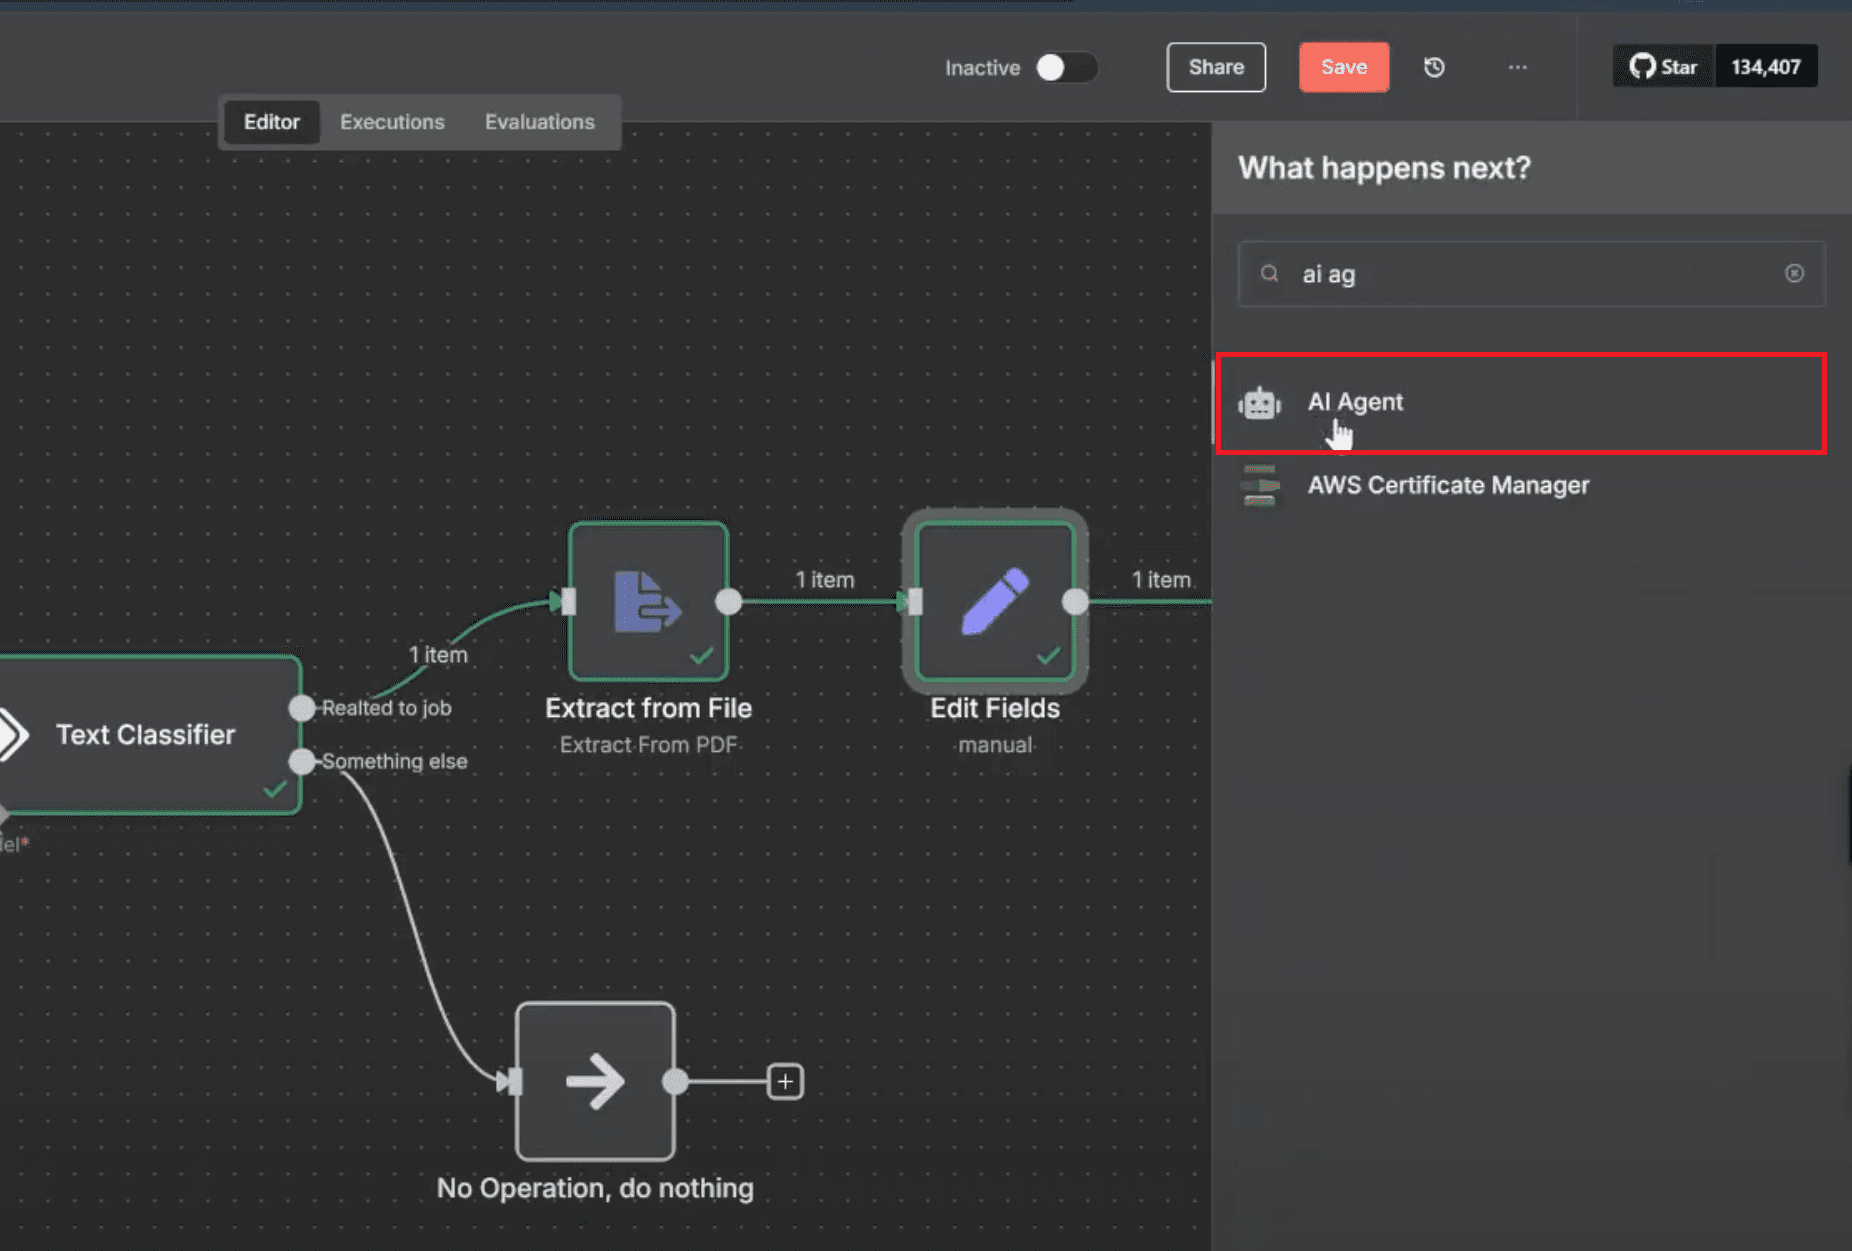
1. Add the AI Agent Node

Click the plus (+) icon after the Edit Fields node. Search for “AI Agent” and select it from the list. This node will handle the resume analysis process.
2. Define the AI Prompt
In the AI Agent node, under Source for Prompt (User Message), choose “Define below.”
Then enter the main instruction inside the Prompt (User Message) box.
For example:
Analyze this resume against the provided job description. Assign a score between 0 and 100 based on relevance, hard skills, and work experience. Summarize the candidate’s strengths, weaknesses, and overall fit for the position.
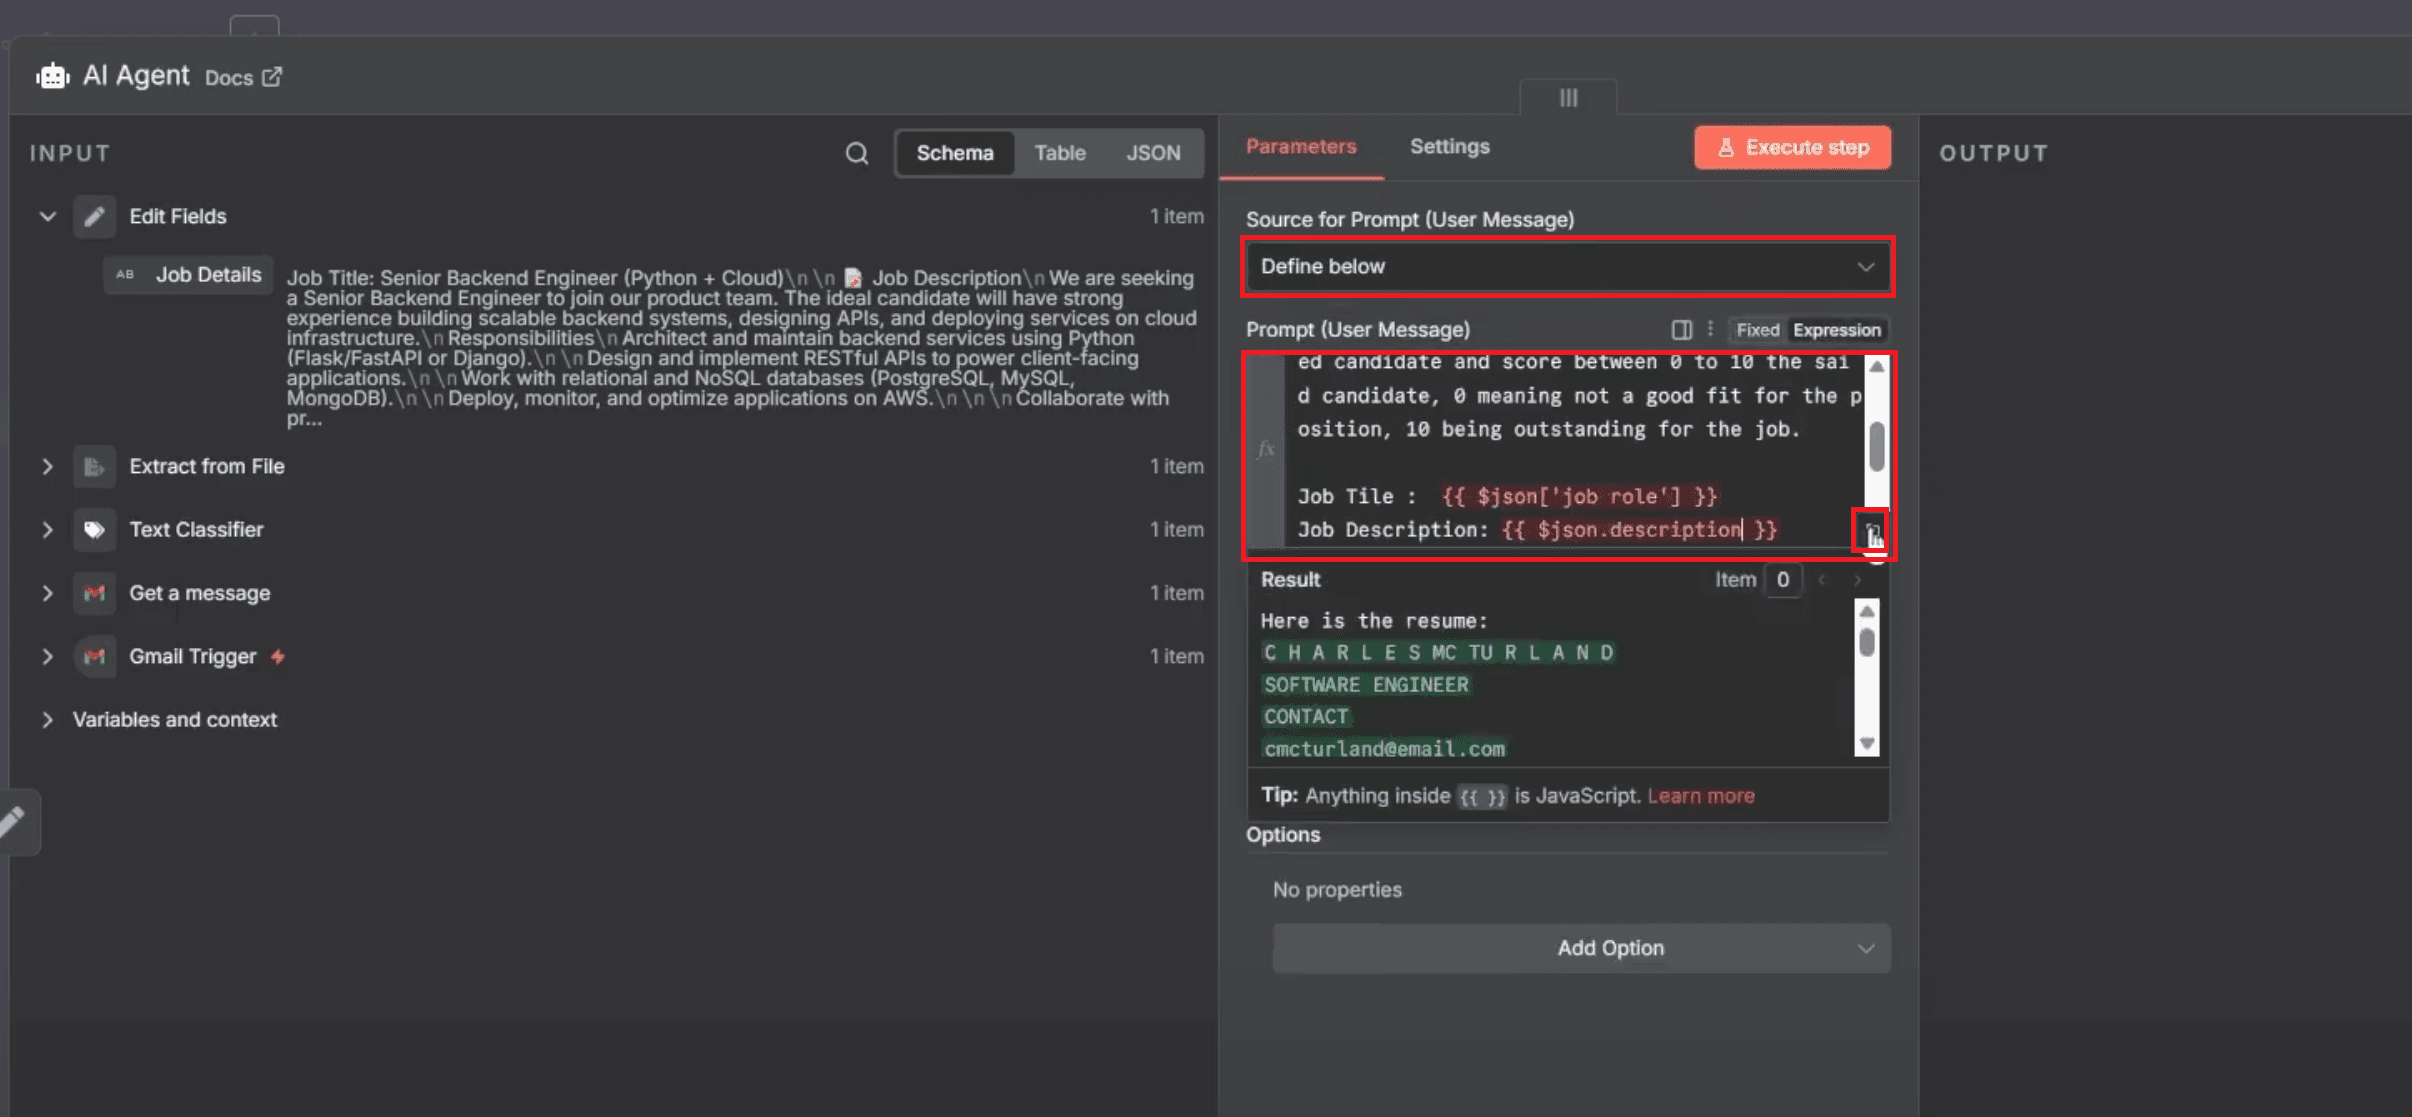
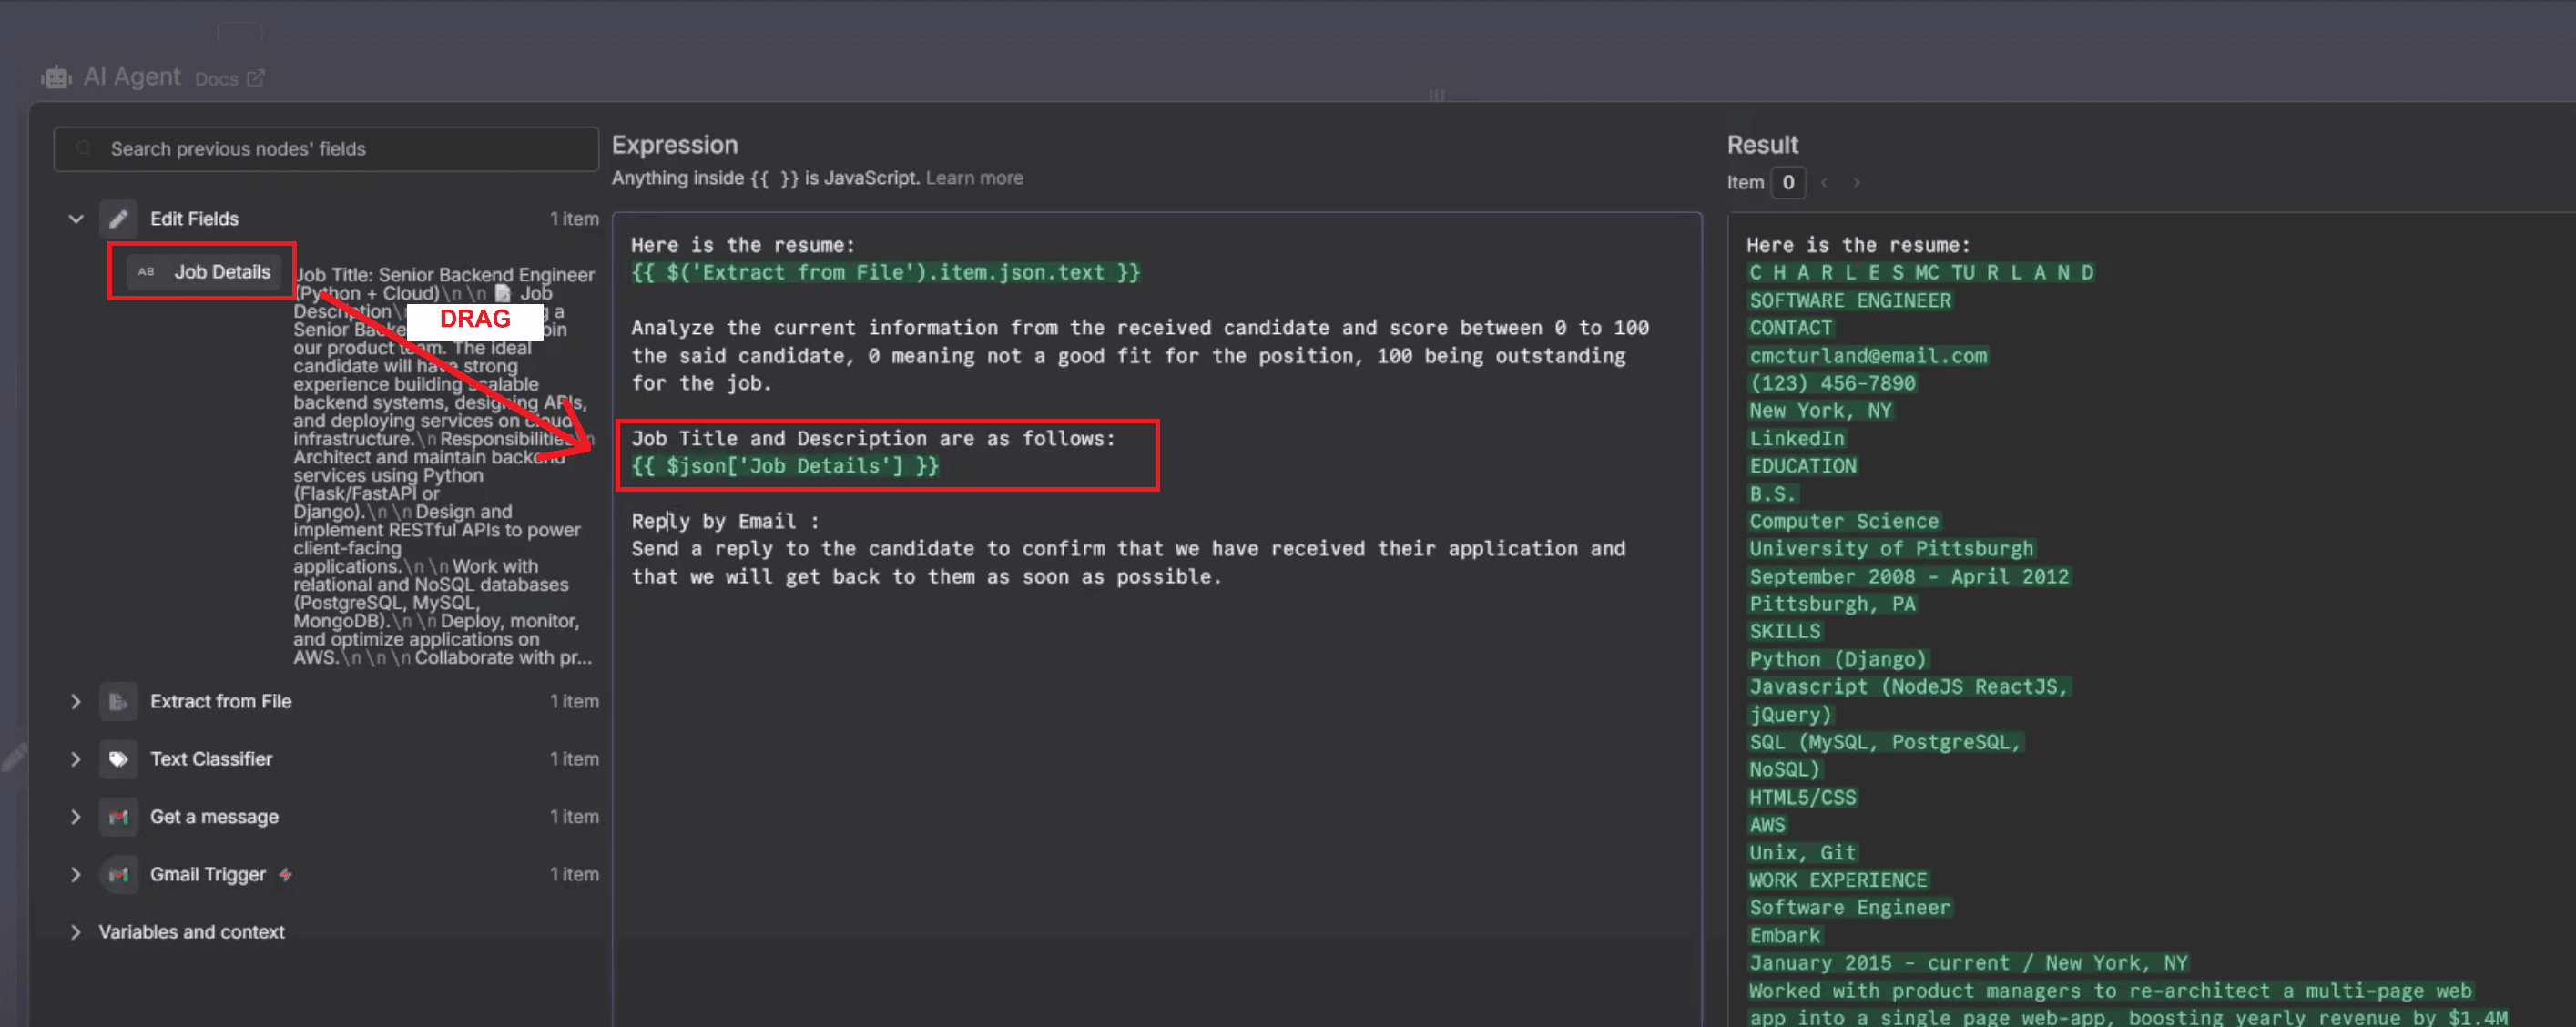
3. Insert Job Description and Resume Variables
Next, add the dynamic data that the AI needs for comparison.
From the left panel, drag Job Details (from the Edit Fields node)
And Resume Text (from the Extract from File node)
into the prompt area.
Your final prompt can include a line like this:
Here is the resume: {{ $('Extract from File').item.json.text }}
Job Title and Description are as follows: {{ $json["Job Details"] }}
This ensures the AI receives real data pulled directly from previous nodes — the job description entered earlier and the candidate’s extracted resume text.
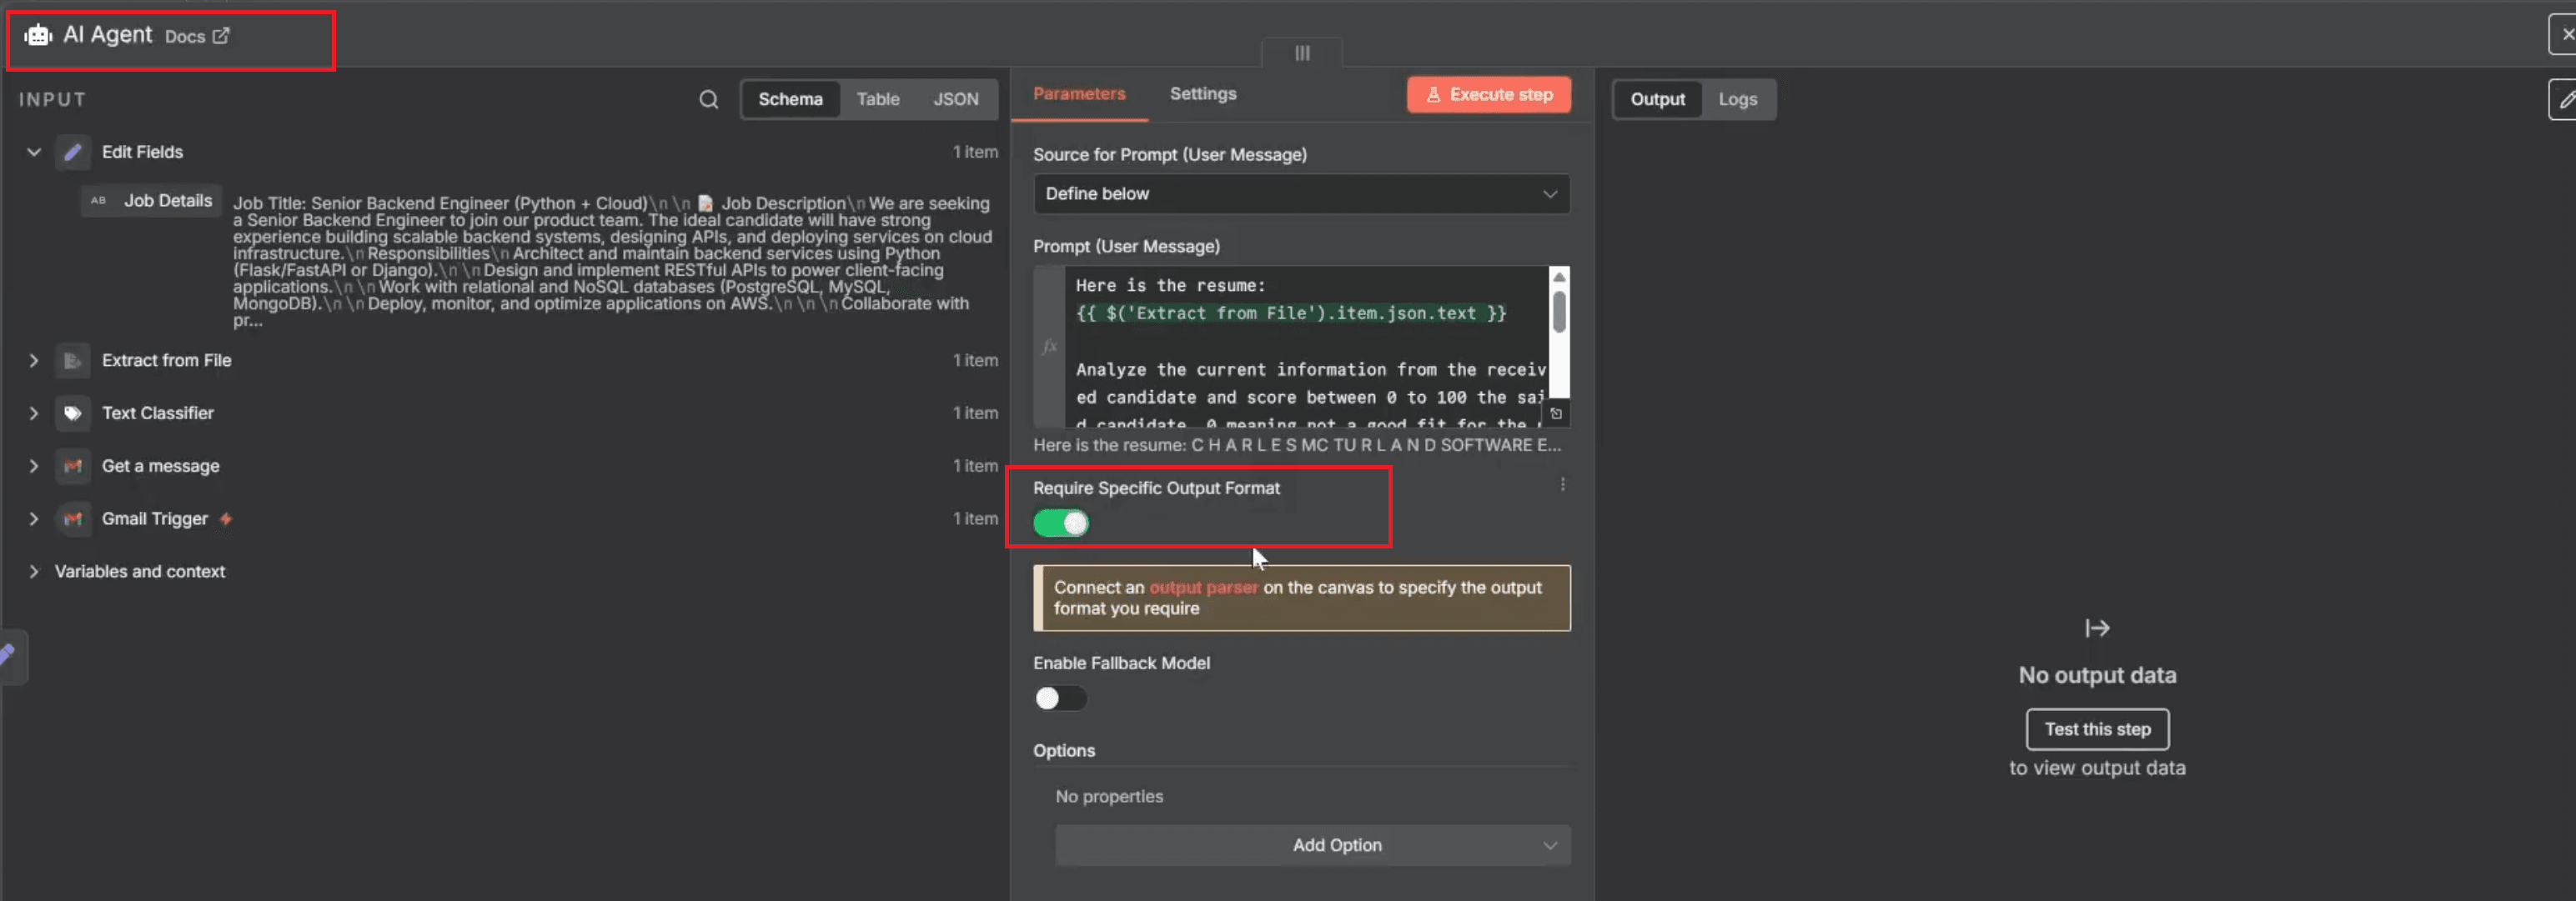
Enable Structured Output Requirement
Once the model is connected, you need to ensure that the AI output follows a consistent format for later parsing and reporting.
• Open the AI Agent node and scroll down in the Parameters panel.
• Toggle the option Require Specific Output Format to ON.
• When enabled, a message appears below it:
“Connect an output parser on the canvas to specify the output format you require.”
(Refer to Image: ai agent -.png)
Step 8: Chat Model – Connect OpenAI GPT
Below the AI Agent node, click the plus (+) icon under Chat Model.
Search for and select OpenAI Chat Model.
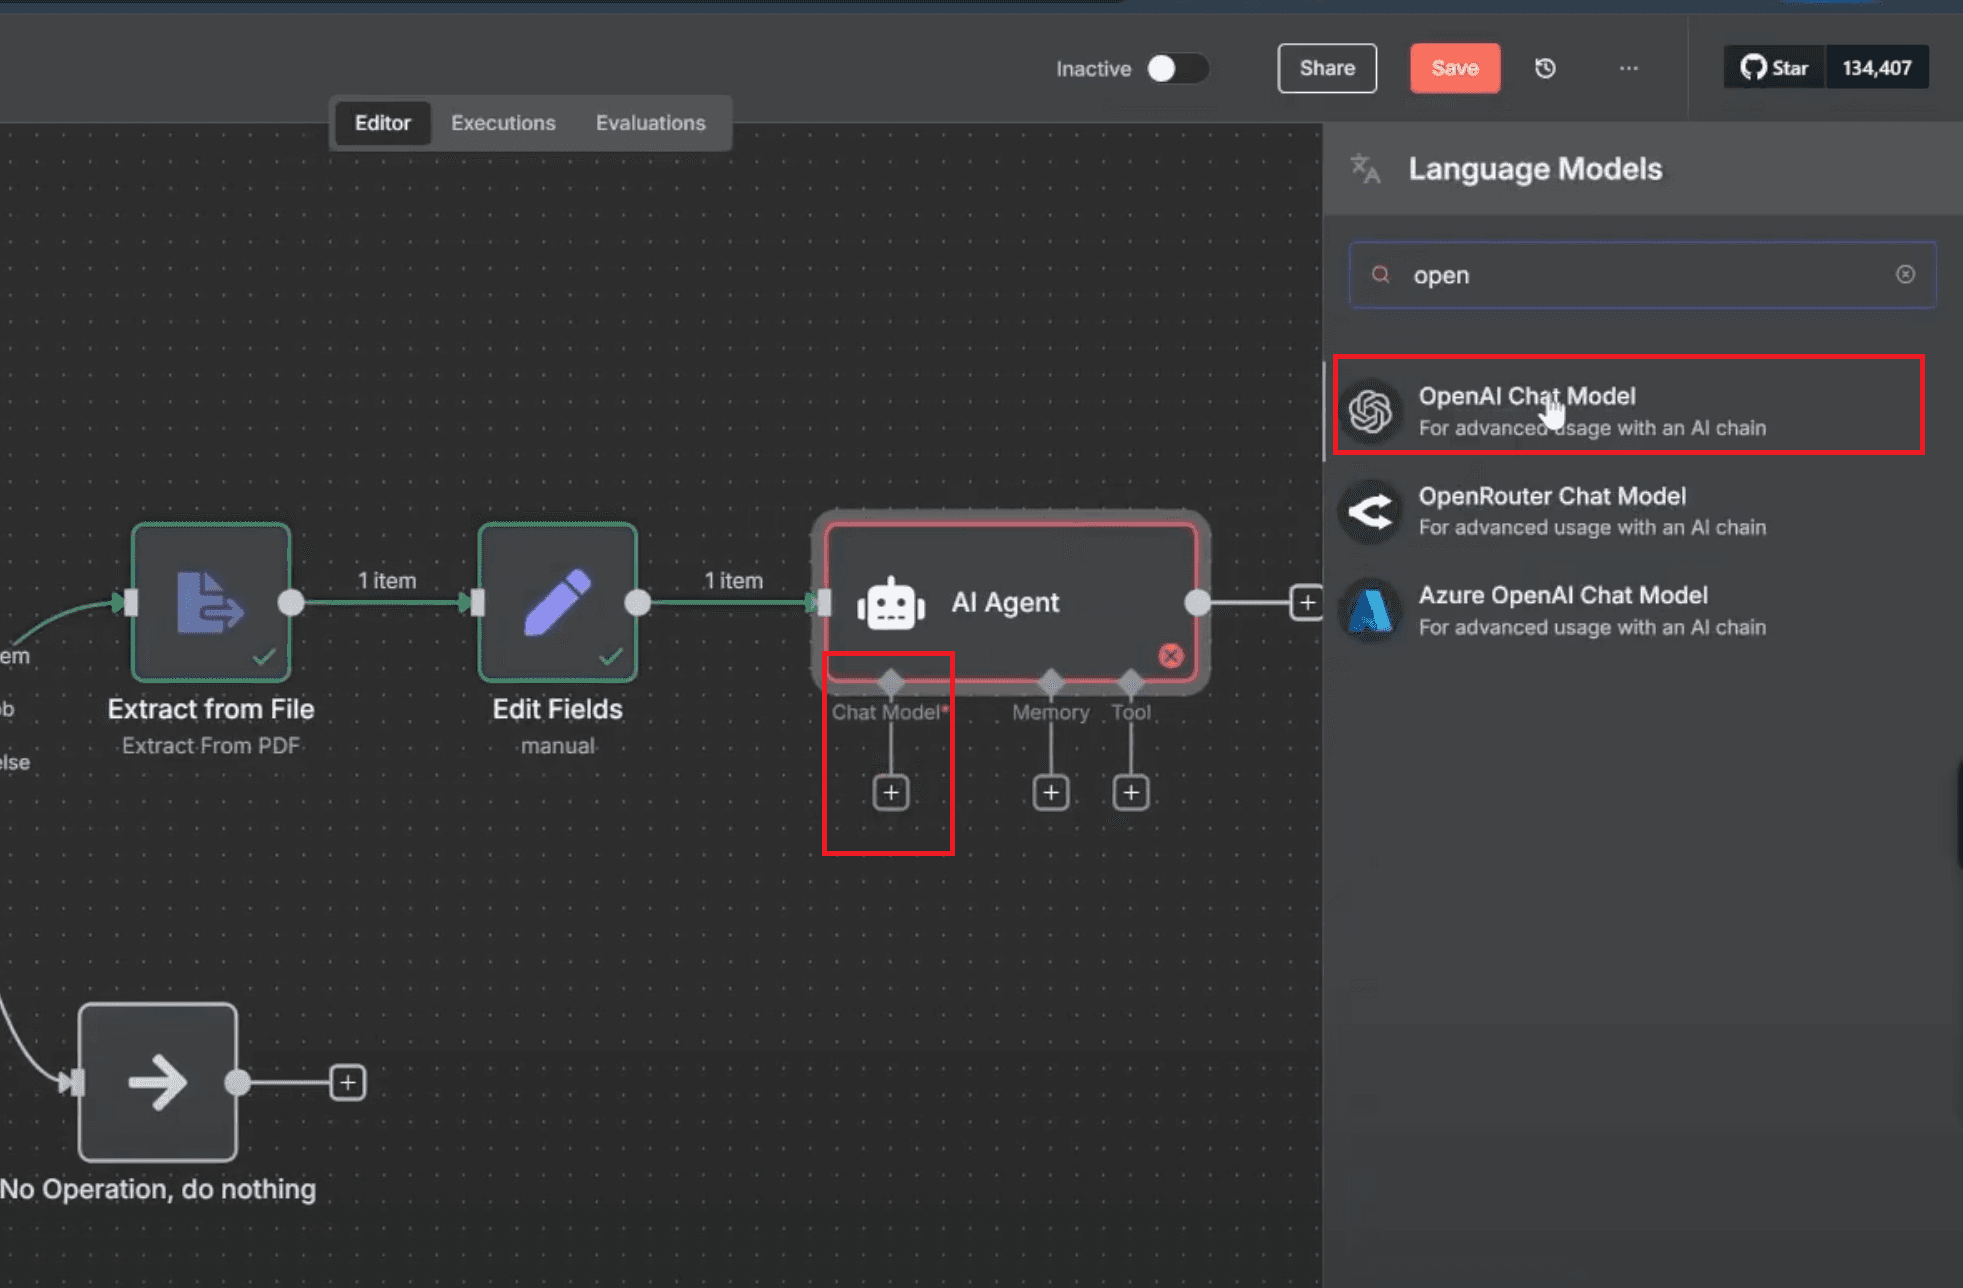
In the model settings:
Credential to connect with: Select your OpenAI account
Model: Choose
gpt-4.1-mini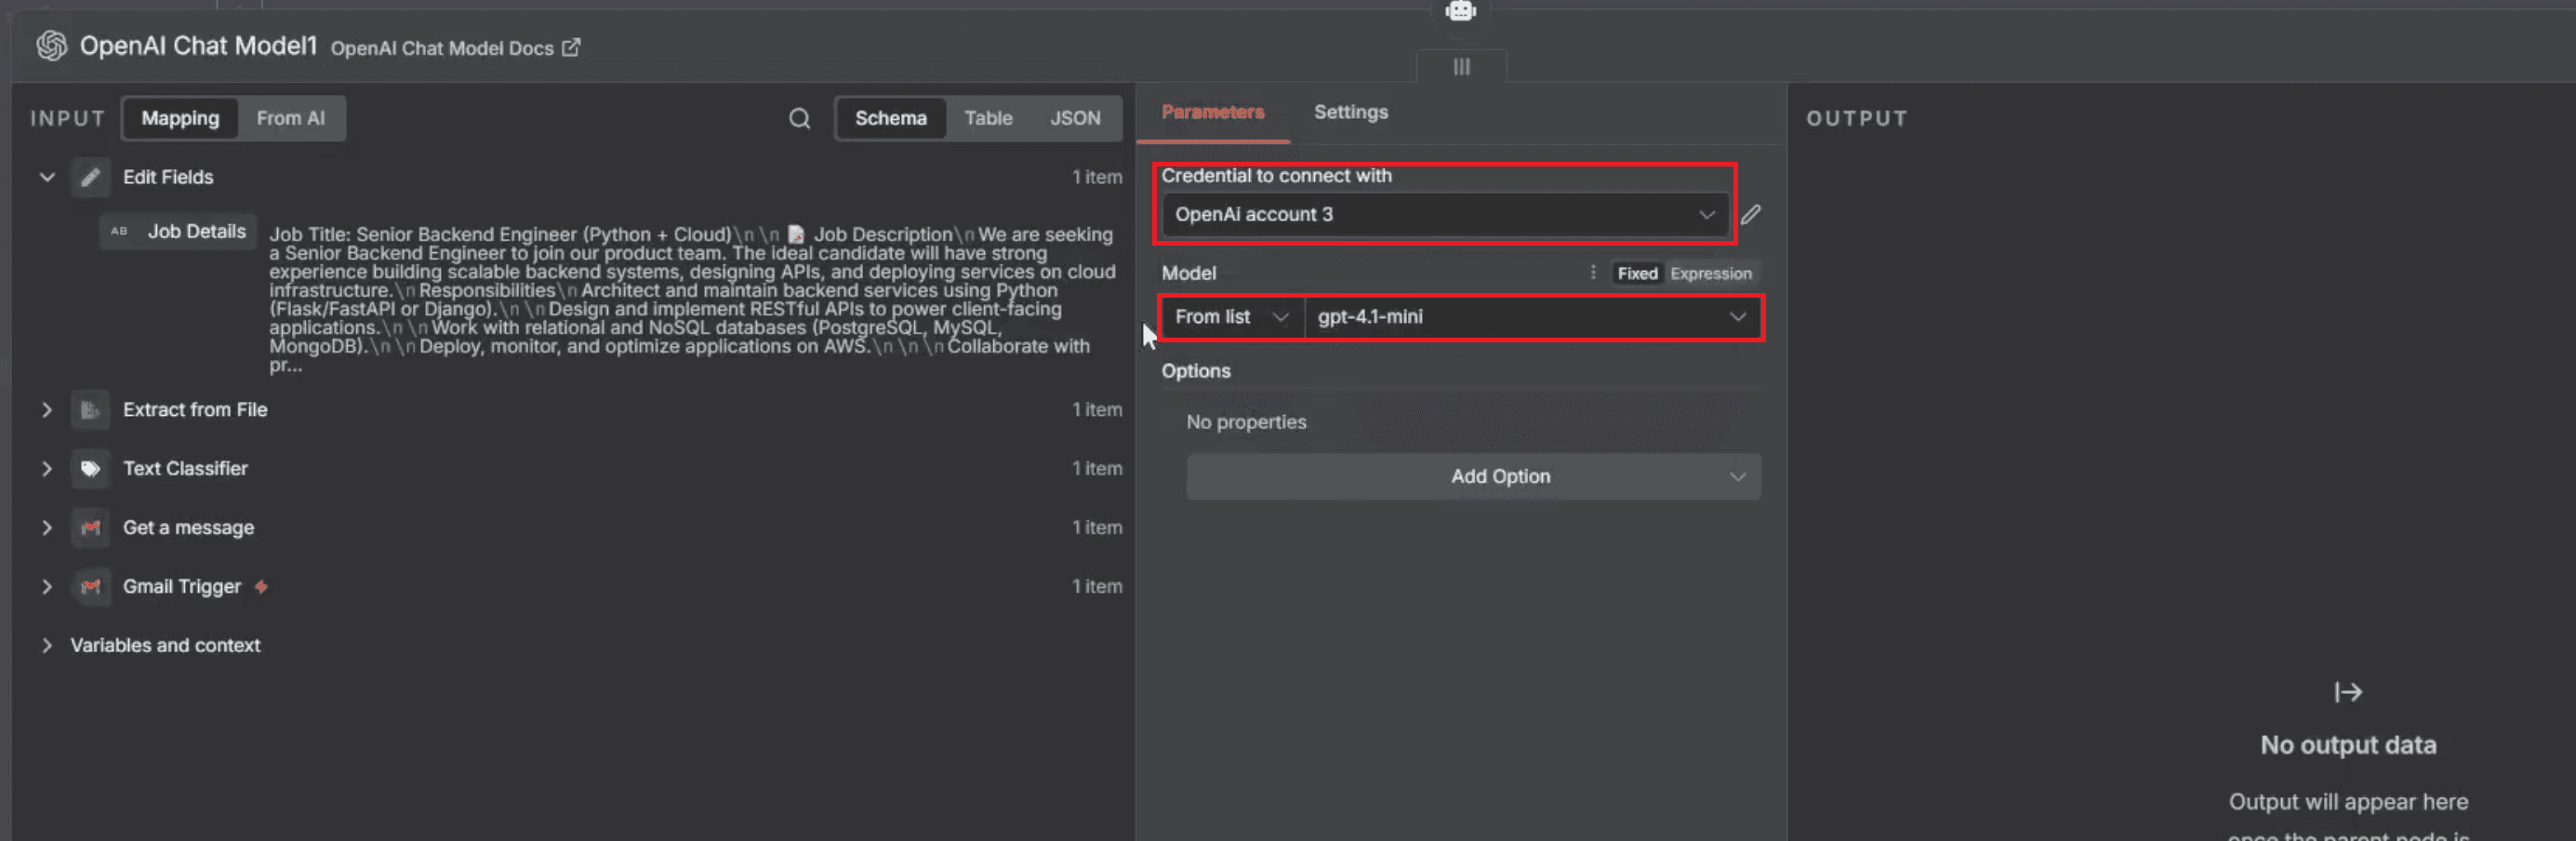
This connects the AI Agent to OpenAI’s GPT model, enabling it to process text intelligently and produce structured scoring results.
5. Execute the Node
Click Execute Step to test it.
The output will show:
A score (0–100) for resume-job match
A summary of fit and reasoning
Optional feedback or recommendations
6. Purpose of This Step
This step transforms your workflow into a smart resume evaluation engine. The AI Agent compares each candidate’s resume with the job description using natural language understanding — similar to how HR systems use AI for resume ranking and shortlisting.
Step 9: Gmail Tool – Send Acknowledgment
After the AI Agent has been configured to analyze resumes and generate results, the next step is to send acknowledgment emails to applicants automatically. Integrating Gmail ensures every candidate receives a professional reply as soon as their resume is processed — no manual intervention required.
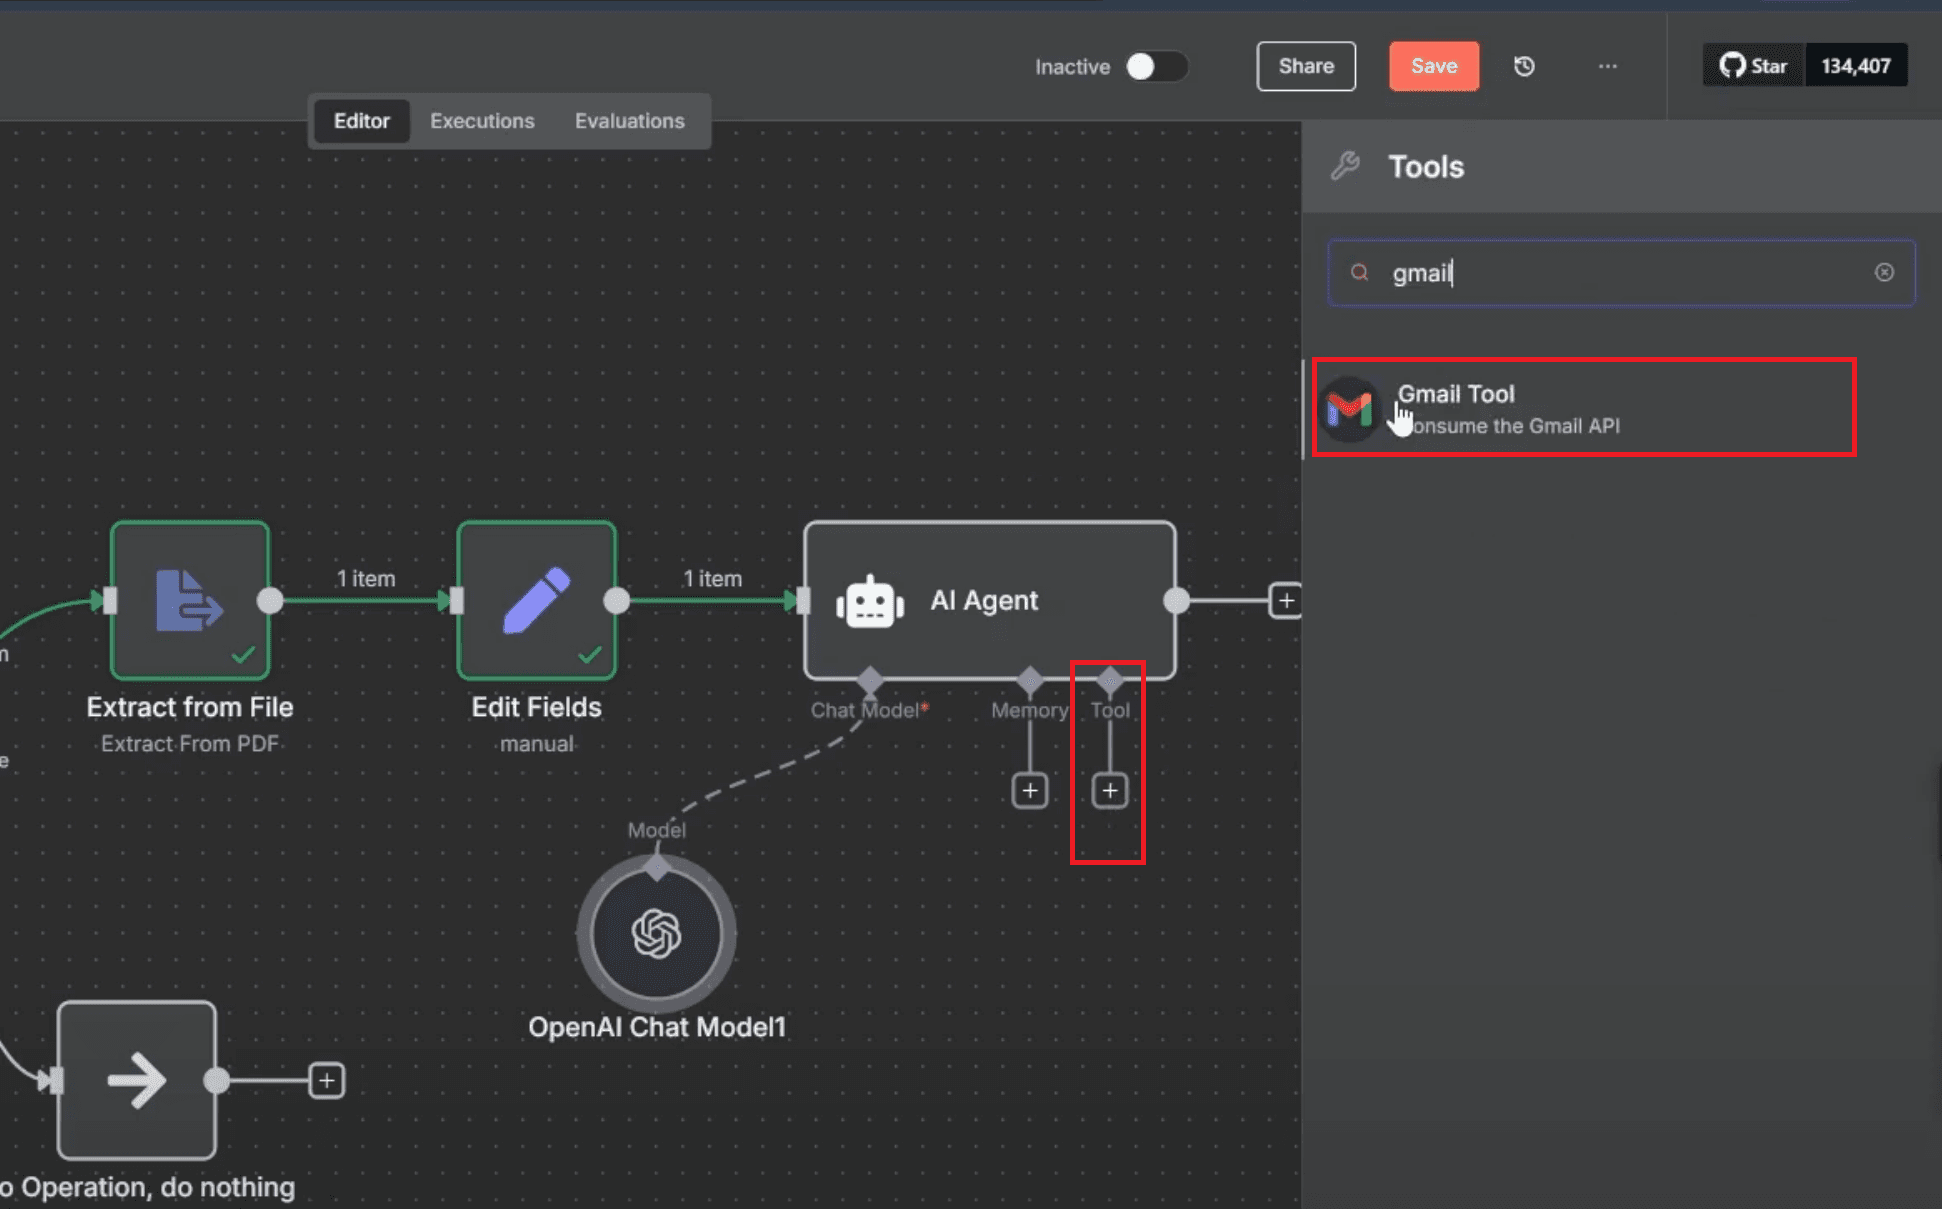
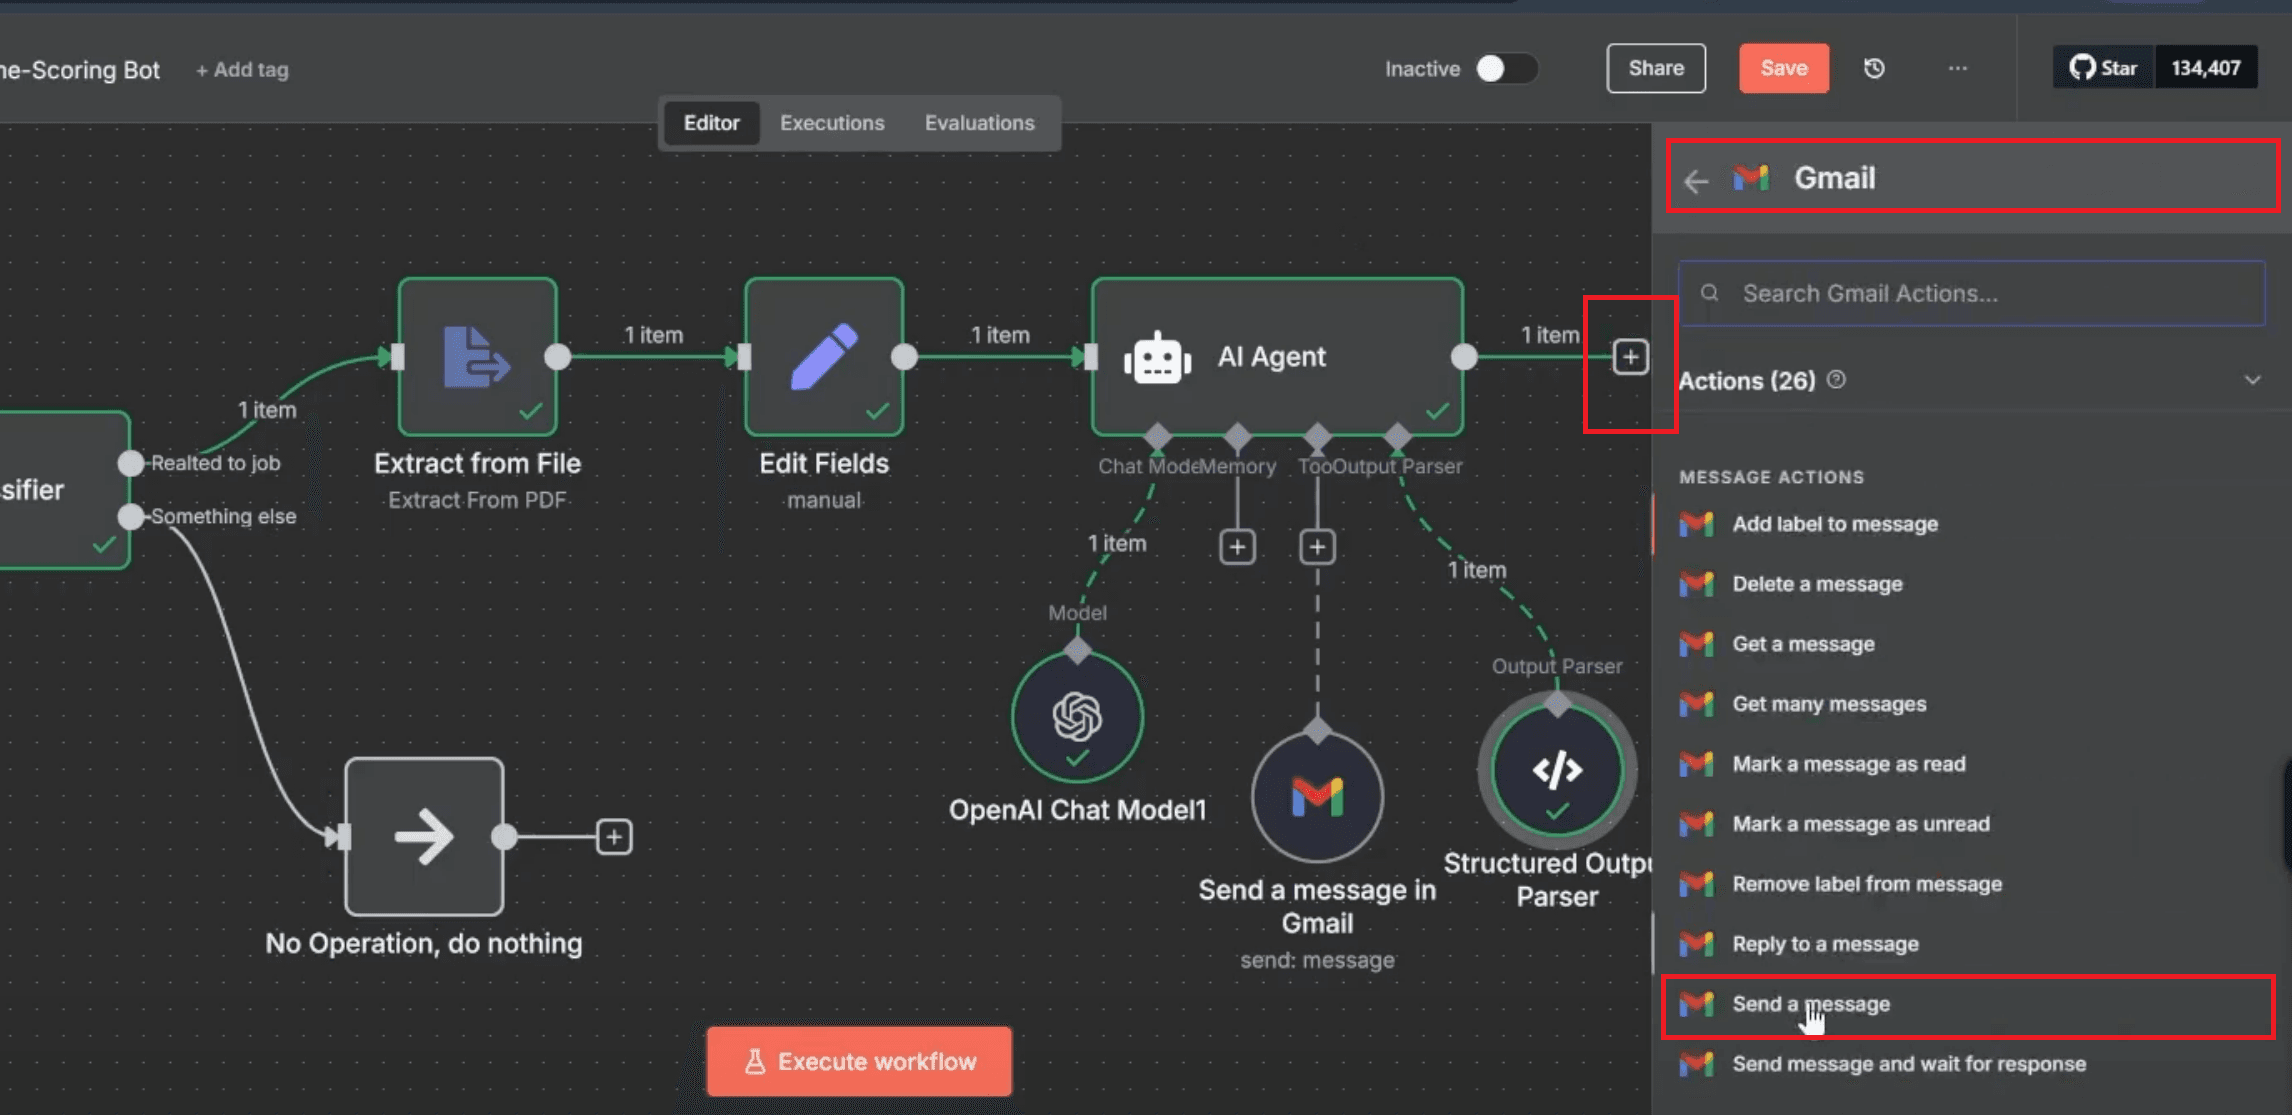
1. Add the Gmail Tool
• Select the AI Agent node on your canvas.
• Under the node, you’ll see three ports — Chat Model, Memory, and Tool.
• Click the plus (+) icon below Tool.
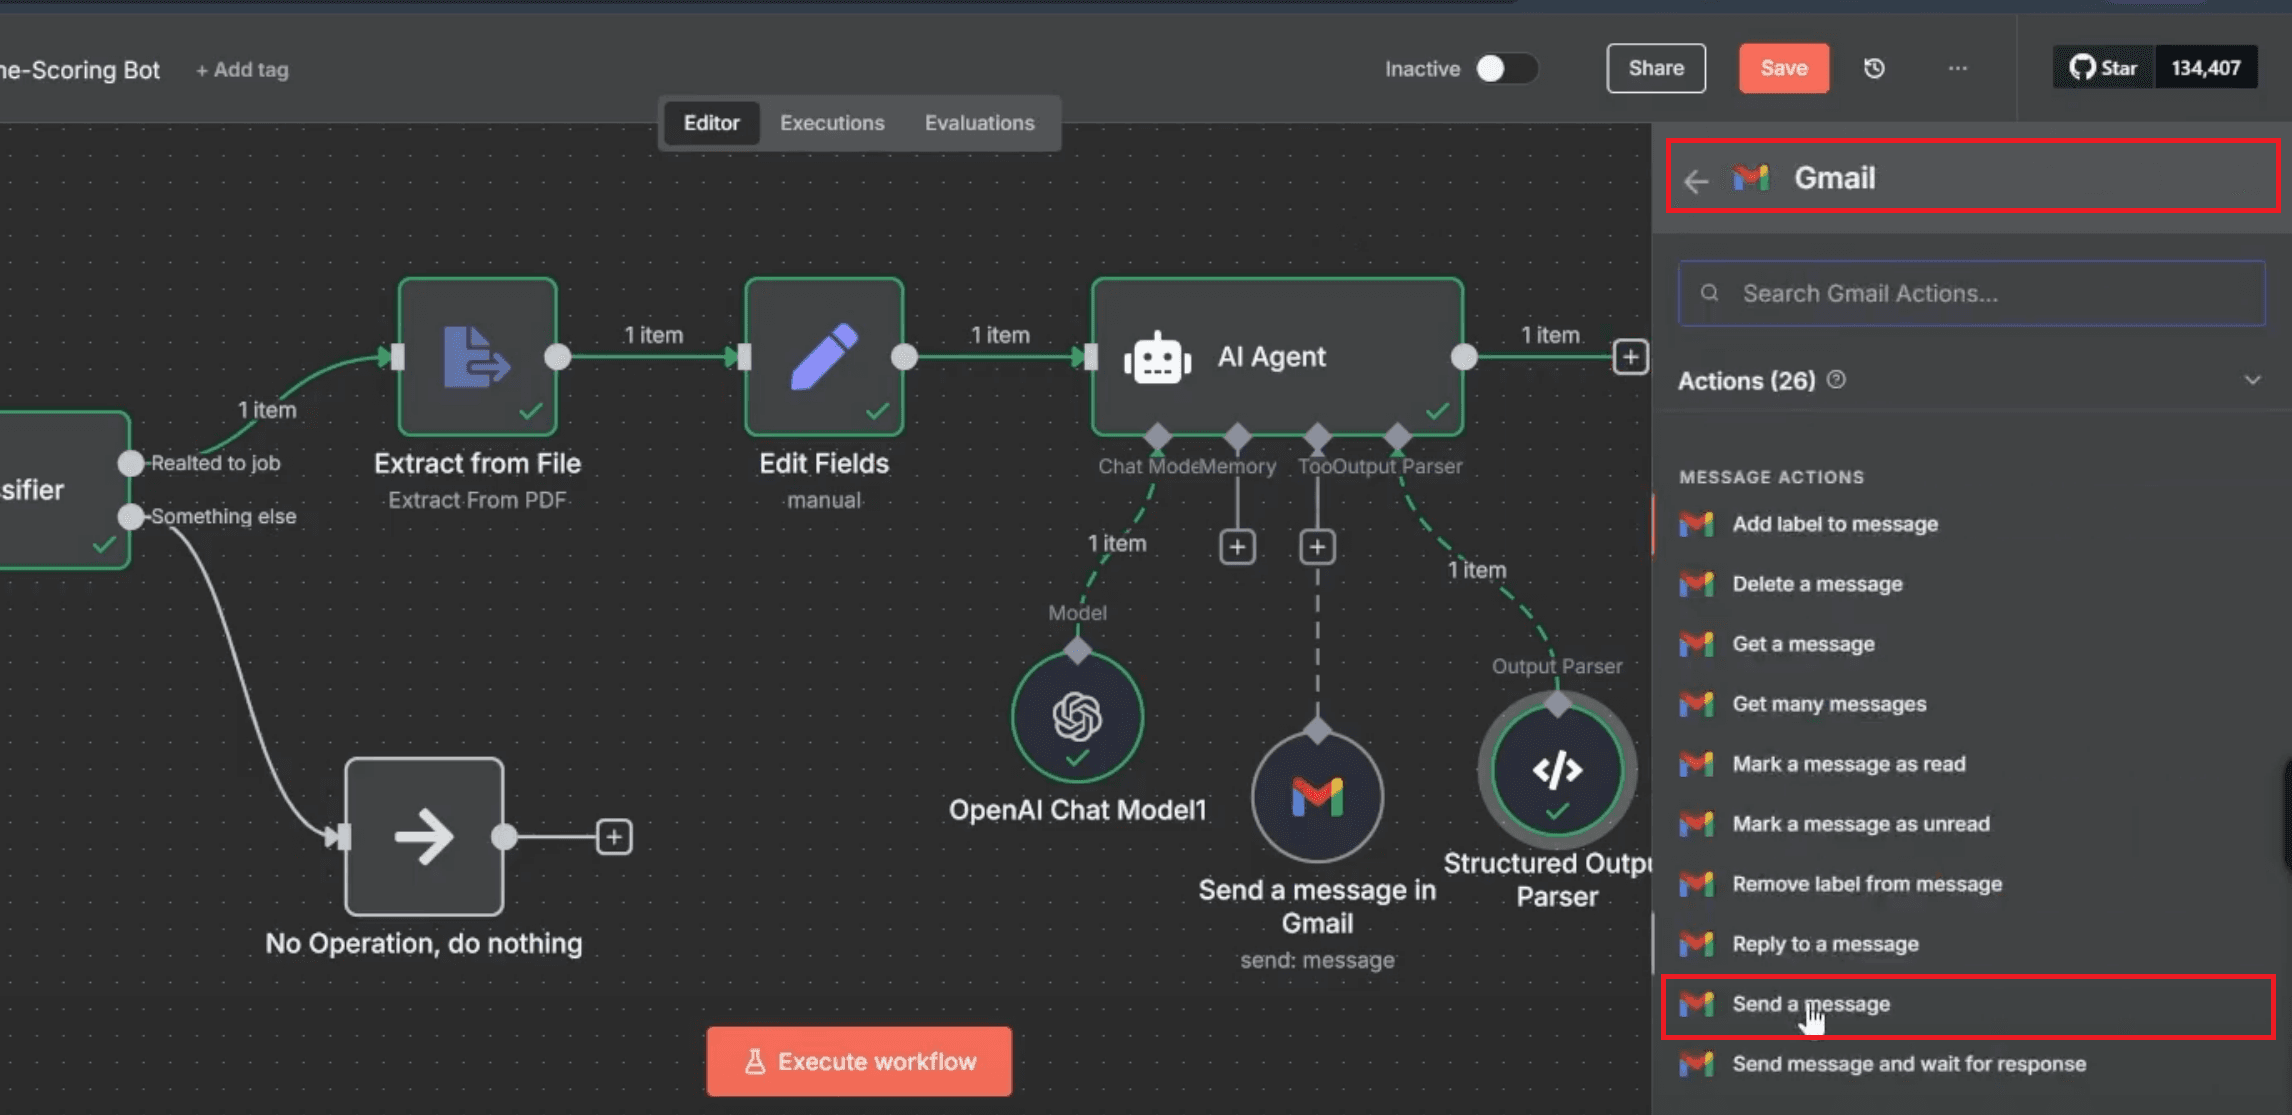
• From the list of available tools, select Gmail Tool (Consume the Gmail API) - Select "send a message in Gmail"
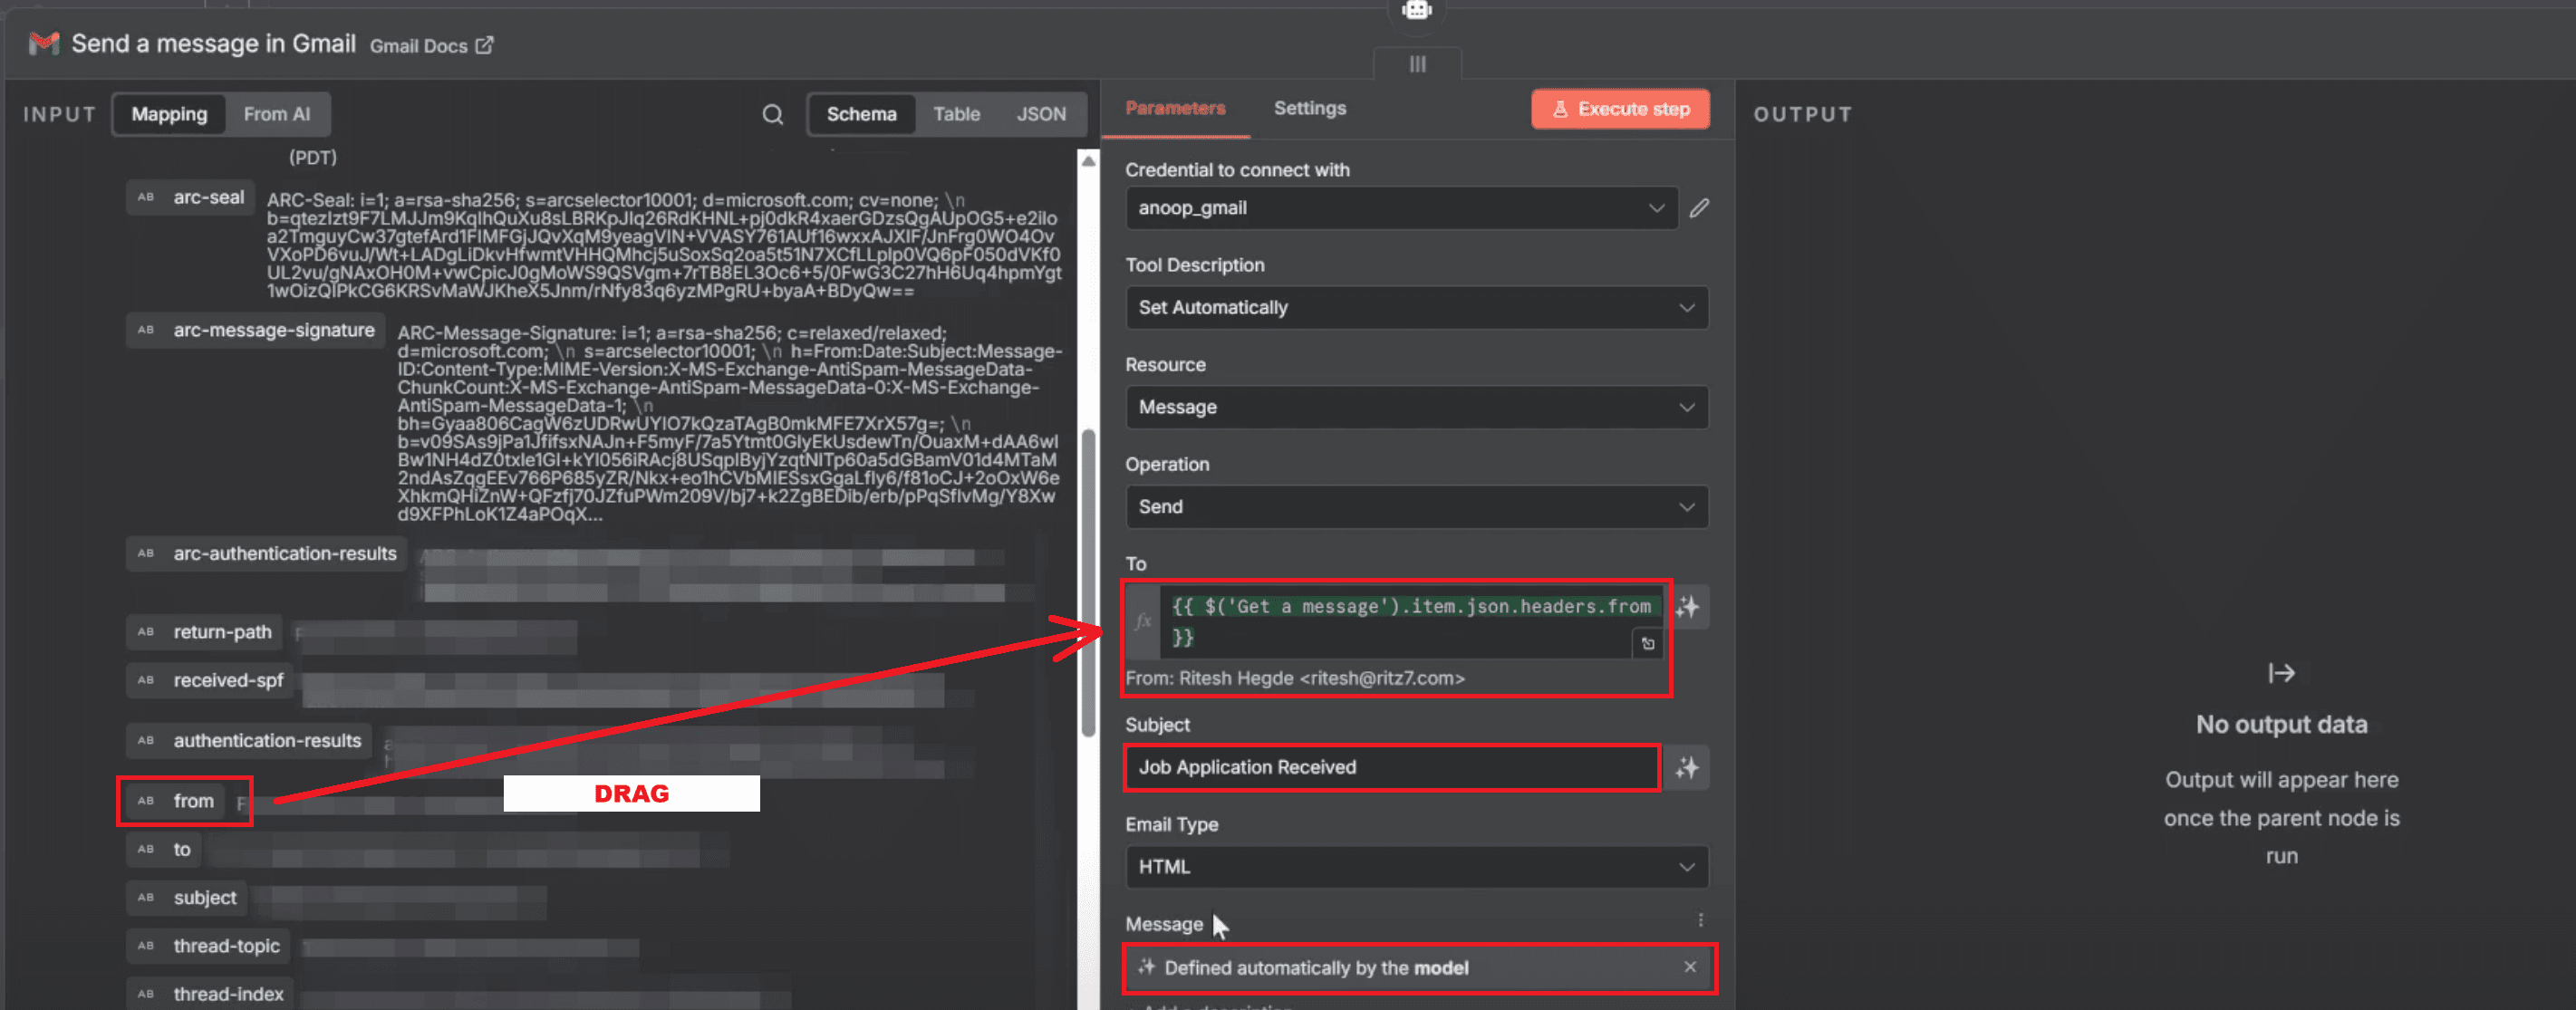
2. Configure the Gmail Tool
• Click the newly added Gmail node to open its configuration panel.
• Under Parameters, fill in:
– Credential to connect with: Choose your Gmail credential (e.g., anoop_gmail)
– Resource: Message
– Operation: Send
– Email Type: HTML
This setup allows the workflow to send formatted HTML emails through your Gmail account.
3. Map Email Fields
The Gmail Tool needs three inputs — To, Subject, and Message.
a. To Field
• In the left-side Mapping panel, locate the variable from (this represents the sender’s email address from the received message.)
• Select from as the value for To, so the reply goes directly back to the applicant.

b. Subject and Message Fields
• In Subject, enter Job Application Received.
• In Message, choose Defined automatically by the model.
• This tells the AI Agent to generate the email content automatically based on its analysis.
4. Execute the Node
• Click Execute Step to test the configuration.
• If successful, the workflow will send a test email to the address in the To field and confirm the action in the output.
Purpose of This Step
This step links the AI Agent to Gmail, allowing it to send automatic acknowledgment emails after an analysis. It saves time and ensures every candidate receives a timely and professional response — just like modern ATS systems do.
Step 10: Output Parser – Structure AI Results
By default, the AI Agent returns free-form text that can vary from one analysis to another. To make the results consistent and machine-readable, you need to add a Structured Output Parser. This ensures that the AI Agent’s response always follows a pre-defined format that can be used for reporting and automation.
1. Enable Structured Output Requirement
Once the model is connected, you need to ensure that the AI output follows a consistent format for later parsing and reporting.
• Open the AI Agent node and scroll down in the Parameters panel.
• Toggle the option Require Specific Output Format to ON.
• When enabled, a message appears below it:
This step prepares the AI Agent to work with a structured schema and tells n8n that the next connected node (Structured Output Parser) will define the expected output pattern.
2. Add the Structured Output Parser
• Below the AI Agent node, find the port labeled Output Parser.
• Click the plus (+) icon next to it and select Structured Output Parser from the list.
• A new parser node will appear below the AI Agent.

3. Configure the Structured Output Parser
• Select the Structured Output Parser node to open its configuration panel.
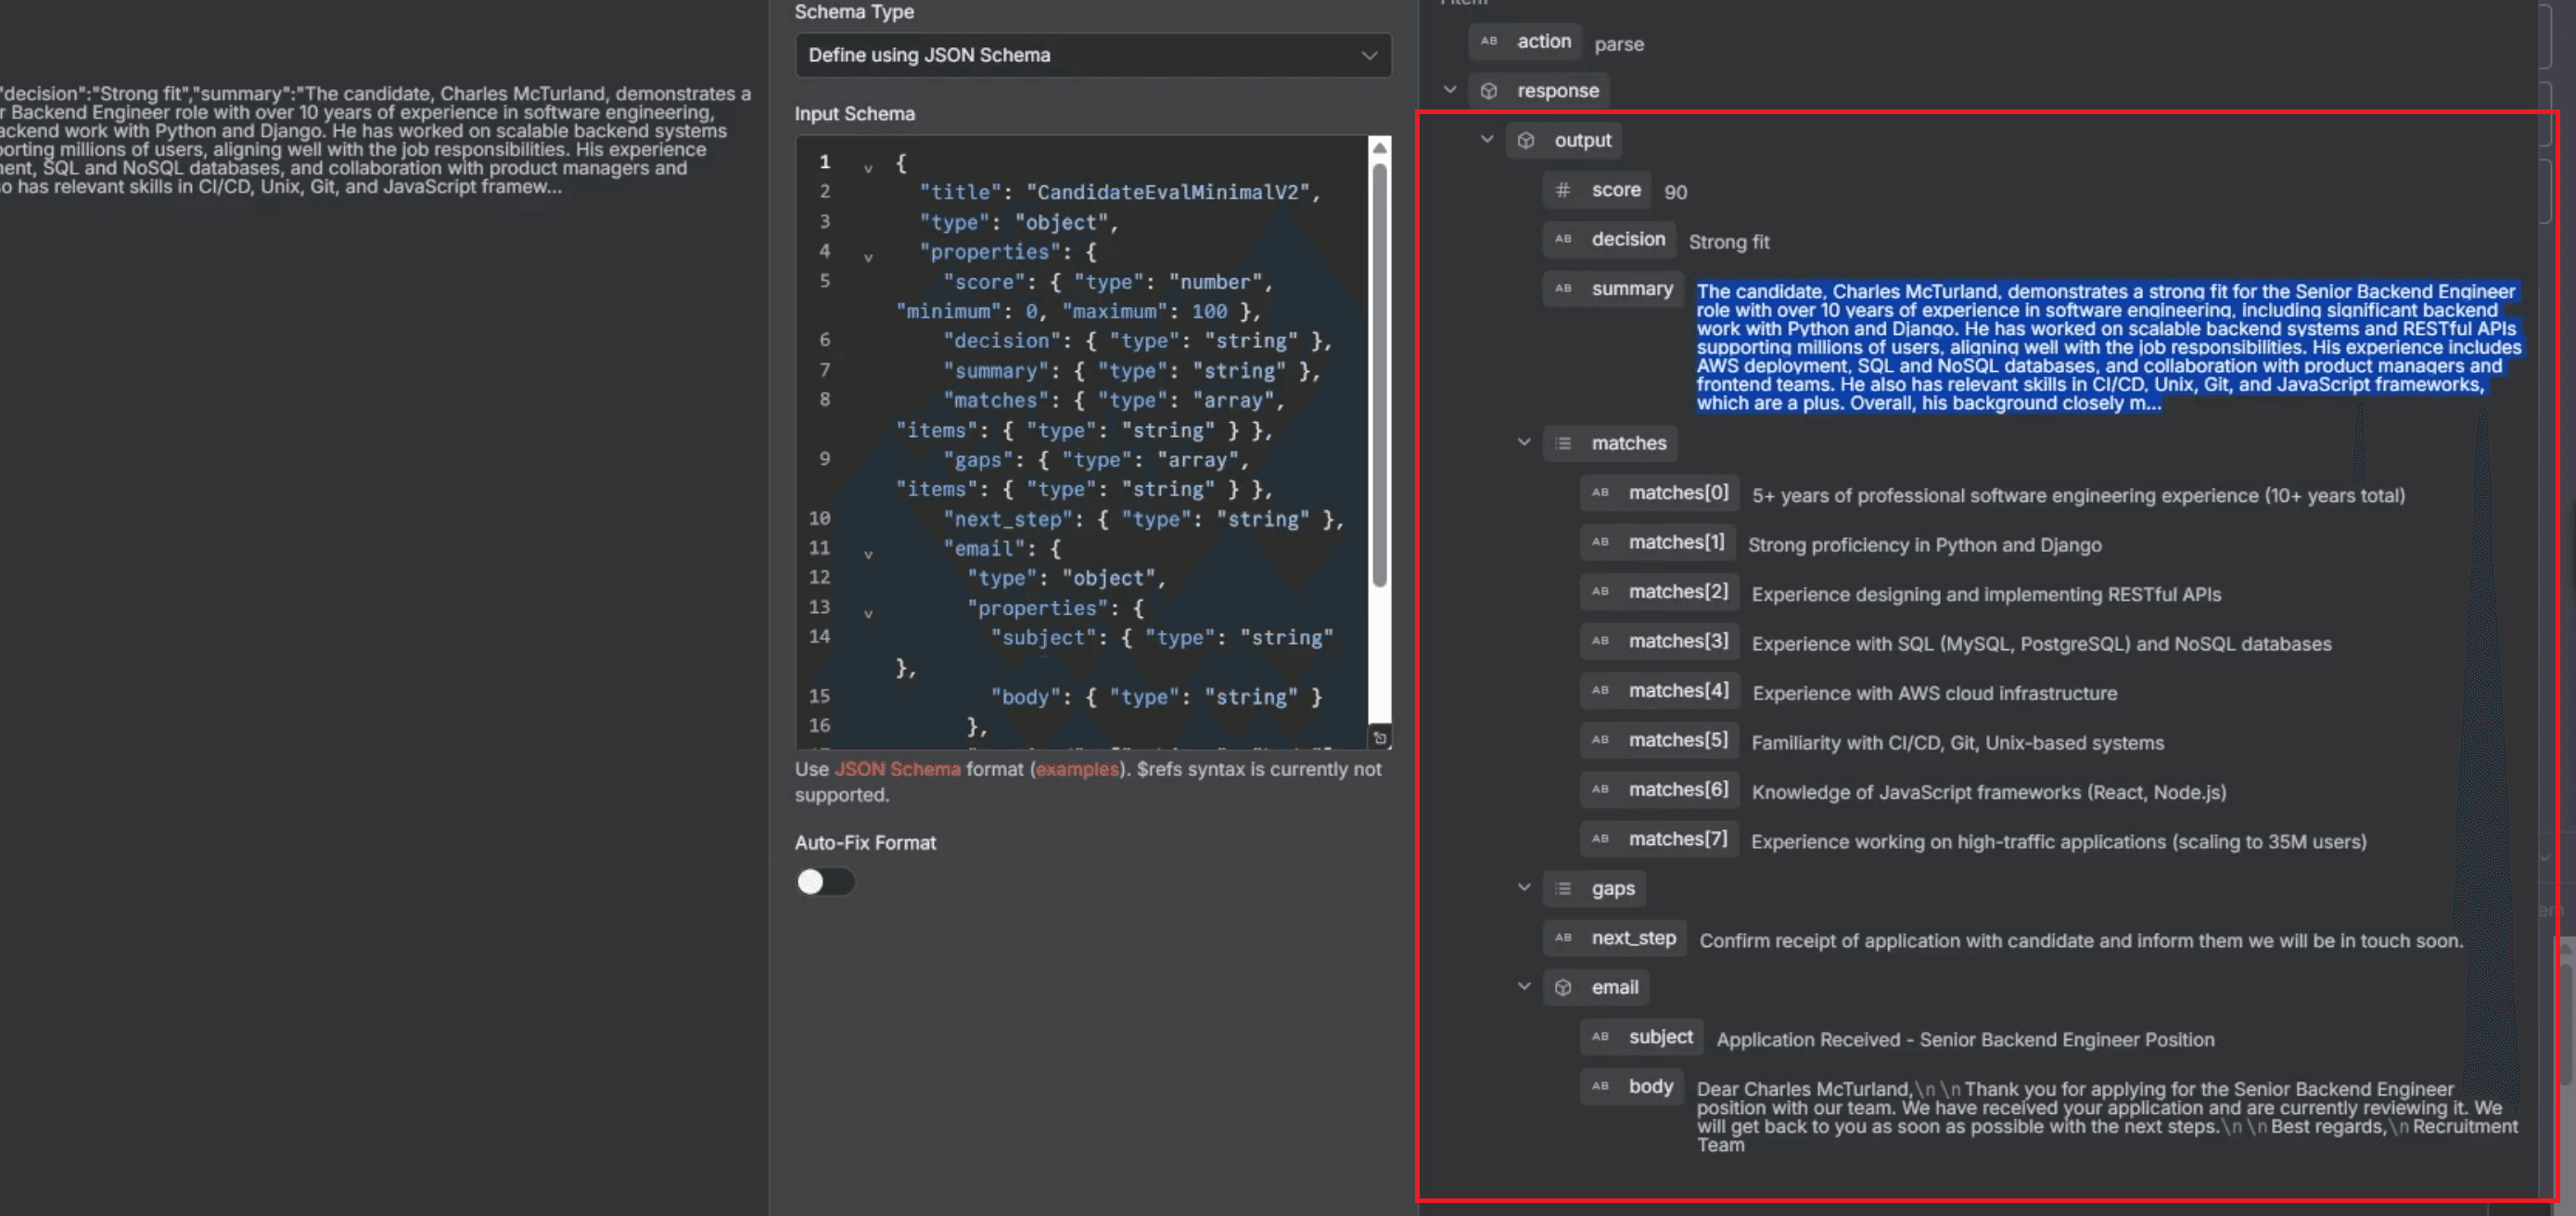
• Under Schema Type, choose Define using JSON Schema.
• In the Input Schema field, define the structure that the AI Agent should follow.
You can ask ChatGPT something like, “I’m looking for this type of candidate — can you give me a JSON schema for it?” ChatGPT will generate the schema for you automatically.
Use the following schema example as a reference:
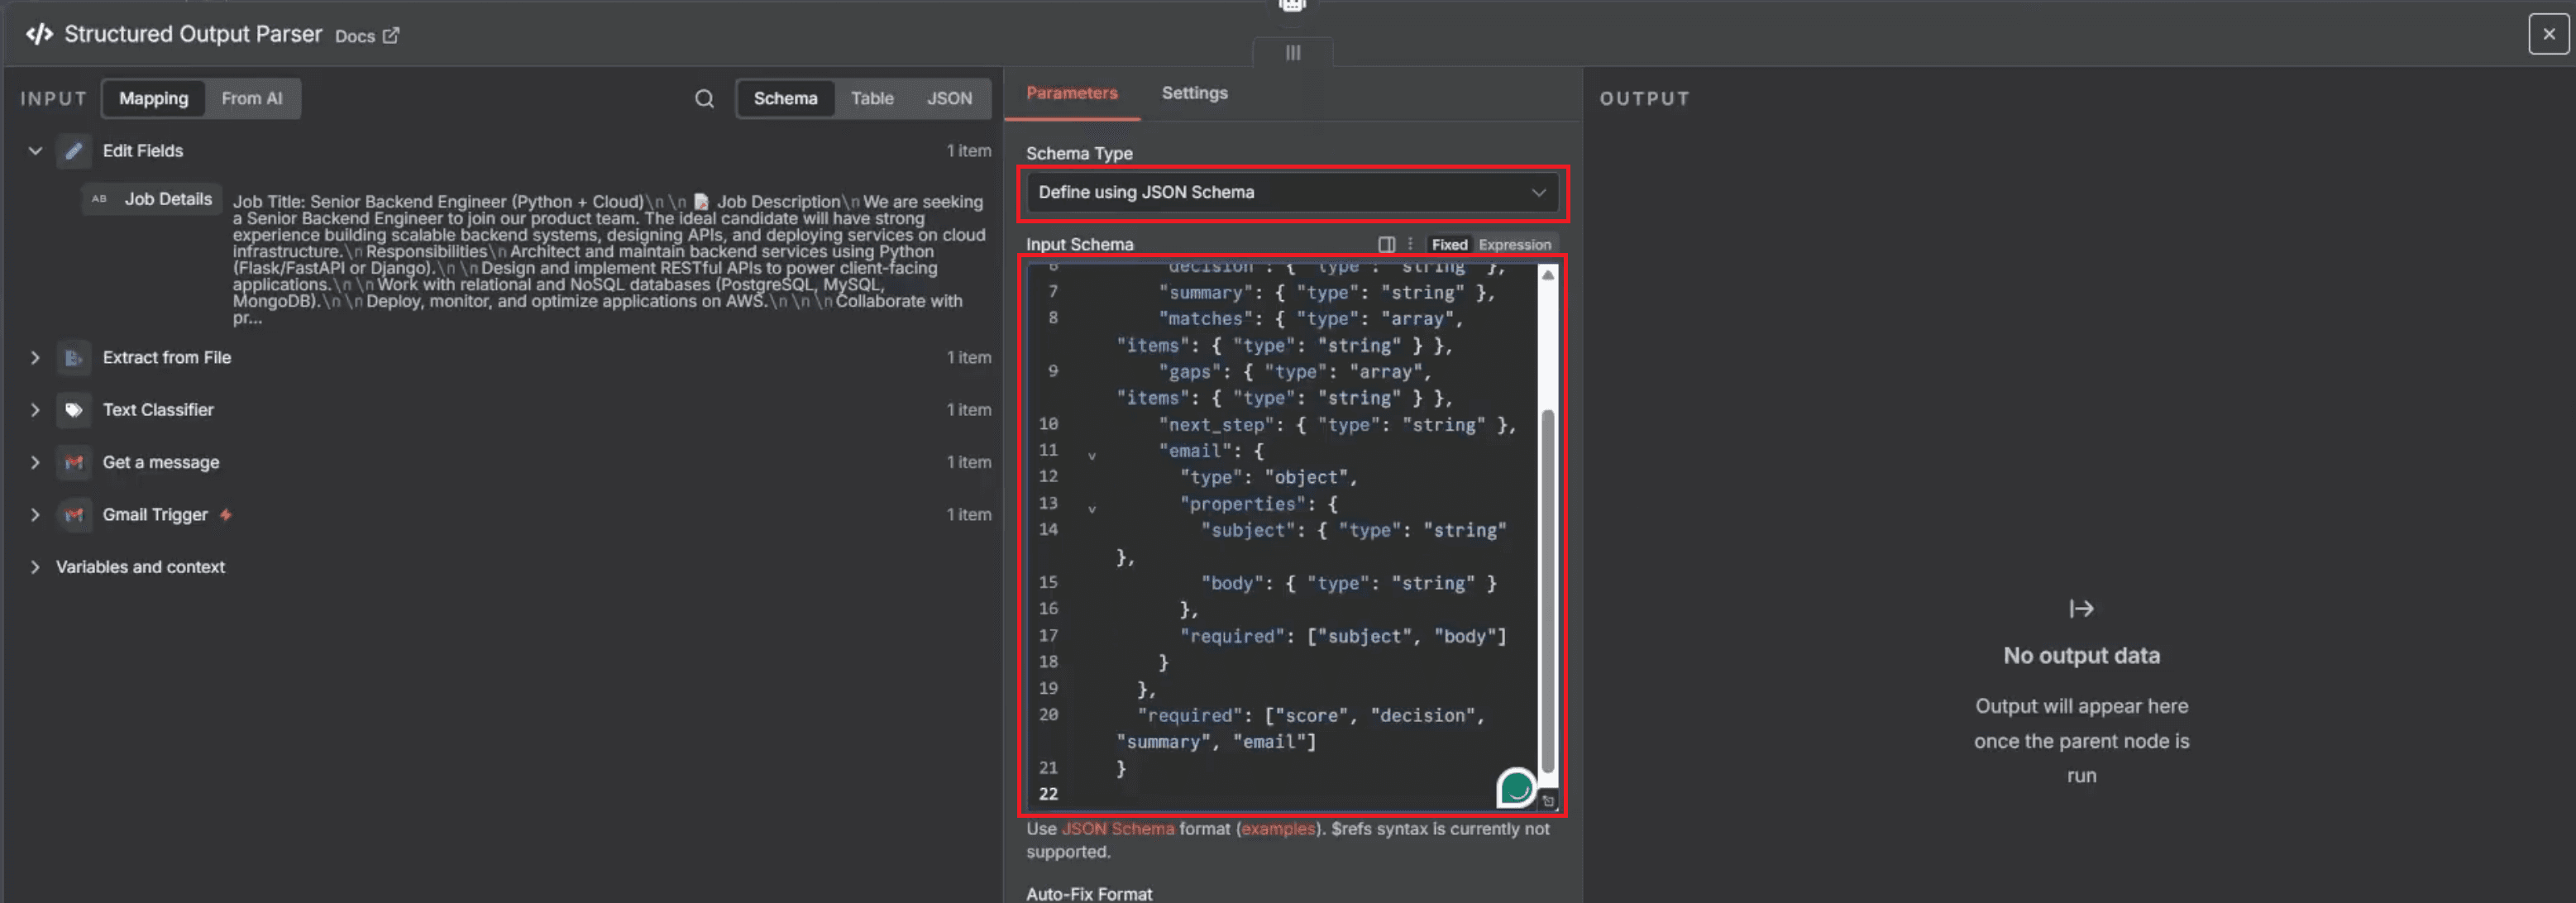
This schema ensures that every AI output includes a structured JSON response containing the candidate’s score, summary, decision, matched skills, gaps, and an email template (including subject and body).
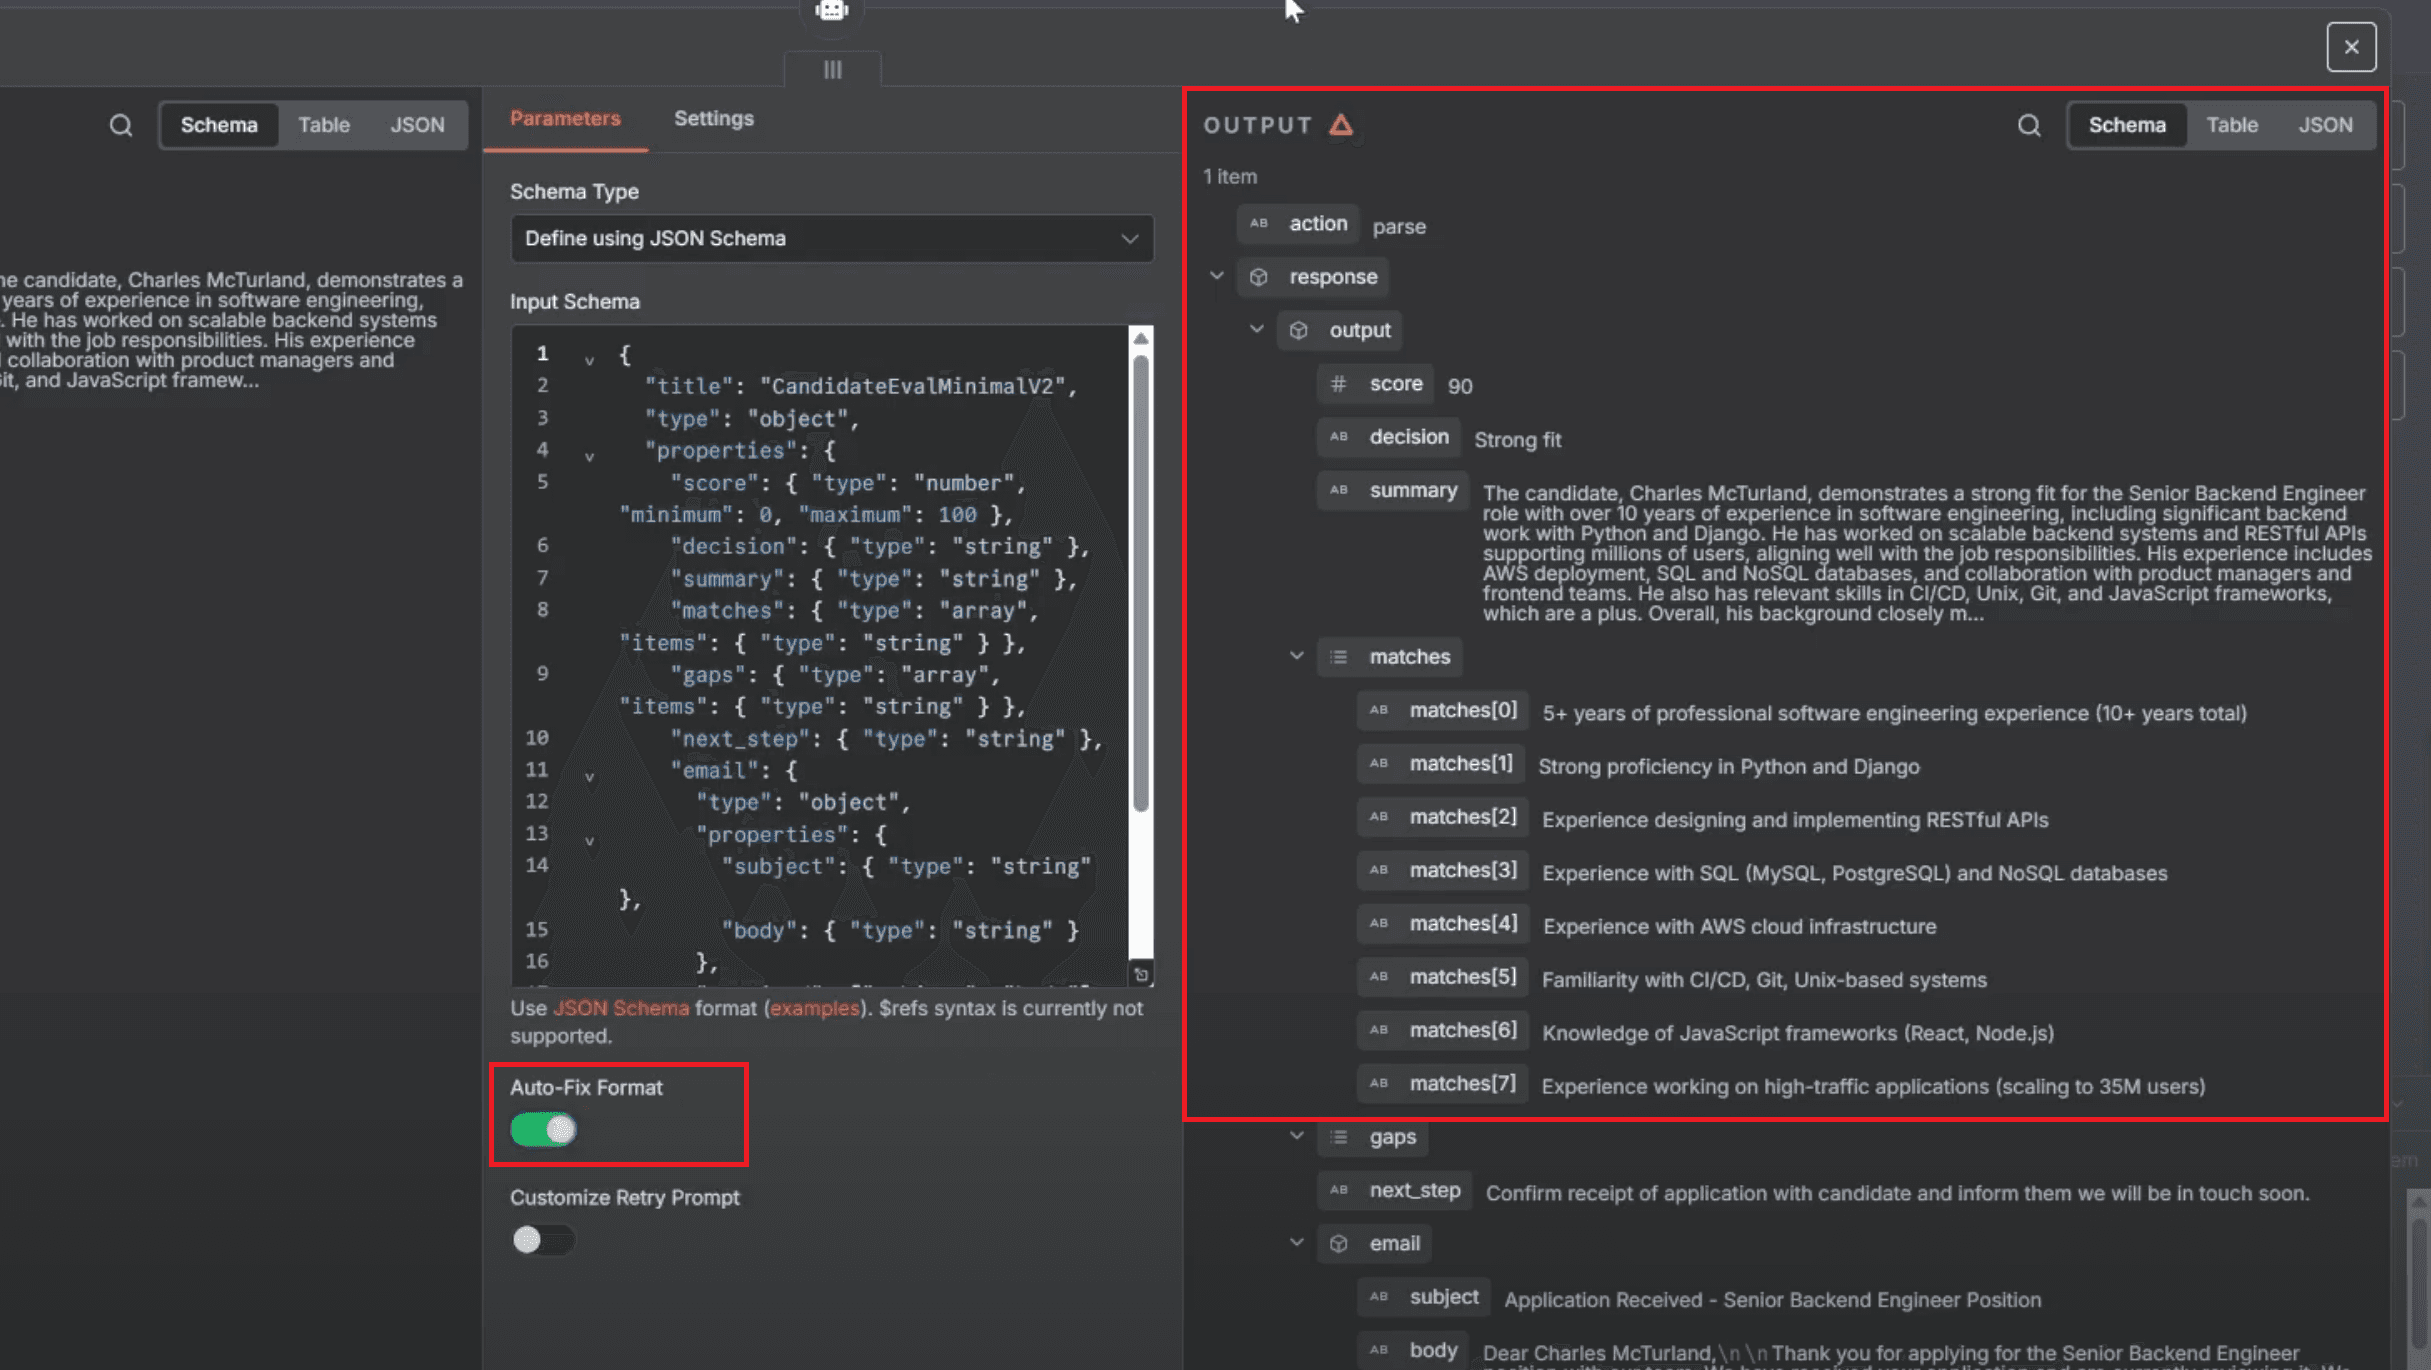
Use Auto-Fix Format if Parsing Fails (Optional)
If the AI output doesn’t appear as expected or fails to extract all details, you can enable the Auto-Fix Format option.
In the Structured Output Parser node, scroll to the bottom of the Parameters panel.
Toggle Auto-Fix Format to ON.
Sometimes the JSON output might not work, and if that happens, simply click on Auto-Fix Format to correct it automatically. When Auto-Fix Format is switched ON, n8n will automatically ask you to connect a model.
At that point, you’ll need to connect it to the OpenAI Chat Model by clicking the model, below the parser node, and selecting OpenAI Chat Model from the list.
However, for this workflow, we’ll keep "Auto-Fix Format turned OFF", as the Structured Output Parser is already working correctly with the defined schema.
5. Execute the AI Agent and View Parsed Output
After defining the JSON schema, the next step is to test the configuration and verify that the AI Agent’s output matches the structured format. This ensures that the parser is functioning properly before moving on to automation.
Go back to the AI Agent node on your canvas.
Click Execute Workflow or Execute Step to run the connected nodes — this triggers both the AI Agent and the Structured Output Parser.
Once the workflow runs successfully, open the Structured Output Parser node and check the Output section on the right.
You should now see a clean JSON-formatted result with all the fields defined in your schema.
The output typically includes:
score: Resume–job match score (e.g., 90)decision: Fit summary (e.g., Strong fit, Average fit)summary: A detailed AI-generated explanation of the candidate’s suitabilitymatches: A list of key matching skills or qualificationsgaps: Missing or weaker skillsnext_step: Suggested recruiter action (e.g., “Schedule an interview” or “Send acknowledgment email”)email: Includessubjectandbodyfields for an automatically generated candidate email
Purpose of This Step
This step confirms that the AI output is properly formatted and fully compatible with your JSON schema. The results are now machine-readable and ready to be used in downstream automations, such as emailing candidates or generating HR reports. By structuring the response this way, your workflow produces a clear ATS Fit summary — a standardized evaluation format that aligns perfectly with Applicant Tracking System-style analysis.
Also Read:
Step 11: Variables (Pro Plan) – HR Report Email
If you’re using n8n Pro, you can create a variable to automatically send candidate reports to your HR inbox. This ensures results are delivered consistently without having to manually edit email addresses each time the workflow runs.
Open the Variables Panel
Open Variables in a new browser tab from the left sidebar.
Add a New Variable
Click Add Variable in the top-right corner.
Enter the following details:
Key:
email_toValue: your HR email address (for example:
support@ritz7.com)Usage Syntax: Use expression "
$vars.email_to"
Save and Use the Variable
Click Save to confirm.
You can now reuse this variable anywhere in your workflow by referencing it with:
This configuration makes your setup scalable and automated — every time the bot analyzes resumes, the results are automatically routed to the correct HR inbox for review.
Step 12: Gmail Send – Deliver Final Report
After structuring the AI output and setting up your reporting variable, the next step is to automate the email delivery using Gmail.
Add a Gmail – Send Message node to your workflow.
Configure the node parameters:
To: Use the variable
$vars.email_toto send the report directly to your HR inbox.Subject: enter
New Candidate Report.Email Type:
Text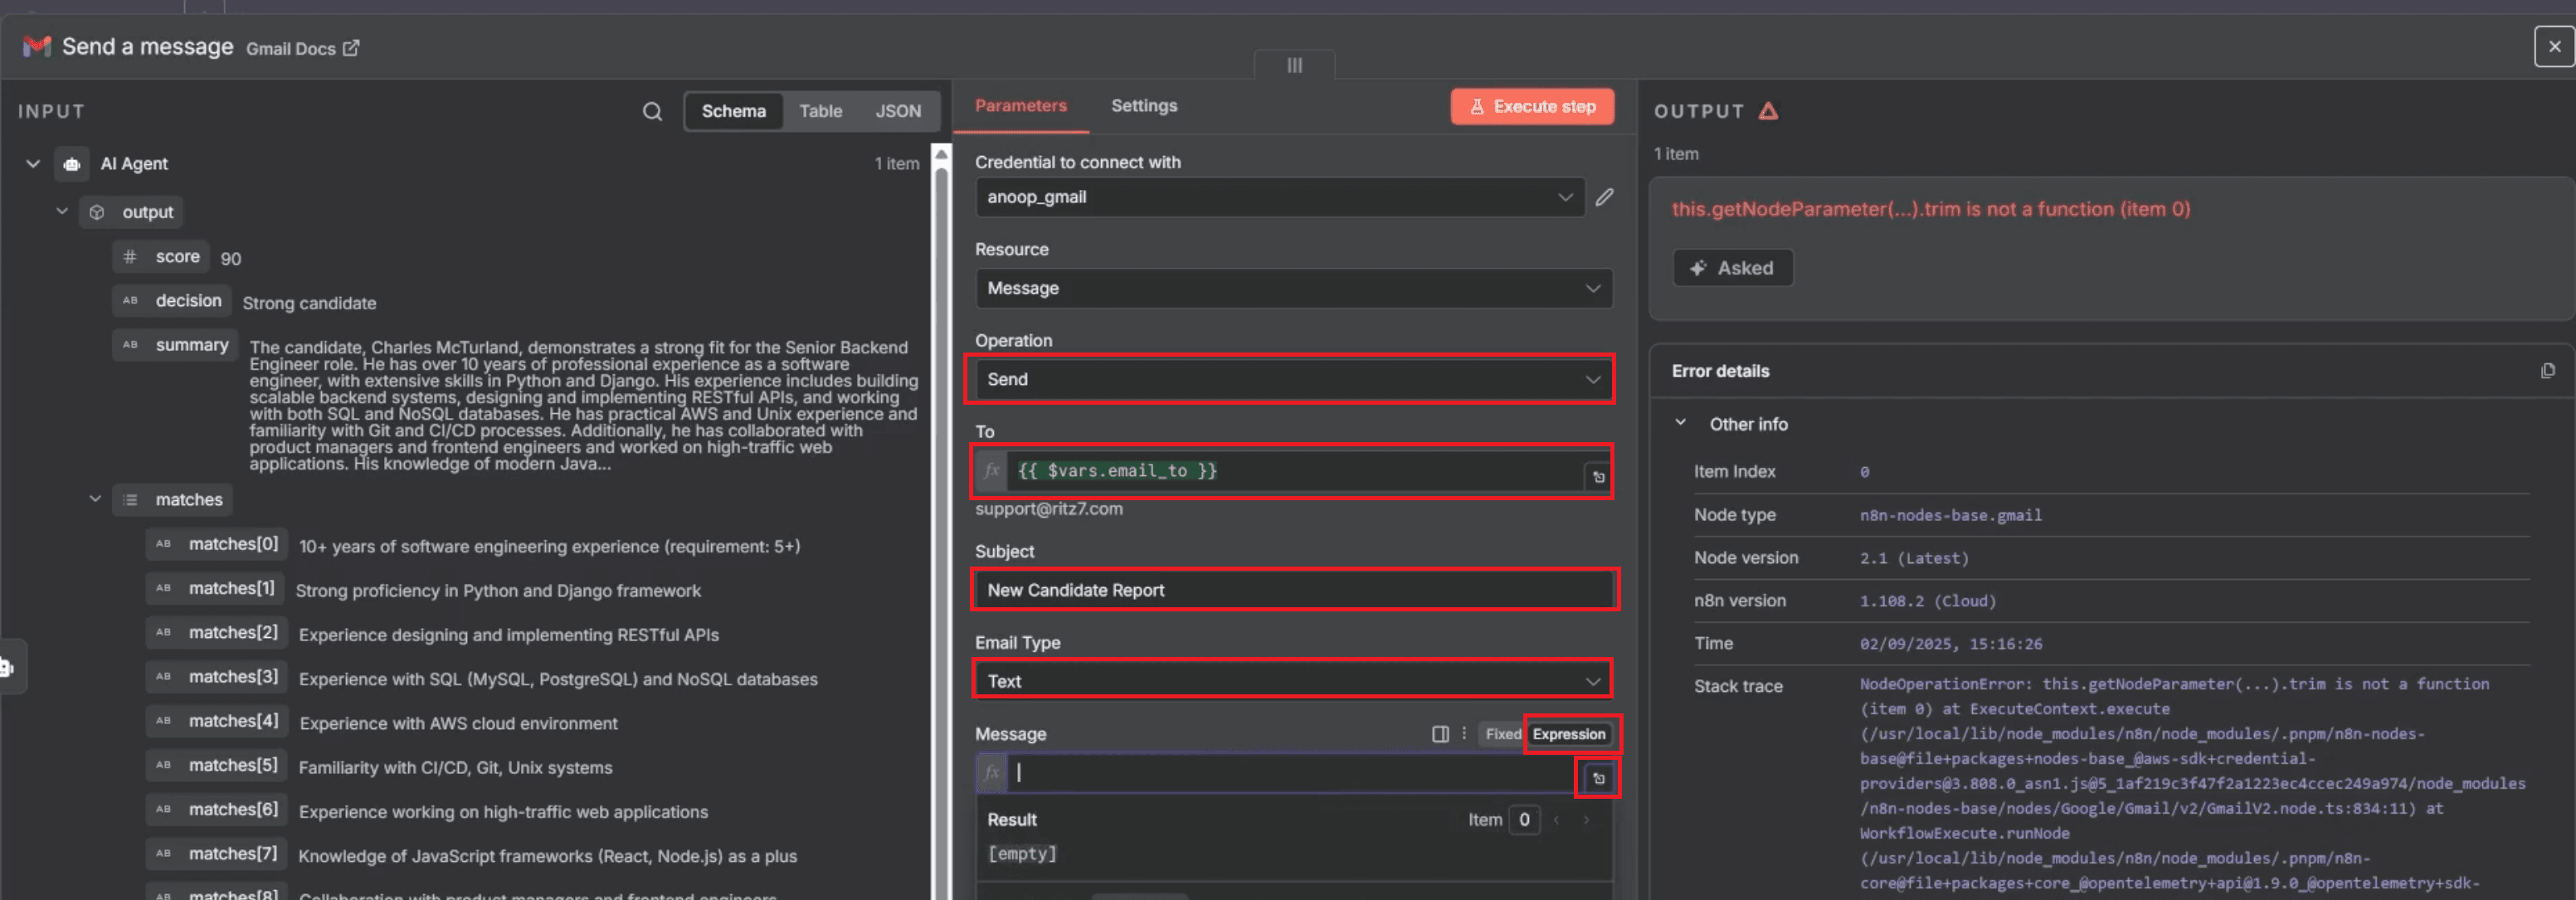
Personalize Email Content
To make each email more professional and context-aware, add expressions that dynamically personalize your messages.
In the message, click the fx (Expression Editor) beside the Message field.
You can either search and drag these values from the left-hand data panel or enter them manually in the fields.
Candidate Name:
{{ $('Text Classifier').item.json.from.value[0].name }}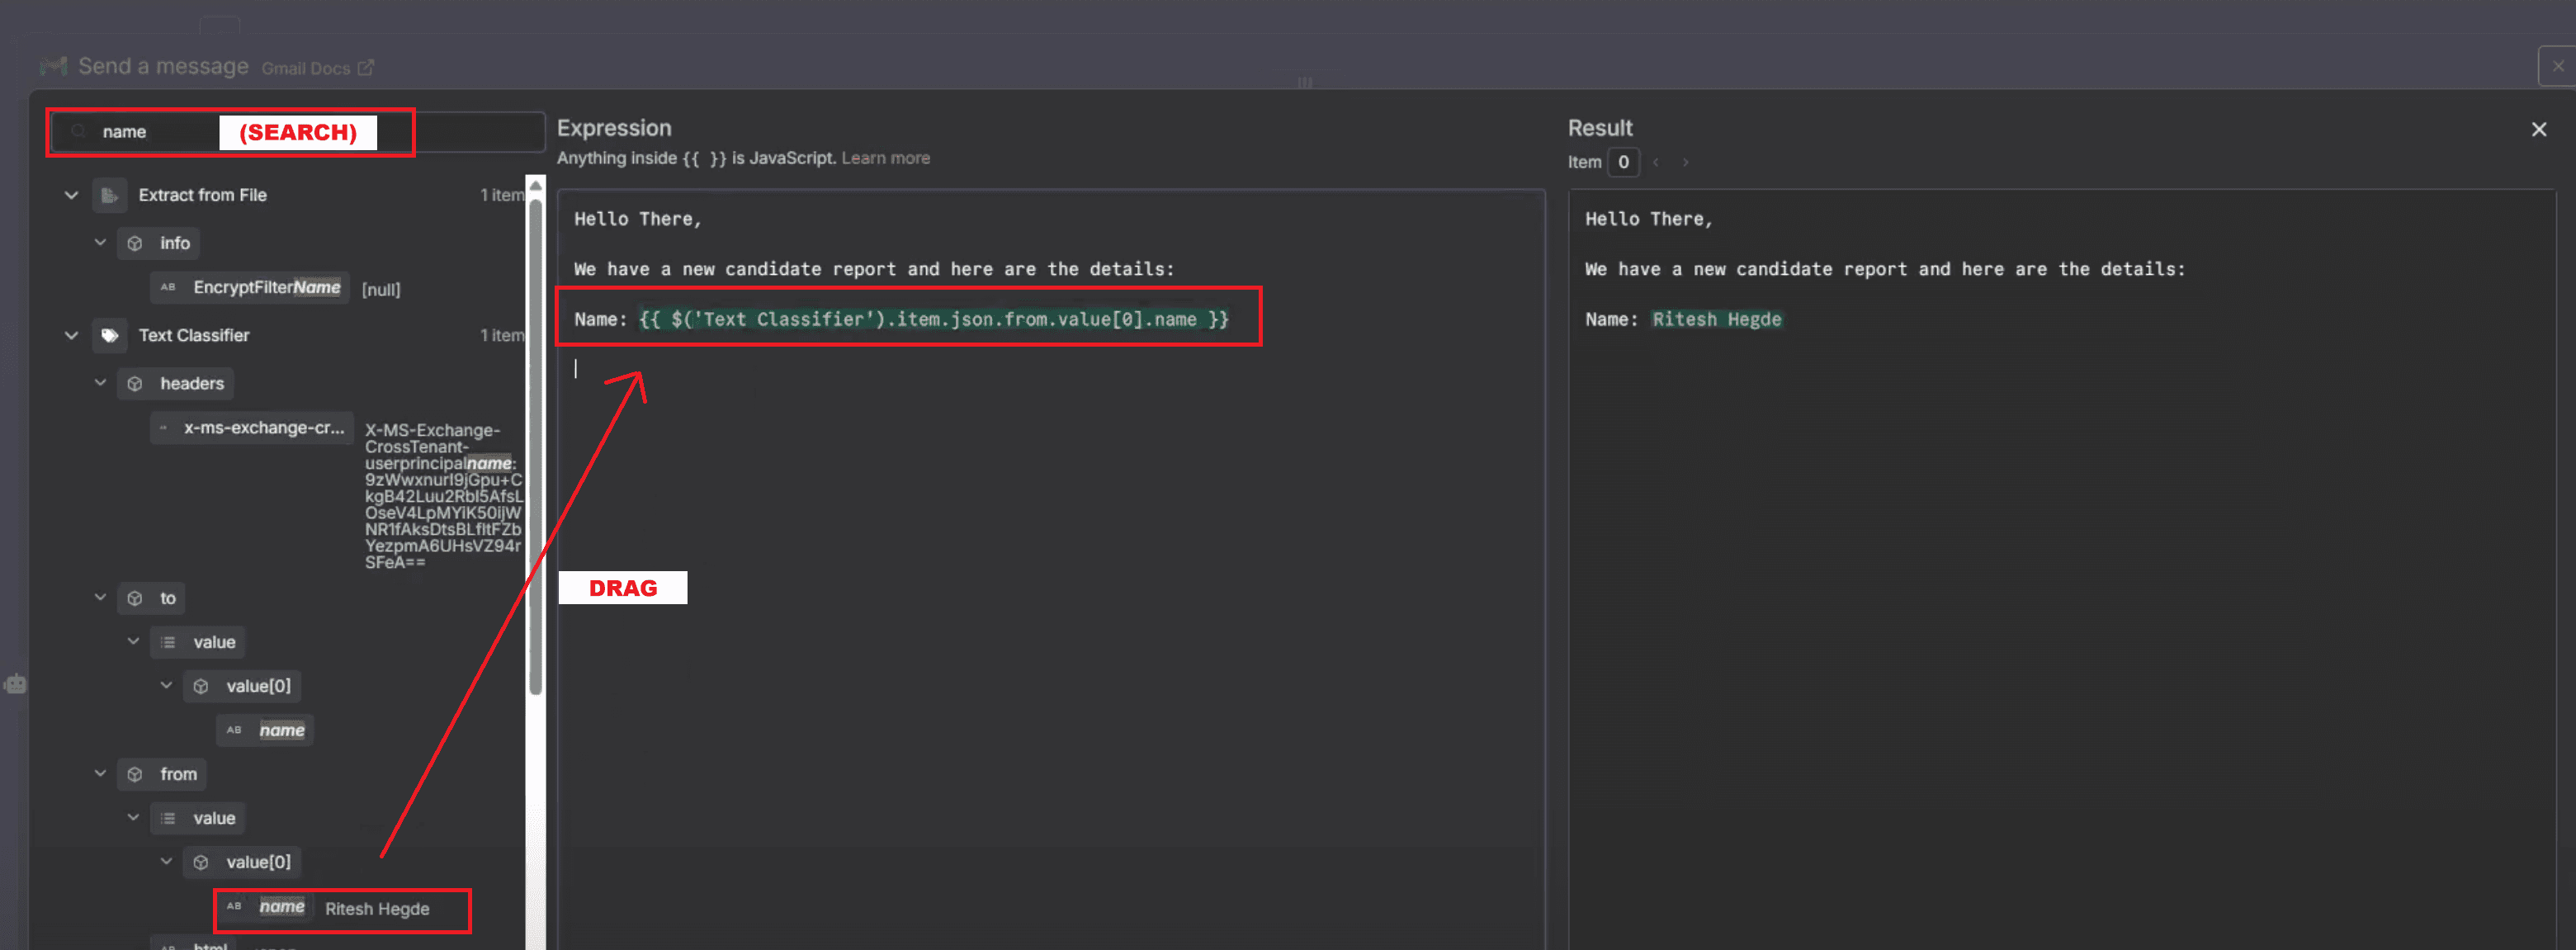
Job Role / Subject:
{{ $json.output.email.subject }}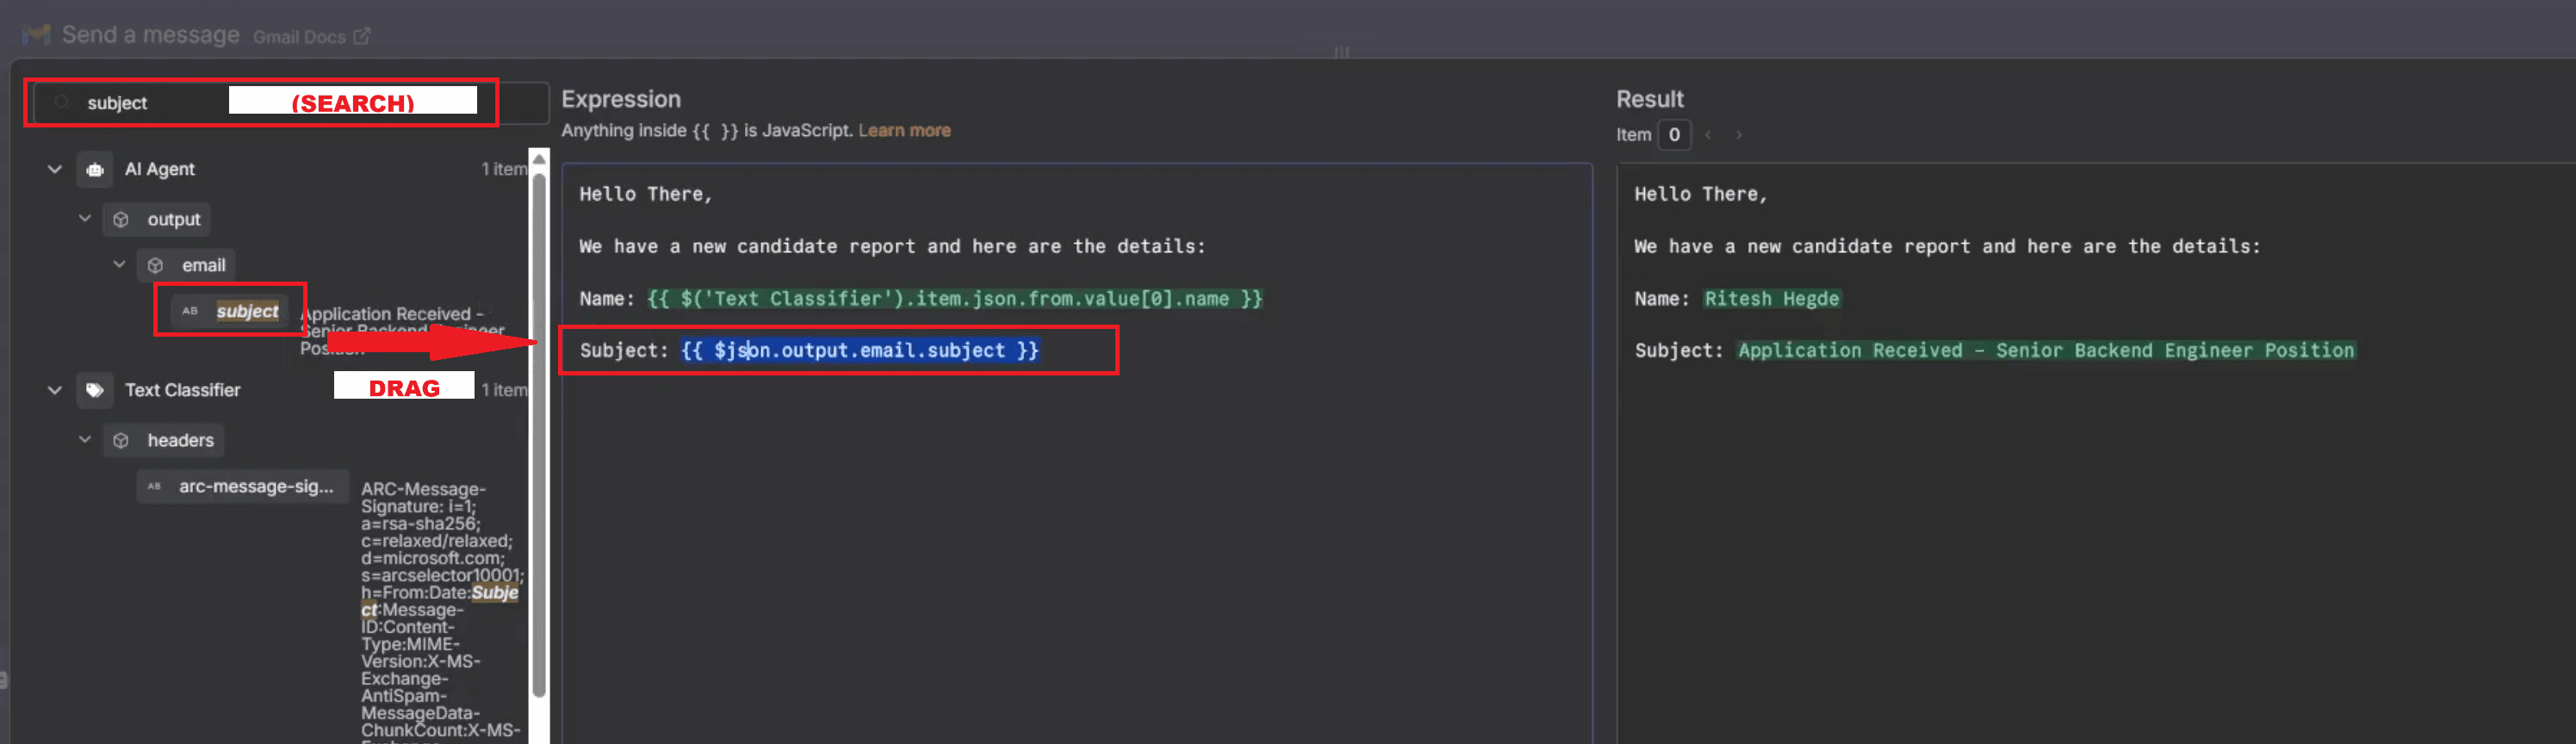
Resume Score:
{{ $json.output.score }}- Search and drag score similarly to the above steps.Summary:
{{ $json.output.summary }}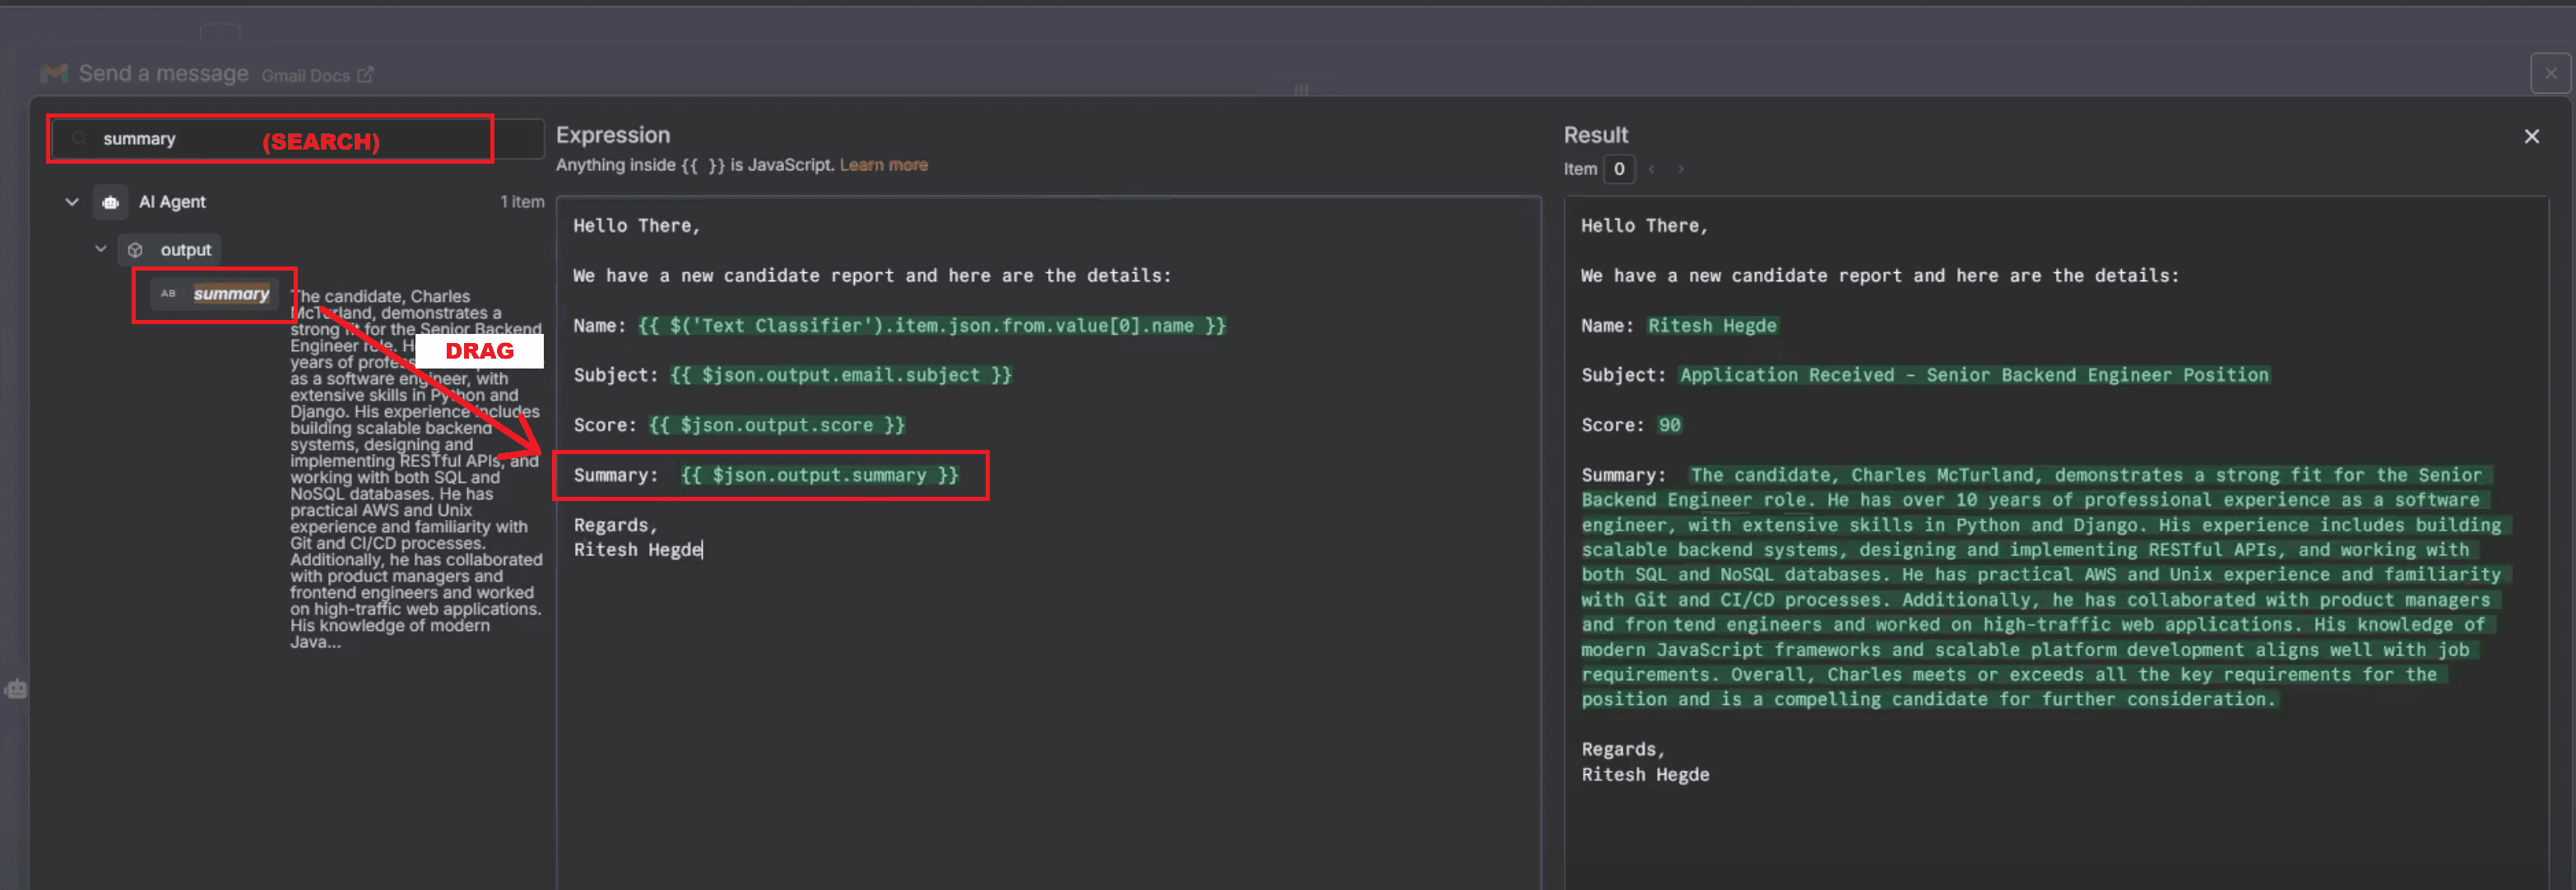
These expressions automatically pull data from your AI Agent and Output Parser, creating a personalized message for each candidate. Each email will now include:
Candidate Name
Job Role / Subject
Resume Score
Summary
This approach gives your communication a human touch, similar to AI-based cover letter generators, while maintaining structured, automated efficiency.
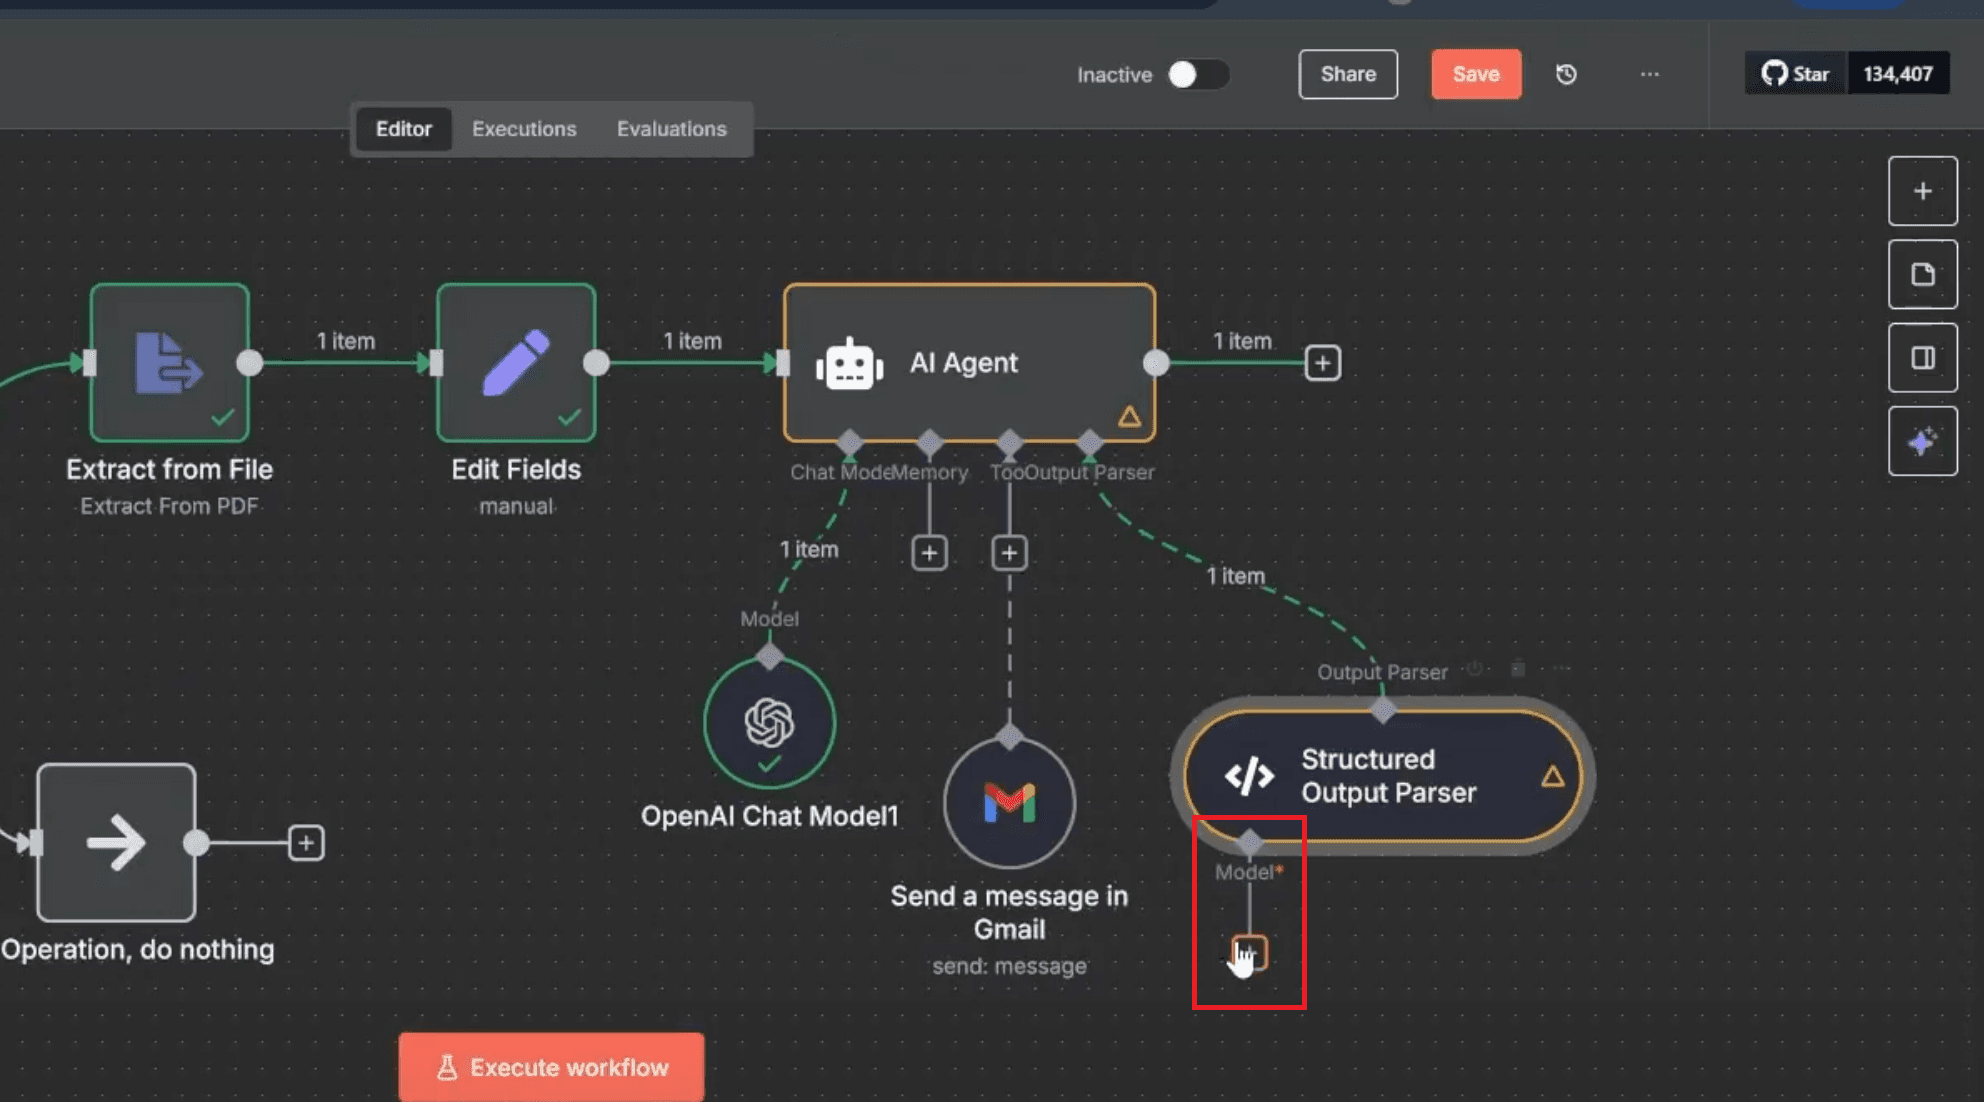
Workflow Structure Overview
Here’s the complete structure of your AI Resume Analysis Bot built in n8n — showing how each node connects and functions within the automation:
Gmail Trigger
– Captures every new incoming email containing a resume attachment.Gmail – Get a Message
– Fetches the full email content (subject, sender, and attachments).Text Classifier
– Classifies the email subject to identify job-related applications.Under Text Classifier:
Model → OpenAI Chat Model (e.g., gpt-4.1-mini)
Used for natural language classification of email subjects.Something Else → Do Nothing (No Operation)
Stops non-job-related emails from proceeding further.Related to Job → Extract from File
Continues only for valid job applications.
Extract from File
– Extracts text from the attached PDF resume (attachment_0), converting it into a readable format for AI.Edit Fields
– Adds the Job Details field using the variable{{$vars.JobRoleDescription}}, which dynamically pulls the job description from Google Docs.AI Agent
– Compares the extracted resume text with the job description, analyzes relevance, and generates a score.Under AI Agent:
Model → OpenAI Chat Model (e.g., gpt-4.1-mini)
Powers the resume analysis and scoring.Tool → Gmail – Send a Message
Sends acknowledgment emails automatically to applicants.Output Parser → Structured Output Parser
Ensures AI results follow a consistent, machine-readable JSON schema.
Gmail – Send a Message
– Sends the final AI-generated candidate report to the HR inbox using the variable$vars.email_to.
Final Output and Functionality
Once executed, the bot performs a complete end-to-end automation of resume analysis:
Reads Resume PDFs from incoming Gmail messages.
Extracts key candidate details such as skills, experience, and education.
Compares each resume against the job description dynamically pulled from Google Docs.
Generates an ATS Fit Score (0–100), along with an AI-generated summary and recommendations.
Sends structured reports to HR teams and personalized acknowledgment emails to applicants.
The result is a fully automated, AI-powered resume optimizer that minimizes human effort, improves accuracy, and accelerates recruitment cycles — delivering professional, consistent, and data-driven results at scale.
Watch The Tutorial Video:
Benefits and Takeaways
Implementing this AI Resume Analyzer Bot provides several key advantages:
Full Automation: End-to-end resume processing with zero manual intervention.
Resume Scoring: AI-generated, ATS-compatible evaluation for unbiased candidate ranking.
Dynamic Updates: Automatically retrieves the most recent job descriptions via Google Docs.
Data Consistency: Ensures fair and transparent candidate assessment across all applications.
Scalability: Suitable for startups, recruitment agencies, or large enterprise HR teams.
By deploying this workflow, you create a smart, self-sustaining hiring assistant that enhances your Applicant Tracking System (ATS). It reduces screening time, eliminates repetitive work, and provides faster, more informed hiring decisions — improving the experience for both recruiters and job seekers.
Also Read:
FAQ
1. What is an AI resume analysis bot, and how does it work?
An AI resume analysis bot is an automated system that receives resumes, extracts text from documents like PDF or Word files, compares this data with a job description, and generates an evaluation. In the workflow built using n8n:
Gmail captures job applications and resumes.
The bot extracts resume text and fetches job details from Google Docs.
OpenAI analyzes the resume against the job description.
It generates a score, strengths, weaknesses, and a decision.
The system can even send acknowledgment emails to candidates and detailed reports to HR automatically.
It works like a simplified version of an Applicant Tracking System (ATS), but is fully customizable.
2. How to extract resume text from a PDF for AI?
In n8n, use the Extract from File (PDF) node. Connect it after the Gmail “Get Message” node, select attachment_0 as the binary field, and execute the step. This converts the resume PDF into plain text that AI can read and analyze.
3. How to store job descriptions using global variables in n8n?
Go to n8n Settings → Variables, create a variable (e.g., JobRoleDescription), and paste the Google Docs link containing the job description. This makes the job description reusable across workflows without editing nodes.
4. How to fetch job descriptions from Google Docs in n8n?
Add an HTTP Request node, set Method to GET, and enter {{$vars.JobRoleDescription}} as the URL. This fetches the job description directly from Google Docs and sends it to the AI Agent for comparison with the resume.
5. How to send automatic acknowledgment emails to candidates using AI?
After AI analyzes the resume, connect a Gmail – Send Message node. Use AI-generated text or dynamic expressions for the message. The email confirms receipt of the candidate’s application automatically.
6. How to email resume score reports to HR automatically?
Use the Gmail Send Message node after the AI output. Set the HR email manually or via a variable like {{$vars.email_to}}, and include resume score, summary, and candidate details using expressions from the AI results.
7. Can AI analyze my resume?
Yes, AI can analyze your resume. Using natural language processing (NLP) and machine learning, AI tools can read your resume, extract important information like work experience, skills, and education, and compare it with a job description. In workflows like the one built using n8n and OpenAI, AI generates a resume score (0–100), highlights strengths, detects missing skills, and even provides a summary of how well you fit the job. Some systems can also send automated feedback or forward results to HR.
8. What are the benefits and limitations of using AI for resume screening?
Benefits:
Saves time by automating resume review.
Provides consistent and unbiased evaluation.
Quickly identifies top candidates based on job requirements.
Automatically replies to candidates and updates HR teams.
Can integrate with existing hiring workflows.
Limitations:
AI may misinterpret poorly formatted resumes.
It depends on clear job descriptions for accuracy.
Soft skills, personality, and cultural fit are harder to evaluate.
Poorly written resumes or missing keywords may get rejected unfairly.
9. How accurate are AI resume analysis bots in evaluating candidate resumes?
AI resume bots are highly accurate when:
The resume is well structured and readable.
The job description is clear and detailed.
The AI model is well-trained (like GPT-4, GPT-3.5, or similar).
They can accurately assess skills, experience, and relevance to the job description. However, they may not fully understand career breaks, personality, leadership qualities, or potential for growth. That's why most companies use AI for first-level screening — not final hiring decisions.